An in-depth guide providing solutions to disabling the headphone jack on Windows computers and smartphones.
One of the more annoying occurrences for anyone using their phone or laptop is for the device to get stuck on headphone mode. This can happen due to incorrect device settings, operating system issues, or having the headphone plug breaking off and getting lodged inside the audio port.
What’s worse is when the device is STILL in headphone mode, even if the headphones themselves are already disconnected. This means the audio can’t come out of the built-in speakers or any other output since the device thinks that the headphones are still connected.
That’s why we’ve made this in-depth guide showing you how to disable the headphone jack for your computer, laptop, and mobile devices so that you can finally play audio through other means.
Why Do You Need to Disable Your Headphone Jack?
If you think that this problem rarely happens to others, then you’d be wrong. People wanting to disable their headphone jack happen way more often than you’d think, and this is heavily attributed to the fact that headphone jacks are considered fragile.
There are several reasons why anyone would want to disable their headphone jack on a Windows computer or mobile device. Some of the more common reasons include:
- Headphone plug broke off and is now stuck in the headphone jack
- Headphone plug is physically broken
- You want to play audio through speakers even when headphones are plugged in
- Your device is stuck in headphone mode due to settings or operating system issues
How to Disable Headphone Jack on Windows
It’s important to know that there are different ways to disable the headphone jack on a Windows PC. Some methods only need simple tweaks to the PC settings, while others are more in-depth and may require some level of administrative access to the computer. It is up to you to decide which method suits you best
- Using Sound Output Settings
- Using Device Manager
- Using Windows Registry Editor
- Using Realtek HD Audio Manager
Using Sound Output Settings
This method is the easiest and most non-disruptive option. However, please keep in mind that these instructions are meant for PC users running Windows 10.
Device Properties
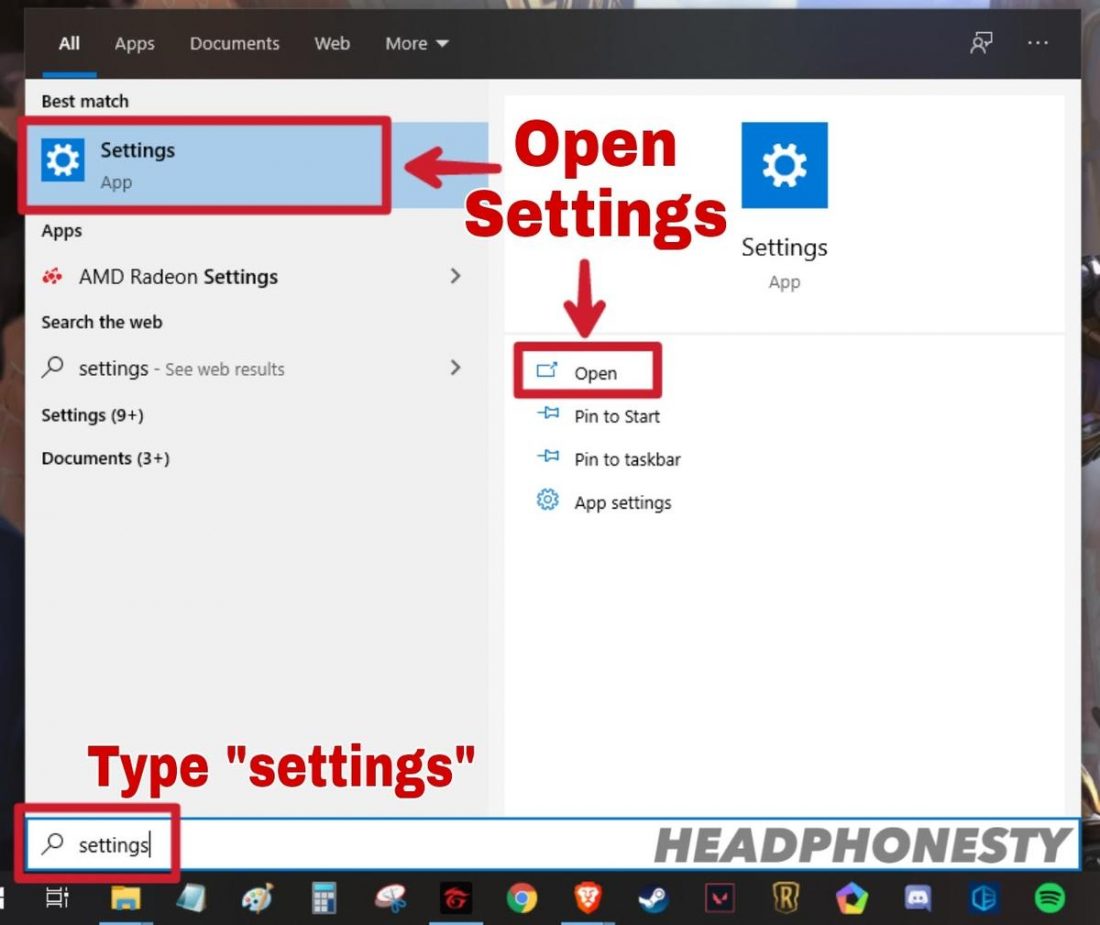
- Access the settings by pressing Windows key + S and type “settings” in the search box, then click on Settings. Alternatively, you can press the Windows key and click on the Settings icon which can be found at the lower left of the screen, just above the power icon.
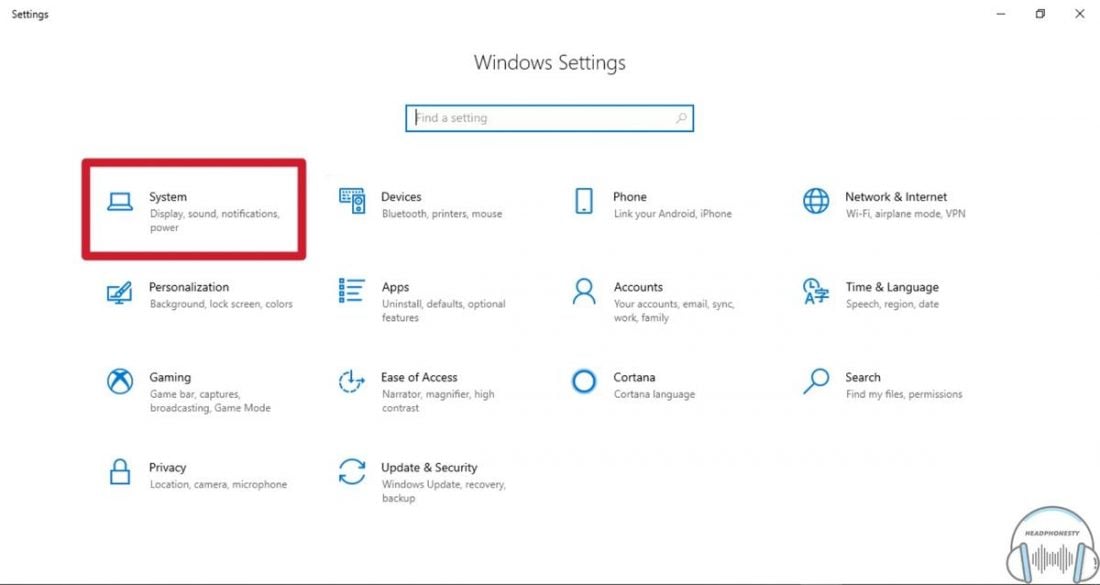
Accessing settings - On the Windows Settings screen, click on the System icon.
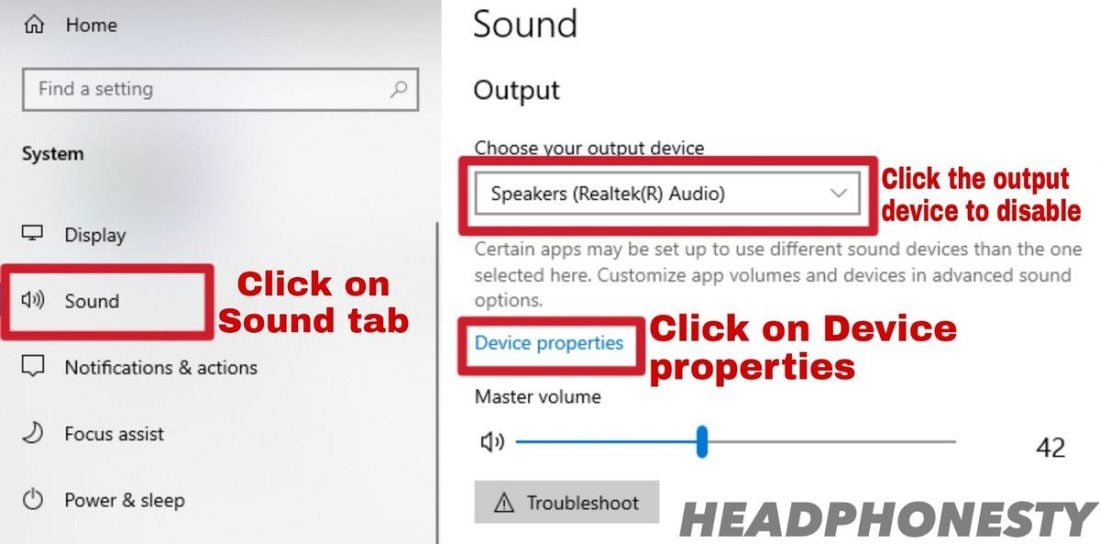
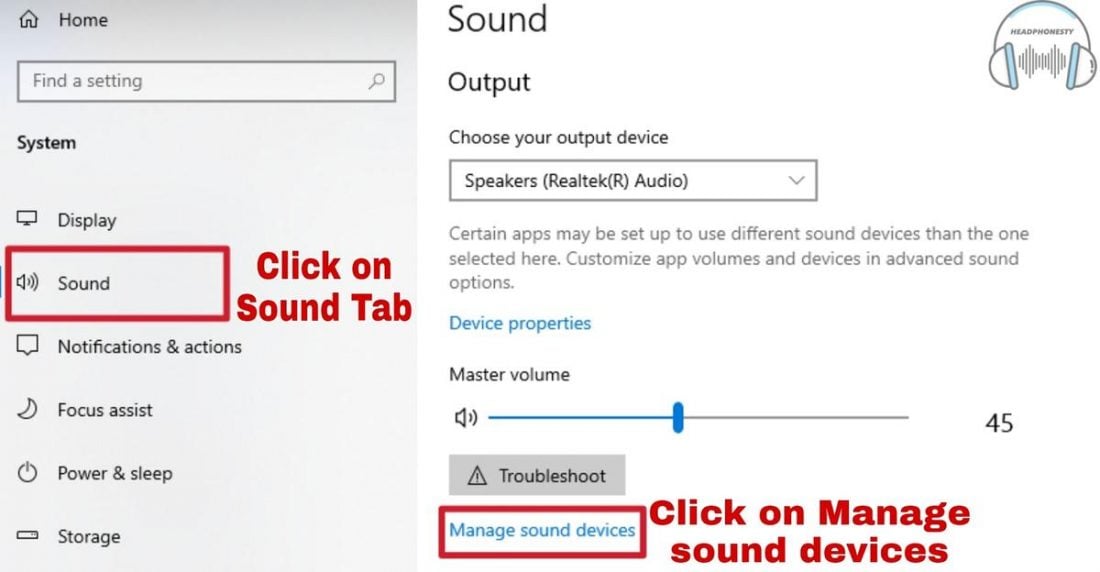
Accessing system settings on Windows - Click on the Sound tab at the left side of the screen, then choose the corresponding sound output device that you want to disable from the selection box. Once selected, click on Device properties.
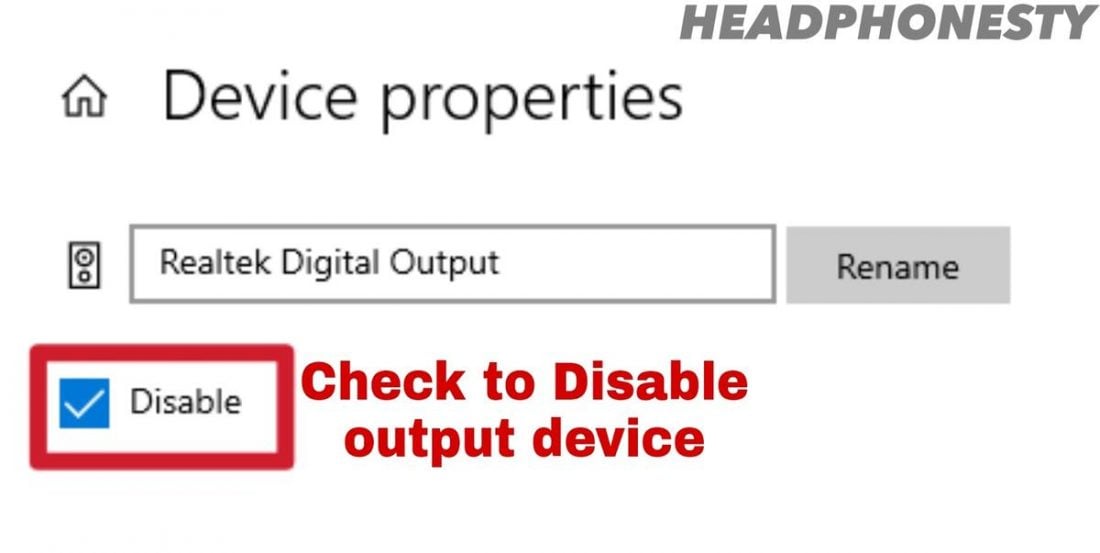
Sound settings on Windows - Check the Disable box to disable the chosen output device/headphone jack.
Device properties on Windows
Manage Sound Devices
- On the System Settings window, click on the Sound tab at the left side of the screen, then click on Manage sound devices.
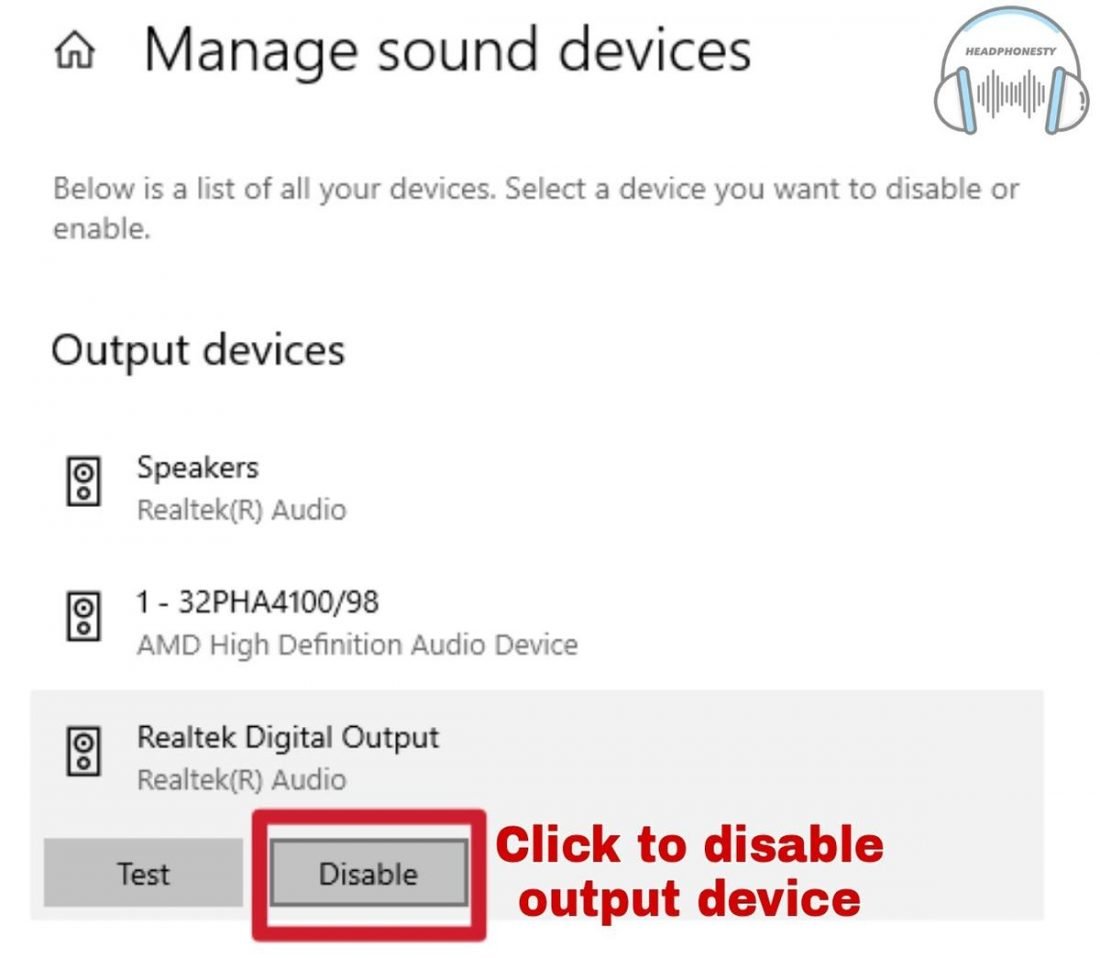
Sound settings on Windows - Click on the output device you want to disable then click on the Disable button to disable it.
Manage sound devices in Windows
Using Device Manager
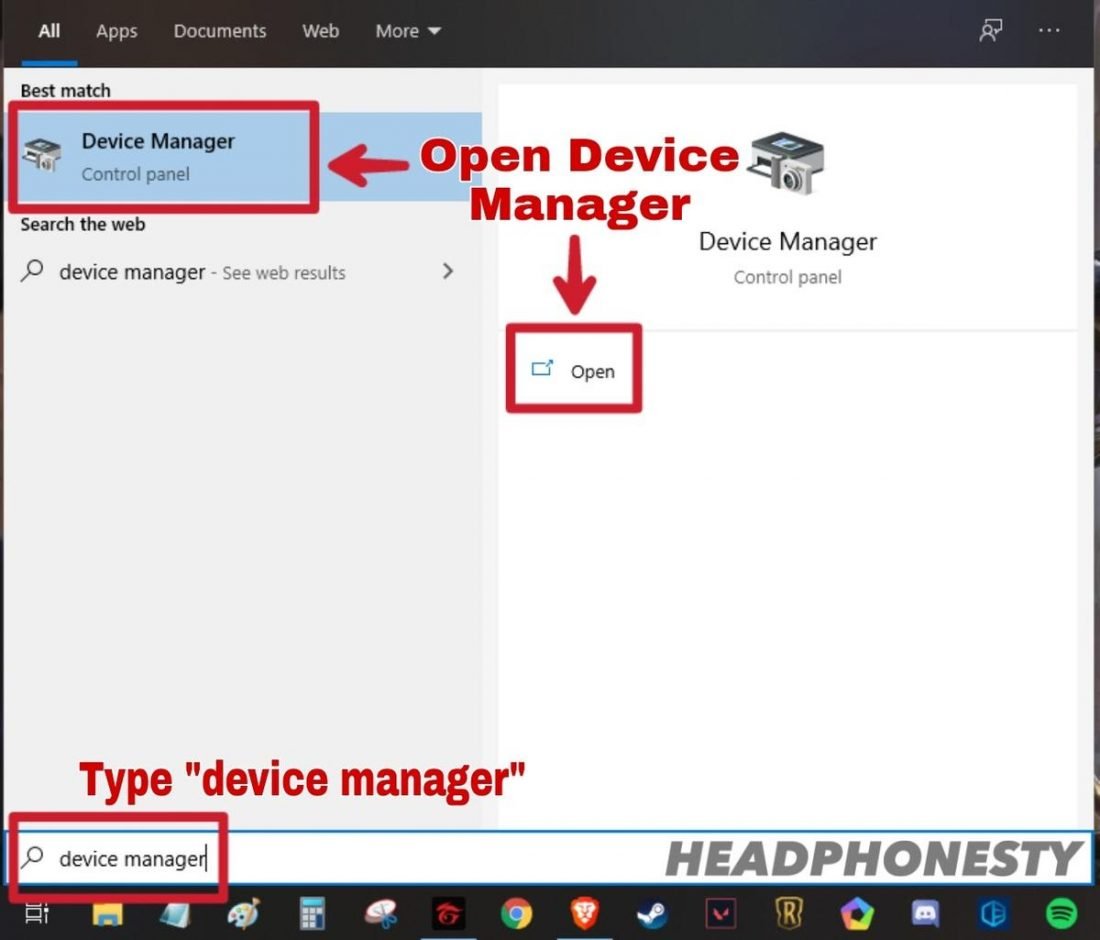
- Access the device manager by pressing Windows key + S and type “device manager” in the search box, then click on Device Manager. Alternatively, you can press Windows key + X and click on the Device Manager tab.
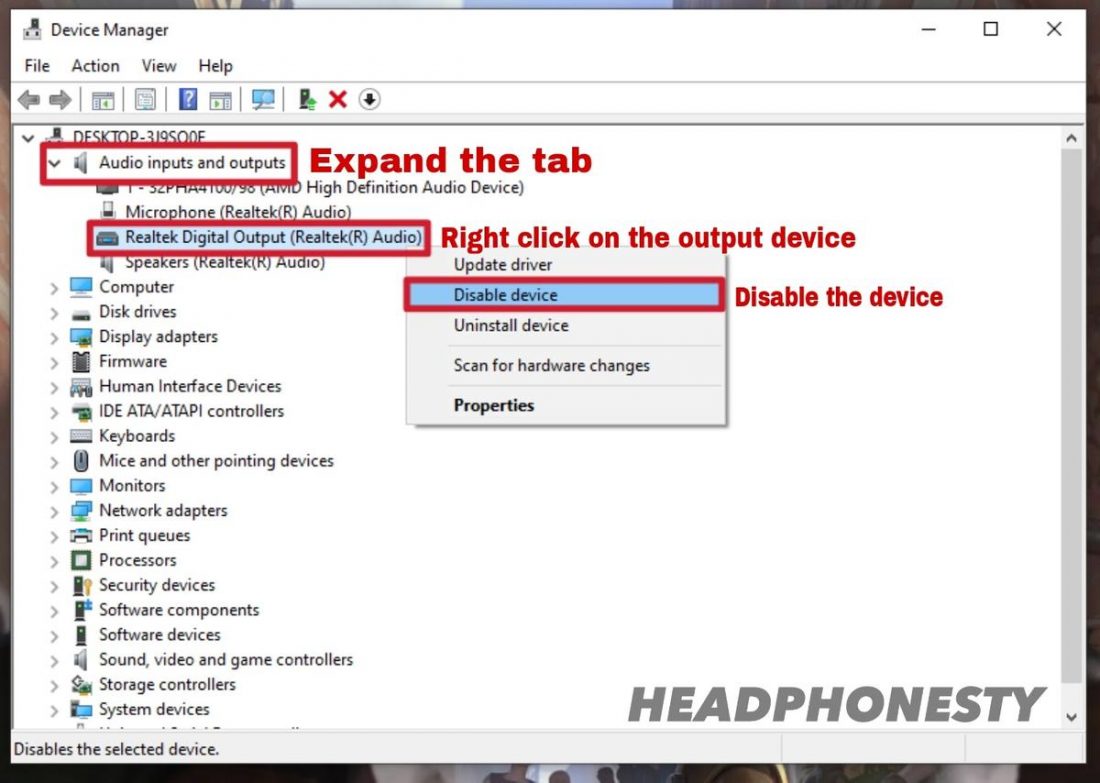
Opening device manager in Windows - Expand the Audio inputs and outputs tab then right-click on your sound output device and click Disable device.
Device manager on Windows
Using Windows Registry Editor
- Press Windows key + R to open Run, then type “regedit” and click OK.
Opening Registry Editor on Windows - Navigate to this part of the registry (you can copy-paste it to the navigation bar on the registry editor):
HKEY_LOCAL_MACHINE\SOFTWARE\Microsoft\Windows\CurrentVersion\MMDevices\Audio\Render
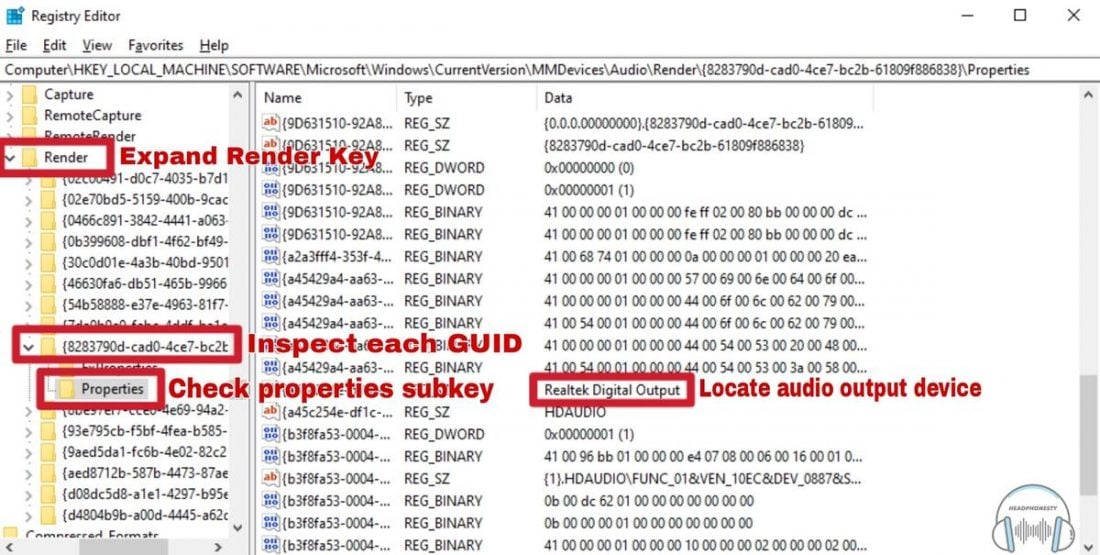
Navigating the registry editor - Expand the Render key on the left side of the registry editor and open the Properties subkey of every Globally Unique Identifier (GUID) until you find the output device you want to disable.
Example GUID: {106817ea-5798-4f12-b707-73dfd781ac23}
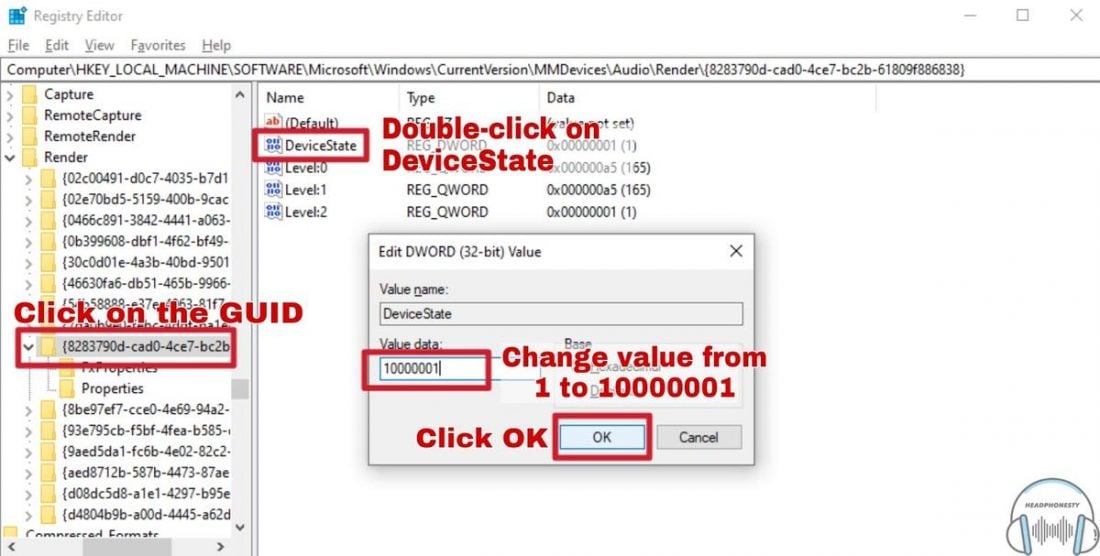
Locate the audio output device in the registry editor - Once you’ve determined the GUID where the output device belongs to, click on the GUID. Then, double-click on the DeviceState DWORD to edit its value. To disable it, change the value data field from 1 to 10000001.
Disabling the audio output device
Using Realtek HD Audio Manager
- Open the system tray at the lower right part of the taskbar and click on the Realtek HD Audio Manager icon. If the icon isn’t there, go to the Control Panel and view it by Large icons.
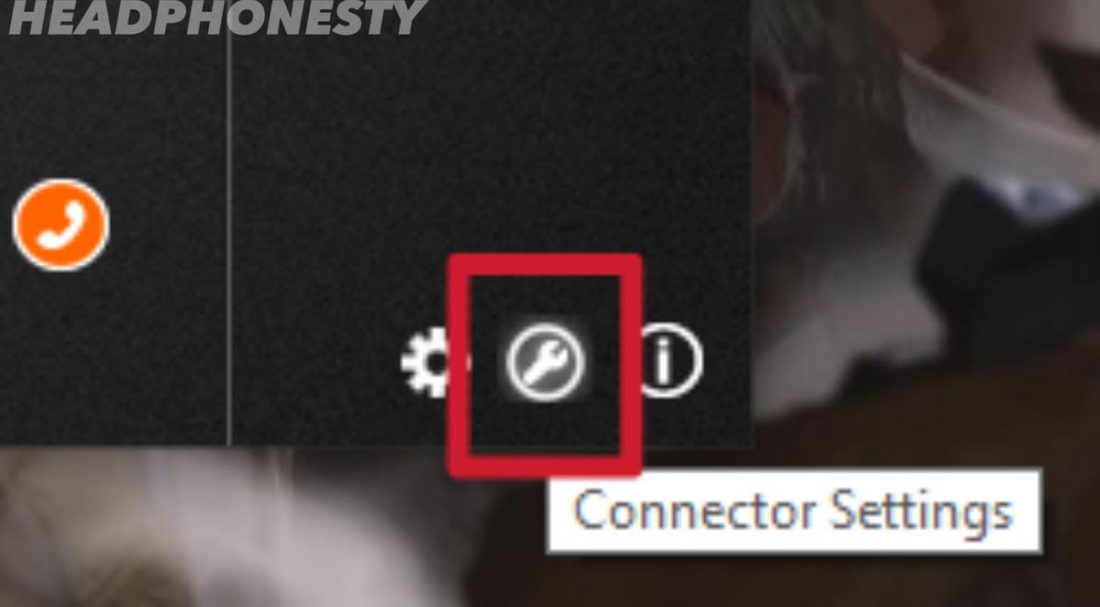
Opening Realtek HD Audio Manager - On the lower right of the Realtek HD Audio Manager, click on the Connector Settings (wrench icon).
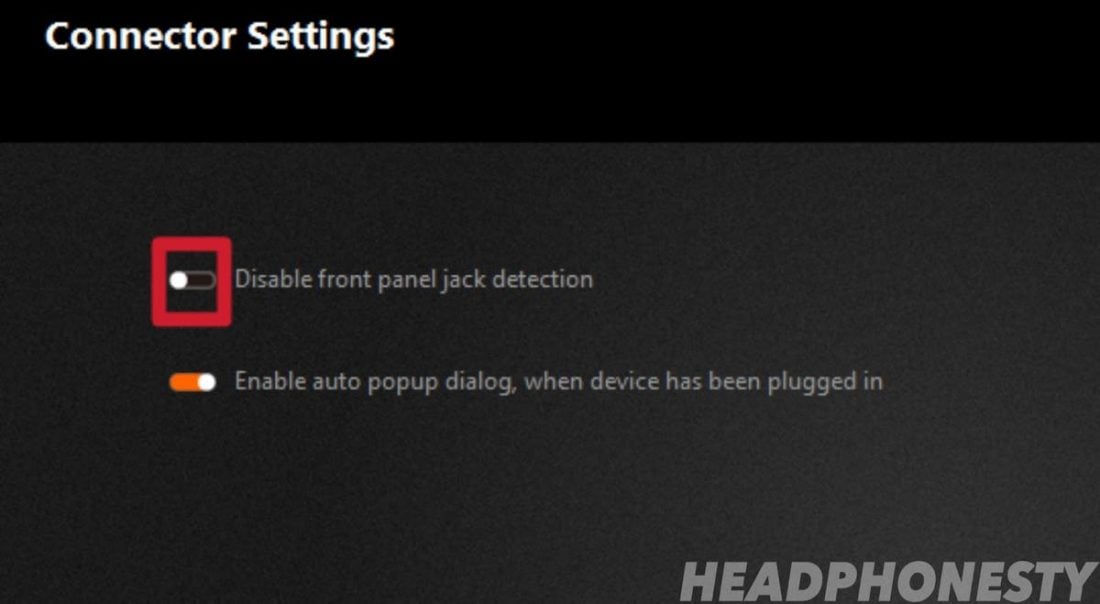
Opening connector settings - On the Connector Settings window, tick the slider on the Disable front panel jack detection to disable the headphone jack.
Disable the front panel jack detection
How to Disable Headphone Jack in Mobile Devices
The following methods will help you fix the problem of your mobile device being stuck in headphone mode even when no headphones are plugged in.
Make sure your headphone jack is clean
One of the most common reasons why mobile devices are stuck in headphone mode is because of dirt and debris stuck inside the audio jack. That’s why it’s important to keep in mind that not only do you need clean headphones, you need to have a clean headphone jack as well.
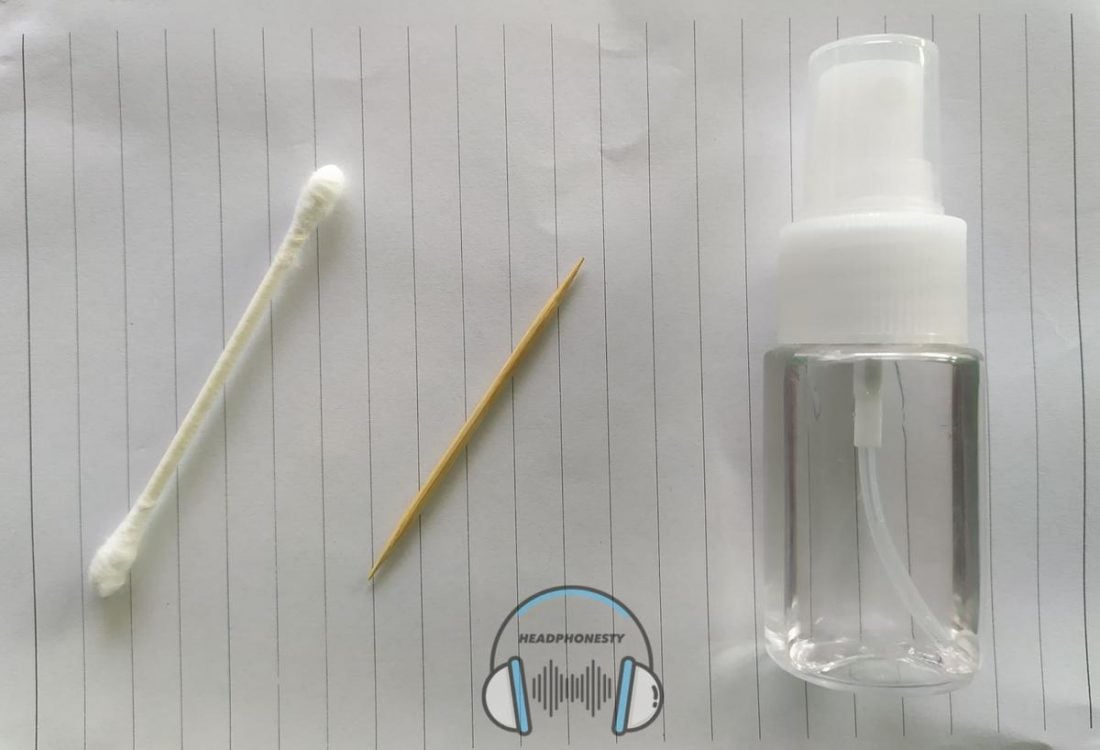
- You’ll need a cotton bud, a paperclip or toothpick, and some rubbing alcohol.
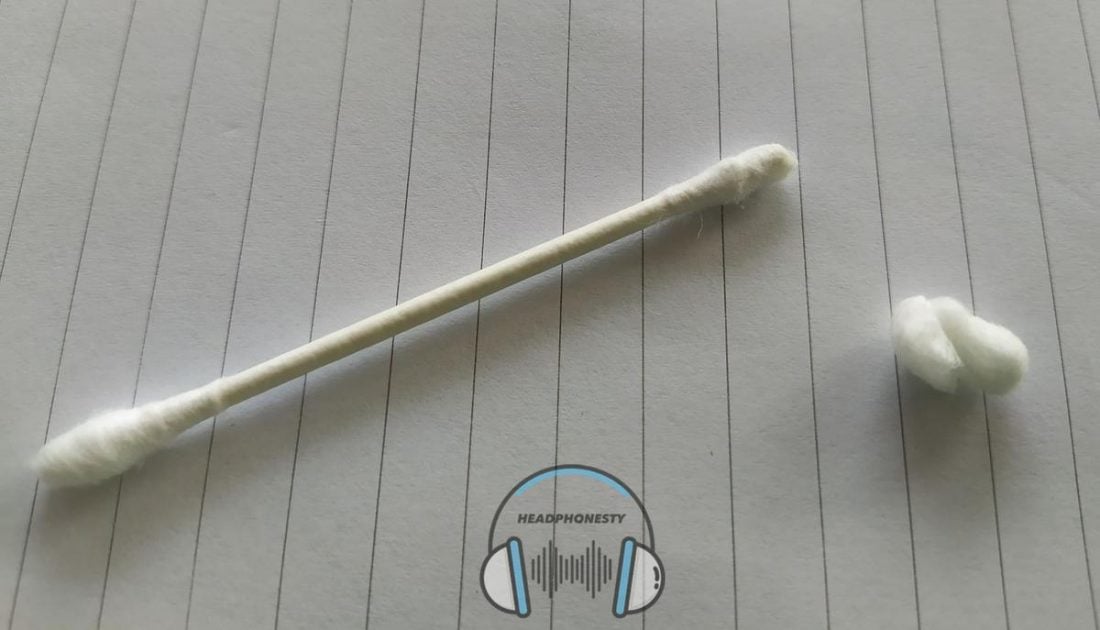
Materials needed for cleaning - Remove a chunk of cotton on one side of the cotton bud, only leaving a small amount of the cotton behind.
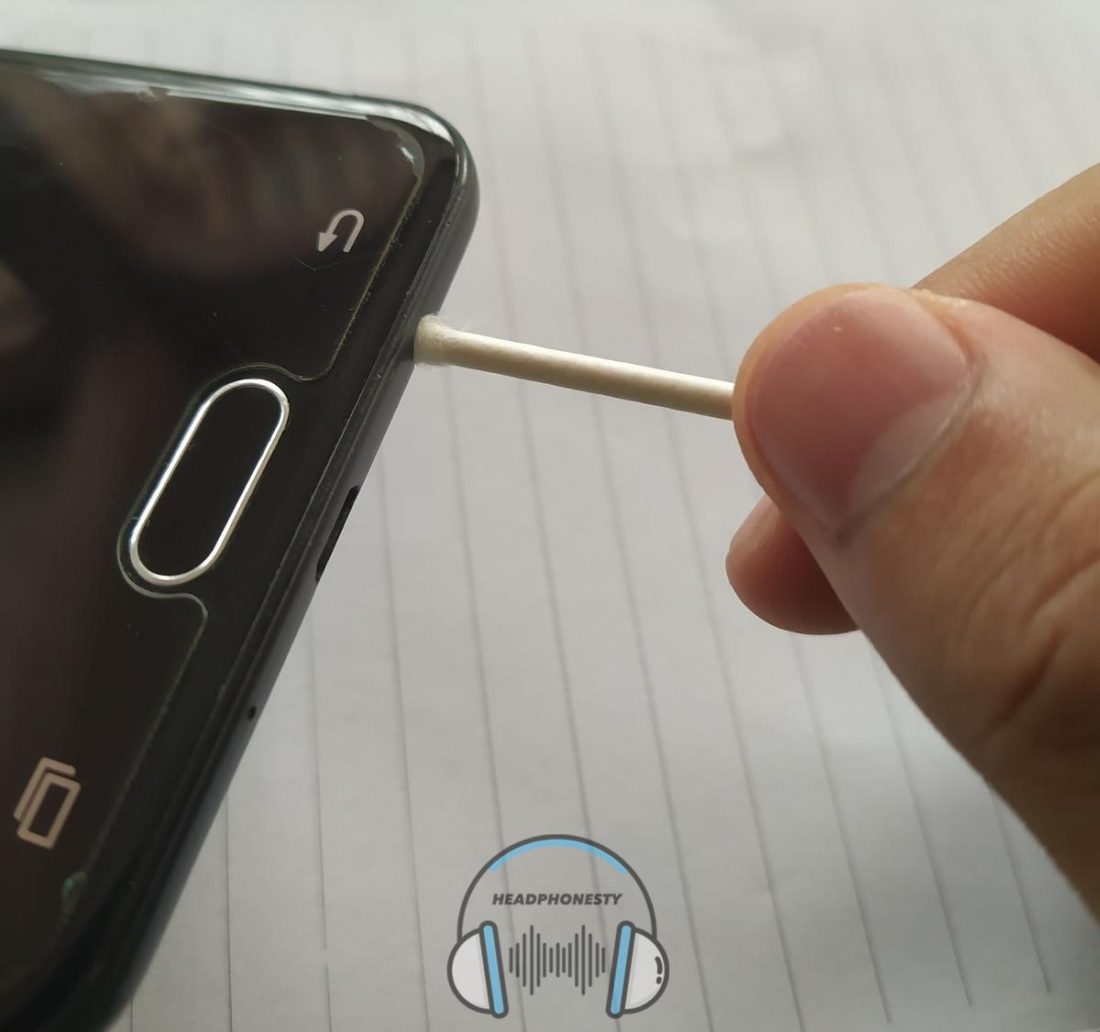
Removing a chunk of cotton - Insert the cotton bud into the audio port of your mobile device and swab around the inside of the headphone jack to pull out any dirt or debris.
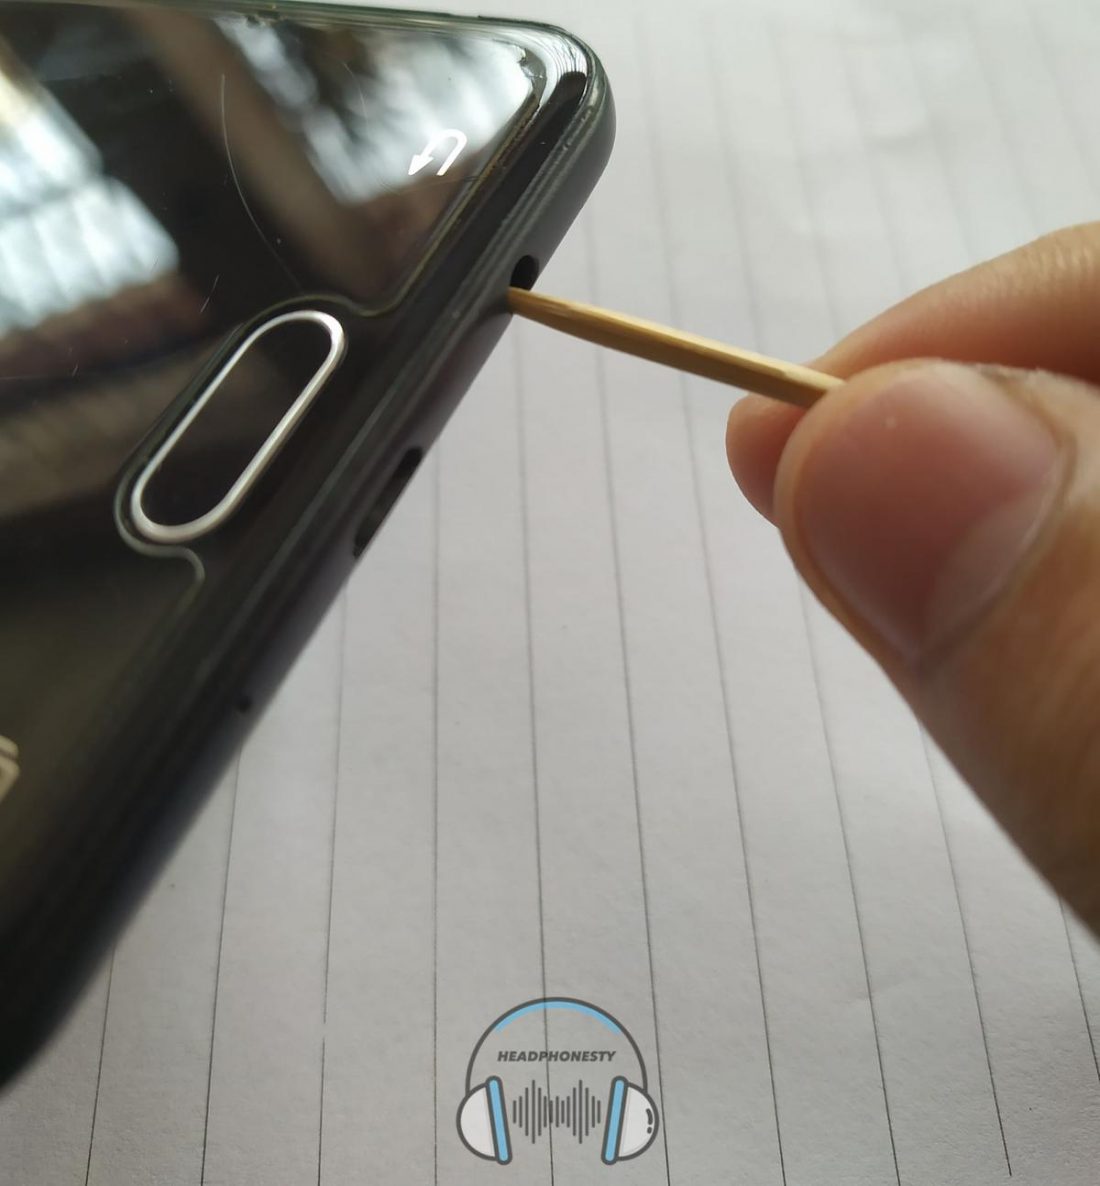
Inserting the cotton bud - Insert the paperclip or toothpick into the audio port of your device and very lightly scrape the inside of the jack to release any remaining dirt or debris.
Inserting the toothpick - Repeat step 3 but this time, lightly damp the cotton bud with some rubbing alcohol.Using rubbing alcohol helps clean the corrosion from the contact points of the headphone jack.
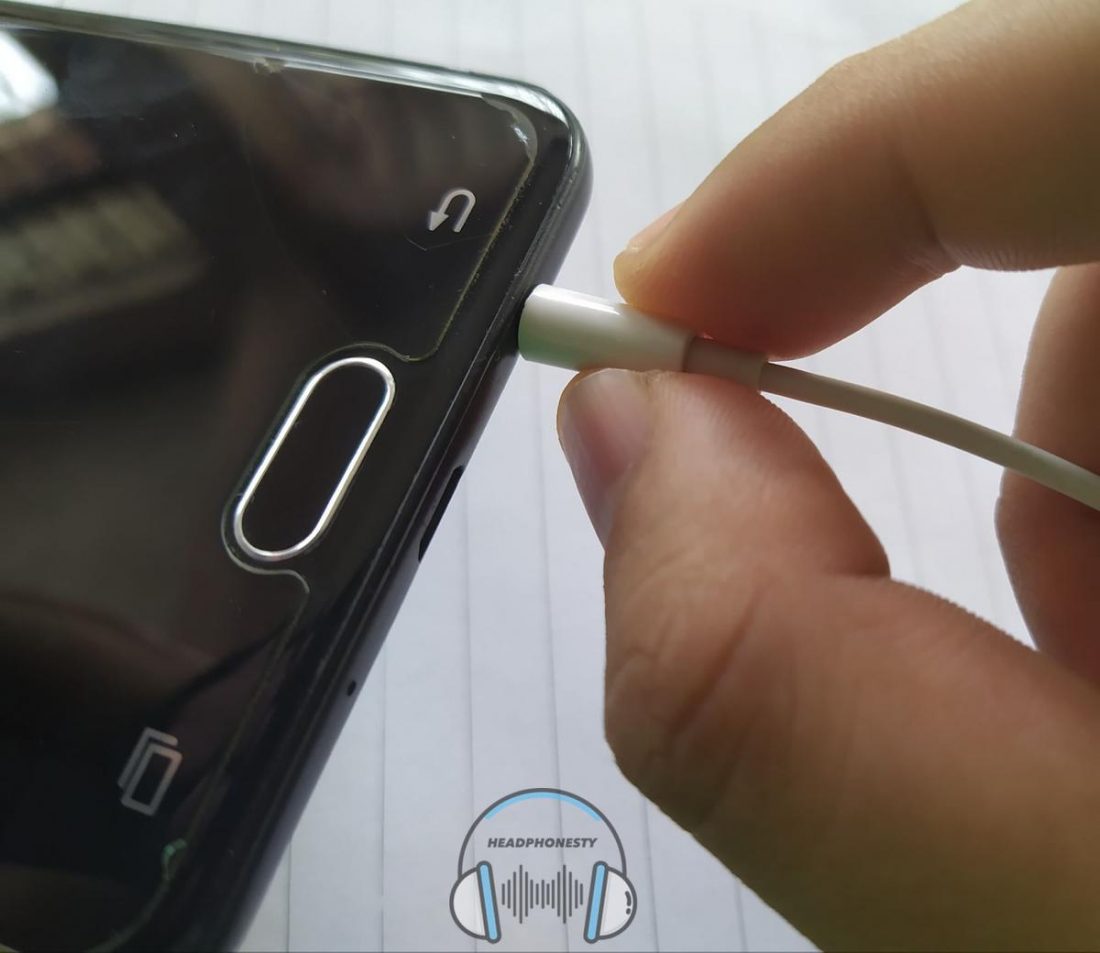
- Insert your headphones firmly while rotating it a little bit before pulling it back out. This should disable headphone mode on your mobile device.
Inserting the headphones
Install apps to turn headphone mode off
As of right now, there are no available apps for this specific function for Apple/iOS users. The apps listed below only work for Android devices.
Disable Headphone (Enable Speaker)

The “Disable Headphone (Enable Speaker)” app has a very minimalistic interface that is very easy to use. You can easily play audio through the built-in speakers of the mobile device even when headphones are connected with just a flick of a switch.
Lesser AudioSwitch

The “Lesser AudioSwitch” app allows you to force the audio output to the phone speakers, headphones, or any other output such as USB and Bluetooth devices. In addition, the app also has added features such as switching the audio output on boot and controlling the app from the home screen.
Headphone Mode Off

“Headphone Mode Off” allows you to switch to speaker mode and play audio from the speaker regardless if your headphones are plugged in or not. It features a rugged, yet simple interface that is easy to understand.
Conclusion
With this article, you should now know how to disable the headphone jack on your Windows computer and mobile phone. Even if your headphone plug is broken or got stuck inside the audio port of your device, you’ll still be able to play audio through your device’s built-in speakers or any other output device.
How’d you find this guide? Were some of the steps unclear? Do you still need further assistance? Please let us know in the comments and we’ll be glad to answer your questions and address your concerns!



………. I have my 3.5 stuck in headphone jack, what can I do , I was using lesser audio switch but the dumb android 11 update don’t let any app to work more then a few seconds. There’s a way to do it like on pc?
The problem I’m having with this, is that under all the settings my audio output is listed together as “headphones/speaker” so when the headphones are disabled, so is the speaker-which was the whole point of trying to do this. I’m using a Windows 10 PC.
Same problem bro