Step-by-step guide on DIY noise cancellation without breaking the bank.
We all know how expensive state-of-the-art noise-canceling headphones can be. And sure, it’s okay to splurge on a high-end gadget that you know could make life a little more enjoyable, or peaceful even, but there are times when it’s just not in the budget to do so.
Even worse, some people might be forced to add to their credit debt or spend outside their budget range especially if they’re already experiencing some hearing loss because of too much noise, and only a pair of noise cancelling headphones can alleviate them.
However, if you want to improve the noise-isolating capabilities of your earphones or headphones, but your budget is tight and you don’t want to spend extra, there’s always the DIY option.
With help from a couple of easy step-by-step procedures, here’s a walkthrough on how to make noise-canceling headphones and earphones all on your own.
Understanding Passive vs. Active Noise Cancellation
Noise cancellation in headphones and earphones occurs in two ways – actively and passively.
Active noise cancellation (ANC) starts with a built-in microphone picking up ambient noise in the wearer’s surroundings. This noise is fed into the ANC system, which generates an opposing sound frequency. This frequency is then fed back to us through the speakers. When the opposing frequencies collide, they cancel each other out, resulting in reduced ambient noise.
Headphones with the ANC feature are usually more expensive than those with passive noise isolation, with the most affordable decent pair at around $50. But these budget options only have the binary on/off ANC functions. If you need more features like the Ambient mode or adjustable ANC, you’ll have to go for headphones under $200 or more.
Of course, as the price goes higher, you can expect more improvements in the ANC technology. For example, some ANC headphones under $300 let you customize the amount of noise you want to hear. Those under $1000, on the other hand, contain industry-leading technological features and up to 11 levels of noise cancellation.
Passive noise cancellation (PNC), on the other hand, is more commonly seen in most headphones and earphones in the market. PNC headphones and earphones do not require a power source to work and instead make use of noise-isolating materials like pads or foam to insulate our ears from unwanted background noise.
Since active noise cancellation involves more sophisticated engineering and internal technology, there’s currently no way to manually DIY such a feature into a pair of regular headphones or earphones. However, adding or improving passive noise cancellation capabilities on a standard pair of headphones or earphones is certainly doable.
Aside from being affordable, upgrading your headphones or earphones with better passive noise cancellation is a great way to get more out of your gear.
Although ANC headphones are generally more effective in reducing low-frequency noise, PNC headphones are typically better at handling middle and high-frequency sounds, like barking dogs, loud voices, and car horns, which are often what our ears are more sensitive to. While they can’t block them out entirely, they do well in muffling disruptive sounds, so we can stay focused and hear our music better.
In this article, we’ll be tackling how to make noise-canceling headphones and show you how to better soundproof your earphones.
Let’s get started!
How to Make Noise-Canceling Headphones
Learning how to DIY noise-canceling headphones isn’t as complex as it might sound. With this helpful tutorial and a few simple materials, you can easily learn how to do it yourself.
Things you will need:
First, make sure to run through the checklist of all the materials needed. Aside from ensuring you have everything you need before starting a project, it’s also good to consider purchasing extras in case you make a mistake along the way. Here’s what you’ll need:
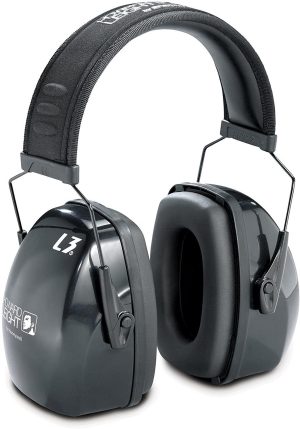
- Noise-isolating earmuffs or ear protectors. You can use a pair similar to the one used in the tutorial, but any other brand will do too.

Howard Leight by Honeywell Leightning L3 Shooting Earmuff (From:Amazon). However, if you’re building noise isolating headphones for kids, you should go for earmuffs that can fit their head size (something like Dr. Meter EM-100 will do)
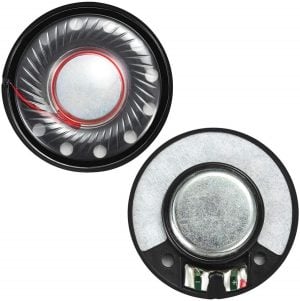
- Replacement headphone speakers

Replacement 40mm Headphone Speaker Driver (From:Amazon). - Any working earphones for the plug and cable
- Small Polyethylene (PE) foam (about the size of the two replacement headphone speakers)
- Pliers
- Soldering iron
- Glue gun
Step-by-step guide to make noise-cancelling headphones
Follow these steps to make noise-cancelling headphones:
- Remove the earpads by peeling them off. As they are typically attached using adhesive, they should be easy to remove and reattach.
- Remove the insulating foam inside the earmuffs.
- Cut out a hole in the foam the same size as the replacement speakers. You can place the speaker in the center of the foam as a guide and simply cut around it.
- Using the soldering iron, make a hole at the bottom of the headphone cup for the wire.
- Using pliers, twist or pry open the earphone casing to reveal the speaker.
- Using the soldering iron, carefully detach the speaker from the wire.
- Pass the wire through the hole you made in the headphone cup, making sure to knot the end of the wire to prevent it from getting dislodged or tugged out.
- Carefully solder the wires to the speaker. Keep in mind that the common or ground wire goes on the negative pad.
- Place the foam back inside the headphone cup.
- Using a glue gun, apply glue to the back of the speaker and attach a small piece of PE foam.
- Place a bit of glue on the inside of the headphone, and secure the speaker on it.
- Once you’ve completed all the above steps on the other headphone, use rubbing alcohol to clean the rims where the earpads go.
- Reattach the earpads.
- Finally, secure the wire to the opening of the hole in the headphone.
How to Make Noise-Canceling Earbuds
If you’re more of an earphone user and you feel that the standard earbuds that come with your earphones are not doing enough to isolate background noise, there’s a quick hack for DIY-ing noise-canceling earphones.
Things you will need:
Similar to the first procedure, make sure to gather all the necessary materials needed to complete the project. You will need the following:
- A standard pair of in-ear earphones. You can buy new ones or use an existing pair that you already have.
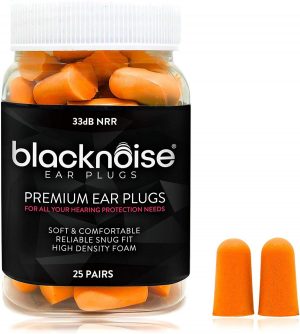
- A standard pair of earplugs

Black Noise Premium Ear Plugs (From:Amazon). - Scissors or a cutter
- A nail, or anything you can use to create a small hole in the earplugs.
Step-by-step guide to make noise-cancelling earbuds
Follow these steps to make noise-cancelling earbuds:
- Remove the existing earbuds from the earphones.
- Take a pair of standard earplugs and cut off the ends using scissors or a cutter.
- Pass a nail through the center of the earplug to create a hole.
- Slip the earplug over your earphone in place of the old earbud, and you’re done.
What to Expect When Soundproofing Headphones or Earbuds
Realistically, when it comes to DIY noise-canceling headphones and earphones, you have to expect that there will be differences when compared to the real thing that costs four to five times more.
Such changes can include the following:
Change in fit
Earmuffs and earplugs are made from different materials than standard headphone pads and earbuds. Earmuffs are made with thick insulating materials meant to protect the wearer from loud sounds, and in some cases, cold weather. They’re also softer and more lightweight.
Earplugs, on the other hand, are made from dense polyvinyl chloride (PVC) or polyurethane (PU) foam. They’re thicker and are designed to be compressed before being placed in the ear, after which they expand to create a nice seal in the ear canal. This is in contrast to typical earbuds which are made from plastic or rubber and often do not seal the ear as well.
While some earplugs are reusable, others are meant to be disposed of after a few uses as they can become deformed over time. If you do decide to use disposable earplugs, you may find yourself regularly having to repeat the process when replacing old earplugs. The upside, however, is that you can buy earplugs in bulk for a very cheap price.
Because you’re dealing with different materials for this DIY project, it’s important to take extra care in choosing earmuffs or earplugs that fit well to ensure that you’re getting the best in terms of comfort and noise-blocking.
Change in sound quality
Since headphones and earphones sport the standard stock earbuds and pads, changing these particular parts could change the acoustics of the headphones or earphones and affect sound quality.
If you find that your newly refurbished DIY noise-canceling headphones or earphones are a little lacking in the sound quality department, you can opt for sound-boosting apps like Boom Music.

Boom Music is a music player equipped with immersive 3D surround sound, an advanced equalizer, and powerful bass boosting capabilities that work on any headphones. It has an intuitive system that allows you to tweak your sound preferences and create custom presets so you can enjoy your music the way you like it.
You can also log in to your Spotify or Tidal account through the app and listen to your music from there, or choose from over 20,000 radio stations it has access to. Boom Music can be downloaded for free on both Android and iOS devices.
Conclusion
Even though it took a century of evolution for the first noise cancelling headphones to be invented, who knew we can live the day when we can simply make our own?
Although these don’t have the ANC technology premium headphones boast of, these DIY headphones still have substantial noise reduction to prevent us from everyday distractions.
A DIY project like this may seem like a daunting task at first, but it’s definitely a rewarding one. Hopefully, after following the steps closely, you’ve now been able to refurbish yourself a solid pair of noise-canceling headphones without having to dip too deeply into your wallet.
However, if you try these and find them lacking, you may opt to go for ANC headphones instead. Luckily, you can check out our list of the best noise cancelling headphones for you. There, you can find the most recommended ANC headphones for different purposes like studying, gaming, and traveling.
How did you find our guide? Do you think we missed out on some important tips? Or perhaps you have your own helpful DIY tips to share? We’d love to hear about them, so feel free to leave us a comment!
Uhhh… Ok, with the earplug method, how in the world are we supposed to 1, pre-compress the earplug so it’ll fit into our ears, without pulling it off of the earbuds? And 2, pull the earplug half out when it inevitably gets stuck while trying to remove them? That just sounds like an accident waiting to happen… 😓
Just a great waste of reading time – OR – a worthwhile project that most people can achieve. The real ANC head phones bring real comfort as a passenger on an aircraft. But the above project would provide some musical comfort.