Everything you need to know to connect your AirPods with a Microsoft Surface laptop or tablet.
Though AirPods are primarily designed to be used with products in the Apple ecosystem, it is possible to connect them to a non-Apple product like a Microsoft Surface laptop.
However, the automatic pairing feature won’t be available. So, connecting them to a Windows device like your Microsoft Surface requires a little know-how.
Luckily, you can easily do this using a manual Bluetooth connection – similar to connecting any Bluetooth device. Read on as we show you how to quickly connect your AirPods whether you use Windows 10 or 11 below.
How to Connect AirPods to Microsoft Surface With Windows 10
If your Microsoft Surface uses Windows 10, these are the steps you need to follow to connect your AirPods. If you use Windows 11, you’ll need to use the method we’ll discuss later in the article.
Here’s how to connect your AirPods to your Surface or Surface Pro on Windows 10:
- Swipe in from the right of the screen to open your Windows 10 Action Center.

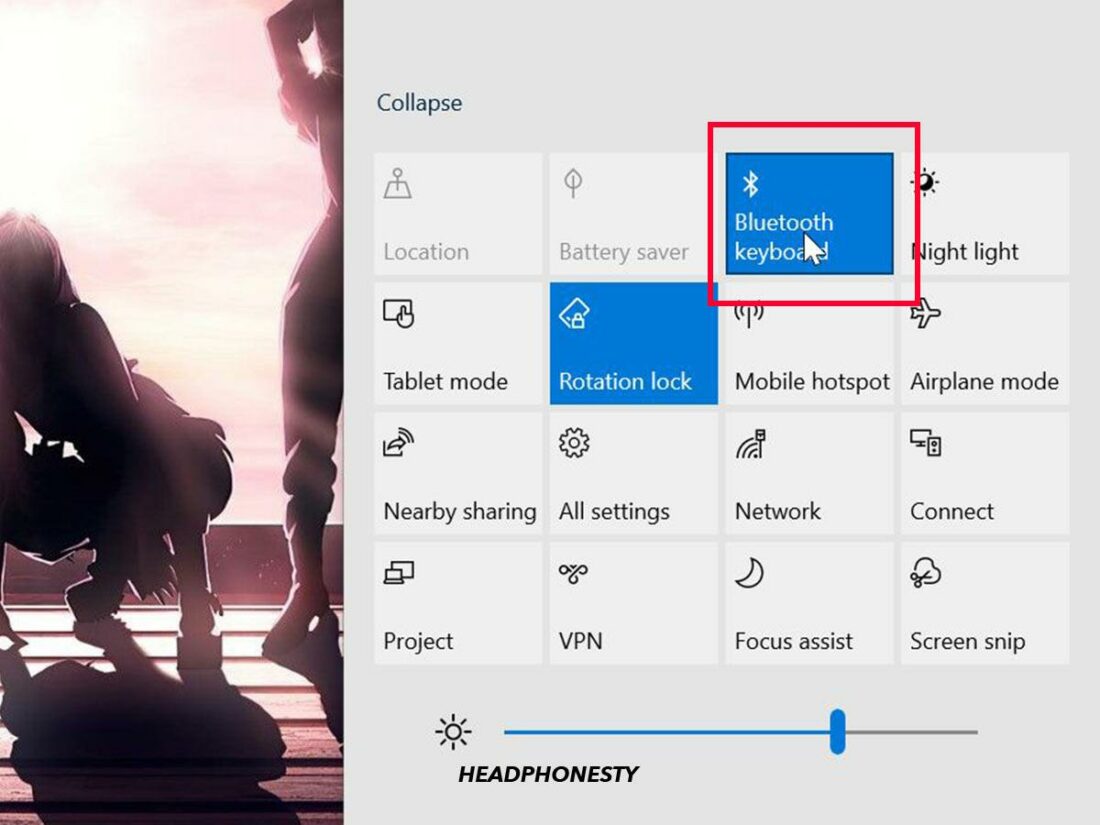
Clicking the Windows 10 Action Center icon - Ensure your Bluetooth is turned on. If not, click on the Bluetooth icon from the action center to turn it on.
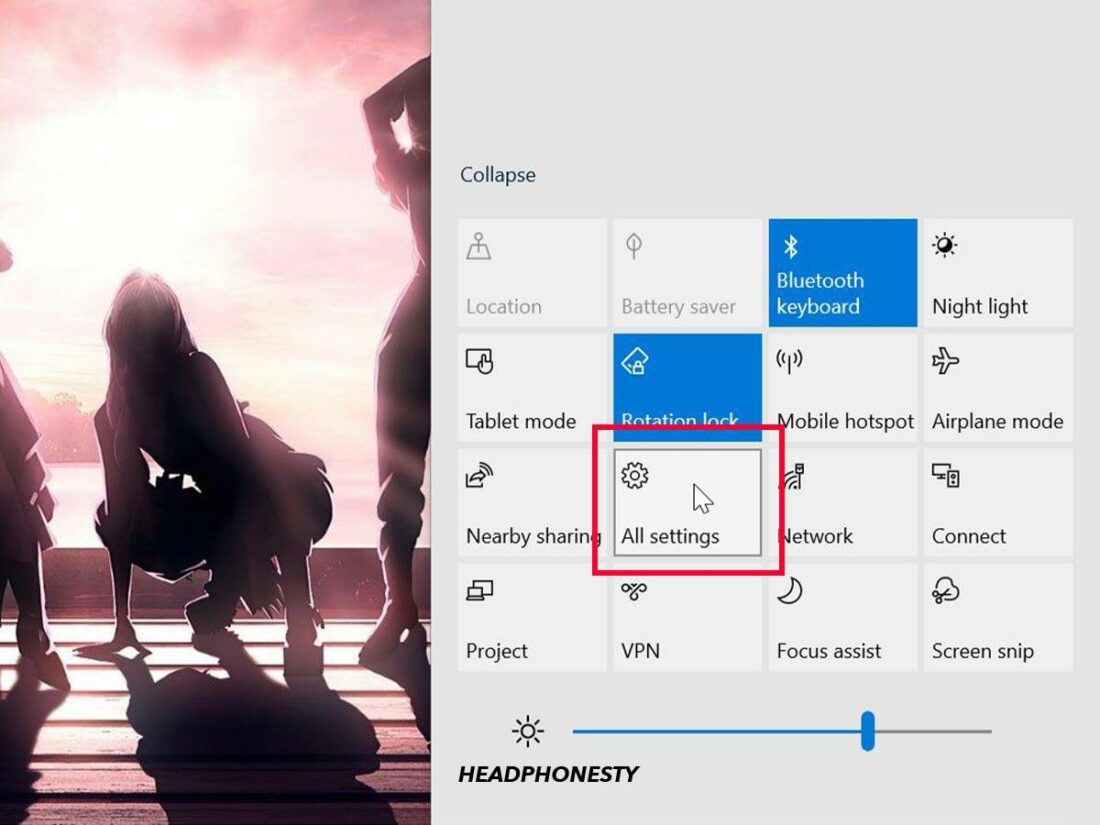
Clicking on the Bluetooth icon. - Select All Settings. This will open the Surface’s Settings.
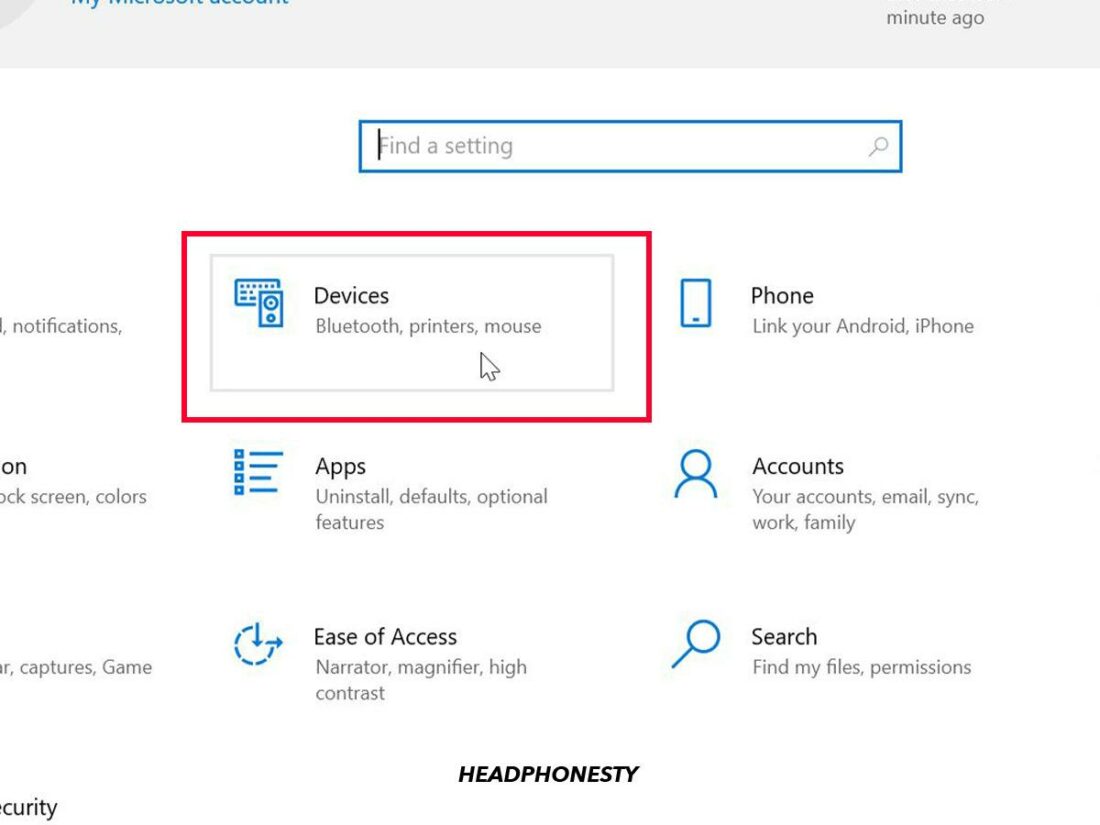
Selecting the All Settings icon. - Choose Devices from the list of settings options.
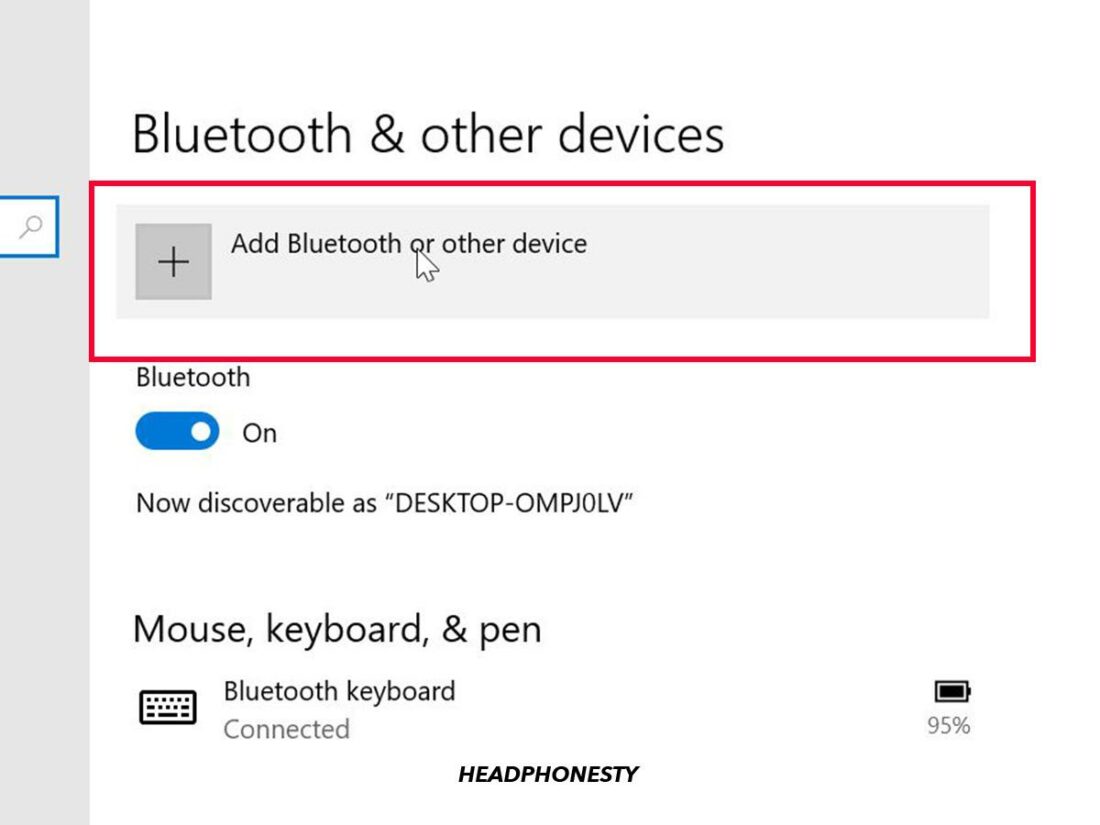
Choosing the Devices option - Select Add Bluetooth or other device.
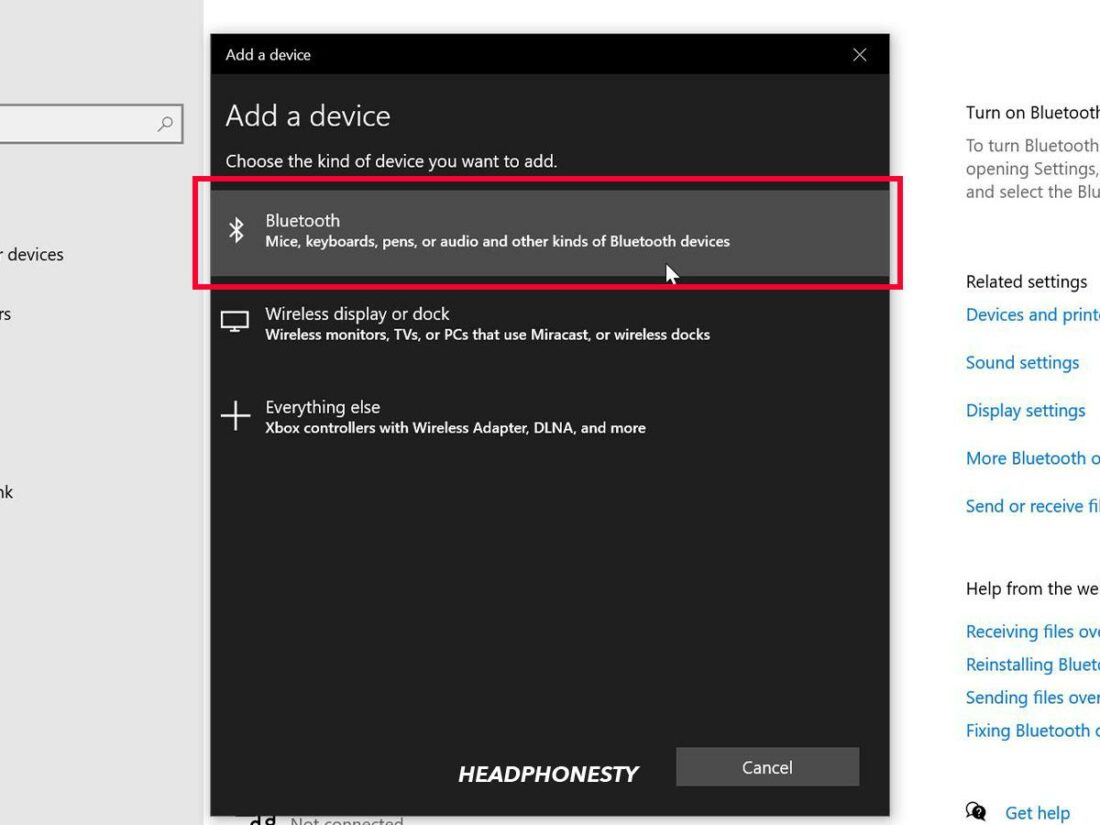
Selecting Add Bluetooth or other device option - Select Bluetooth. This will open a list of available Bluetooth devices.
Opening Bluetooth on Windows 10. - Now you need to make your AirPods discoverable. To do this, put your AirPods in their case and open the lid.
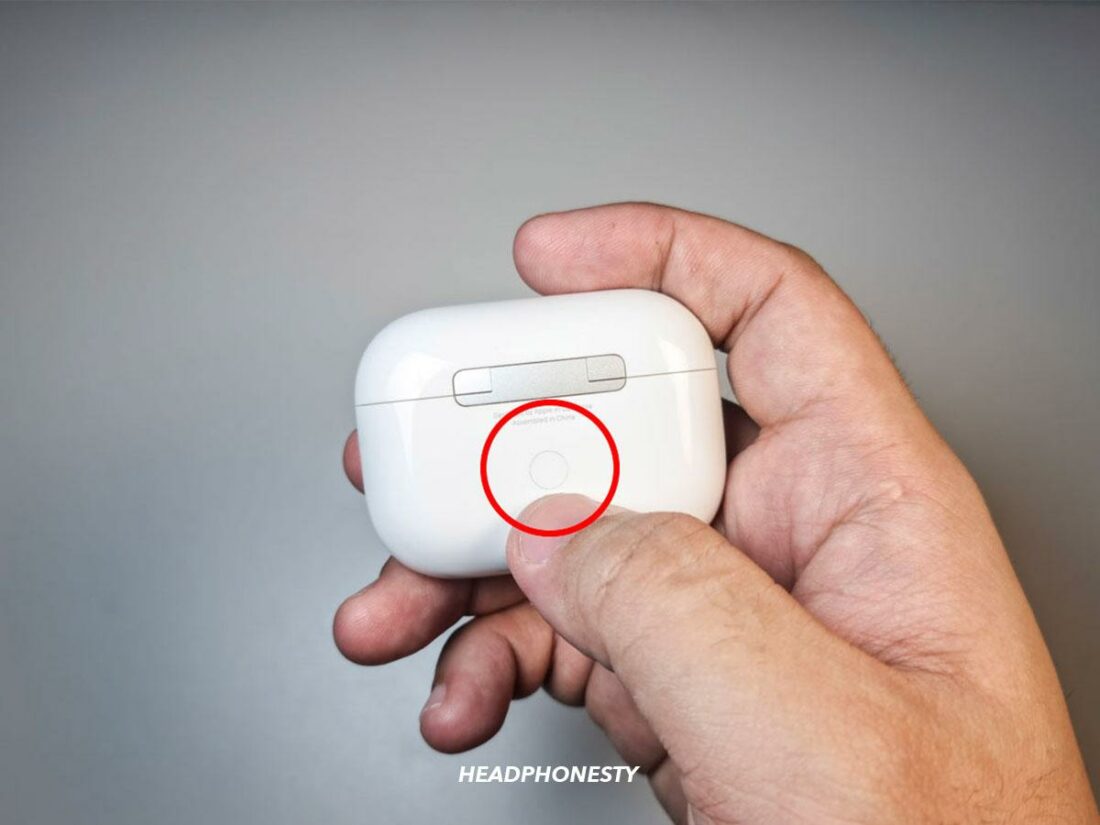
Putting AirPods in their case and opening the lid to make them discoverable - Press and hold the button on the case until the LED starts to flash white. This puts your AirPods into pairing mode.
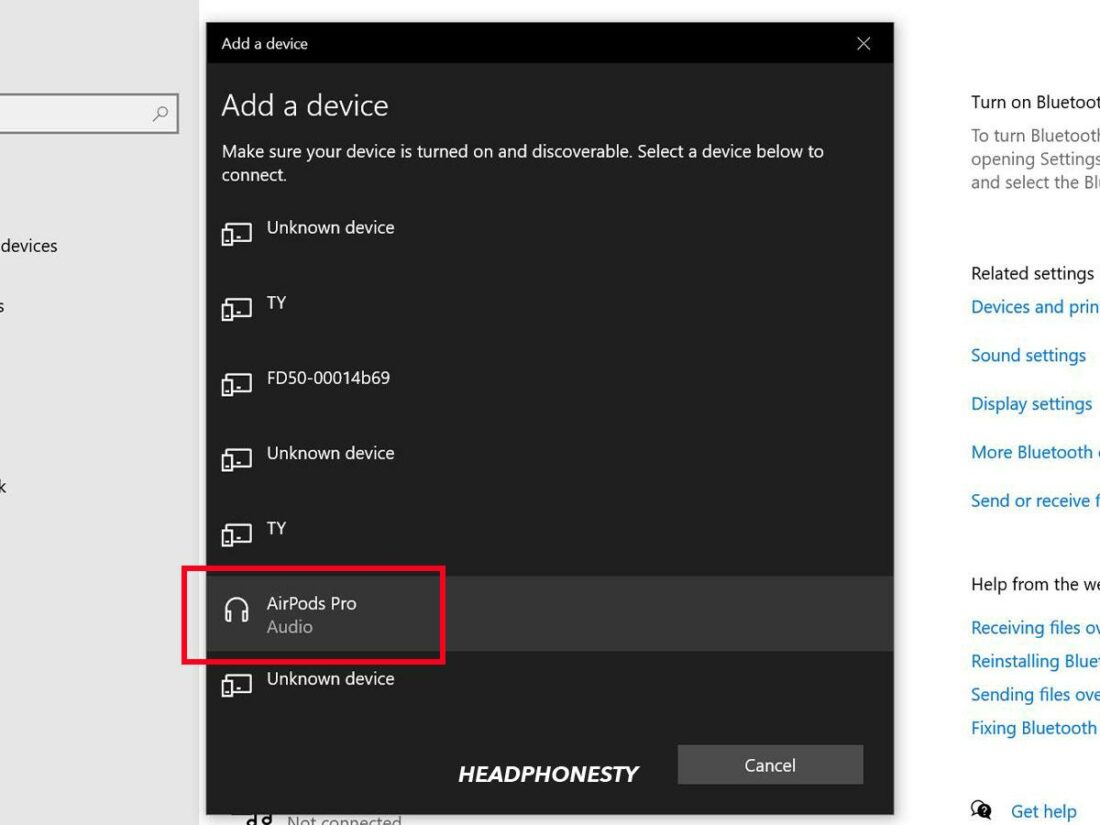
Holding the setup button to put AirPods in pairing mode. - Your AirPods should now appear in the list of available Bluetooth devices. Select them from the list.
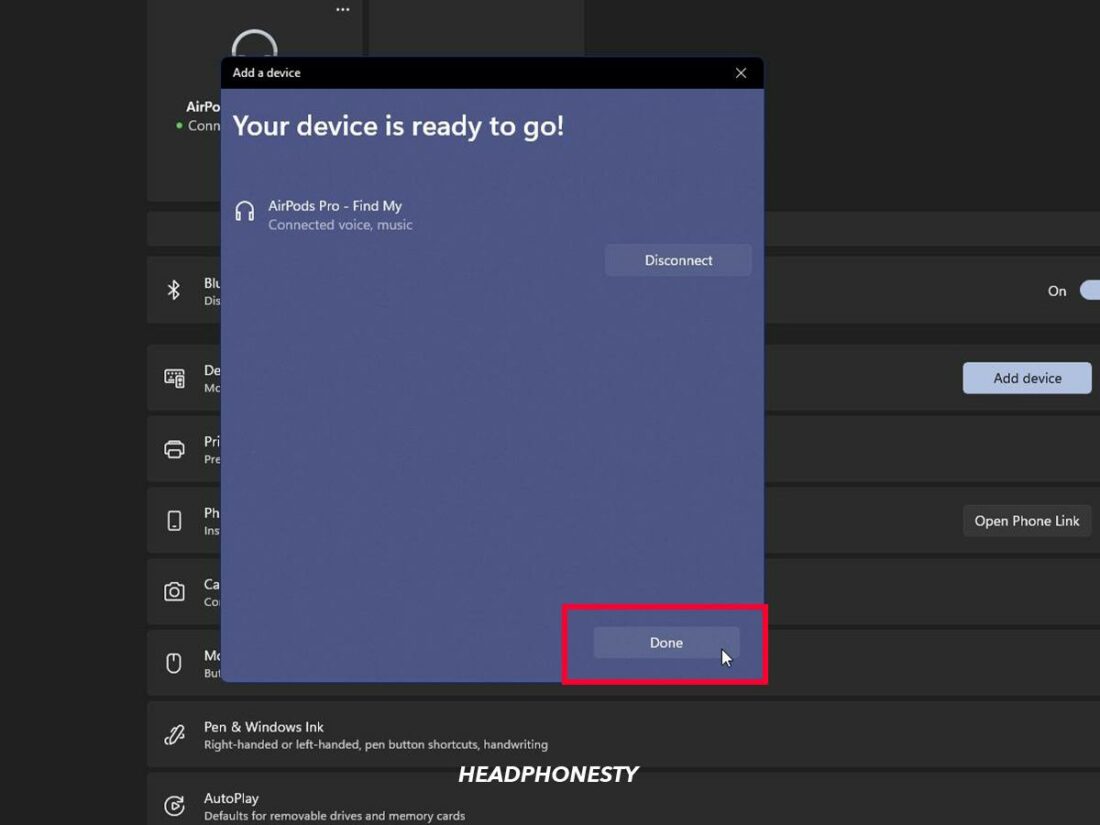
Selecting your AirPods to Connect to Microsoft Surface. - Click on Done.
Clicking Done to complete connection of AirPods to Microsoft Surface


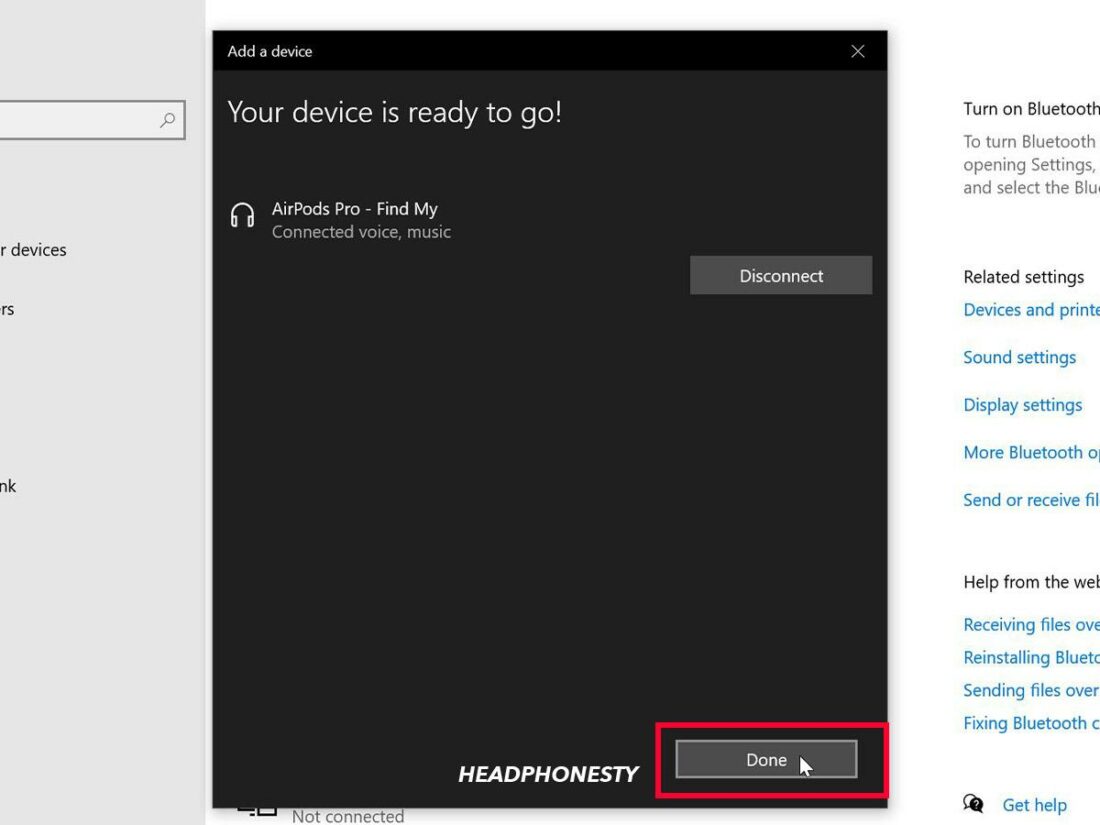
Your AirPods should now be connected to your device. You can test this by streaming audio and checking whether it plays through the AirPods.
Now that the AirPods are paired, it’ll be easier to connect them next time. You will simply open your Bluetooth settings and choose your AirPods from the available audio devices.
How to Connect AirPods to Microsoft Surface With Windows 11
The Windows 11 interface differs from Windows 10 in how you access Settings and the layout of the Bluetooth page. This means the steps you need to follow aren’t exactly the same.
Here’s how to connect your AirPods to your Surface or Surface Pro in Windows 11:
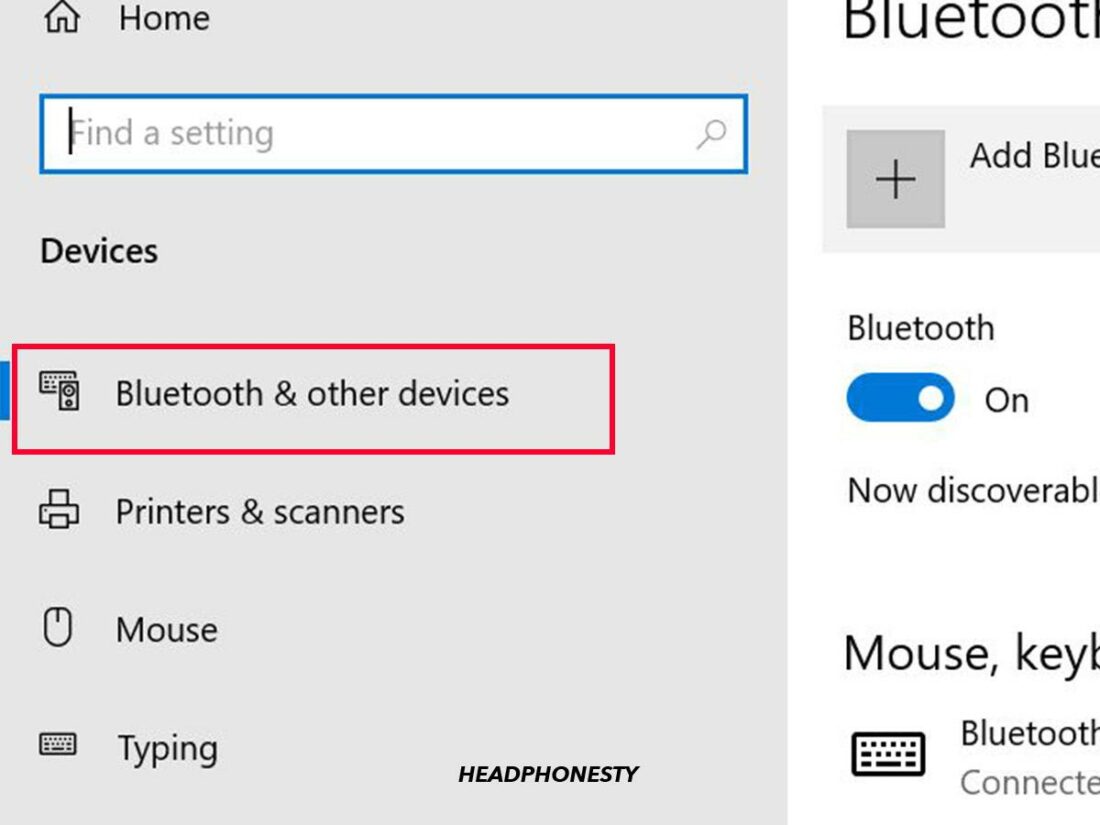
- Right-click the Windows icon in your taskbar, and choose Settings from the pop-up menu.
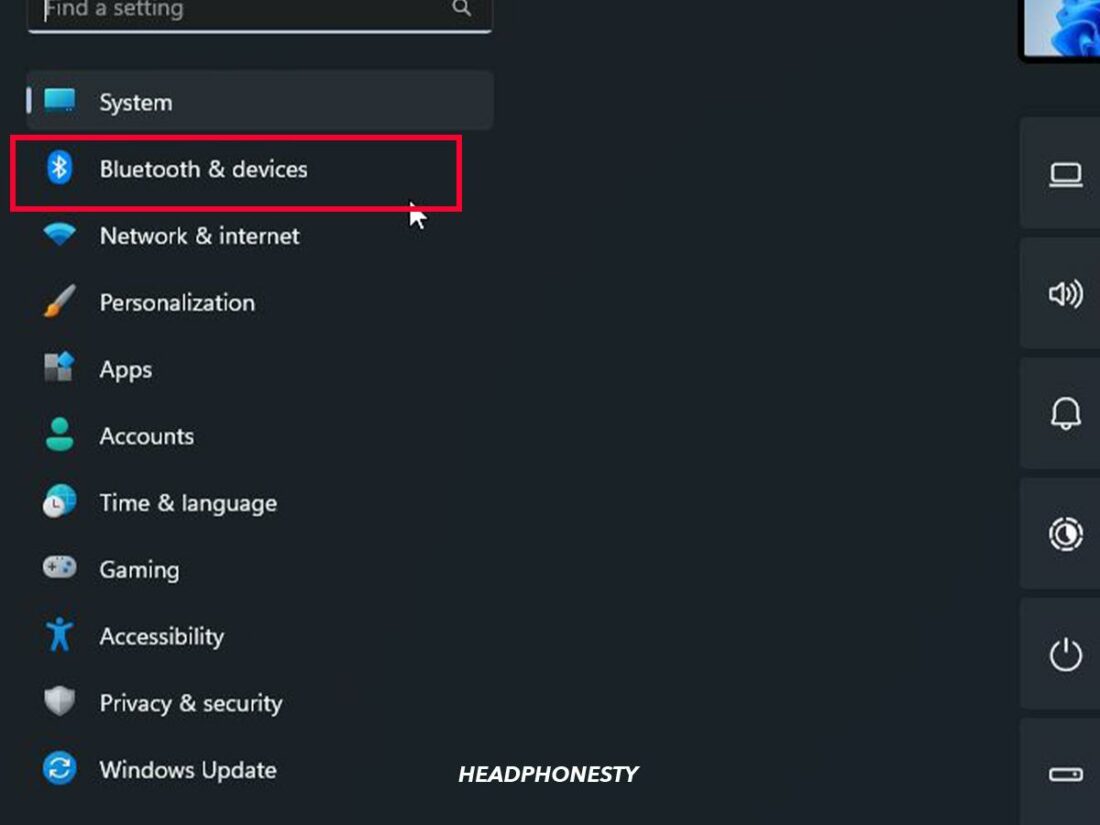
Opening Settings on Windows 11 - Choose Bluetooth & devices from the sidebar on the left-hand side of the screen.
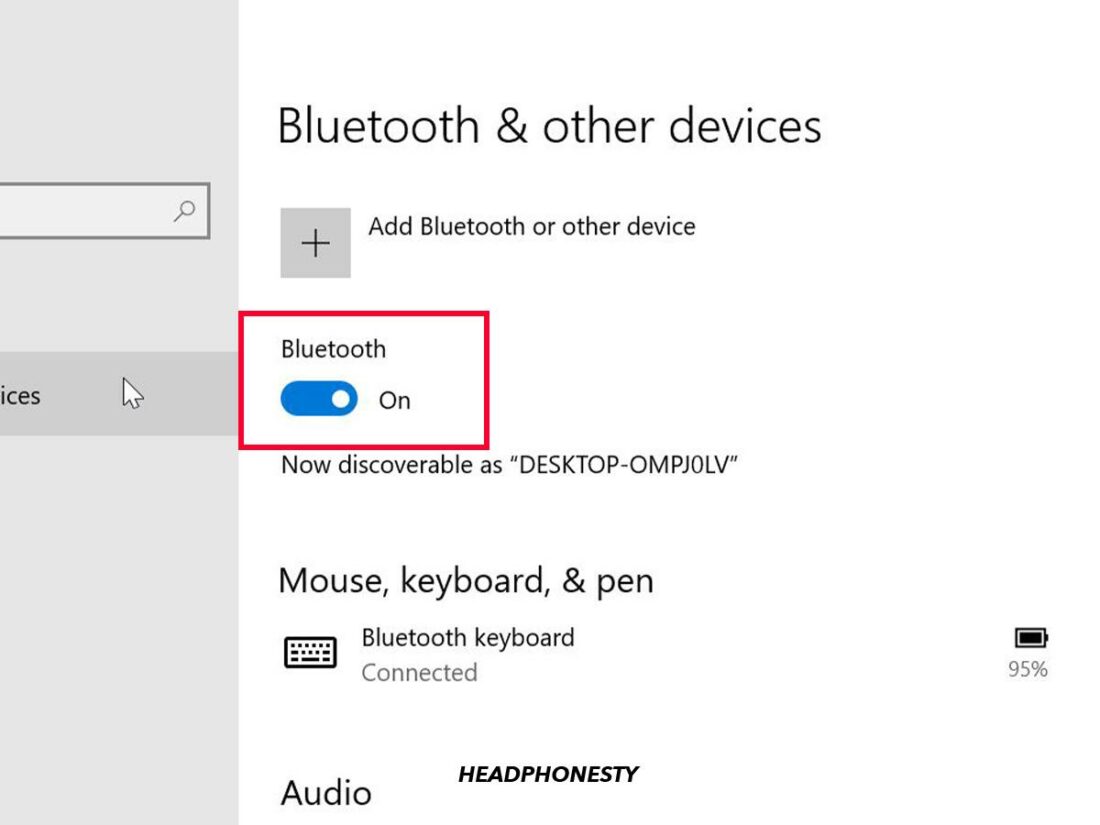
Choosing Bluetooth & devices on on Windows 11 - Ensure that your Bluetooth is turned on. If not, click the toggle to the On position.
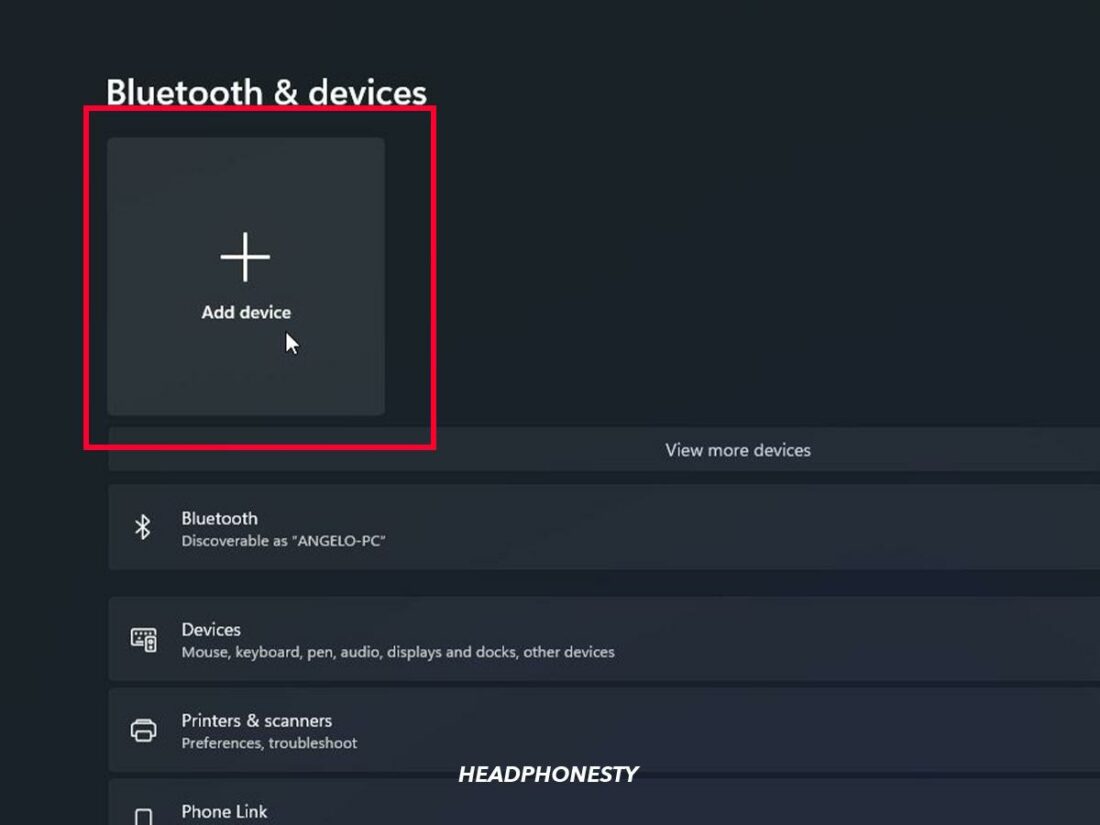
Turning on Bluetooth on Windows 11. - Choose the Add Device option from the large, square boxes under the Bluetooth & devices heading.
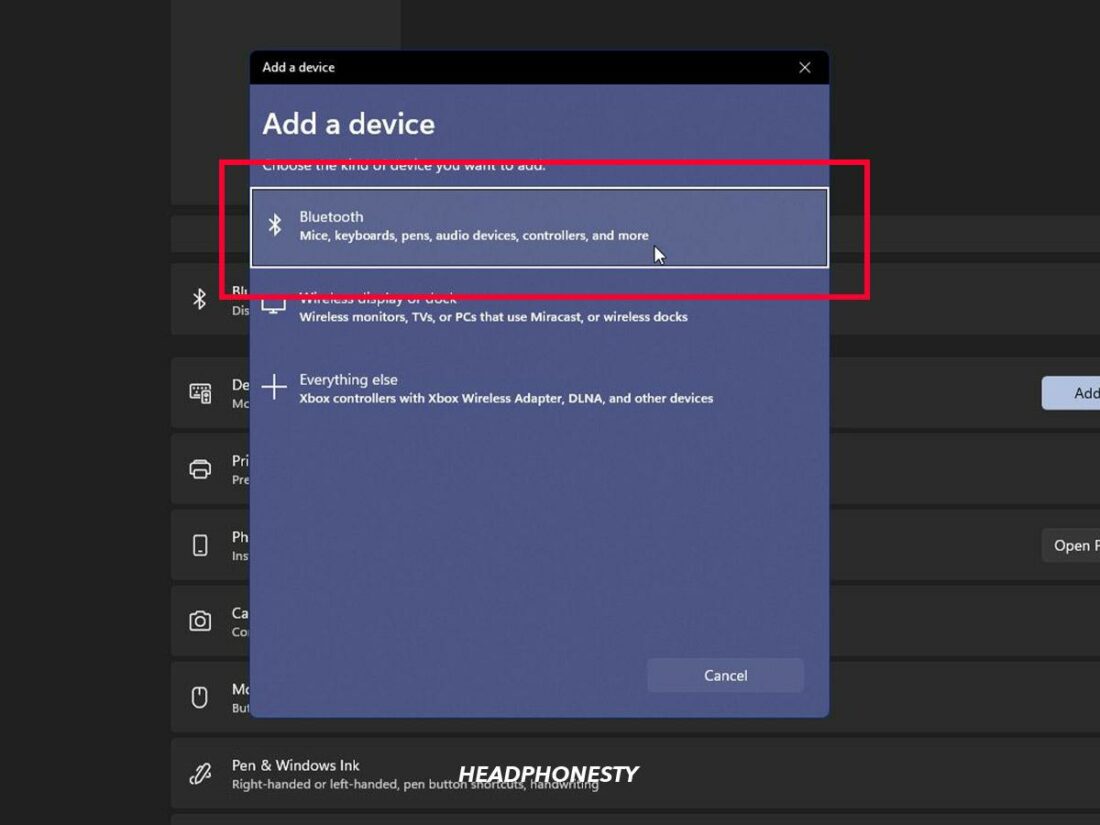
Adding a new Bluetooth device on Windows 11 - Select the Bluetooth option.
Selecting the Bluetooth option on Windows 11 - Put your AirPods into pairing mode as before and then open the case with the AirPods in.
Putting your AirPods into pairing mode. - Your AirPods should now show up in the list of available Bluetooth devices. Select them, then click Done.
Clicking the Done button to complete connection


You can check if the AirPods are connected by playing some audio on your Microsoft Surface.
Can’t Connect AirPods to Microsoft Surface? Try These Fixes
If you’ve followed the method above and your AirPods won’t connect, there are a few troubleshooting fixes you can try:
- Reset your AirPods
- Ensure your AirPods have enough charge
- Restart Bluetooth on your Microsoft Surface
Reset your AirPods
As you use your AirPods, bugs, and glitches that affect your connectivity or listening experience can start to arise. Resetting your AirPods will revert them to factory settings, resolving these bugs.
Here’s how to reset your AirPods:
- Put your AirPods in their case and close the lid. Wait at least 30 seconds.
AirPods in a case with closed lid. - Open the Bluetooth settings on the device your AirPods are connected to.
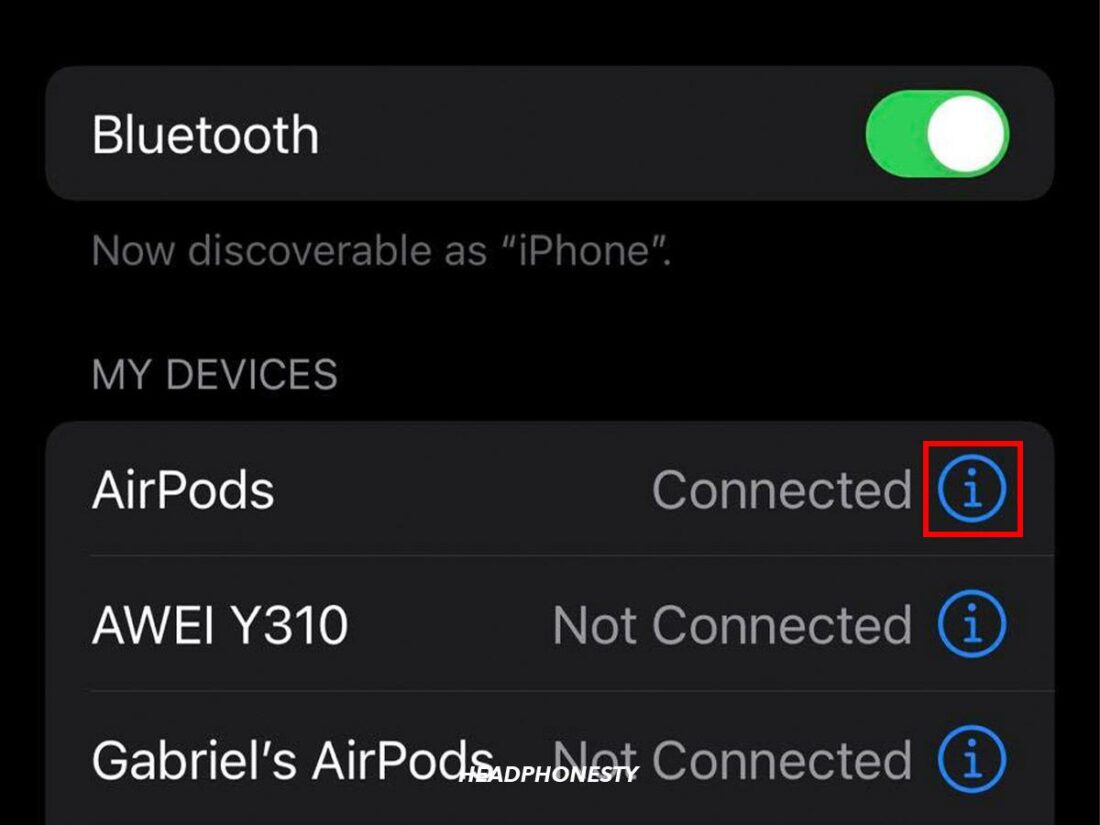
Opening the Bluetooth settings on a Windows device. - Tap the More Info icon next to your AirPods.
Tap the More Info button next to your AirPods. - Choose Forget This Device.
Forgetting a Bluetooth Device on Windows - Next, open the charging case. Hold down the setup button until the light flashes amber, then white.
Pressing the setup button on AirPods - Your AirPods are reset. You can now reconnect them to your devices and hopefully your Surface.
Connecting AirPods to a Windows AirPod


Ensure your AirPods have enough charge
AirPods with low charge will disable some functionalities to preserve power, often leading to a failed Bluetooth connection.
You can check out our article on how to know if your AirPods are charging for more detailed instructions, but here’s how to quickly check your AirPods battery status:
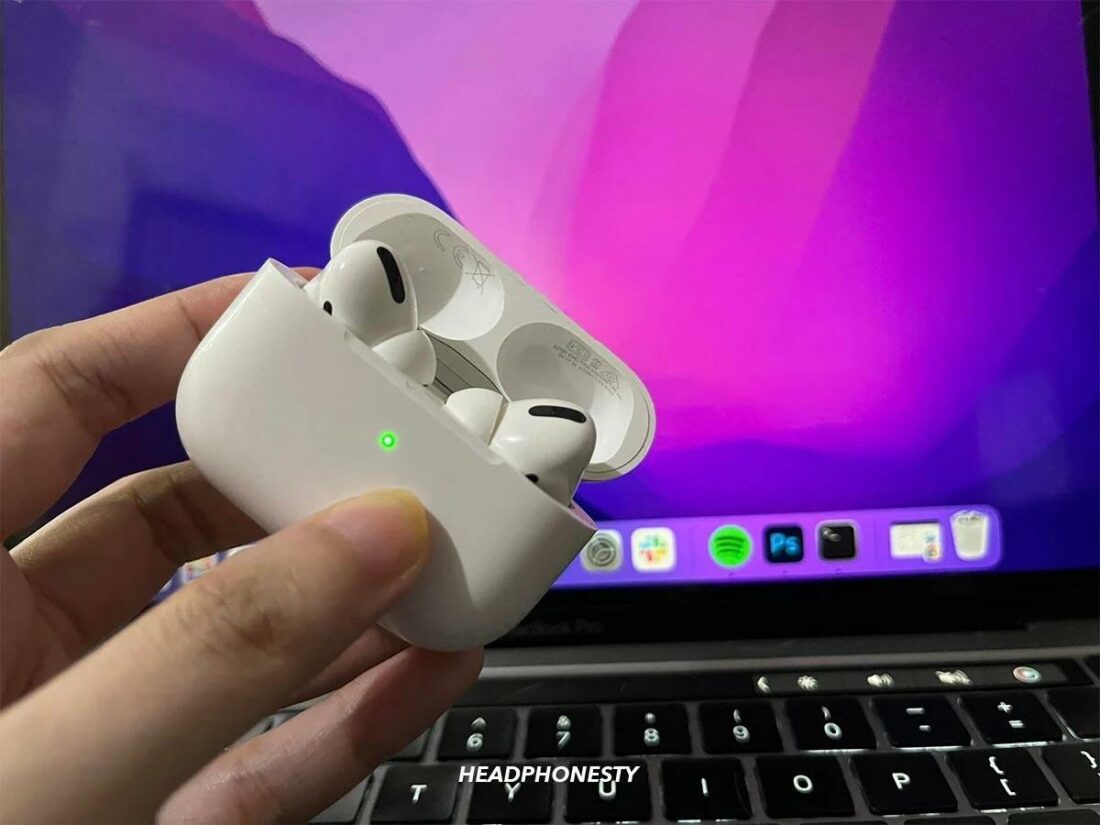
- Put your AirPods in their case and open the lid. The LED on the charging case will light up.
AirPods in an open charging case. - Check the color of the light. A green light indicates fully charged AirPods, while an amber light means the AirPods have less than one full charge.
Indicating the green status light on the AirPods charging case.

If the LED is amber or doesn’t light up, you should try charging your AirPods and then trying to connect them again.
Restart Bluetooth on your Microsoft Surface
Restarting your Bluetooth can help clear issues preventing AirPods from connecting properly. Here’s how to restart Bluetooth on your Surface or Surface Pro:
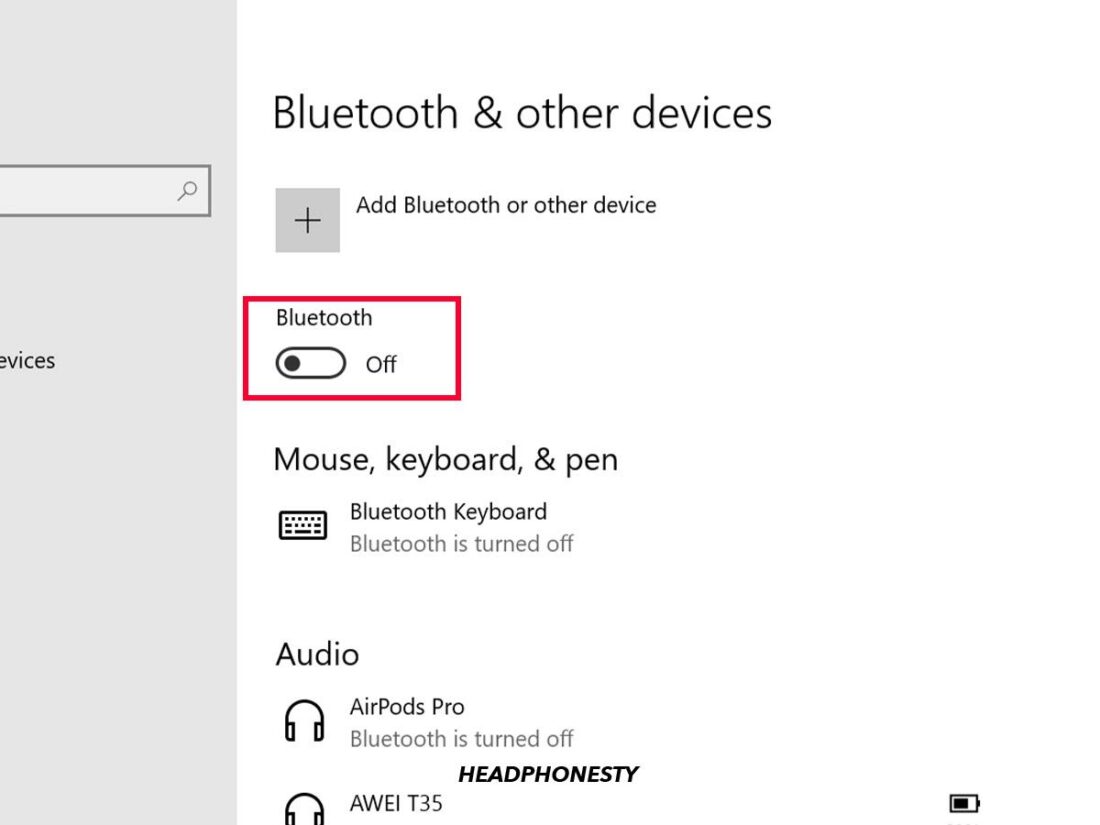
- Open the Bluetooth settings on your Surface.
Open the Bluetooth settings. - Click the Bluetooth icon to turn it to the Off position.
Turn off the Bluetooth toggle switch. - Wait a few seconds, then toggle the Bluetooth back to the On position.
Turn on the Bluetooth toggle switch. - Try connecting your AirPods again.
Select your AirPods from the list.

FAQs on Connecting AirPods to Microsoft Surface
Which features won’t work when connecting AirPods to Microsoft Surface?
Since AirPods are designed for use with iOS products, you won’t have access to all the features of the wireless earbuds if you’re using a Windows device.
You’ll lose these features using AirPods with a Microsoft Surface:
- Tap to access voice assistant: When using AirPods with an Apple device, you can activate Siri by tapping the stem of the earbuds. This feature isn’t automatically available on Windows, though there are apps you can install to summon Google Assistant through your AirPods.
- Playback control: AirPods include a touch sensor for playback control. However, this feature isn’t available when using a Surface or Surface Pro. You’ll have to play, pause, and skip through your tracks directly on your Surface.
- Automatic ear detection: AirPods can detect when they’re in your ears when used with Apple products. This lets them pause audio when removed and resume playing when you put them back in your ears. However, this feature won’t work when your AirPods are connected to a Microsoft Surface.
- Find my earbuds: The Apple Find My app lets you track Apple products, including your AirPods when they’re lost. However, this feature is only available on Apple devices, so you won’t be able to use it on a Microsoft Surface.
Why is there no sound on AirPods when connected to Microsoft Surface?
When connecting AirPods to Microsoft Surface for the first time, they’ll automatically be selected as the default sound output. However, software issues may prevent this, so you’ll sometimes have to set it up manually.
Here’s how to set your AirPods as default on Windows 10 and Windows 11:
- Take your AirPods out of their case and ensure they’re connected to your Surface.
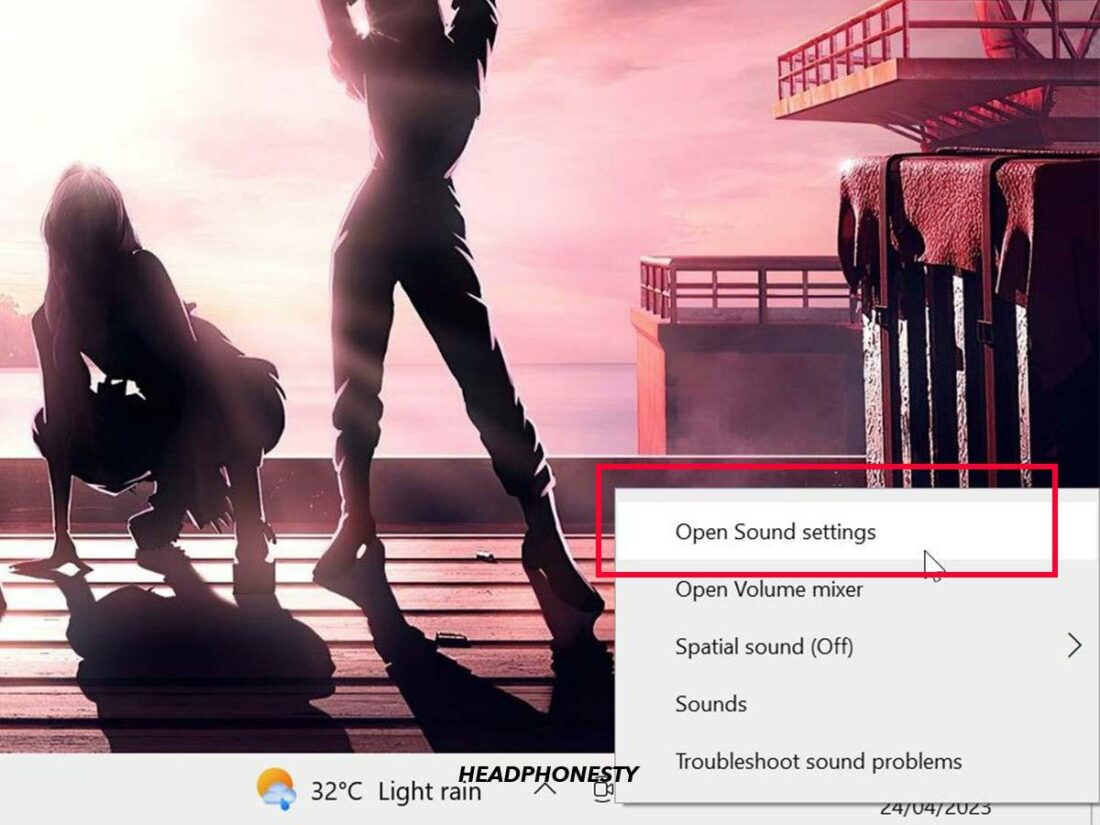
Taking AirPods out of their case. - Right click on the Speaker icon at the bottom right of the taskbar.
Right clicking the Speaker icon at the bottom right of the taskbar. - Click the Open Sound Settings.
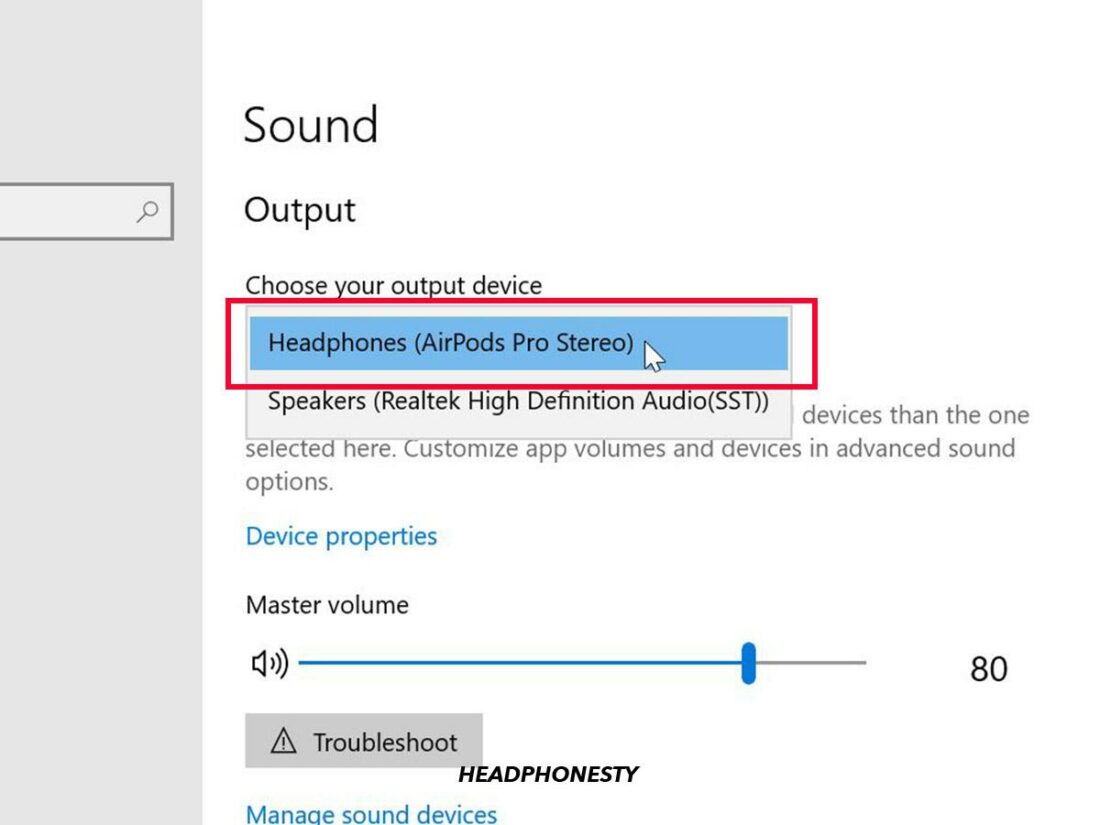
Opening Sound Settings. - Select your AirPods from the list under the Output section. This will set your AirPods as the default audio output.
Select your AirPods from the list under the Output section.


Conclusion
While connecting AirPods to a Microsoft Surface laptop is not as fluid as connecting to a MacBook, it is certainly possible. If you follow the steps and our troubleshooting tips correctly, you should be able to enjoy some quality audio from your Microsoft Surface through the AirPods.
Did this article help you connect your AirPods? Did you have any issues or find a troubleshooting solution we missed? Let us know in the comments section below!