
Open source and affordable, but fully-featured and highly customizable!
I recently reviewed the Orchard Audio PecanPi Streamer Ultra, a Raspberry Pi-based network music streamer device with an integrated touchscreen. While I appreciated the device’s idea and sound quality, I struggled to justify the price and the compromises made in convenience and features.
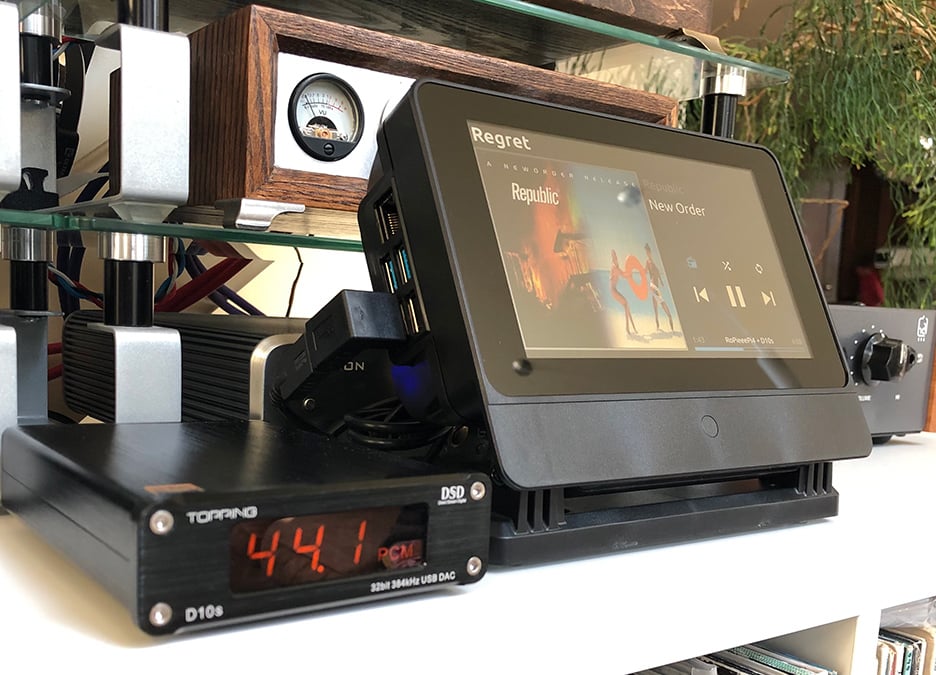
My biggest takeaway from using a commercial Pi-based network music streamer was that I could build one myself!
Many compelling aspects of a Pi-based streamer became apparent when using the Streamer Ultra. Rather than using a multi-purpose, complicated, and inherently noisy computer to serve up digital music files, a Pi streamer can offer a streamlined and straightforward solution. It’s the ultimate DIY device, allowing the average tinkerer to select components and easily combine them into a custom product. And the price CAN be far less than a finished commercial product with similar features and sound quality.
With champagne tastes and my (cheap) beer budget firmly in mind, my frugality-fueled motivation was to see how fully-featured and high-fidelity a product I could create for the least amount of money possible. I tried to select high-quality components firmly situated in the bang-for-the-buck category.
Throughout this guide, I’ll explain what (and why) I selected for my own build, and I’ll also provide available options for you to make your own purchase decisions. Your list of acceptable compromises is likely quite different than my own.
The great thing about a Pi-based device is that you’ve got SO MANY options and choices to make every step of the way, and the end product can be significantly different for each builder.
Recommended Builds + Parts
I put together two recommended builds that are both priced around $250. These are fully functional and complete music streamers, but offer different options based on whether you already own an external USB DAC.
Build 1 contains an internal DAC board but the slower Pi 3B+, while Build 2 does not include a DAC in the price (it requires an external USB DAC) and is based on the faster Pi 4B.
| Component | Build 1 - Internal DAC | Build 2 - External DAC |
|---|---|---|
| Pi Model | Pi 3B+ | Pi 4B - 4Gb RAM |
| Power Supply | Official 2.5A micro USB Supply | Official 3A USB-C Supply |
| Memory Card | SanDisk Ultra 16 Gb (3 pack) | SanDisk Ultra 16 Gb (3 pack) |
| Screen | Official 7” Touchscreen | Official 7” Touchscreen |
| Case | SmartiPi Touch2 + rear cover | SmartiPi Touch Pro |
| Internal DAC | HiFiBerry DAC2 Pro | N/A Requires either: - 1 X external USB DAC (Topping D10s) - or 1 X DAC/amp (xDuoo XD05 Plus) |
| Software | Volumio (or RoPieee for Roon) | Volumio (or RoPieee for Roon) |
Main Hardware Components
There are four main hardware components in a Pi-based network streamer:
- Raspberry Pi
- Screen (optional)
- Case
- DAC
Raspberry Pi
There have been several Raspberry Pi revisions over the last few years. Each revision is more powerful than the previous but shares the same basic shape and size. The Pi’s claim to fame is, of course, inexpensive and flexible open-sourced computing power. For the sake of this discussion, we only need to concern ourselves with the most recent Pi models.
| Pi Version | Release Year | Processor | WIFI | Bluetooth | Ethernet | USB |
|---|---|---|---|---|---|---|
| 3B | 2016 | 1.2 GHz 64-bit quad-core ARM Cortex-A53 processor | 802.11n – 2.4GHz | 4.1 | 100Mbit/sec | 2.0 |
| 3B+ | 2018 | 1.4 GHz | 802.11n – dual-band 2.4 and 5GHz | 4.2 | 300Mbit/sec limited by shared USB 2.0 connection | 2.0 |
| 4B | 2019 | 1.5 GHz | 802.11ac | 5 | Full Gigabit | 3.0 |
Before the 4B version, using a Pi as a network streamer was primarily limited by the shared Ethernet and USB controller. This combined controller restricts the bandwidth for USB-based DAC connections (to external DACs) and the Ethernet throughput. Clever folks worked around this limitation by designing separate DAC boards (HATs) that bypass the USB connection and connect via the 40-pin GPIO header on the Pi board. More on this later.
Although the 3B has the lowest power consumption of all the models, meaning it generates less heat, creates less thermal noise, and has the least chance of overheating, I don’t believe these benefits present a compelling argument to use this version. While the 3B may be sufficient to run a network streamer device, the lower clock speed likely slows down the software and extends boot times.
The 4B model is about twice as expensive as the sub-$50 Pi 3B and 3B+ versions, but the improved speed and unrestricted bandwidth make the 4B this model of choice. Unless you are going to use a very air-flow restricted case, overheating shouldn’t be an issue, and adding a powered fan is an option (although this adds noise as well).
The 4B means your DAC choices are almost unlimited, as well as being faster to use and more future proof.
Although the 4B is the best overall option, for my first build, I chose a 3B+. Why? First off, I was unaware of the USB/network bandwidth limitation and potential impact with external USB DACs. I really could have used a guide like this one!
Secondly (and perhaps mainly), it was cheaper (including a DAC), and therefore more attractive to my budget. To be honest, it has worked absolutely fine for my needs, but for my second build, I bought a 4B.
Pi accessories
You can make things easy on yourself (as I originally did) and purchase a Pi that comes in a starter kit bundled with needed accessories, namely power supply, microSD card, and case. Or you can buy them separately (which may make more financial sense if you are going to end up buying a different case anyway).
Power supply
There are official power supplies available for each model that are reliable, use heavy gauge wires, and are reasonably priced. The Pi creators recommend their 2.5A micro USB Supply for the 3, and for the 4, they recommend their 3A USB-C Supply.
“The power requirements of the Raspberry Pi increase as you make use of the various interfaces on the Raspberry Pi. The GPIO pins can draw 50mA safely, distributed across all the pins; an individual GPIO pin can only safely draw 16mA… Check the power rating of the devices you plan to connect to the Pi and purchase a power supply accordingly.
If you need to connect a USB device that will take the power requirements above the values specified in the table above, then you must connect it to an externally-powered USB hub.” – The Raspberry Pi Foundation
Power supply requirements
| Pi Version | Recommended PSU current capacity (Amps) | Maximum total USB peripheral current draw (Amps) | Typical bare-board active current consumption (mA) |
|---|---|---|---|
| 3B or 3B+ | 2.5A | 1.2A | 500mA |
| 4B | 3.0A | 1.2A | 600mA |
Suppose the power supply isn’t sufficient for the Pi’s power demands. In that case, the Pi incorporates low-voltage detection circuitry and displays a low power warning icon (yellow lightning bolt) on all attached displays. Insufficient power can cause erratic behavior, including unexplained crashes and corruption of the SD card.
As there isn’t a hardware power switch on the Pi itself, some power supplies include a physical switch on the cable. Choosing a power supply with a cable mounted switch can be a handy feature, saving you unplugging and reconnecting when needed.
Switching vs. linear power supplies
The vast majority of power supplies are of the switching (or switch-mode) type. However, there is a higher quality, and correspondingly much more expensive, option available. A linear power supply differs from the switching version in how the primary (input) AC voltage is converted to the output DC voltage.
A switching power supply typically creates high-frequency voltage using a power transistor and uses pulse width modification (PWM) to regulate the output voltage. This voltage is then filtered to remove unwanted noise and become DC. Linear power supplies pass the AC through a transformer to convert it to DC and then filter after that.
Since linear power supplies use no high-frequency switching, they are generally considered lower noise. Their rectifier circuitry and filtering produce very clean DC voltage; however, they are typically larger, heavier and less efficient than a comparable switching power supply.
For those concerned with squeezing the best (but perhaps unnoticeable) performance out of their Pi build, a high-quality linear power supply is an option. Keep in mind that adding a linear power supply can add to the project’s overall price many times over.
MicroSD card
The Pi has no internal memory for an operating system (OS), so everything that it does is dependent on an installed MicroSD card. In fact, a Pi can instantly change between being a full-fledged desktop computer, or retro-gaming station, or a network music player simply by powering it off and swapping the MicroSD card. Buy a few and try the many software options out there!
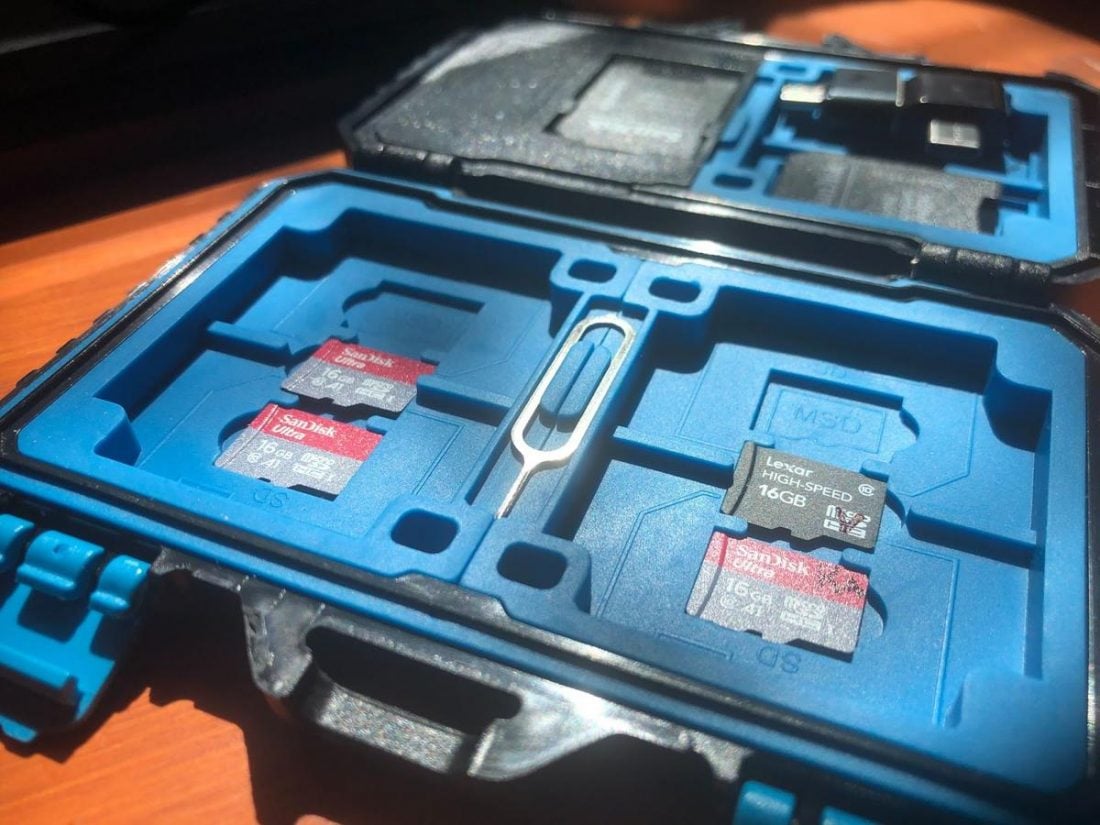
Memory is cheap these days, so there is no excuse for not simply purchasing the best performing MicroSD card available, such as the class 10 Sandisk Ultra. A 16Gb capacity is typically more than enough to run most available software, as long as you don’t expect to store media on the card as well. Media will need to be accessed via the network or a connected USB drive.
Screen
For my own build, I wanted to maximize compatibility and features, including an integrated touch interface and an always-on, ‘now playing’ display. I needed a touchscreen!
There are two main ways to connect a screen to a Raspberry Pi. The first is through the HDMI connection on the Pi. Unfortunately, although HDMI is an industry standard and allows for compatibility with a significant number of screens, many of the network streaming software options do not support this interface.
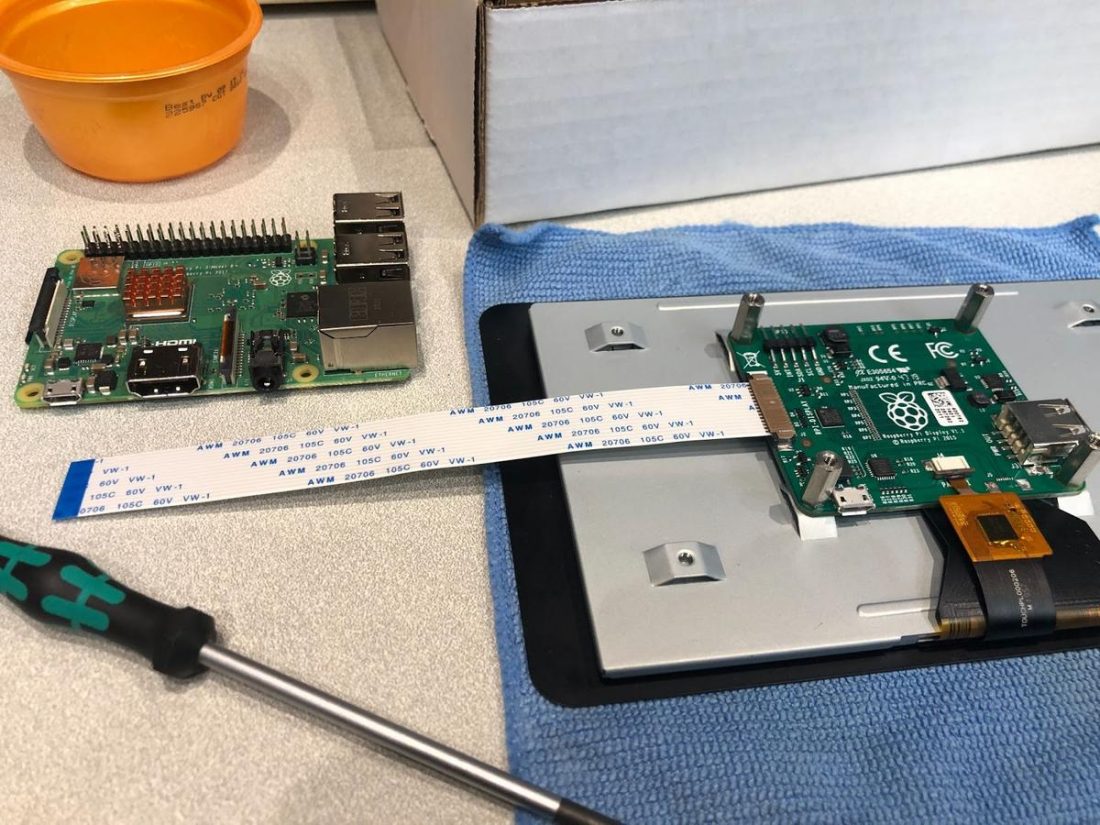
The other connection method uses the Pi S2 connector. The S2 port is a display serial interface (DSI) for connecting a liquid crystal display (LCD) panel using a 15-pin ribbon cable. The official 7” Raspberry Pi Touch Display uses the DSI port.
LCD displays have an optimum viewing angle, so it is advantageous to choose a case that can adjust the display to the proper angle for your application. Most LCDs seem to work best when viewed from slightly above. A 90 degree, straight up and down, vertically mounted display is easy to implement, but you may struggle to read or interact with it.
Official Raspberry Pi display specifications
- Resolution: 800×480 RGB LCD display
- Color depth: 24-bit color
- Viewing angle: 140-degree viewing angle horizontal, 130-degree viewing angle vertical
- Touchscreen: 10-point multi-touch touchscreen
- Backlight lifetime: 20000 hours
- Contrast ratio: 500
- Average brightness: 250 cd/m2
- Power requirements: 200mA at 5V typical, at maximum brightness
Case
Case choice is limited by the decision to include a screen in your network streamer. While a screen is convenient for setup, and I like the option of touch screen controls and ‘now playing’ notification, many folks choose to build smaller and less expensive streamers without a screen. The basic and inexpensive cases bundled in many Pi accessory packages work fine.
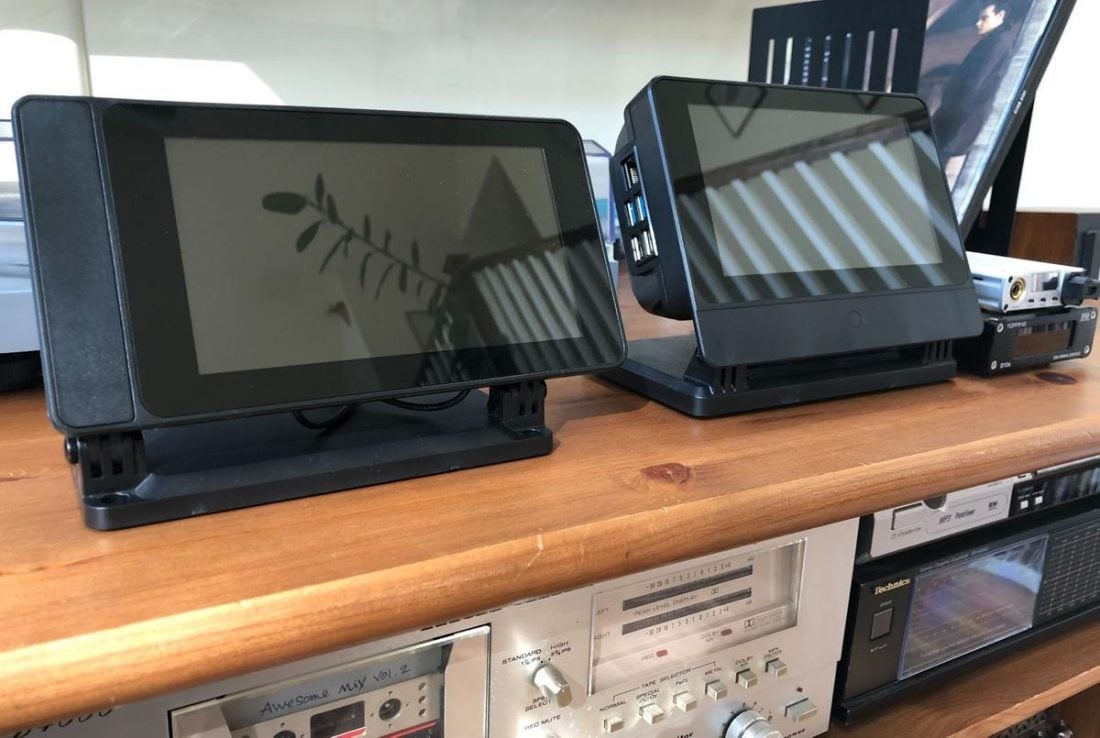
Since I decided to integrate the 7” official Pi screen (for maximum software package compatibility), surprisingly few case options were available. Luckily, the SmartiPi SmartiCase met my needs and is unexpectedly affordable. They make (in their words) “super cool Raspberry Pi cases.”
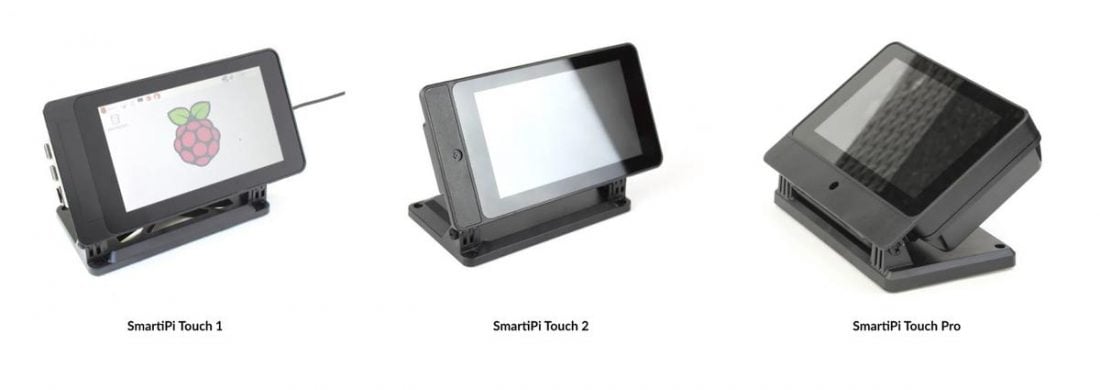
The SmartiCase is available in a few different options. For my first build, I went with a black SmartiPi Touch 2 because it was readily available on Amazon, although it does require separately purchasing a back cover if using a DAC add-on board. The newer SmartiPi Touch Pro case with its centered screen position and spacious back cover will fit virtually any hardware choice.
SmartiPi Touch 2 case features
- Adjustable viewing angle
- 3 replaceable front plates: Lego compatible, smooth with camera hole, smooth flat
- 2 rear doors: Door with fan, door with GPIO pin access – Neither door works with HAT boards
- USB-C y-split power adapter (for use with Pi 4) + Micro USB y-split power adapter (for use with Pi 2 and 3)
- 2 ribbon cables: short for the Official Pi camera v1 or v2, long for the display control board
- 75mm m4 VESA mounting
- 2 small mounts can be used to mount the case to a variety of surfaces in lieu of the stand
- Compatible with the official Raspberry Pi display
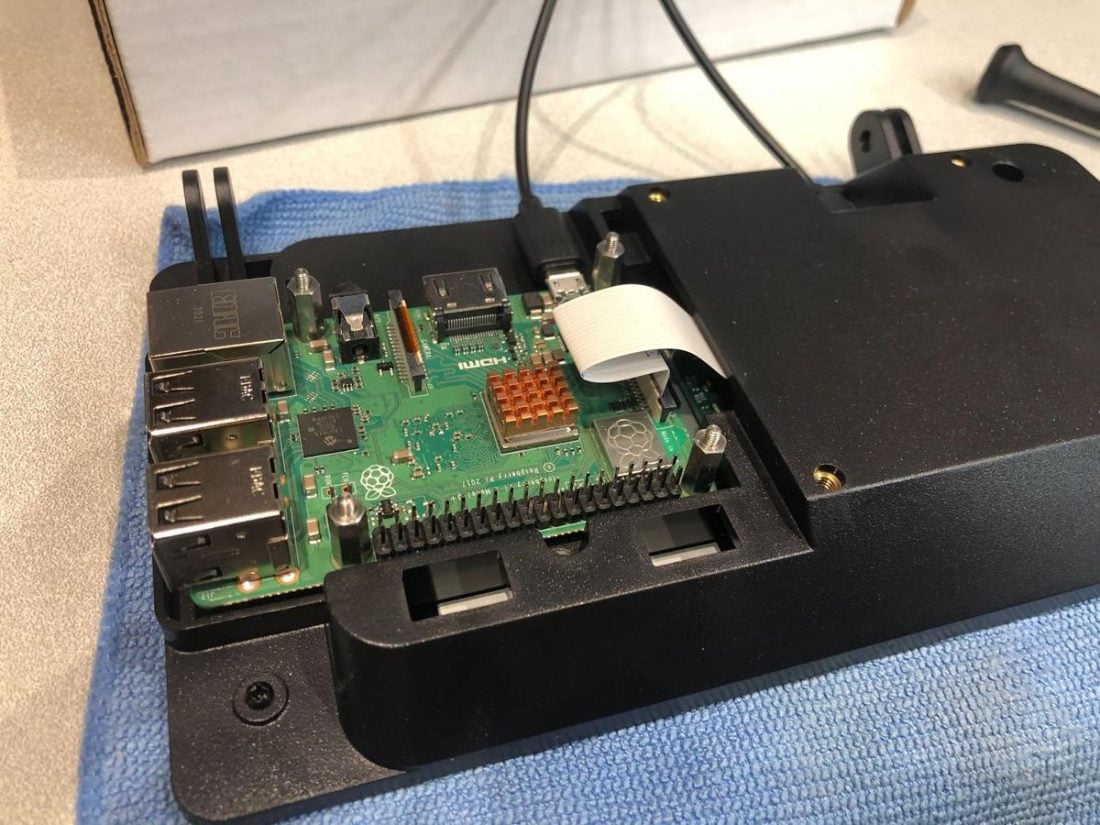
Assembling the SmartiPi cases is a relatively simple affair, with good instructions and pictures available on the official webpage. The screen is mounted to the front of the case, while the Raspberry Pi is assembled into the back and connected via the included ribbon cable.
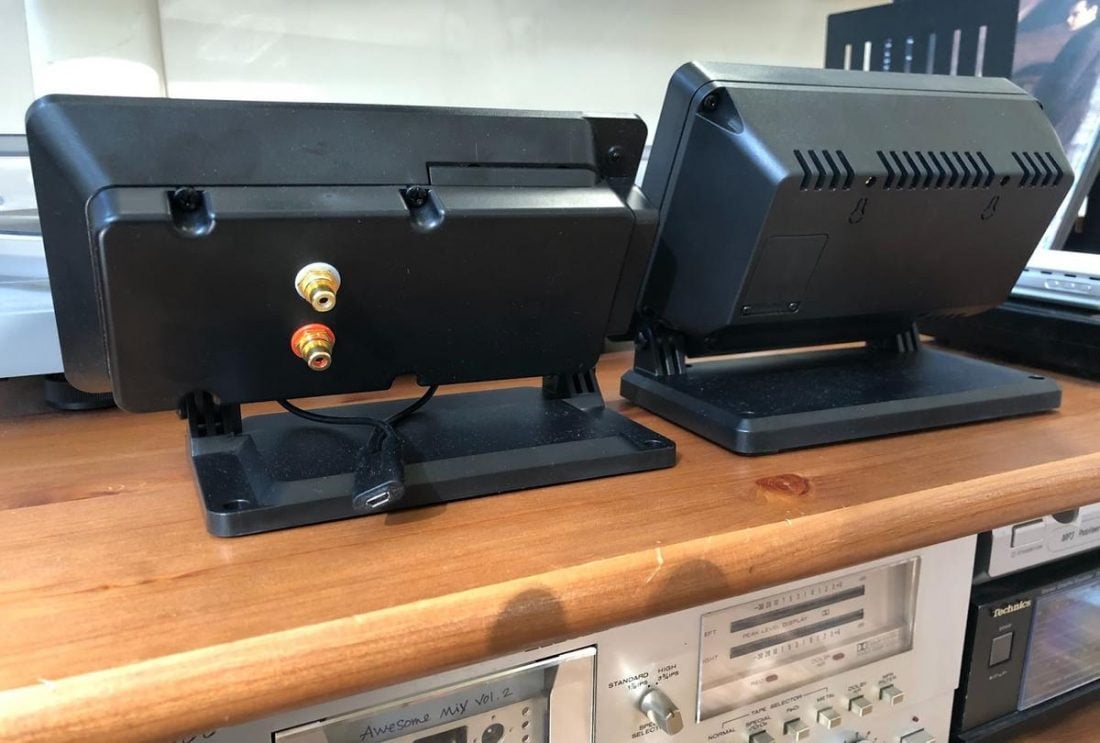
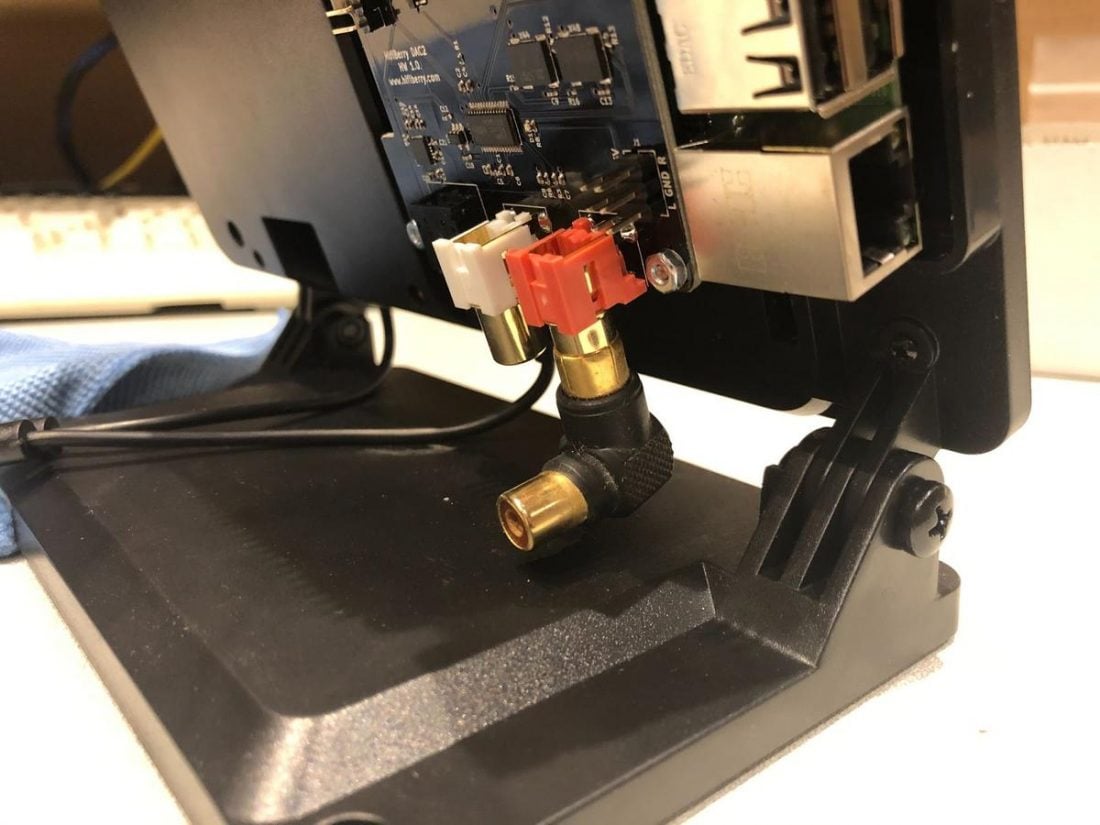
The included 30x30mm fan (optionally mounted on the rear door) can be powered by the 5v GPIO pin (7500 RPM) or 3.3v GPIO pin (4800 RPM) to change speed and noise level. On the Touch 2 case, the rear door must be removed in order to use add-on HAT boards. An optional back cover plate accessory can be purchased separately to cover the HAT board.
The primary limitation of the SmartiPi cases is the inability to access the installed microSD card without removing the rear cover and Raspberry Pi. It is not a big deal once you’ve decided on software, but it makes quick changes somewhat more cumbersome. Additionally, due to the Pi’s positioning at the leftmost edge (as viewed from the front), any USB or ethernet cables stick out from the side.
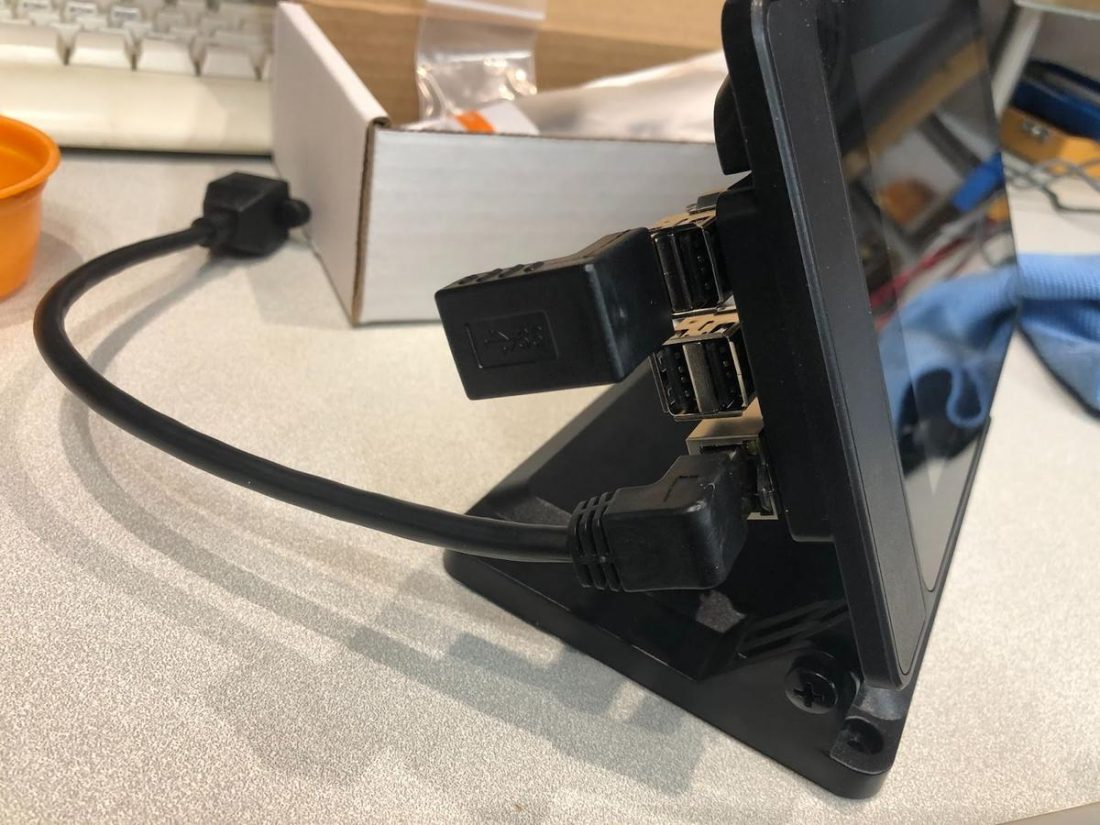
I purchased a few inexpensive right-angle USB adapters and a network cable extension to minimize the visual impact of the port and cable placement.
External USB DAC vs HAT DAC
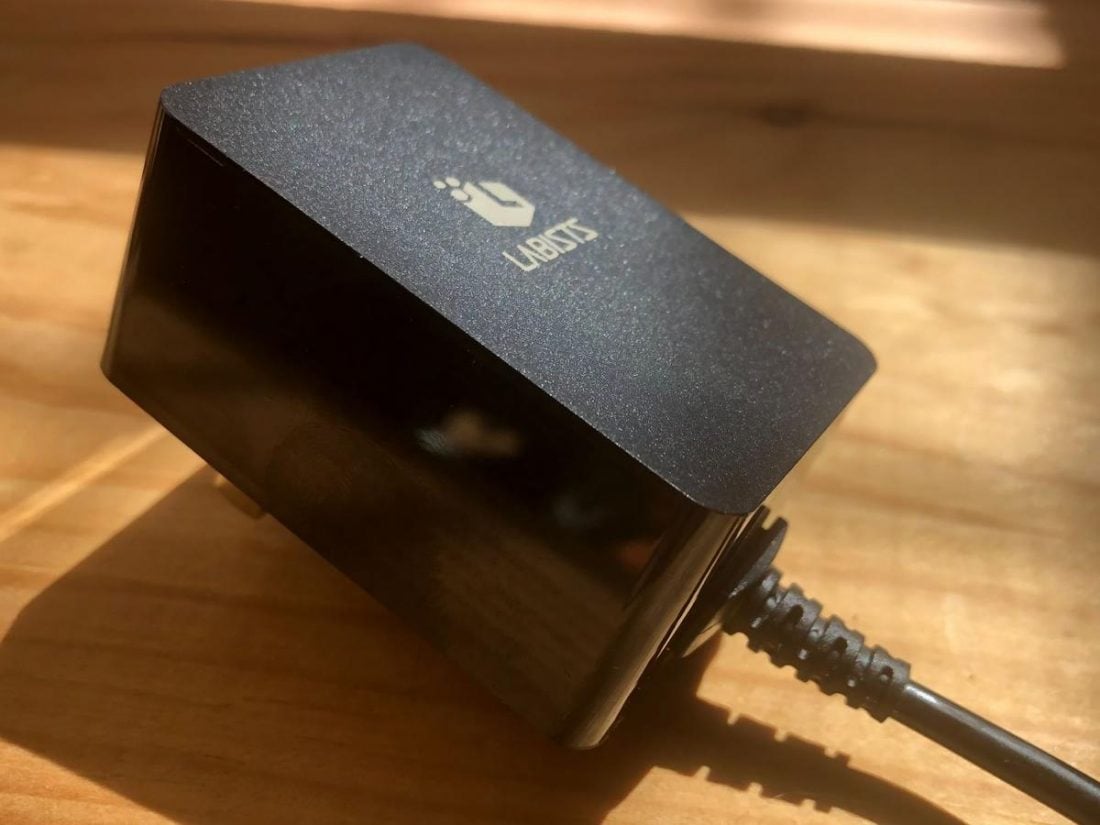
If you are basing your build on the Raspberry Pi 4B , you are free to use whatever sort of DAC you want. Already have an excellent external USB DAC? No problem! Just connect it via the USB port and have at it!
For my own project based on the Pi 3B+, I have been able to use a USB DAC with no real issues, but the model’s bandwidth limitations strongly suggest that the best way to go for maximum stability is a HAT DAC.
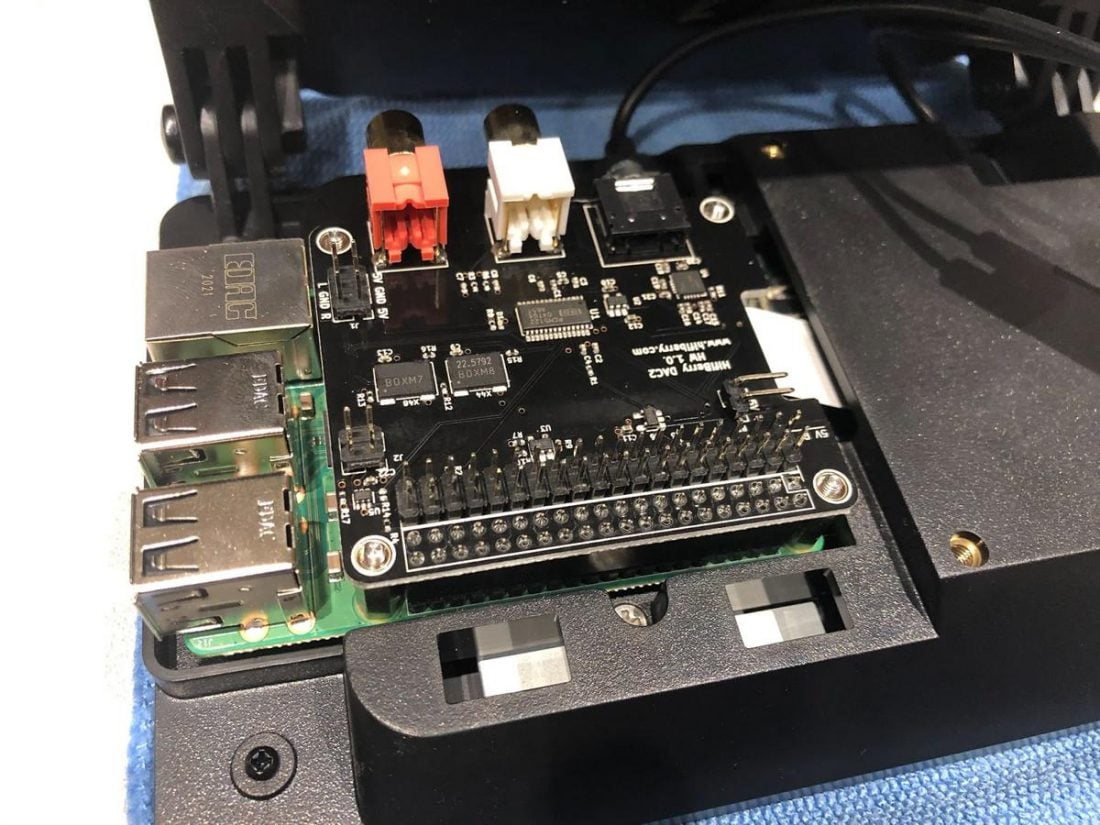
The Raspberry Pi connects to add-on extension boards via its 40-pin GPIO header interface. These add-on boards are called HATs (Hardware Attached on Top). I assume its name also is derived from the fact that the Pi wears the board much like a hat. As mentioned before, the GPIO interface’s use circumvents any bandwidth limitations of USB and can ensure maximum sound quality.
Luckily, there are lots of choices out there, with a variety of price points, chipsets, and supported formats.
HAT DAC options
| Pi DAC HAT | SNR (dB) | THD+N (dB) | Chipset | Maximum Format Support |
|---|---|---|---|---|
| <$50 | ||||
| AUDIOPHONICS DAC Sabre ES9023 | ? | ? | ESS Sabre ES9023 | 192kHz/24bit |
| IQAudio DAC Pro | 114 | -94 | Burr-Brown PCM5242 | 192kHz/24bit |
| HiFiBerry DAC2 Pro | 112 | -93 | Burr-Brown PCM5122 | 192kHz/24bit |
| JustBoom DAC HAT | 112 | -93 | Burr-Brown PCM5122 | 384kHz/32bit |
| $50-$100 | ||||
| Allo BOSS I2S DAC V1.2 | 112 | -93 | Burr-Brown PCM5122 | 384kHz/32bit |
| HiFiBerry DAC2 HD | 123 | -108 | Burr-Brown PCM1796 | 192kHz/24bit |
| $100-$150 | ||||
| SUPTRONICS ST4000 | 127 | -120 | ESS Sabre ES9018K2M | 384kHz/32bit |
| AUDIOPHONICS DAC I-Sabre ES9038Q2M | ? | -108 | ESS Sabre ES9038Q2M | 384kHz/32bit |
| >$150 | ||||
| PecanPi DAC XLR | 130 XLR / 124 RCA | -124 XLR / -110 RCA | Burr-Brown PCM1794A | 192kHz/24bit |
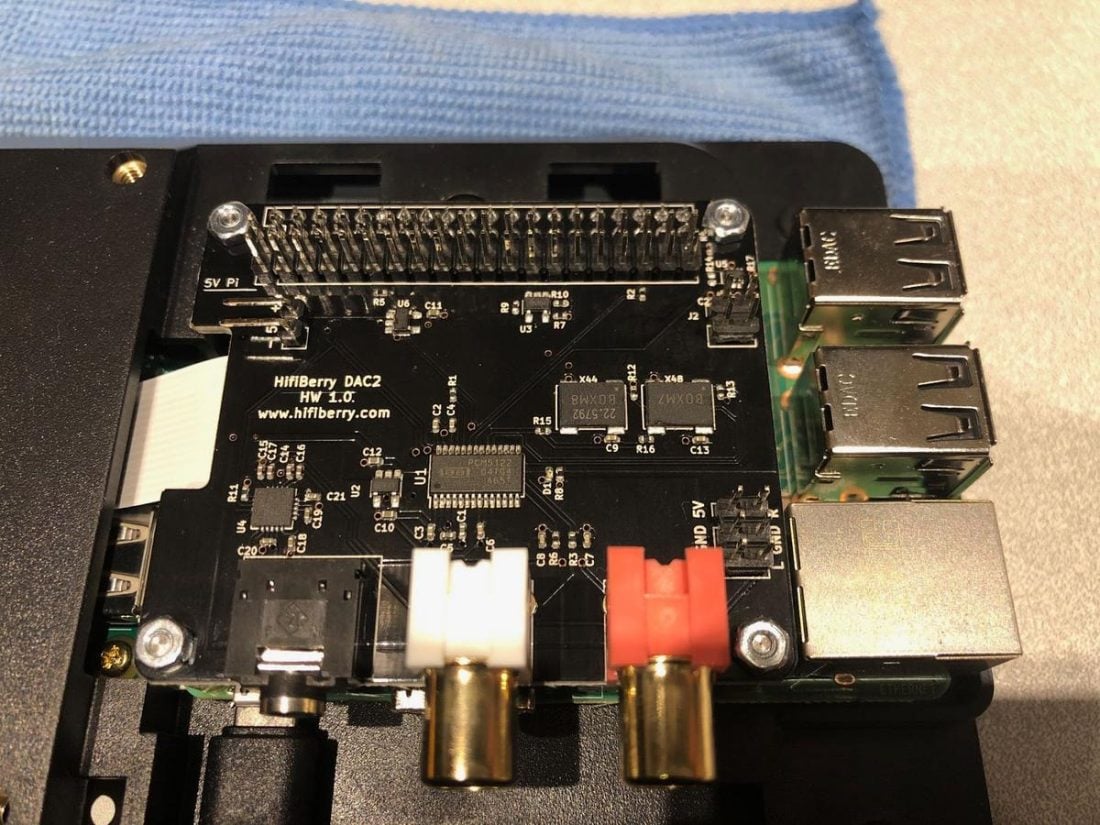
I decided on the popular and well-regarded HiFiBerry DAC2 Pro for my 3B+ build. Although within the lowest price point tier, I find the sound quality of this budget DAC HAT to be excellent.
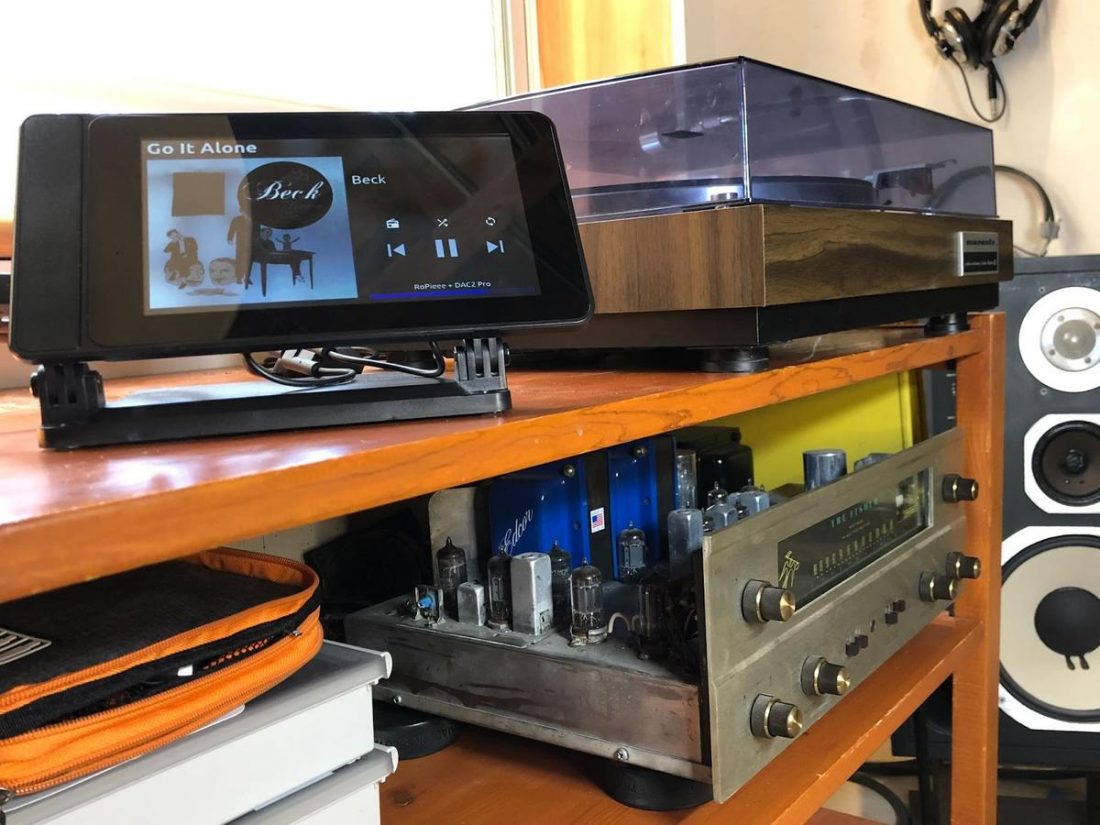
The main use of this network streamer is feeding a mid-‘60s era The Fisher 400 tube receiver powering late ‘70s JBL L96 speakers. Fun, but not the ultimate word in high fidelity, so a mid-performing DAC is more than capable enough of producing great sound on this system.
Let your budget and audiophile ears make the final decision for you.
Media Player Software
Now that you’ve assembled all the hardware for your Pi-based network streamer, it’s time to pick the software. No matter how great the hardware choices you made are, if the user interface is cumbersome and frustrating to use, you will not be happy with the device. Software choice is a crucial decision.
If you thought there were too many decisions to make for hardware, please keep in mind, the software choices are no less vast. Some are more lightweight and designed to be minimal and speedy. Others are designed for maximum compatibility and file format support, including both audio and video playback. Some are easier to set up and quick to get running, while others present seemingly unlimited options and configurations.
All the options are fairly mature, meaning that they are stable, have extensive documentation, and an active user community to turn to for help. There’s seriously not a bad decision to be made here from the list below, and it’s up to you to figure out what you want from your new device. Many of the software packages feature add-ons to increase functionality, and most support additional streaming services like Spotify, SoundCloud, etc.
Players are listed and linked below with a brief (non-complete) description of stand out features. The only way to know what you like is to try them!
Pi music streamer software options
- JustBoom Player – A music player designed to work with their own DAC HAT boards. If you aren’t buying a JustBoom DAC, there are better options.
- Moode Audio Player – A music player featuring a responsive adaptive user interface and support for a wide variety of audio devices. Includes 12-band parametric and 10-band graphic EQ, crossfeed for headphone listening, and support for Airplay, Spotify, Squeezelite, and RoonBridge.
- Mopidy – An easy-to-use, audiophile-focused, music server developed with Python. Extensions allow support for local playback, Spotify, SoundCloud, and Google Music. Control through a web interface on the same network.
- PiCorePlayer – (pCP) – A very small, but high-quality audio player via Squeezelite and Logitech Media Server (LMS), built on piCore Linux. It boots very quickly and runs entirely in RAM.
- PiMusicBox – A “Swiss Army Knife” media player (based on Mopidy) supporting local network-based music playback, AirPlay, and DLNA streaming, as well as support for online services such as Spotify, Google Music, SoundCloud, Webradio, and podcasts.
- RoPieee – A Roon Bridge that enables playing audio over a USB DAC and supports most well-known audio HATs. It can use the original 7″ Raspberry Pi touchscreen for display and control purposes. RoPieee also supports RF-based remote controls and has an elaborate update mechanism (saving you the hassle of manually downloading and reflashing the card to update the program).
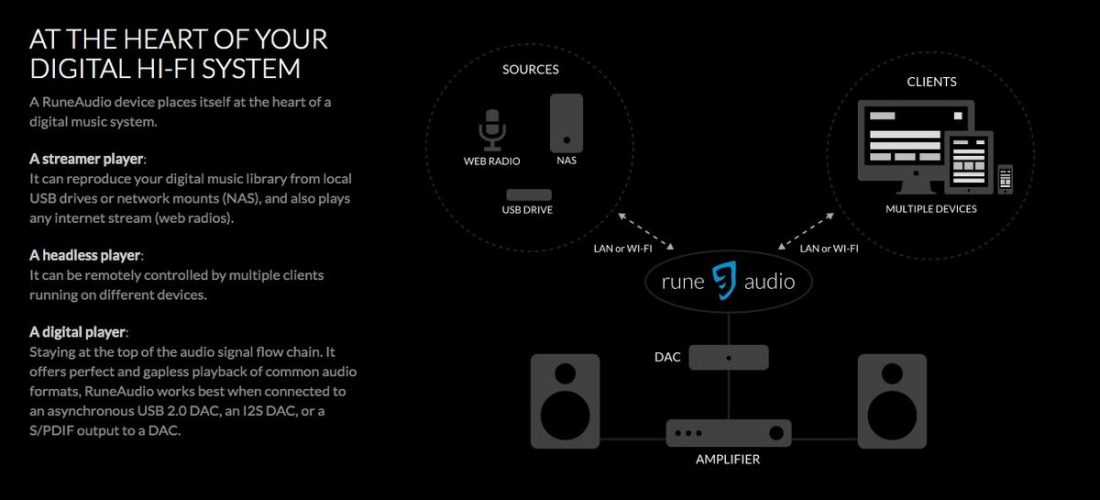
- RuneAudio – A free and open-source Linux OS, with only the features and functions necessary for high-quality music playback retained. Rune can be controlled by any device on the same local network as the Raspberry Pi via a web user interface.
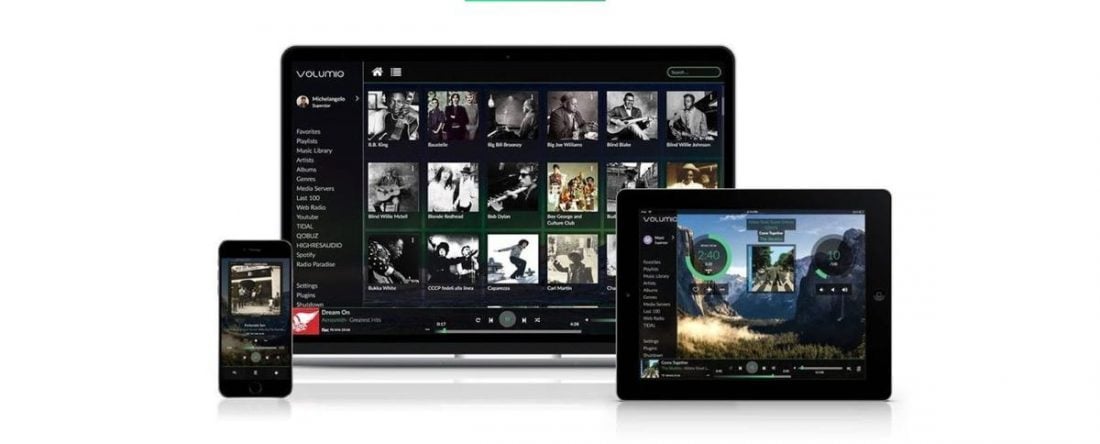
- Volumio – A music server for the Raspberry Pi dedicated to audiophiles based on the Raspbian Pi operating system. Volumio is easy to use, supports all types of files (mp3, FLAC, Alac, Aac, Vorbis, etc.), and works with most DAC HATs and the official Pi touchscreen. Available extensions allow compatibility with DLNA, AirPlay, and Spotify. A subscription-based premium service called “MyVolumio” allows for Tidal and Qobuz support as well.
For simplicity, I suggest you stick with a music player only software package. Don’t add video playback compatibility if you aren’t going to use it.
Pi music and video streamer software options
Many of the combo music and video streamer software packages are based on the excellent Kodi (formerly XBMC) program. Kodi is a fully-featured, free, and open-source media player software package. Kodi development has been around since the days of the original Xbox modification scene in the early 2000s, and has been ported to most imaginable devices.
If you are looking to simply create a dedicated music-only streamer, the Kodi options are likely overkill as they are designed to play back all popular media file formats including audio, video, and pictures.
Kodi variants
- LibreELEC – (Libre Embedded Linux Entertainment Center) – A non-profit fork of OpenELEC for Kodi. More stable and faster feeling than Open ELEC.
- OpenELEC – (Open Embedded Linux Entertainment Center) – A small Linux-based Just Enough Operating System (JeOS) built from scratch as a platform to turn the Pi into a Kodi media center. It offers add-ons to Kodi which allows access to more platforms and content and is faster and lighter weight than Kodi.
- OSMC – An operating system (based on Debian) built around Kodi but with a more modern, lightweight, and optimized skin than OpenELEC which makes it faster, easier to configure, and more customizable.
- Xbian – A very small, fast and lightweight Kodi version for the Raspberry Pi, based on Raspbian.
Emby and Plex, while not currently based on Kodi, are similar enough that I’ll include them here. Early versions of Plex were a Kodi/XBMC variant.
- Emby – (formerly “Media Browser”) – A client-server media player very similar to Plex. Plex is easier to use while Emby is more customizable and flexible.
- Plex – A client-server based media player system that requires a Media Server computer and separate Client devices on the network to playback media.
Installing the software
Volumio is likely the best (and most common) solution for a Pi-based network streamer. It offers an efficient and highly intuitive web control interface and is ideal for getting started. Newbies should start here!
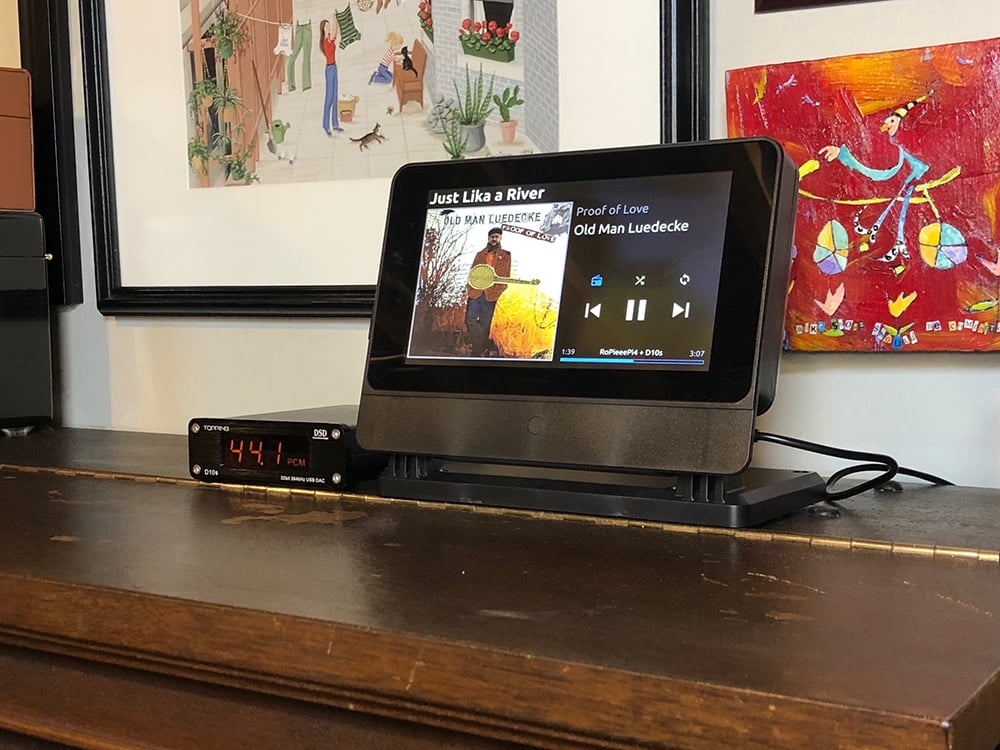
Since I’ve recently become a dedicated Roon user, I ended up settling on the more fully-featured XL version of RoPieee for my Pi network streamer after trying the other options. In addition to Roon, the XL version supports DLNA, Airplay, and Spotify technology to stream audio.
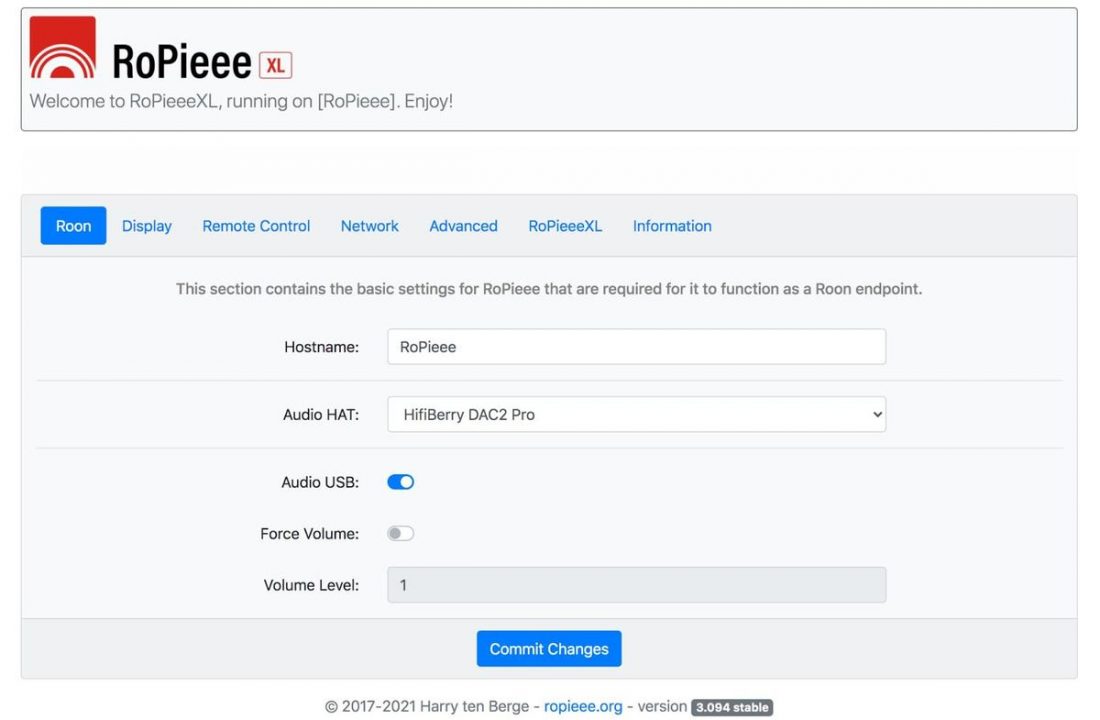
RoPieee’s motto is “it’s not an OS, but an appliance.” This commitment to simplicity appeals to me. I just want a device to work and not require constant fiddling around with. Configuration (if necessary at all) is done from RoPieee’s web interface from any device on the network.
Frankly, RoPieee is not the prettiest option for the touchscreen. Volumio’s fonts and layout are more attractive, but far more complicated. Certainly, Roon itself is much more aesthetically appealing. But, it’s a tradeoff I’m willing to make.
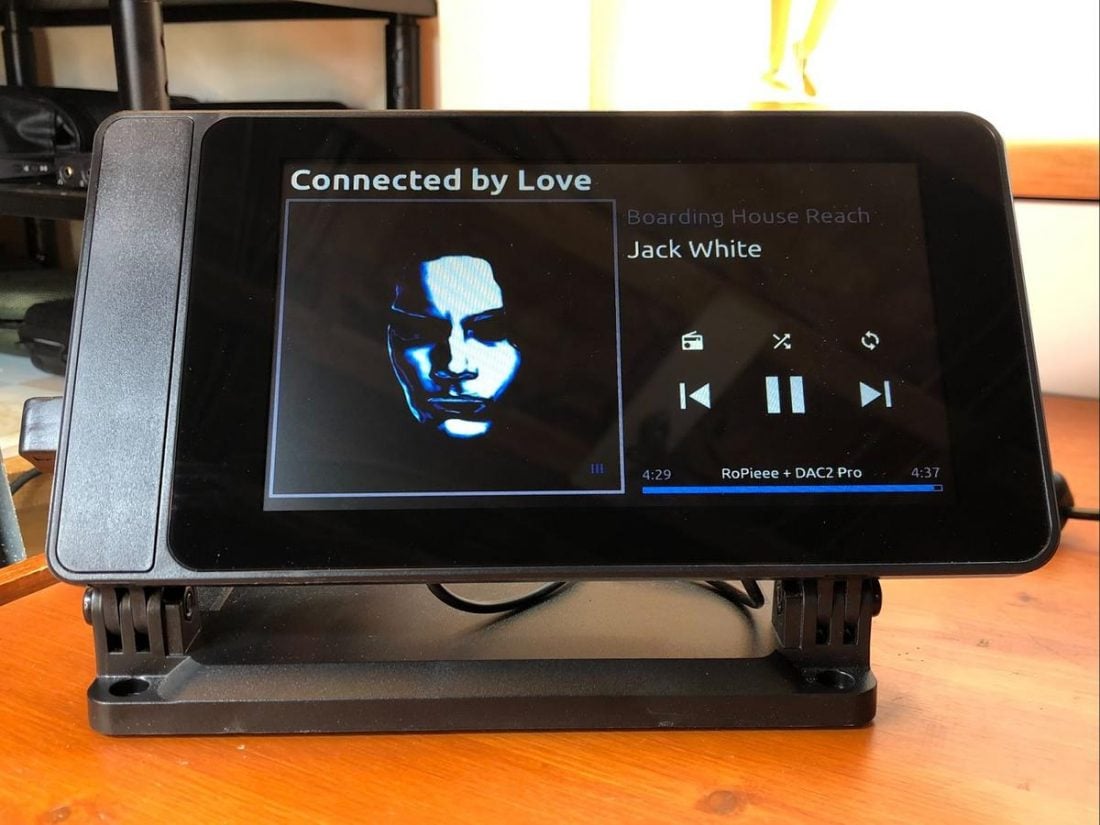
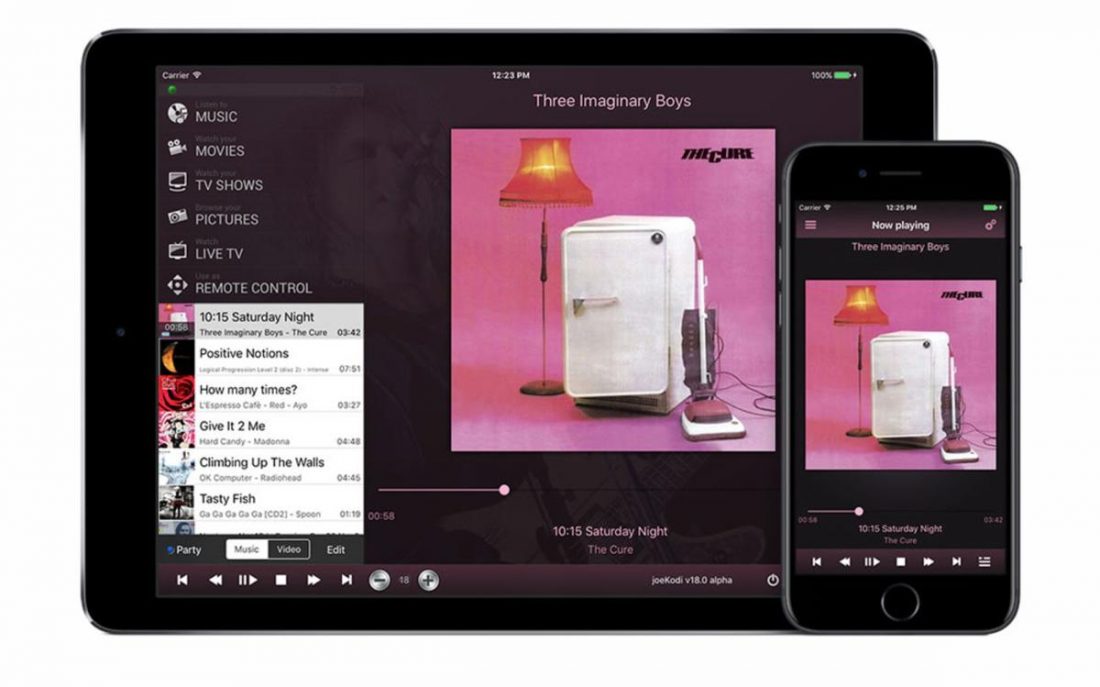
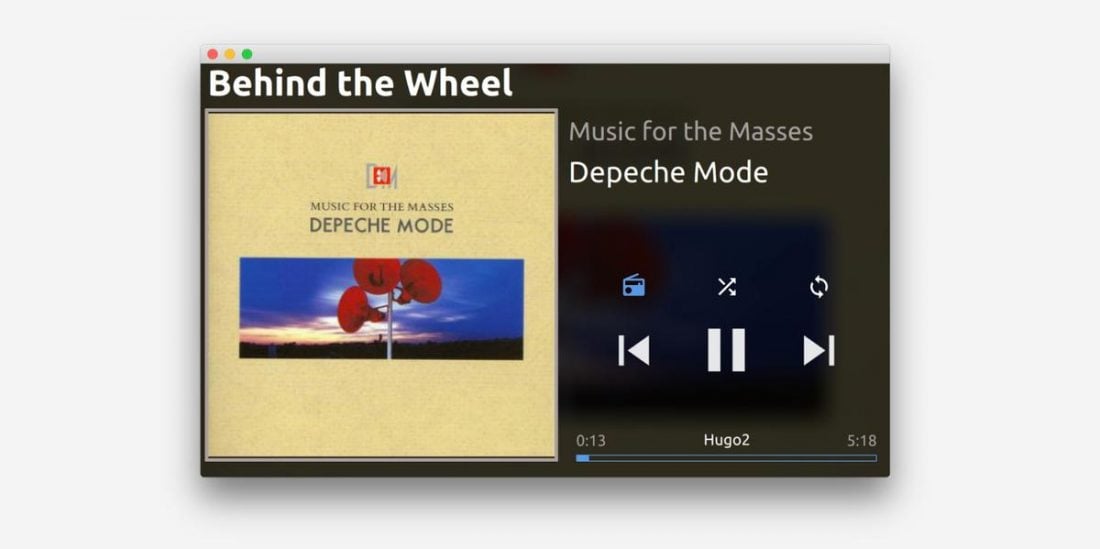
The left half of the Ropieee screen displays album art, while the right side has basic play/pause, previous, next, repeat, random, and volume controls. When no music is playing, RoPieee can default to displaying a digital clock. Simple and useful.
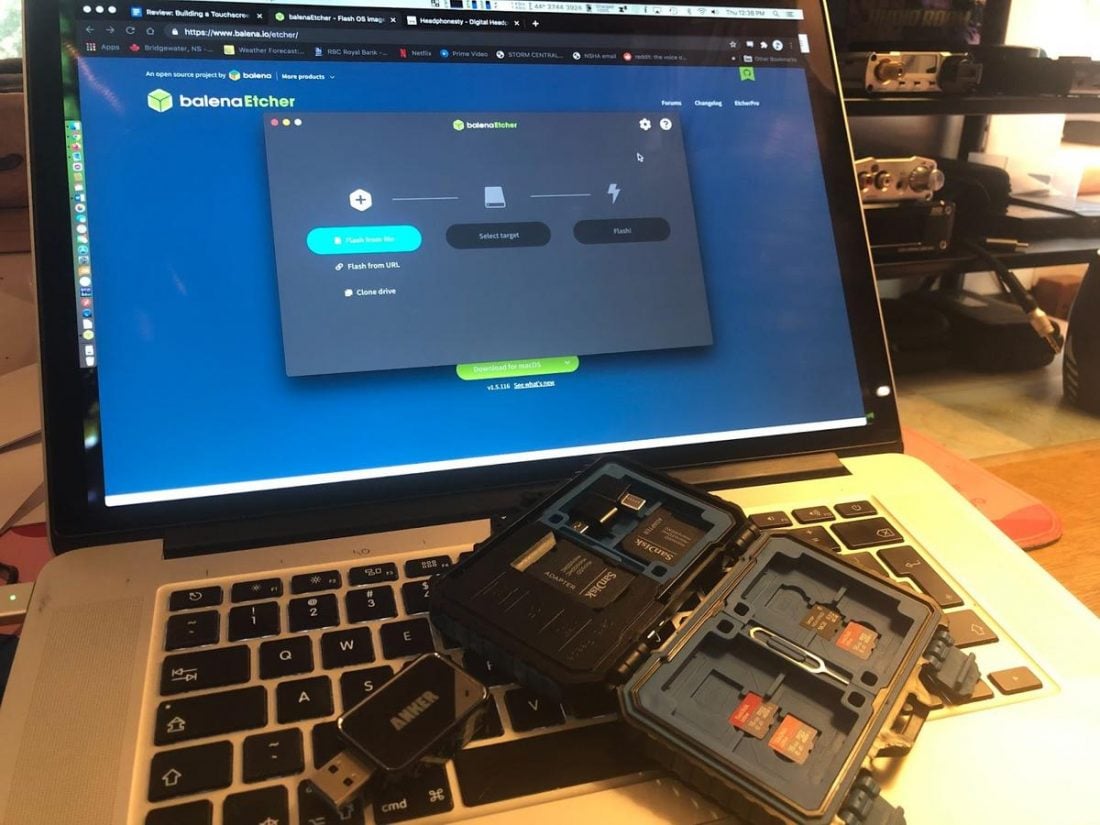
How to install software onto the Pi
- Download a Pi software image to your computer.
- Download an installation tool such as Balena Etcher to your computer.
- Insert a blank MicroSD card into your computer. You may need a USB reader.
- Use Etcher to create a bootable SD card for your Pi from the software image you downloaded in step 1.
- Unplug the Pi from power.
- Install the MicroSD card into the Pi.
- Attach Ethernet cable to the Pi.
- Attach power to the Pi. Note that the first boot is typically the longest.
- Follow individual instructions for setting up the music streamer software.
Most software packages will require you to do a few extra configuration steps once installed. The software will guide you through the steps to enable the DAC as an output, connect to your network, and install optional add ons for extra streaming service support. This is where the startup guides provided by the software itself are invaluable. Every one is a bit different, but there’s tons of help available if you get stuck.
Just remember, there’s nothing to worry about. You can’t hurt anything! If all else fails, flash the memory card again and start over, or try a different software package. Take your time, have fun, and soon enough you’ll have the music streamer of your dreams!
Conclusion
My first network music streamer consists of:
- Pi 3B+
- Official 7” touchscreen
- SmartiPi Touch 2 case
- HiFiBerry DAC 2 Pro HAT
- RoPieee XL software
It’s great! It works flawlessly and sounds fantastic. It does all that I want it to, and for a cost under $250 USD.

That being said, for my second build, I skipped the DAC HAT, and for about the same overall price, upgraded to the Pi 4B, Touch Pro case, and used an external USB DAC (that I already had on hand and is not factored into the build price).
If you are just looking for analog RCA outputs, the Topping D10s is a great affordable DAC choice. Or, the xDuoo XD05 Plus offers analog outputs for an external amplifier or amplified speakers, and a terrific integrated headphone amp. The sky’s the limit for DAC choices with a build based on the Pi 4B!
And that’s the thing about building your own network streamer. The more you know about all the options upfront, the better your decision-making will be when purchasing. You are in charge, so it’s up to you to build the best device to fit your needs!
Thank you SO MUCH for this guide! I’ve been considering building an RPi for Volumio for a few months, but every time I’ve researched, the options are just endless and there were no easy to follow guides that I could find.
What problem did you have with the Helm Bolt? Did you get it working? John Darko posted a video today about Tidal Connect on the RPi and he showed it connected with a Bolt.
I just couldn’t get Volumio to recognize the Bolt. I don’t know how Darko did it! 🙂
I know Helm says to make sure you have your speakers or headphones plugged in to the Bolt before connecting the USB end… I wonder if that would apply here, as well? I think that allows the Bolt to set the correct impedance.
Maybe! It was connected to my ’60s The Fisher 400 tube receiver via a 3.5-RCA cable, so not a typical loan for the Bolt. That may well have been the issue, although I haven’t run into it with any other DAC. YMMV.
This is an excellent article. Thank you.
Cheers! Appreciated!
Thank you for this! I’ve been wanting to build a dedicated streamer, which I know is possible but haven’t had great luck trying to figure out exactly how to do it. This was exactly what I needed!
I’m really glad it was helpful. I tried to summarize my learnings along the way.
Great article. You’ve insured me to build a streamer with a screen.
I have a headless RPi 4 w/ a Hifiberry Digi+ Pro HAY running MoOde. I primarily use it to stream Qobuz via UpNP. I feed it to the DAC on my integrated amp via COAX. It’s reliable and sounds great.
Awesome! Sounds like a great setup!
Great article I was looking after in the last couple of week in my search for a RPi streamer to my DAC.
Unfortunately RPi stocks seem very scarce these days. Hopefully you found one at a reasonable price!
Hey
Thanks for this great guide. There is just one point is not clear to me. Does 3A USB-C Supply enough to power pi+dac+screen or should we use another power supply?
Thanks! Yes, yes it does. Just one power supply is required.
Hi, I thanks in thought this article was excellent especially for a complete novice like me. I’d like to try and do this with my 16 year old son but have a couple of questions please.
1. How do I connect rca or line out jack from internal hat da. to case.
2. Can I swap from say lineout to Bluetooth seamlessly using software such as Voluminio or does it involve always changing settings?
Thanks, really looking forward to having a go at this.
Hi. Sorry for the late reply!
The HAT DAC outputs will either be accessible, or you will need to run cables to them (perhaps extension cables) through a hole in the case (depending on case design).
I’m not sure which software packages support Bluetooth output (most allow input), so it may not be easy to swap back and forth.
First allow me to reiterate, THANKS SO MUCH for this marvelous guide.
I plan on pretty much going w/your Build 2 here (the 4B-based build) as I’ve got a couple of excellent outboard DACs already.
My question is: I’ve also got an NAS that I’m about to put together (based on a used Synology DS 409 I picked up) and that I hope to connect.
Any suggestions about what I can do w/the R-Pi build that will improve or ease my chances of seamless NAS integration?
Also, I’m not happy about what I’ve heard about ANY of the software streamer choices; I guess I’ll have to go w/Volumio (which I’ve heard very mixed things about). Roon would be nice, but that’s just another multi-hundred dollar expense I can’t justify. Somebody should create a regularly updated wiki for the current state of Streamer Software :>
No, really. :>
Again–thanks so much. Hope to hear some feedback from you–or from anyone else who has gone through the R-Pi + NAS (preferably Synology NAS) experience.
Cheers!
Alex, not sure if you ever got this answered or not. I run the same configuration, I have Volumio running on a Pi, connected to a Topping D50s. This setup connects to my 16TB Seagate ReadyNAS. Volumio controls everything so you should not have any problems getting your Synology integrated into the mix.
Thake care,
Ben
Not to diminish anyone’s decision but if you want a first class music management system and specifically ui display, Roon, even though it sounds expensive, provides a very good platform to build your streamer on. Build a performant Fanless Roon nuc with a Roon license and rip the Roon fruit of labor without having to revisit the music server build ever again. Then use pi based endpoints for an economical solution to provide multi-room Roon access points. At least building your own Roon Music Server will reach its cost point and be cheaper than the Roon offering out there. I like Trav suggestions for Roon based software for the pi specifically RoPieee XL software solution.
I’m with you Jon!
While I’d love to find a free software package that rivals Roon, I simply haven’t. Check out my Introduction to Roon article if anyone is wondering what makes a subscription player worth paying for.
IMHO Logitech Media Server plus max2play or picoreplayer are superb.
I have picoreplayer and the same 7 inch screen in one room and max2play with a 5″ hdmi touchscreen in another. I also have about 6 logitech hardware squeeze play devices. Fantastic system.
Thanks for the input! I haven’t tried the Logitech MS options. I really do need to get around to checking them out first hand.
Instead of the touch screen, can you use a web interface to control the Audio Server?
It depends on the software you want to use, many can be used ‘headless’. I suggest checking on the software developer’s website to confirm functionality.
In any LMS based solution* you can use a web browser or you can use a number of android or iphone apps.
* eg picoreplayer, anything that runs squeezelite.
Hi,
Thanks for this. I’m going to give it a go. My first question is – if I have a DAC in my amp (Marantz PM6006) and or CD player (Marantz CD6007), do I need a DAC when building the streamer?
Thanks!
Hi. Yes. You need a way to connect the Pi, either digitally to a DAC, or via analog cables to the RCA inputs of your amplifier. The Pi only offers a basic headphone output, or USB ports to connect to a non-HAT device. So unless your Marantz amplifier can accept a USB input, you still need a DAC between the Pi and the amp.
Amazing. I’ve been struggling for days at end to push DSD256 to my T+A MP 3100 HV from a USB stick. With a Pi4B and Volumio, it works like a charm. Thanks!
That’s great to hear! Cheers!
You encourage me to try this. I have been thinking of getting a streamer for my system to move away from using PC and external DAC. I am gonna try this path. Thanks for the clear and simple explanation
You are welcome, and thanks for the kind words! The process is fairly straightforward and you should be able to replicate it with ease. The only negative these days is the scarcity of Raspberry Pi units and the resulting price increase. I’m currently using the Pi as a Plex endpoint.
Hi, thanks for this guide, it makes all really clear. I’m interested in building a streamer. Nowadays I have all my music in a PC with a Plex library. Could you explain how to use Plex with the Raspberry Pi unit?
cannot get the pi4b to work with the touchscreen with the dsi cables??? any hints
Unfortunately no, it all just worked for me.
First of all, thank you for that insightful and easy to understand guide. I just came across this in my research on making a Raspberry Pi as a Roon endpoint. The only question that I couldn’t seem to find the answer to, is can you use all the available features of Roon on the devices touchscreen, or do I have to use my phone or a separate tablet for that? I only photos I saw were of individual songs.
You are very welcome. In order to use all the Roon features, you have to control it through the phone app. The touchscreen has limited functionality.
I’ve put your version 2 together however I have an issue. The touchscreen is displaying text only (eg, volumio@volumio:~$
I can’t get the “pretty” Volumio “skin”?
What have I missed?
Ugh, it’s been too long since I’ve played in the weeds with volumio to know where to start. The best bet is to try the official forum for support: https://community.volumio.com/
Thanks for this guide! I’m strongly considering upgrading my DAC to one that supports an onboard RPi (Okto Dac8 stereo). In the meantime, why not pick up a 4B and get it streaming to my current DAC rather than relying on my tablet?
Anyway, I wanted to highly recommend Minim Server for Synology NAS-based music storage & playback. It handles every format I play including any PCM and DSF files at higher sampling rates. It’s lightweight and simple to set up and am guessing it’ll work well with Volumio, etc.
Thanks for the recommendation! That Okto DAC8 is really interesting! I’ve not seen it before.
Why does one need to have a DAC? My Amp has a HDMI input and according to me that eliminates the need for a DAC in my build? Am I right?
I would like to build a headless Raspberry pi 4 as streamer for my Wavelength Consecant USB DAC, my question is will the pi4 run on wifi without wifi dongle.