
The hardware and software you need to make meaningful measurements of your IEM and chart its frequency response graph.
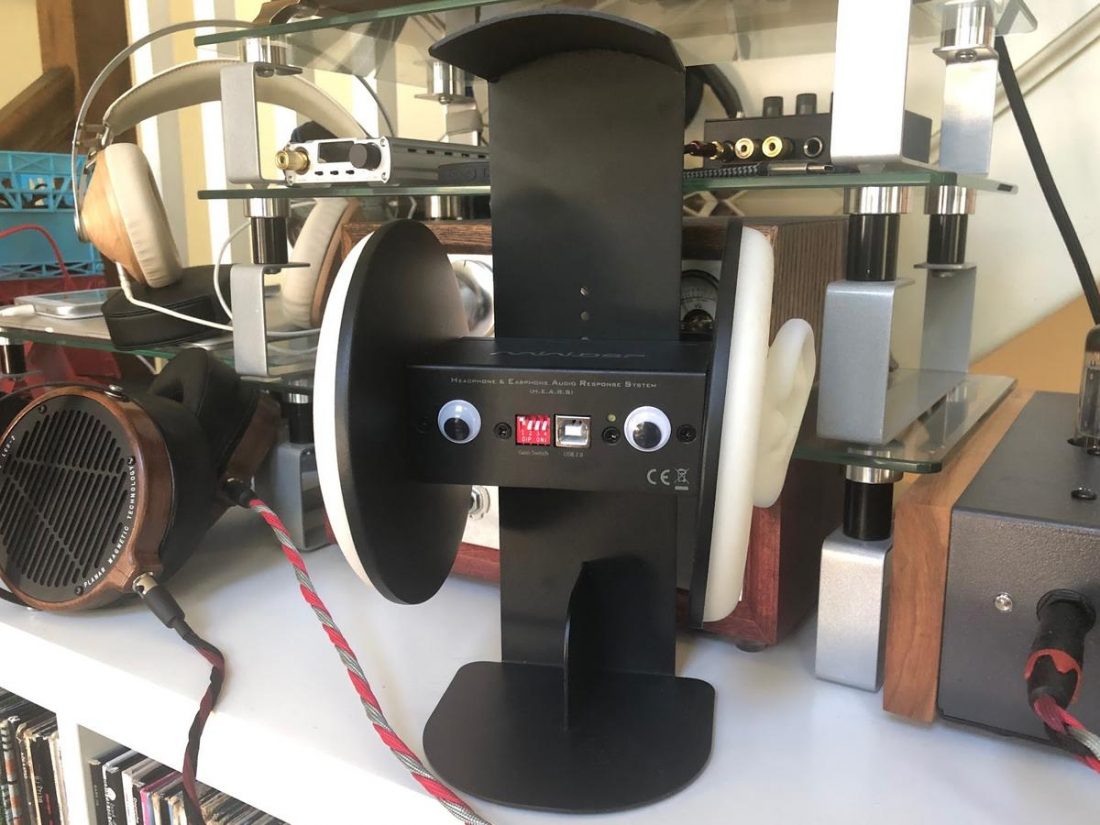
Armed with the combination of a limited budget and realistic expectations, we purchased a miniDSP EARS headphone test fixture to standardize our headphone frequency response measurements.
After trying it out, I created a couple of articles about the EARS to share my experiences in using the device. First, I look at what the EARS is, what it can do, and the inherent limitations in using the EARS for measurements. The second article is a step-by-step guide on how to measure headphones using the EARS.
“The EARS is a testing rig that uses microphones fitted in simulated ears to record data via a computer connection. Test tones are played through a pair of headphones fitted on the device.
The EARS comes pre-assembled as a unit consisting of a pair of molded silicone ears with embedded microphones, a rectangular USB interface box holding the ear plates, and a stamped steel stand. The stand is rounded on top to approximate the top of a human head and to hold the headphone band.
The USB interface box connects to a computer with a standard USB A-B printer cable and no driver is needed for use in Windows, Linux, or Apple OS. The USB interface powers the EARS and captures the input from the microphones.
The EARS is one of several commercial headphone measurement rigs on the market. It holds the distinction of being the most affordable (by a LARGE margin).” – An introduction to miniDSP EARS.
The original intent was to use the EARS to measure both full-sized headphones and IEMs. Unfortunately, while the EARS works just fine with full-sized headphones, some serious limitations were discovered when attempting to use it with IEMs.
The shape and size of the ear canal in the EARS is short, cylindrical, and simply not natural. This limits the range of insertion depths and does not simulate the acoustic effects of the shape of the ear. It soon became apparent that there has to be something more suitable.
Occluded-Ear Simulators
Ear simulators are standardized devices traditionally used for the calibration of earphones. To better mimic natural ear responses, ear simulators replicate the occlusion effect. This effect occurs when an ear canal is filled by a foreign object. This causes the person to hear a hollow or booming sound when speaking or listening.
The strange sound is due to the sound traveling via bone conduction to the cochlea. Acoustic pressure is increased in the occluded ear canal at low frequencies due to the vibration of the ear canal wall.
The lack of an occluded-ear simulator in the miniDSP EARS creates results that are quite different from measurements made with industry-standard rigs and creates non standard peaks due to canal response.
We have to remember that the most important factor in making headphone measurements is consistency.
We must be able to repeat and trust in the measurements we make. The tools and the processes that we follow to make the measurements must be consistent. This is the only way we can compare measurements.
We would be better off making measurements with an industry-standard occluded ear simulator device. Unfortunately, the standardized devices from a company like GRAS Sound and Vision are too expensive for the average consumer (like me).
This led me to take a look at what tools are being used to create the most respected online IEM measurement databases.
In-Ear Fidelity’s Measurement Tools
The search for an accepted standard basically started and ended with the extensive (approximately 800 IEMs at the time of writing) measurement database on In-Ear Fidelity. I reached out to Corin Ako (or Crinacle as he’s known online) and he was kind enough to answer my questions and point me in the right direction as to what gear he was using to create his database.
It turns out that with enough support, Crinacle was recently able to update his hardware closer to a (much more expensive) industry standard. “…I’ll be shifting to a GRAS KB5000/5001 setup with my existing IEC60318-4 coupler for headphone measurements, so basically a GRAS 43AG-4 but with a little extra DIY to fit my portability needs.”
From In-Ear Fidelity’s September 3 post, the new hardware consists of:
“Laptop PC > Room EQ Wizard > Motu M2 audio interface > B&K 1704-C-102 CCP signal conditioner (USB bus power) > GRAS RA0402 pre-polarised “high resolution” IEC603318-4 coupler > GRAS KB5000/KB5001 artificial pinna (right and left respectively) …
…the IEM database will continue to use my existing 711 coupler. Certainly not ideal given that it’s still slightly off from a GRAS RA0402 (though still well within IEC 60318-4 specifications), but the database is basically its own standard these days given the sheer volume of entries anyways. As such, continuing with the old coupler makes more sense to maintain precision, repeatability and comparability…”

Since this new level of hardware represents a significant financial commitment (the crowdfunding target was $9000 USD!), I decided that replicating In-Ear Fidelity’s previous setup, the one that produced the bulk of the measurements, would be ‘good enough’ for my measurement purposes.
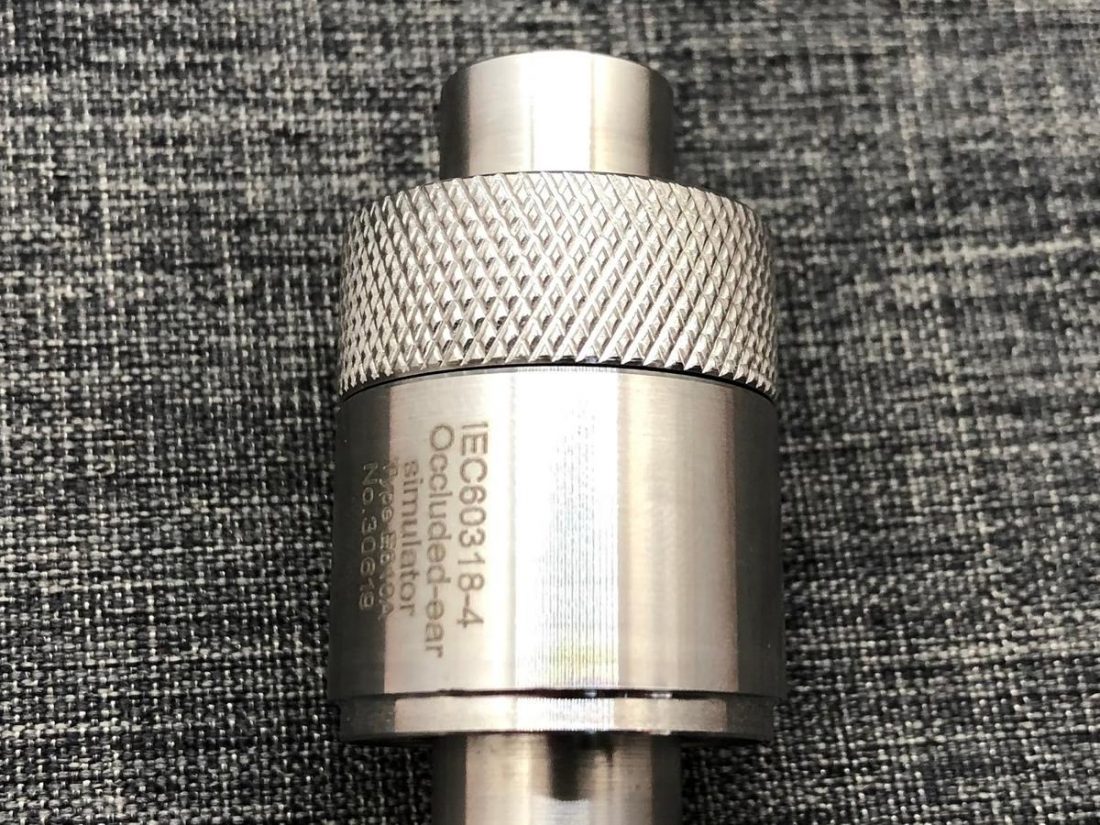
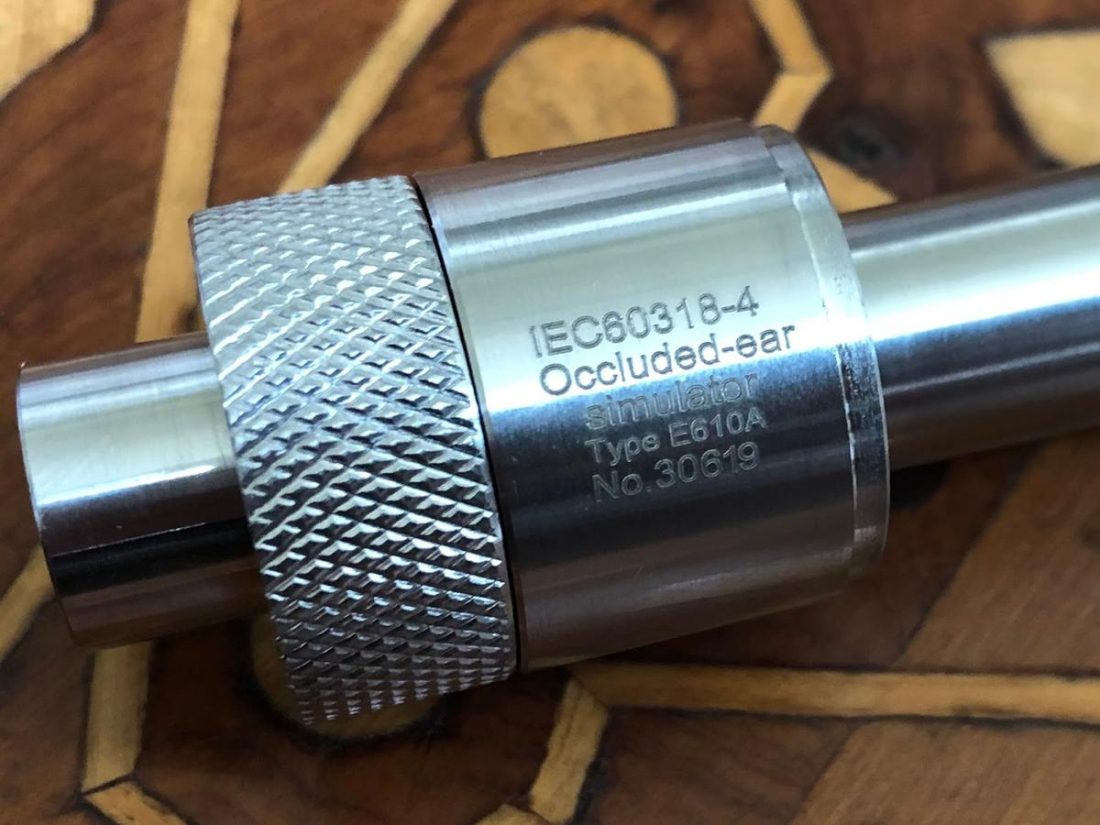
IEC 60318-4
Specifically, IEC 60318-4 defines “Electroacoustics – Simulators of human head and ear – Part 4: Occluded-ear simulator for the measurement of earphones coupled to the ear by means of ear inserts.”
It describes an occluded-ear simulator intended for the measurement of inserted earphones in the frequency range from 100 Hz to 10 kHz. It is also suitable as the basis for an extension intended to simulate the complete ear canal and the outer ear by simulating the acoustic transfer impedance for the occluded normal adult human ear.
There are several limitations for devices designed to meet this standard that should be understood by anyone performing or interpreting measurements.
- Large performance variations among individual ears will occur which should be considered when using the ear simulator.
- It does not simulate the leakage between an earmould and a human ear canal.
- The results may deviate from the performance of an inserted earphone in a real ear, especially at low frequencies.
- Below 100 Hz, the device has not been verified to simulate a human ear but can be used as an acoustic coupler at additional frequencies down to 20 Hz.
- Above 10 kHz the device does not simulate a human ear but can be used as an acoustic coupler at additional frequencies up to 16 kHz.
As with everything, it’s best to approach things with eyes wide open, and understand the limitations when interpreting results.
Hardware Requirements
To create IEM measurements, the following hardware is required:
- Occluded-ear simulator coupler (IEC 60318-4 compliant) (Buy)
- 3.5mm headphone/microphone splitter cable adapter (Buy)
- Apple lightning to 3.5mm headphone adapter (Buy)
- iOS device
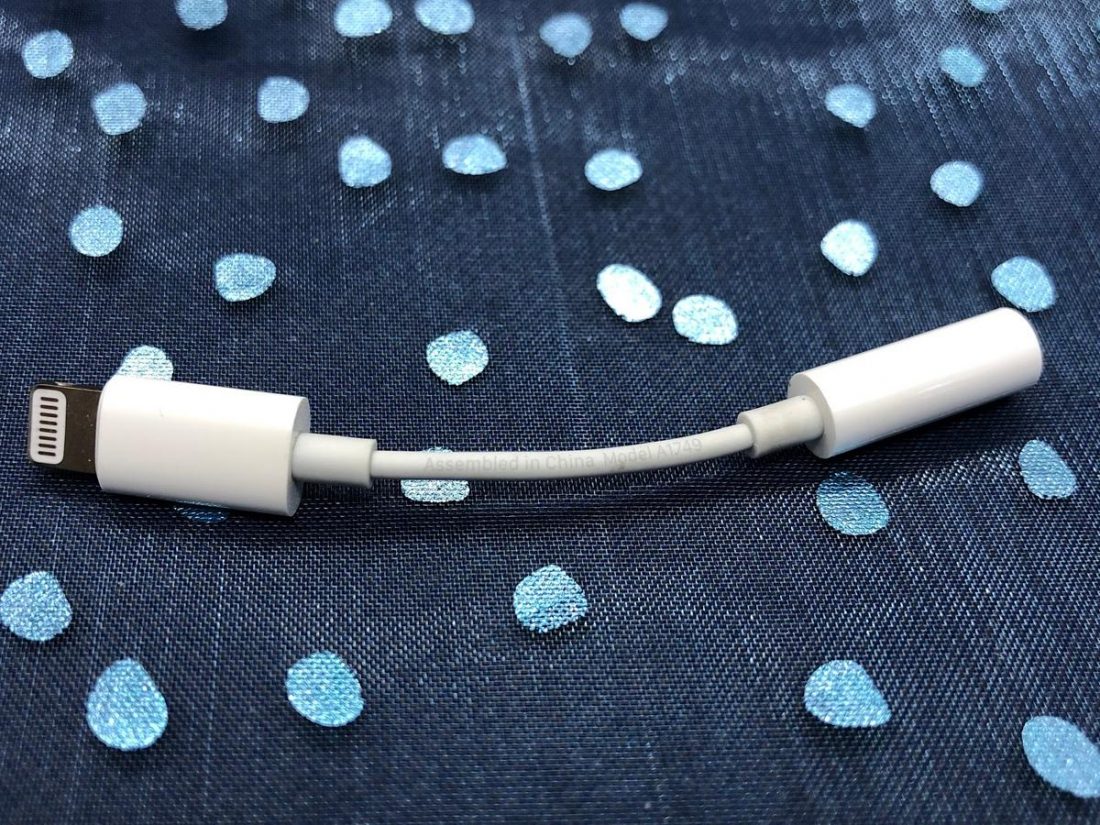
Believe it or not, that’s it. Assuming you already have an iPhone or iPad and the Apple headphone adapter, there are only two additional hardware items to purchase. A headphone/microphone splitter cable adapter is inexpensively and easily sourced from Amazon. Here’s the one I purchased.

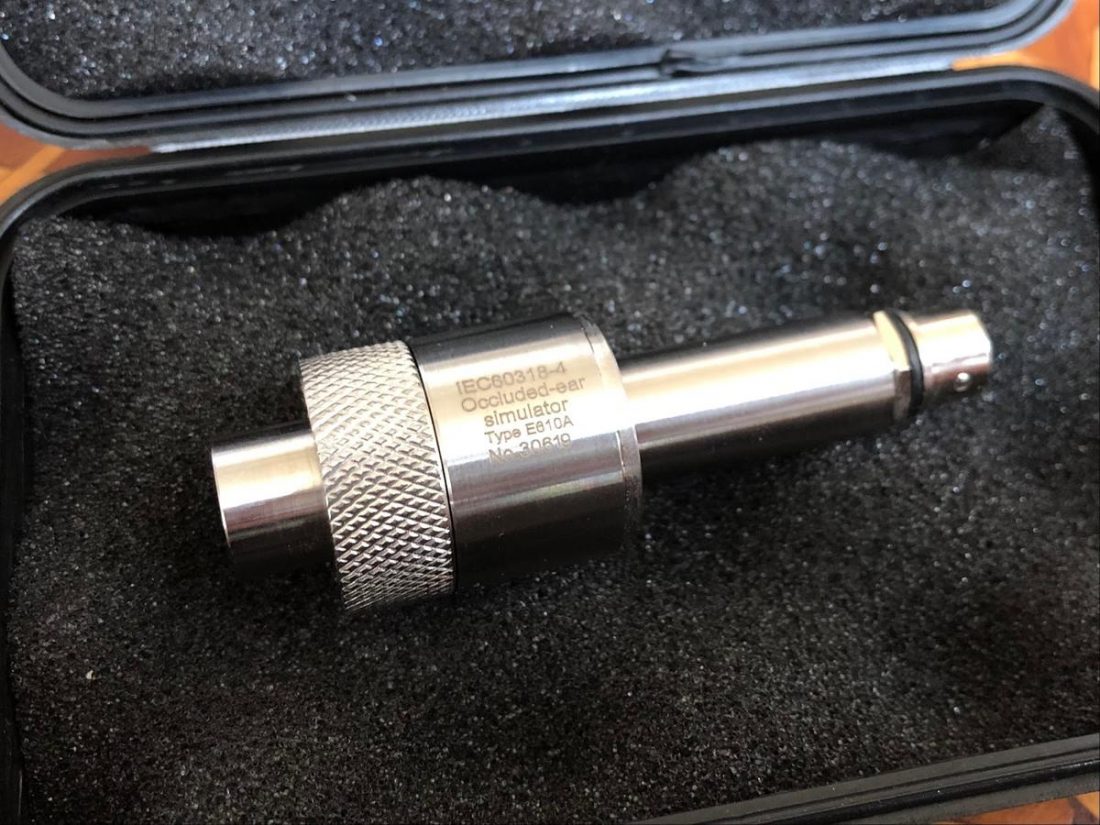
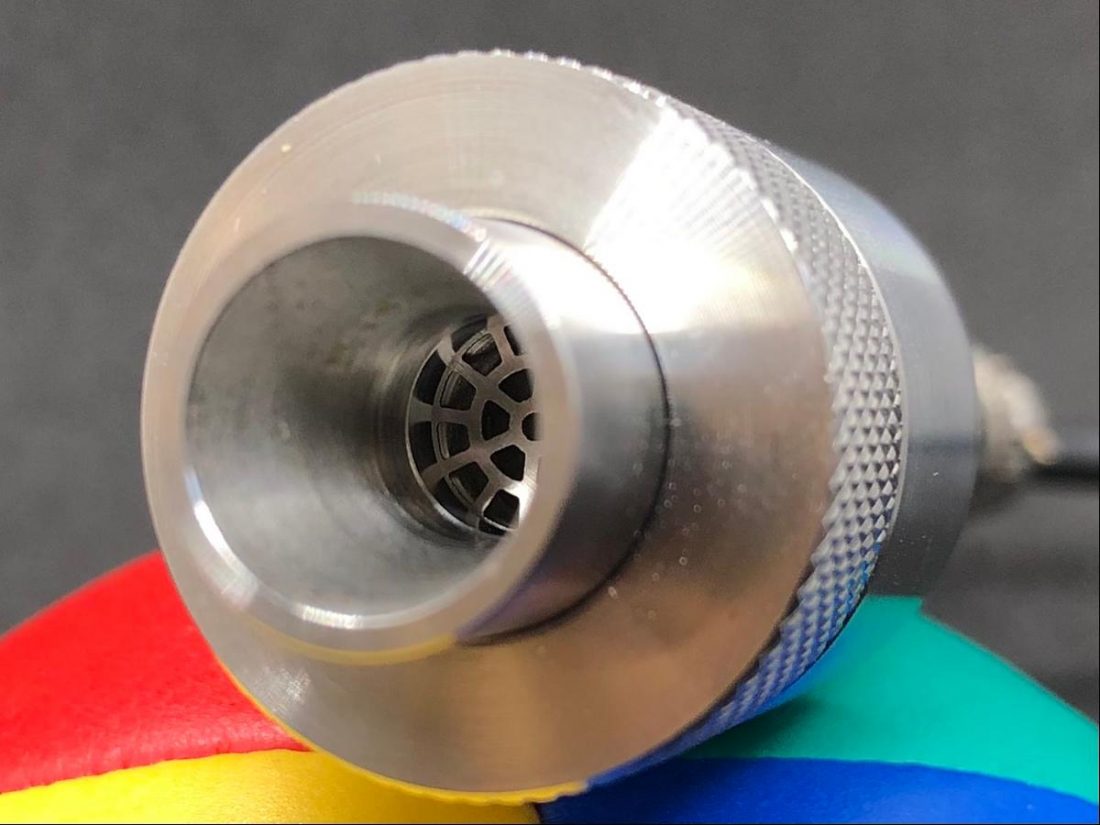
The challenge lies in purchasing the appropriate occluded-ear simulator (I’m going to refer to it as ‘OES’ for the purposes of this article). This IEC 60318-4 compliant inner ear simulator is currently only available from Taobao, a Chinese online shopping website, owned by Alibaba. Taobao is the world’s biggest e-commerce website; however, it is not in English or designed for a North American market.
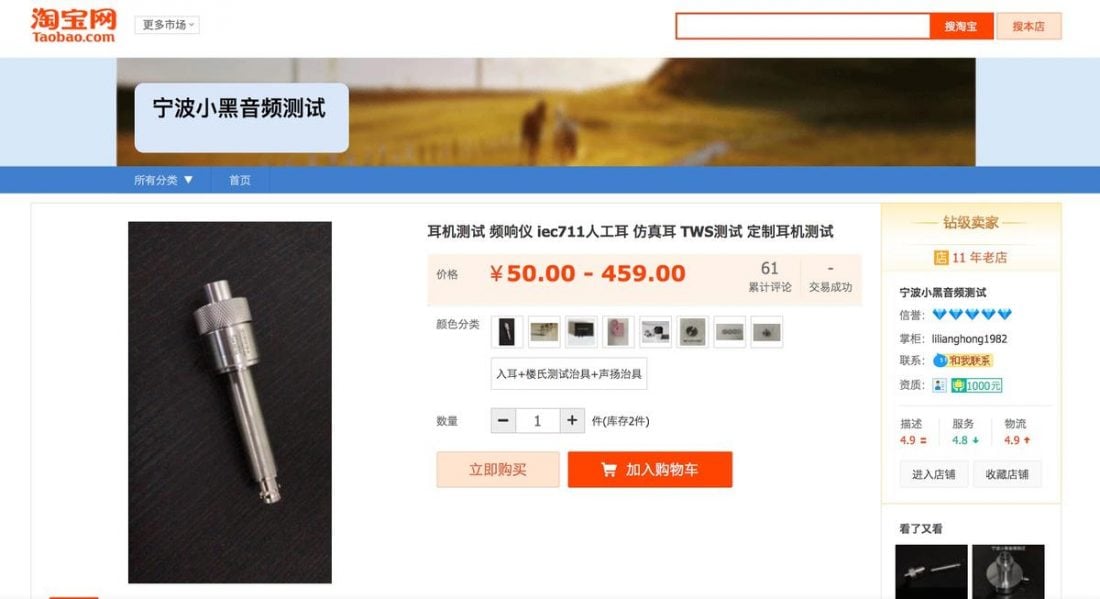
How to purchase from Taobao
To purchase from Taobao, you will require a third-party shopping, warehousing, and shipping agent. Superbuy worked well for me as I muddled through the purchase steps for the first time. You’ll end up purchasing the product through Superbuy’s website, and they buy it from Taobao on your behalf, and then package and send the item to you.
Superbuy offers additional packaging and wrapping services before shipping, which I did ‘just in case’. The parcel that arrived was so securely packaged it took about a half-hour with scissors and knives to finally liberate the OES, which ended up being securely packaged in its own foam-lined hard plastic case.
The entire ordering process felt a bit baffling and like a leap of faith, but in the end, it all went perfectly smoothly and the device arrived safe and sound.
Software Requirements
“Software-wise, I am using periodic noise averaging or sine sweep peak holding on iOS AudioTools (not to be confused with AudioTool on Android, which is a vastly inferior FFT program) purely for portability reasons. On my desktop, I use Room EQ Wizard with the occasional dabble in ARTA depending on what functions I require.” – Crinacle in a personal email exchange
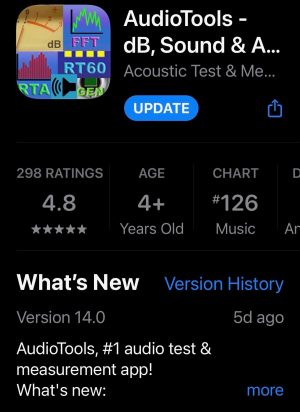
I purchased AudioTools for iOS from the App Store. It appears to be quite full-featured and does many things that I will likely never use. But, as they say, it is the right tool for the job.
Costs
- Occluded ear simulator (OES): $71.57 USD
- Shipping (to Canada): $32.02 USD
- DHL Import Charges: $23.57 USD
- Headphone/microphone splitter: $11.02 USD
- iOS AudioTools software: $20.60 USD
GRAND TOTAL: $158.78 USD
Compared to the multi-thousand-dollar alternatives, this solution is both affordable and reasonable for the enthusiast.
Hooking It All Up
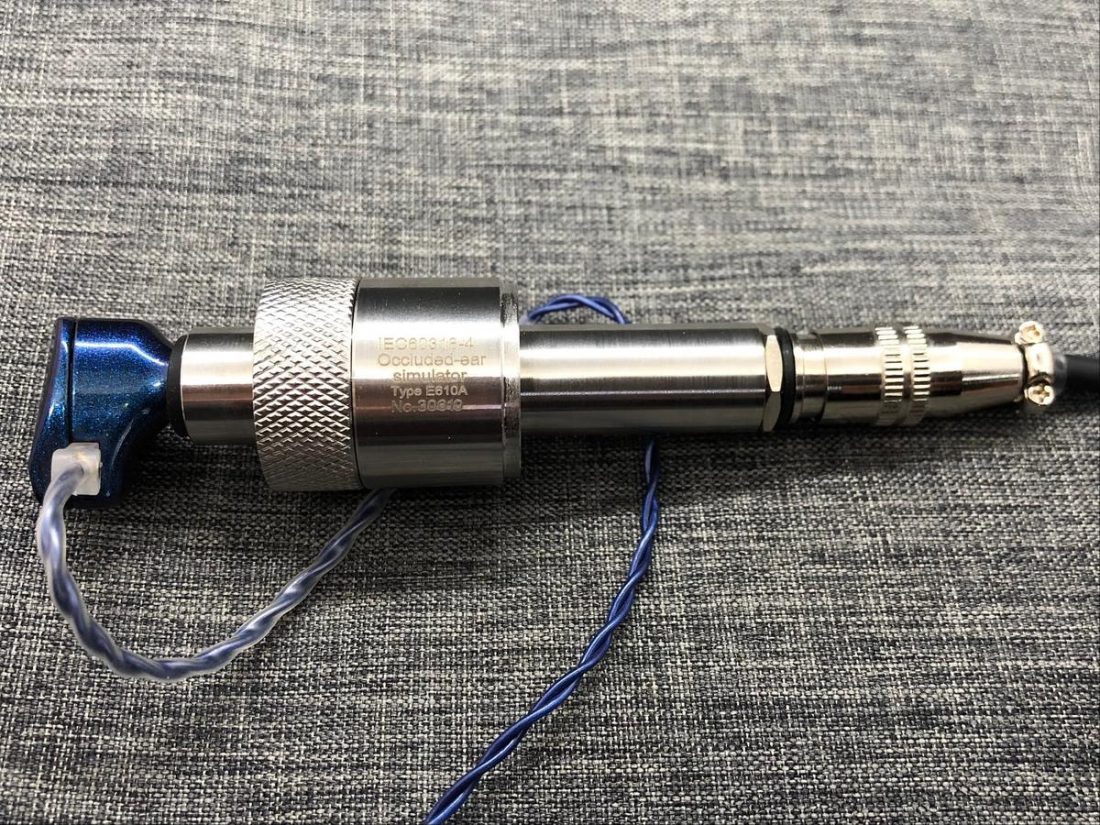
The OES comes with a standard 3.5 mm microphone jack. The hook-up procedure couldn’t be easier.
1. Start by plugging the Apple lightning to 3.5mm adapter into the iOS device.
2. Plug the male jack of the microphone/headphone splitter cable into this adapter.
3. Plug the IEM cable into the marked headphone 3.5mm socket on the splitter.
4. Plug the male jack of the OES into the marked microphone 3.5mm socket on the splitter.
5. Open the AudioTools application on the iOS device.
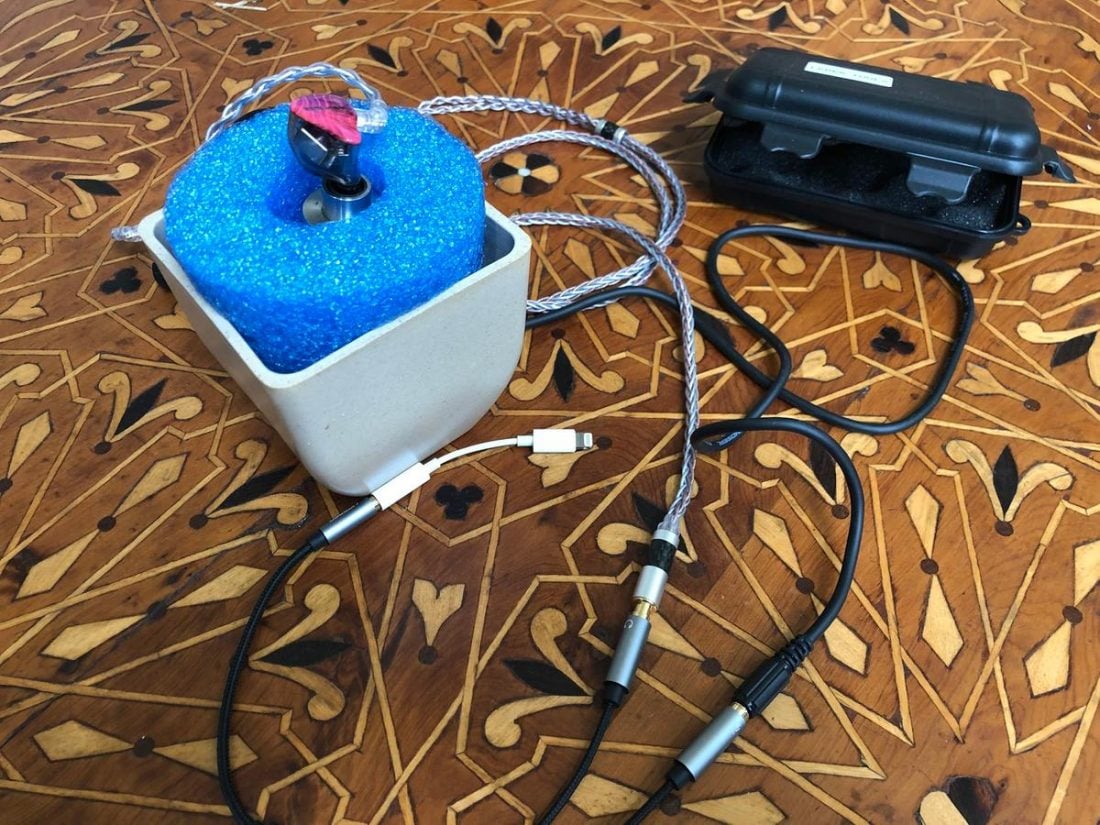
Since the OES does not have a stand (although it can be used lying on a desk or table), I cut a short length of a pool noodle and found a small flower pot to fit the foam piece. This securely holds the OES in a vertical position and can be adjusted to provide support for the inserted IEM.
iOS AudioTools Software Settings
In the AudioTools software, a few basic settings have to be changed. This is perhaps the most complicated part of the process, as nothing is documented. Again, I appealed to Crinacle for his recommended settings, and I did my best to replicate them.

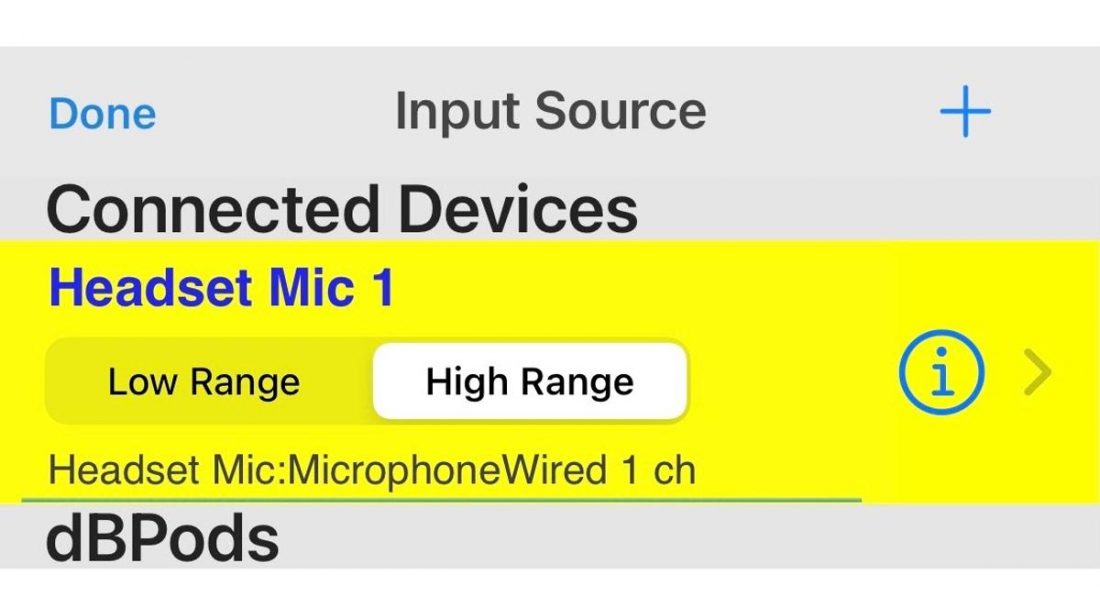
Settings → Microphone Setup
- Headset Mic 1: High Range
Acoustics – Acoustical Analysis Tools → FFT – Fast Fourier Transform
Explanation of the application settings (from L to R)
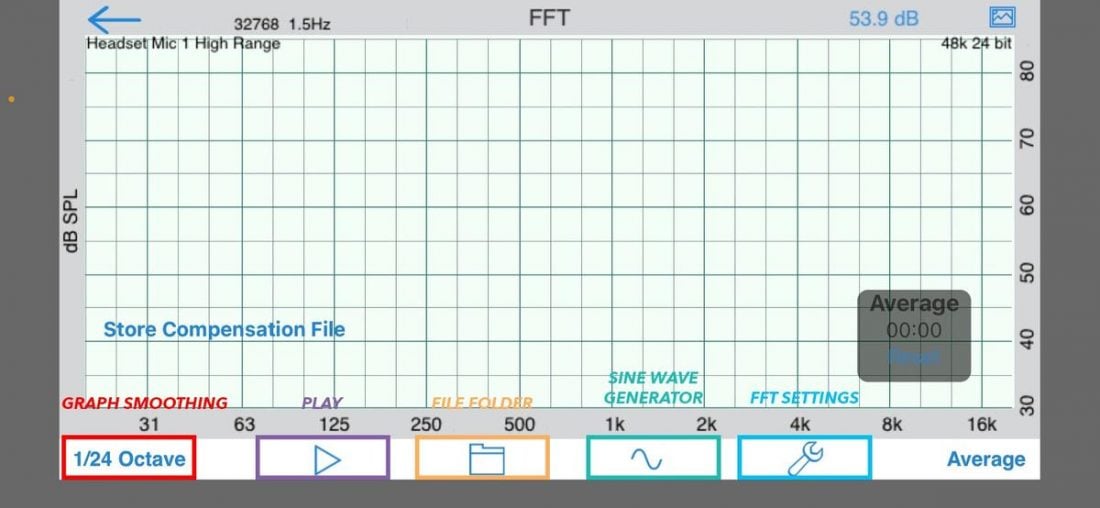
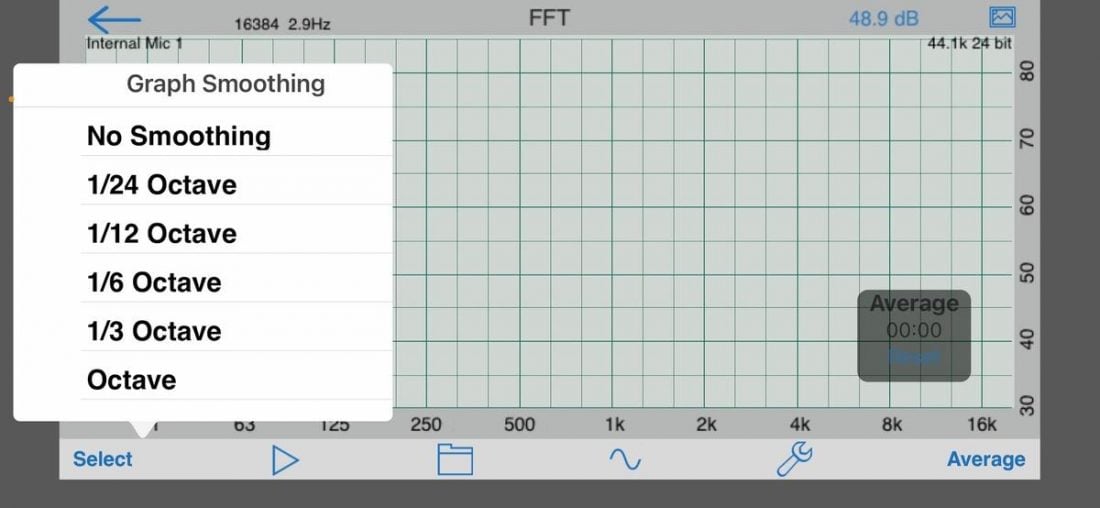
- Graph Smoothing: 1/24 Octave
- Play Icon: Press when ready, after all the settings listed have been changed. Press again to pause after 30 seconds.
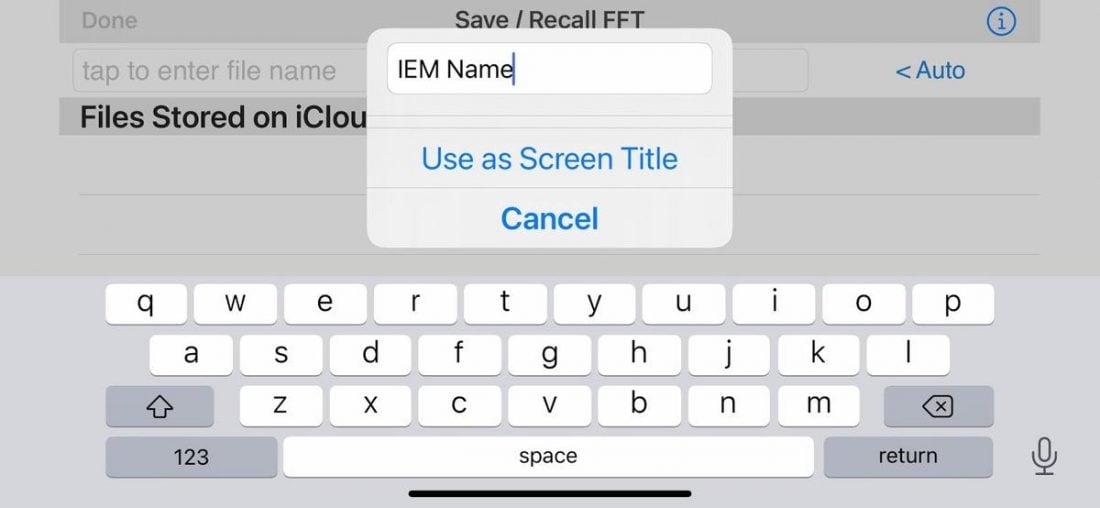
- File Folder Icon: Tap to enter a filename (the name of IEM being measured). Save as the graph screen title when prompted.

- Sine Wave Icon (Generator): Pink. -2 dBFS. Click the slide switch (make it green) to start playing.
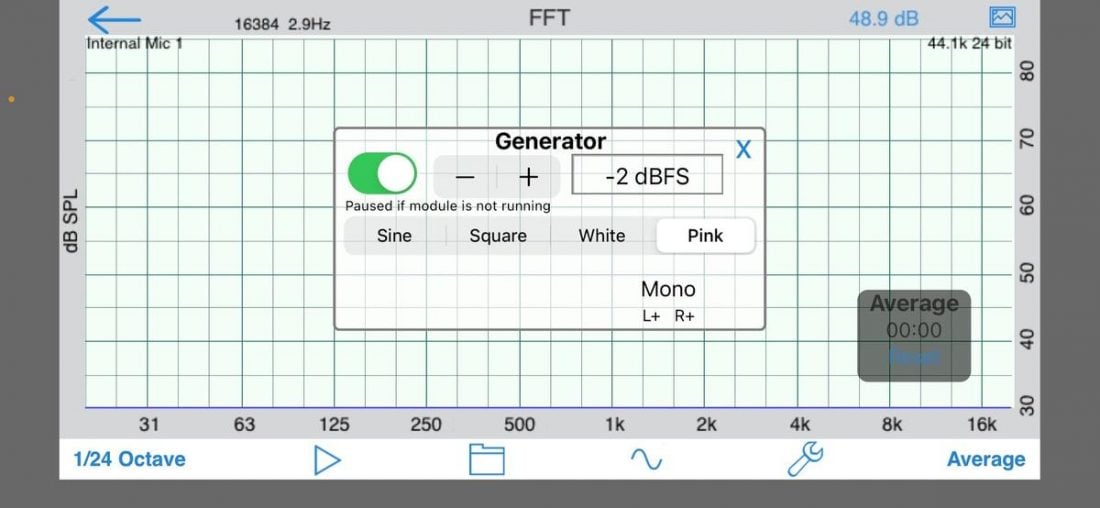
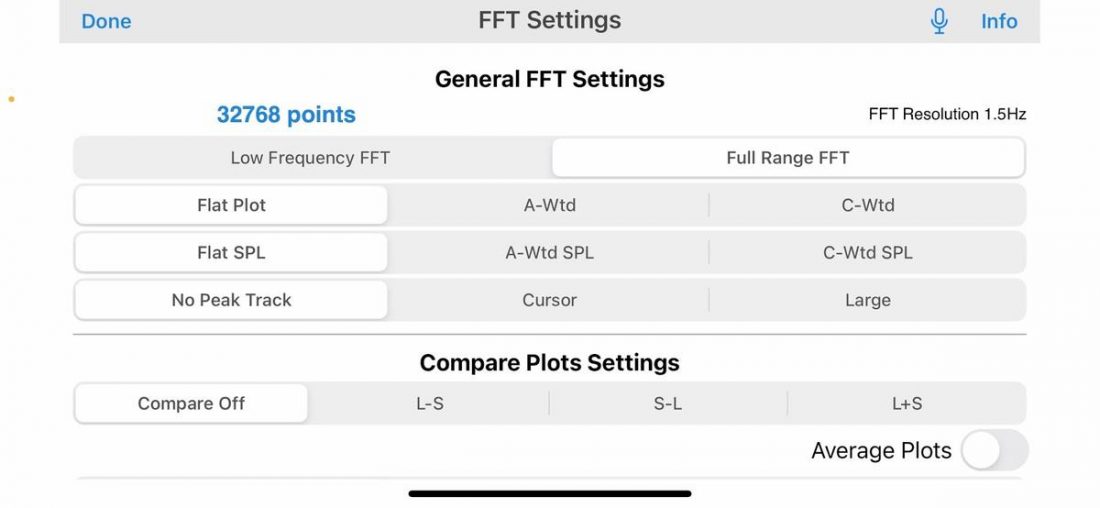
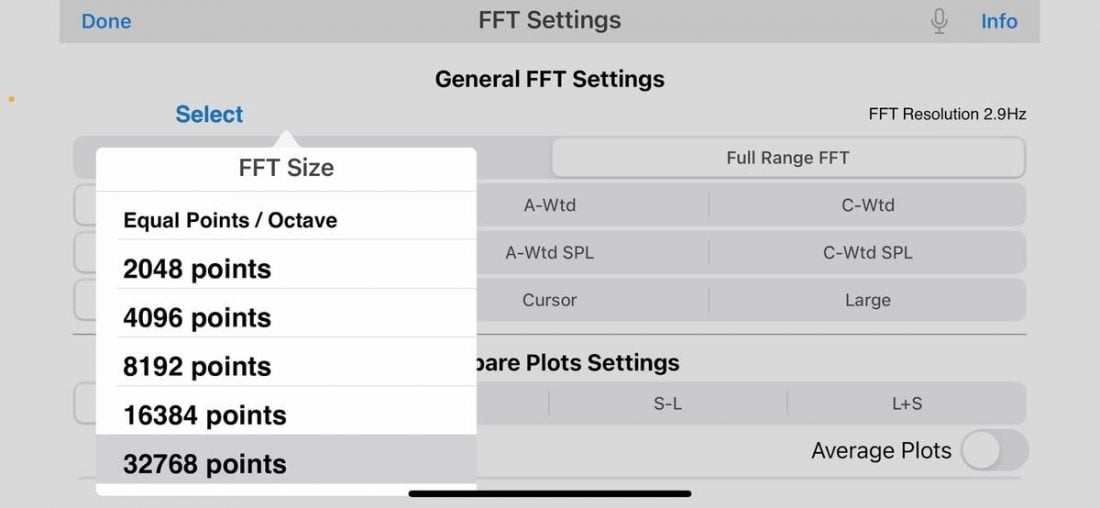
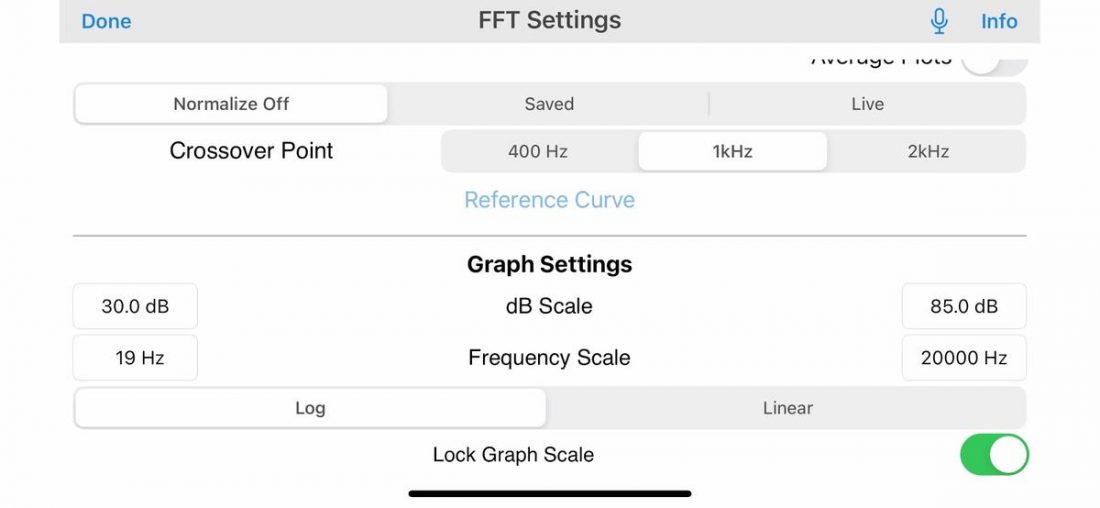
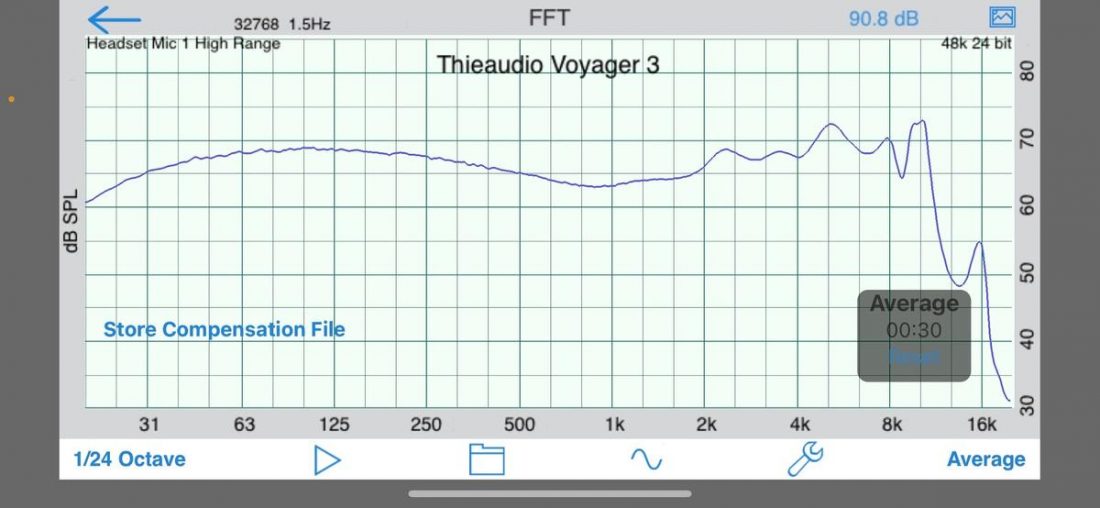
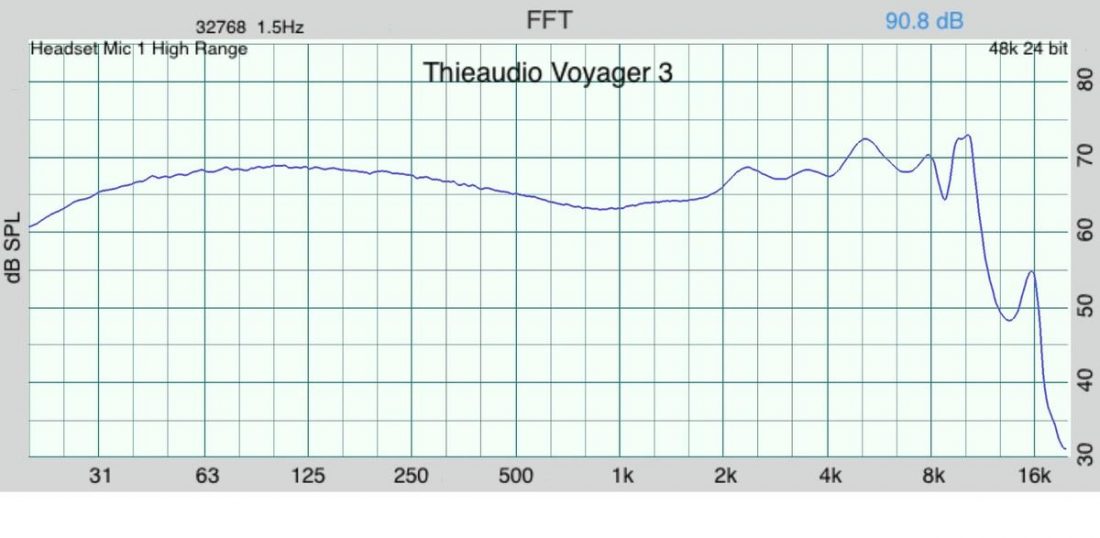
- Wrench (FFT Settings): 32768 FFT Points/Octave. Full Range FFT. Crossover Point: 1kHz. Graph Settings: dB Scale: 30-85 dB. Frequency Scale: 19Hz – 20000 Hz. Thick Plot.
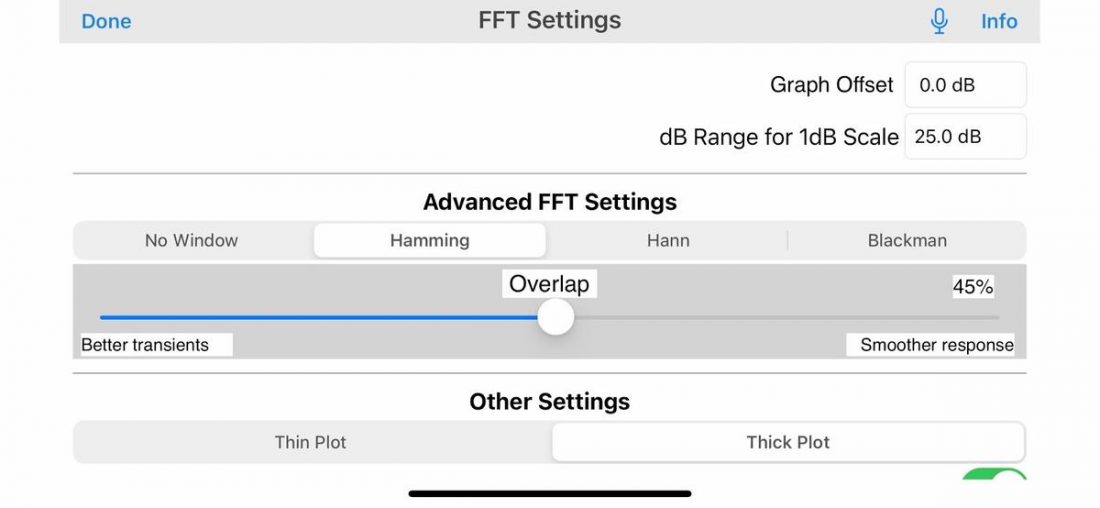
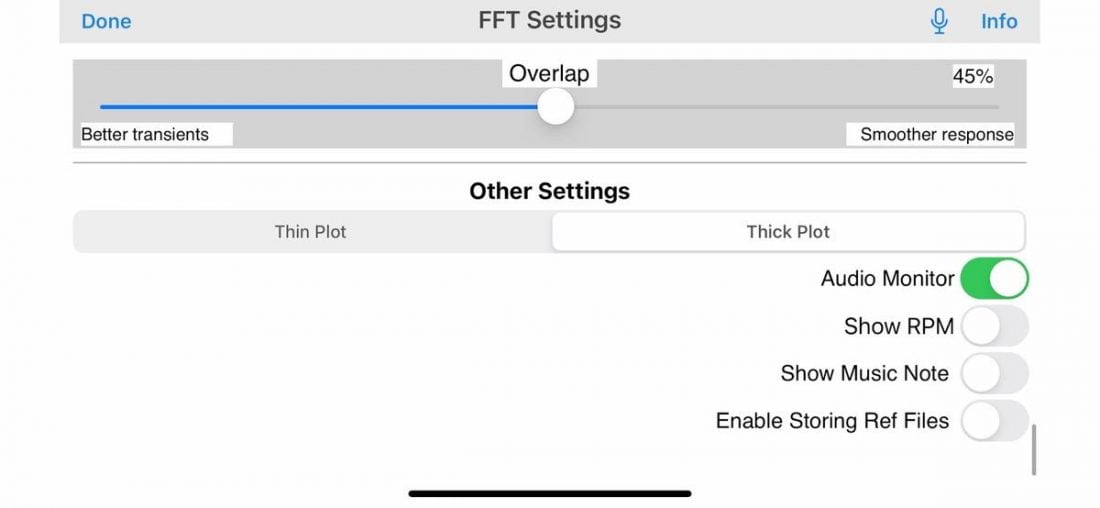
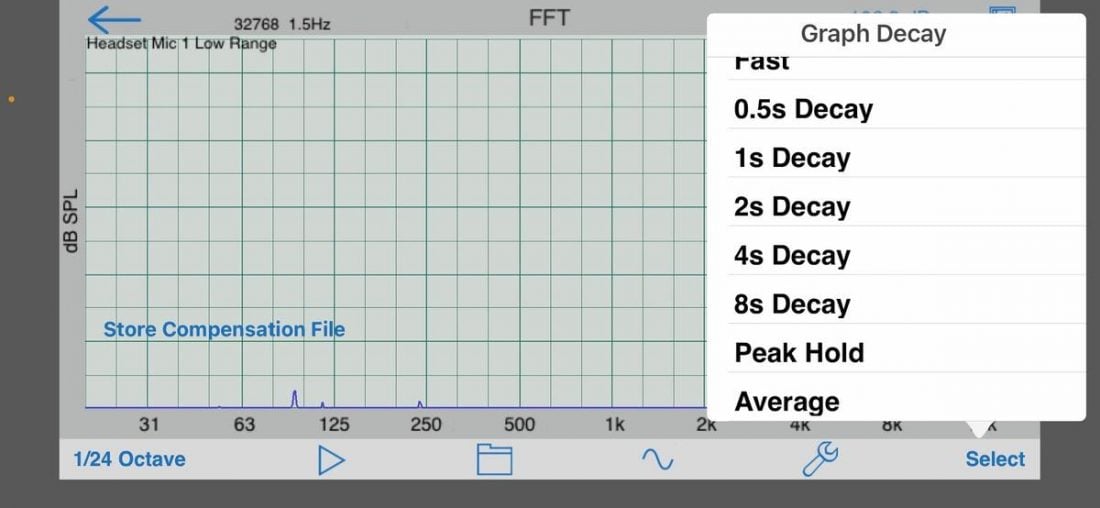
- Graph Decay: Average
- The photo icon button in the top right will save an image of the current screen to the Photo library on the iOS device.
Making Measurements
Once all the above setting changes are made, the basic steps in taking measurements are:
- Connect the iOS device, lightning adapter, headphone/microphone splitter and OES.
- Open up the FFT Graph under Acoustical Analysis Tools in iOS AudioTools.
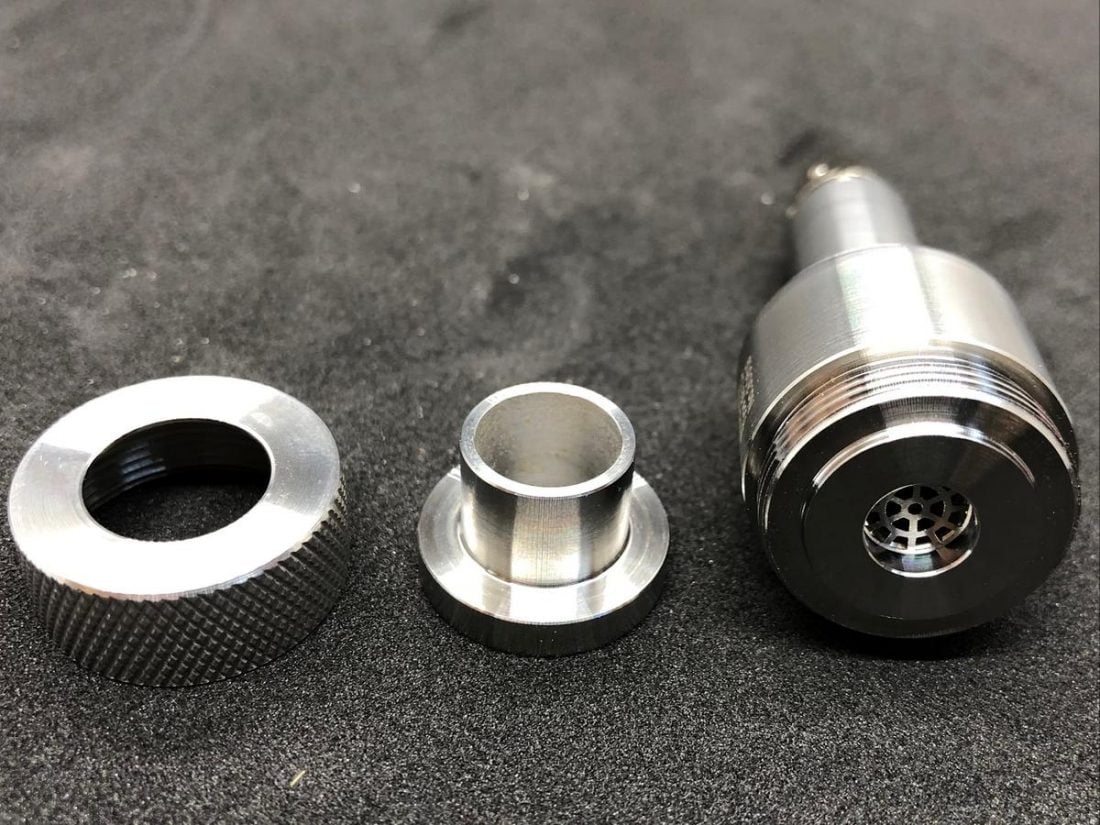
- Insert the IEM at the end of the coupler. As the size of the OES nozzle is fixed (and fairly small) it may be necessary to use a smaller than normal ear tip to get a good fit. Strive for a smooth insertion with a good seal. Leave a small amount (±1mm of the end of the ear tip visible).
- In a quiet environment, place the OES on a solid non-resonant surface that will not transfer any external noise during measurements.
- Press the play button at the bottom of the FFT screen.
- Adjust the volume on the phone until the line is approximately 65 dB at 1 kHz.
- Press the Reset Average link (in the small box on the bottom right) after each change.
- Wait for 30 seconds (the timer will count on the bottom right of the screen) until the graph stabilizes (the line will smooth).
- Press the pause button at the bottom of the FFT screen.
- Press the file button to save and name the measurement.
- Press the photo button to save the graph to the Photos library on the iOS device.
Important Considerations When Performing Measurements
- The purpose of creating frequency response measurements is to be able to compare one IEM to another. Comparisons are only valid if measurement tools and methodology are the same for all measurements.
- Unit variations between the same model of IEMs can also create measurement differences.
- The frequency response measurement graph is not an objective indicator of sound quality or fidelity. Results must be subjectively interpreted.
- Listening is the only way to validate if the graph accurately depicts the sound.
- Measurements made with an OES have limitations.
- The solid and fixed diameter of the metal coupler fits some ear tips better than others. I attempt to find the best fit with the ear tips included with the IEMs.
- The insertion depth cannot be consistent due to tip and nozzle variations between IEMs.
- The graphs will show a resonant peak in the upper treble frequencies (typically near 7-10kHz).
Conclusion
I highly recommend this method of performing IEM measurements. It’s simple, portable, and fast.
Not to mention affordable.
Is it perfect? Absolutely not. But it is a great solution for most enthusiasts. It’s also far easier to obtain repeatable results than attempting IEM measurements using the miniDSP EARS.
So, hopefully, you will no longer wonder how the measurements are obtained for my IEM reviews on Headphonesty. If you are looking for an effective way to measure and compare your IEMs, I trust that this guide will help you make educated decisions on your options.
Cool, more articles like it. Seem, the OES uses regular condenser electret microphone with DC phantom supply, then it is very easy to set up with other hardware/soft like REW, ARTA, Clio. Nice set up w/o breaking the bank – something like GRAS is unreachable for most people.
Will you post measurements with your headphones reviews?
Thanks Trav.
Hey. Thanks for the positive comments! Yup, it’ll work just fine with REW software as well.
All my recent IEM reviews are measured using this setup.
Cheers!
Really great how-to, thanks!! Does the OES have a microphone in it? From your article I’m having a hard time figuring out where the actual measurement microphone is.
It does. I’m sorry if I didn’t make that more clear in the article. The cable that plugs into the bottom of the OES device is the microphone cable.
Where do I get this microphone cable from?
Hi Trav – I’m looking for a solution to record the sound of iems not measure them. Could this be used to record sound to contrast the sound of different iems not in waves but in actual audio files? My in ear mics work great for headphones but not for iems obviously. Any thoughts would be appreciated thanks!
While I’ve not tried this, I can’t see why it wouldn’t work. Worth a try, but keep in mind that you’d only be recording one channel.
I use one of the Chinese 1/4″ lab condenser microphones, very much the same quality as the big names. Tiny little thing w. BNC cable, it requires 24V 10mA constant current power supply. It’s flat from 20 to 30kHz within 1dB. I got it from Toronto Surplus & Scientific (torontosurplus.com).
I just have make really proper preamp for it. It eats Clio mic for breakfast (I think, Panasonic based capsule).
Also, I have question – how is your Moondrop Starfield holding up, since some people complain that the drivers are dying suddenly. Is it manufacturing problem or people just crank to them too high. I’m asking myself if I should get one, having Sennheiser’ish sound in your description.
My Sarfields are holding up fine, other than initially some chipping paint issues, however, they are treated well, not heavily used, and seldom played loudly, so YMMV.
Very helpful, thank you. I have only recently begun to explore IEMs. As a former FOH engineer, I could not reconcile the published frequency response graphs with what I was hearing. Makes more sense now. I might even dig up my UM1 at take a run at the units I own…
Glad it was of some use for you!
Hi there, I’m a bit confused as to how to connect the bottom of the coupler to the 3.5mm female microphone on the y splitter?
Not to worry. The proper cable is included with the OES I linked above.
Looks like clicking the OES Taobao link provided here, the one I bought didn’t come with the 3.5mm microphone jack?
Is there any way I can buy that separately? All I have is the actual OES itself.
That’s the link I used and it does indeed come with the necessary 3.5mm cable for the mic.
Yeah, not sure what happened. Maybe mine just wasn’t included or something. Bummer.
Sign, my apologies. Looks like i forgot to submit the shipment from superbuy for the cable, i just assumed it would all come together.
Hello Trav, I have been searching to make my own rig and this article seems to nail it. I want one that will do headphones (over the ear) as well as in-ear. I was thinking of getting two of the OES’s, some simulated ears and building a crude rig. Is this possible or will I need to find a way to match the mics? Also, would I need a specials cable to connect both mics to say a windows computer.
One thing I would like to know is can I also do decibel levels with this, that is to know how loud the headphones are through my amp?
I found an OCS on Ebay and AliExpress do you think going through Taobao is better or the same.
Sorry for the long questions, but finding this has gotten me all excited about building a rig and thank you for any help.
Hi, thank you very much for the taobao link as I bought one from the seller but with a solid stand. As far as I know the seller actually provides calibration files to loaded into Arta. Did you get the files from him?
Hi, thanks for the article. What is the best measurement app for Android? I can’t seem to find one that is as good as the iOS app you mentioned.
Unfortunately, I don’t know of an Android equivalent.