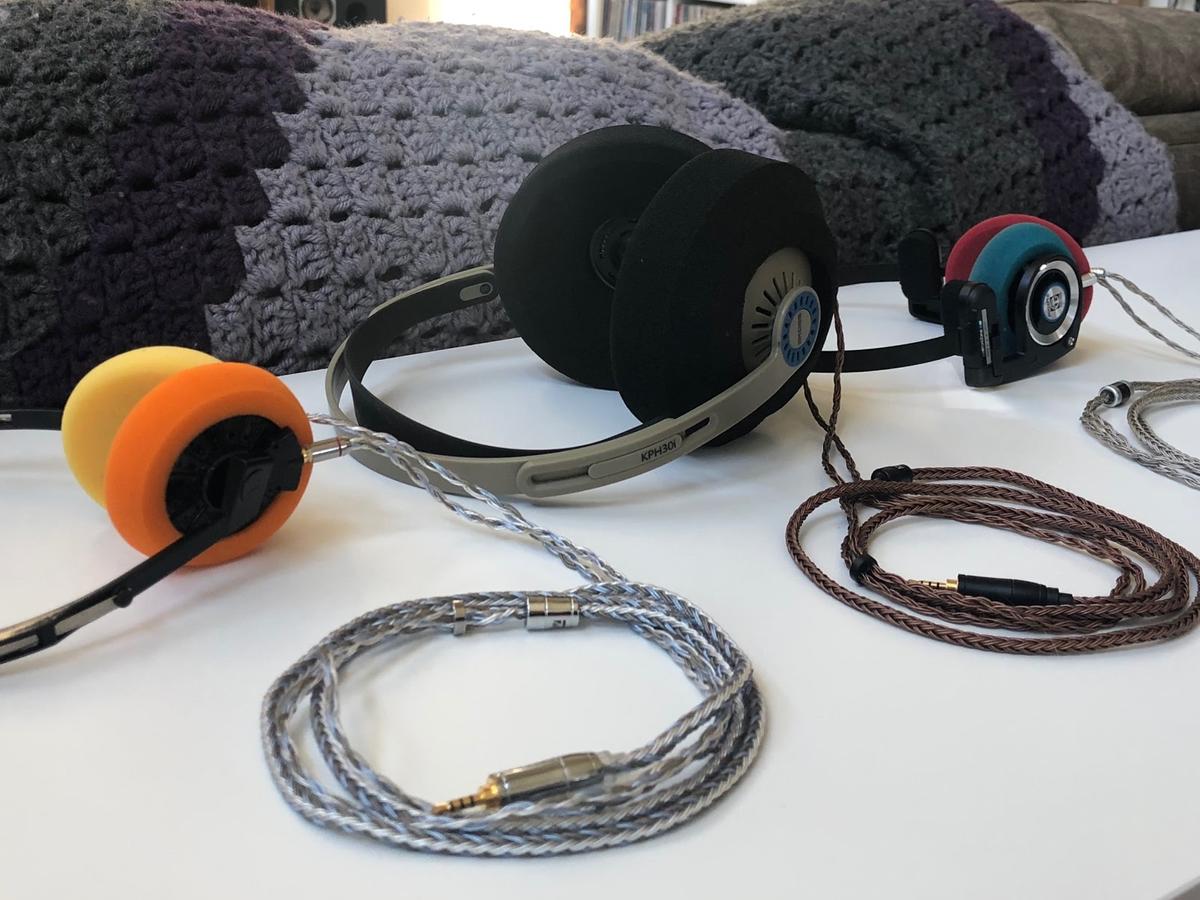
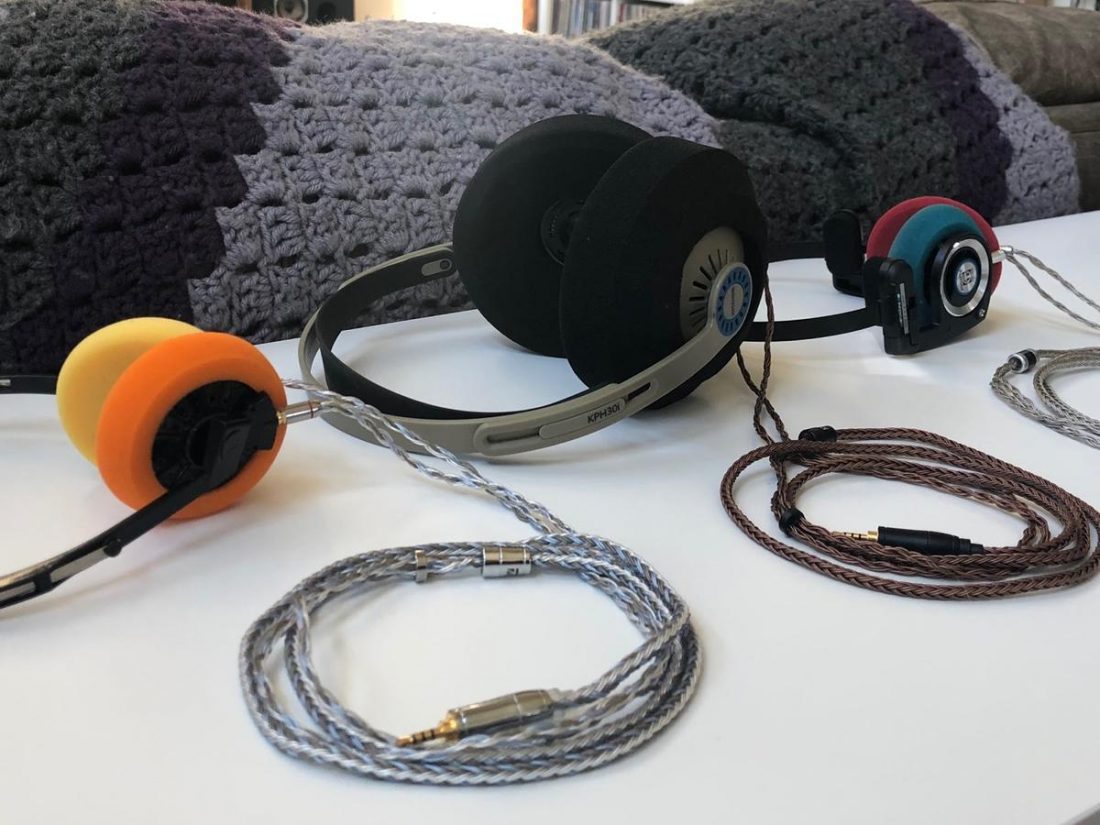
Tuning, personalizing, and beautifying the Koss Porta Pro, KSC35, KSC75, and KPH30i.
Every few years, a new group of headphone enthusiasts discovers the least well-kept secret in portable audio. Brace yourself. The truth will blow your mind.
Koss makes great-sounding inexpensive headphones.
* Gasp * I know, right? Shocking! The latest iteration of these enthusiasts calls themselves #KossGang.
Those of us with a few grey hairs, might remember that these great-sounding and inexpensive headphones have been around for a year or two, err…, decade or three. Doctor, set the Tardis to the fantastical year 1984, and let’s see what Koss is up to.
Literally the year before ‘Back to the Future’ made it into theatres, Koss released their most successful product of all time. The iconic staple in the headphone universe known as the Porta Pro. With just the right amount of shiny silver highlights, blue and black plastic, and unique folding shape, the Porta Pro fit right into Walkman culture.
But like every other electronic product that has disappeared from that era, the Porta Pro would have vanished into our nostalgic past, if not for one important distinction. Their new 35mm, 60-ohm drivers sounded great. Great for the time, and as it turns out, they still sound great 37 years later.
I can think of no other audio product that not only has lasted so long, but still is oft recommended by audio enthusiasts. Curious as to my personal desert island, ‘you can have only one,’ headphone choice? The Porta Pro all the way.
So, like any company with an unmitigated success on their hands, Koss pulled a Marvel Universe, long before the Mouse House figured out this key to financial success.
While this line of headphones is fantastic, there’s always room for improvement. Headphone modding enthusiasts love a great driver, low price, and the dreams of creating giant-killing franken-phones.
Spoiler alert. I’m one of those enthusiasts. So today, we’re going to explore the popular Koss modifications. I’ll detail how to do them, and we’ll take a look at how the results measure and sound. We will be focusing on the Porta Pro, KSC35, KSC75, and KPH30i.
Modding your headphones invalidates the warranty!
Throw caution to the wind and grab your soldering iron!
Koss Modification Overview
Headphone modifications fall into three general categories (with some overlap):
- Cable modifications
- Comfort modifications
- Sound quality modifications
The one thing we won’t be modifying is the driver itself. The ear pads, band, grills, and cups are all fair game, though.
Let’s be clear about the price. The Koss headphones we will be modifying today are all sub $50 USD. Modifications that multiply their cost several times are not my intention and simply do not make sense to pursue.
We’re striving for bang-for-the-buck improvement, not throwing away money to achieve marginal enhancement.
These Koss headphones sound fantastic for their price category, but they are not viable competitors for TOTL headphones, regardless of modifications.
Cable Modifications
Tools needed
- Soldering iron + solder
- Tiny flat head screwdriver or spudger
- Epoxy or hot glue gun
- Dremel rotary tool with a small grinder bit
- X-acto knife or break-off utility knife
- Very thin wires
- MMCX sockets
Like with most inexpensive headphones (especially ones designed many years ago), the Koss cables are all dual-entry and fixed to the ear cups. That is to say, non-replaceable. Damage your cable, and you are going to have to take Koss up on that lifetime warranty. While all are entirely functional, they are of the ‘thin, black, plastic’ variety and have none of the appeal or bling that is the current hotness.
For this write-up, I’m treating cable changes primarily as an aesthetic change. Many different cables are available with unique braid patterns, plugs, y-splitters, various wire materials (including silver and copper), and a rainbow of colors. For my thoughts on whether cables make a sound quality difference, check out this article.
When we modify to allow aftermarket cables, we can use Bluetooth and balanced connections (and amplifiers) with the headphones.
These Koss headphones are all a reasonably small, on-ear design. The cups are just big enough to contain the 35mm driver, so there is simply no space for mini-XLR, 3.5mm, or even 2.5mm sockets that other headphones employ. This means we need to look at IEM socket solutions. The tiny MMCX socket is sized small enough to fit and large enough to be worked with by the average DIY’er.
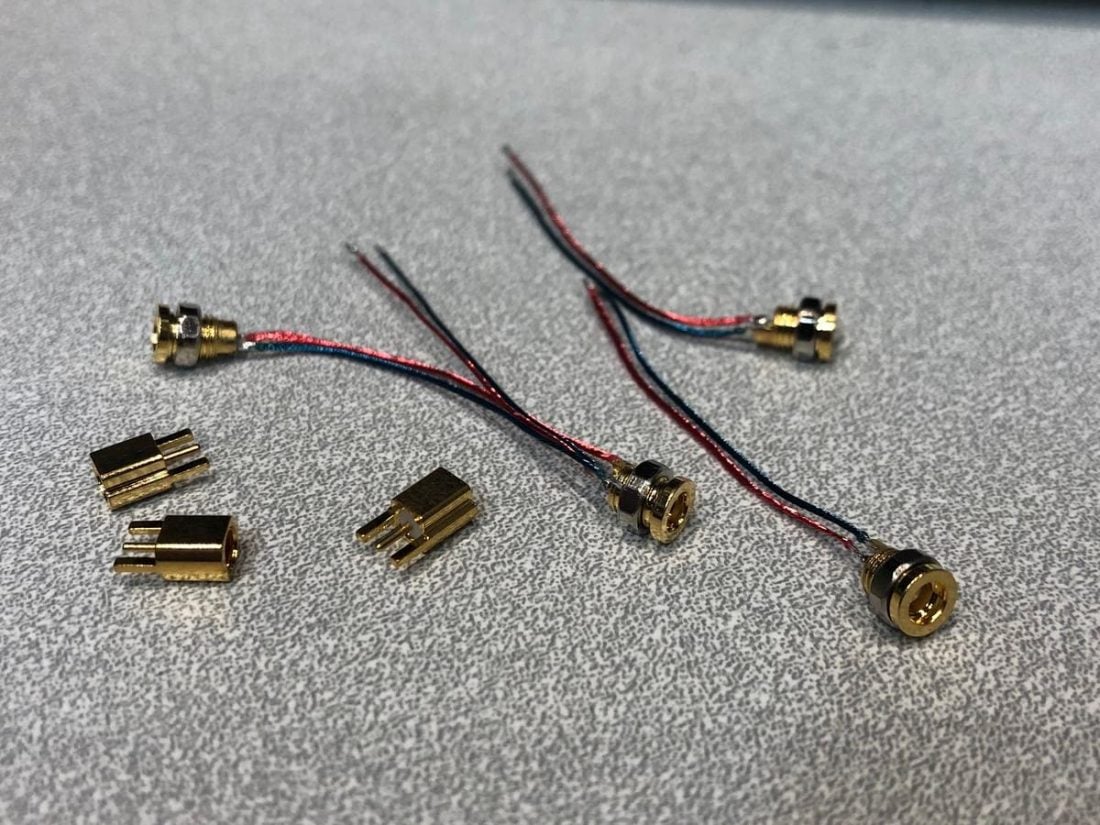
There are two basic styles of female MMCX sockets readily available. One is a circuit board pin style, while the other is a threaded socket. Neither can be used as intended on the Koss headphones, but both can work well with a liberal application of epoxy to hold things together.
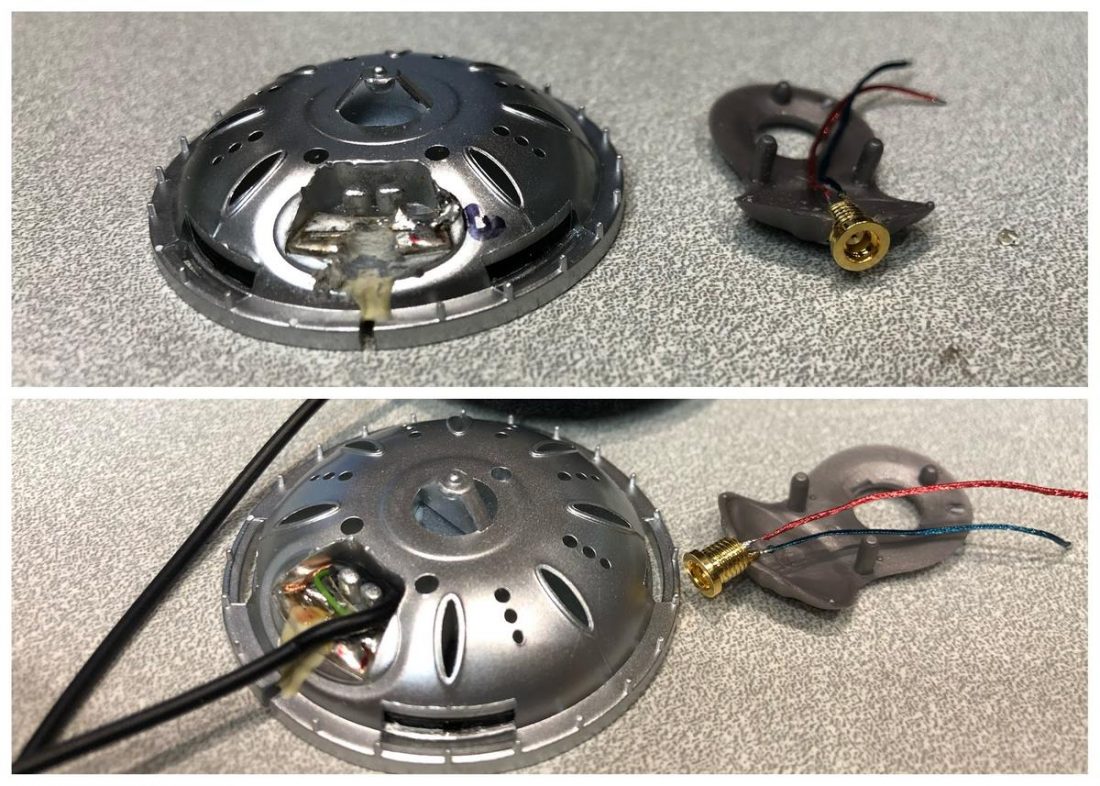
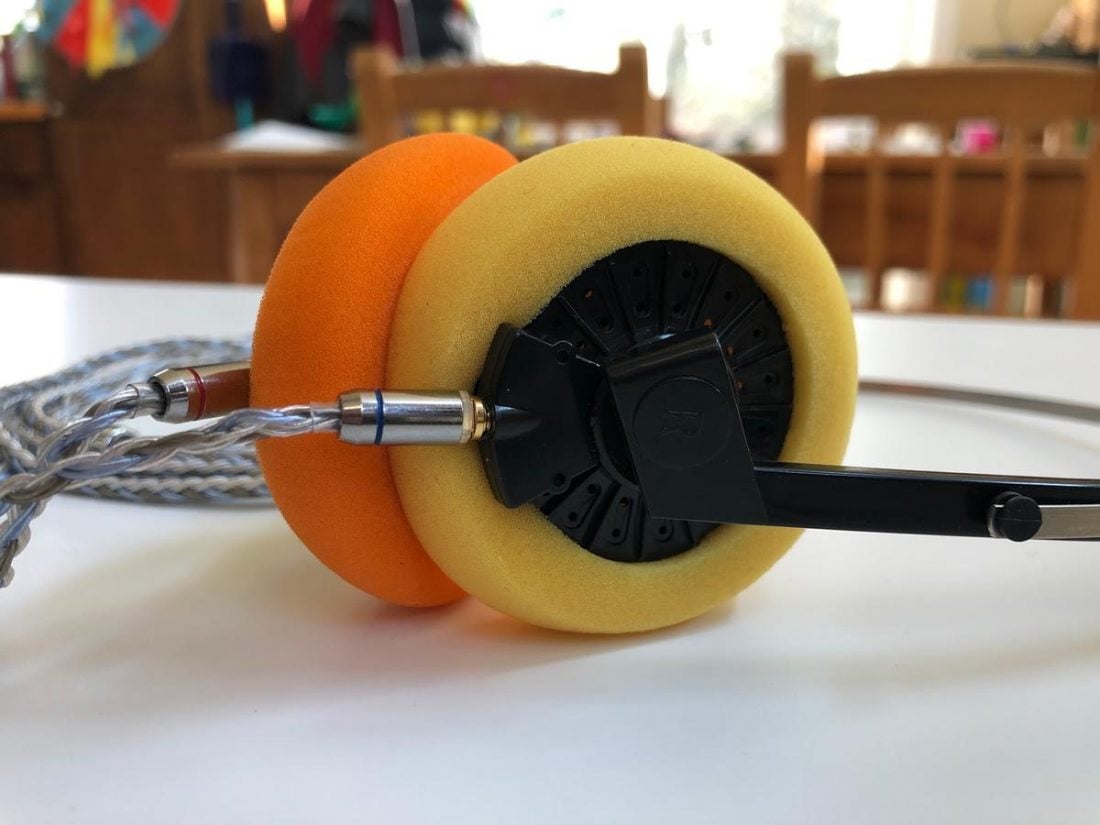
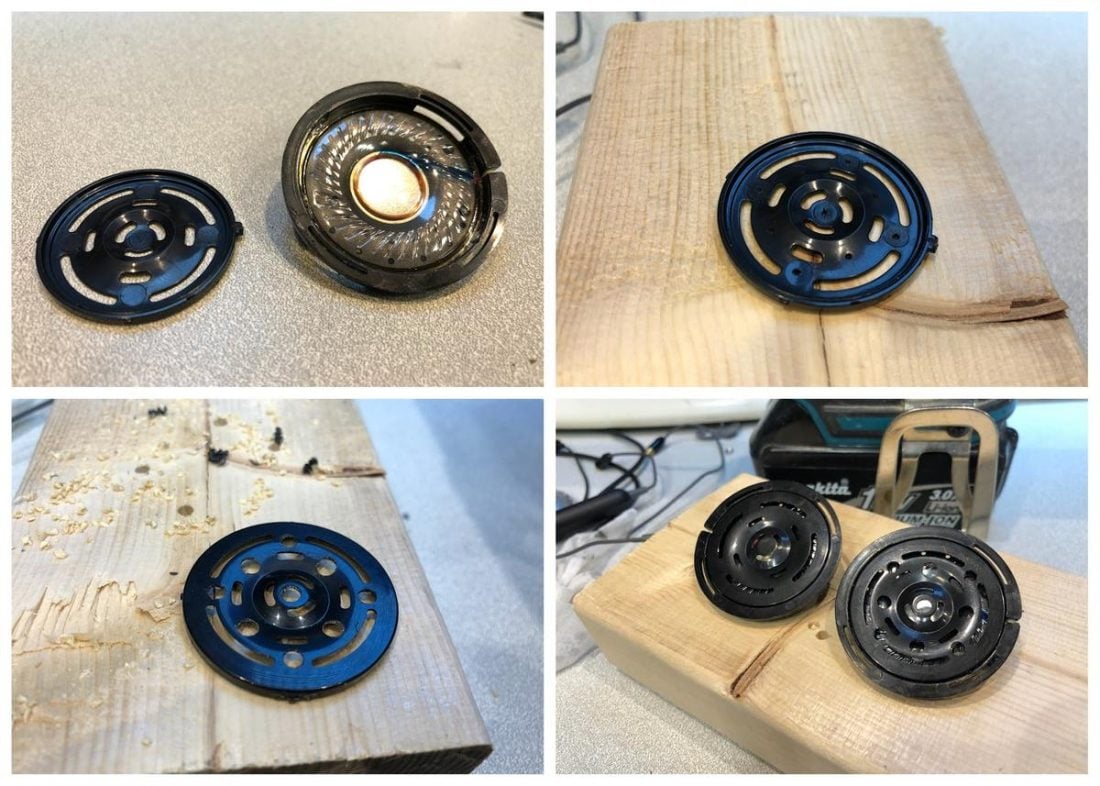
How to Add MMCX Sockets to the Porta Pro and KSC35
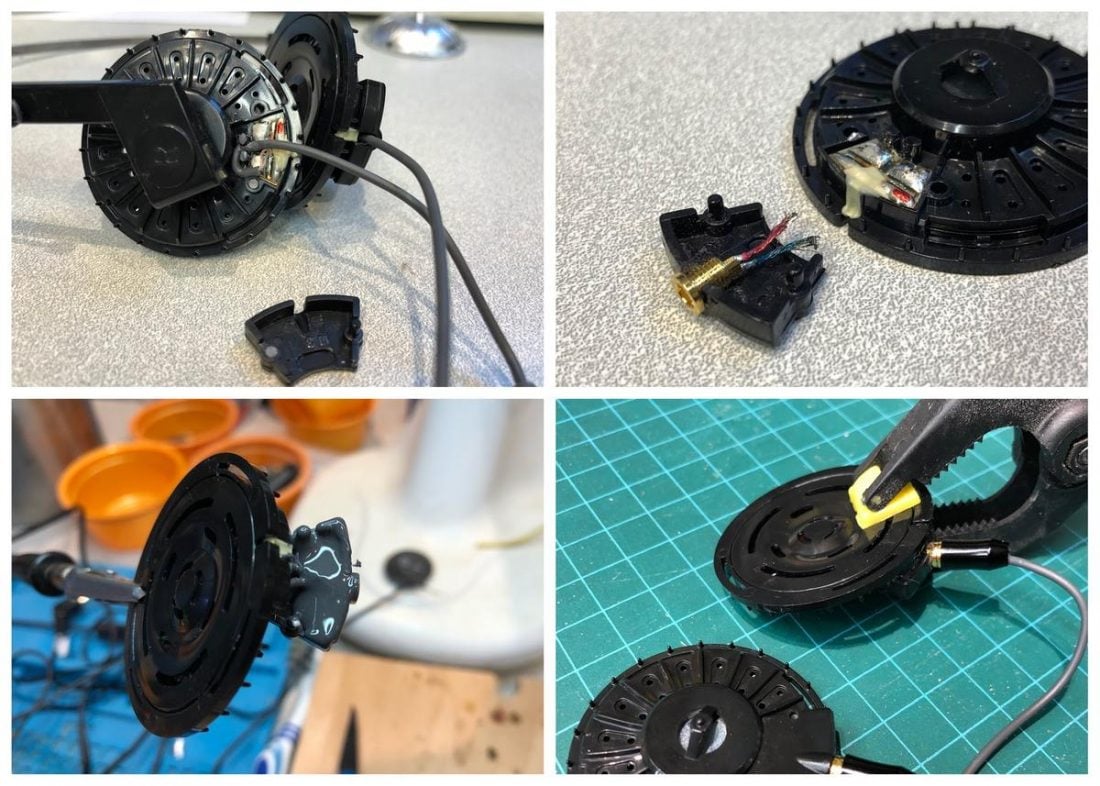
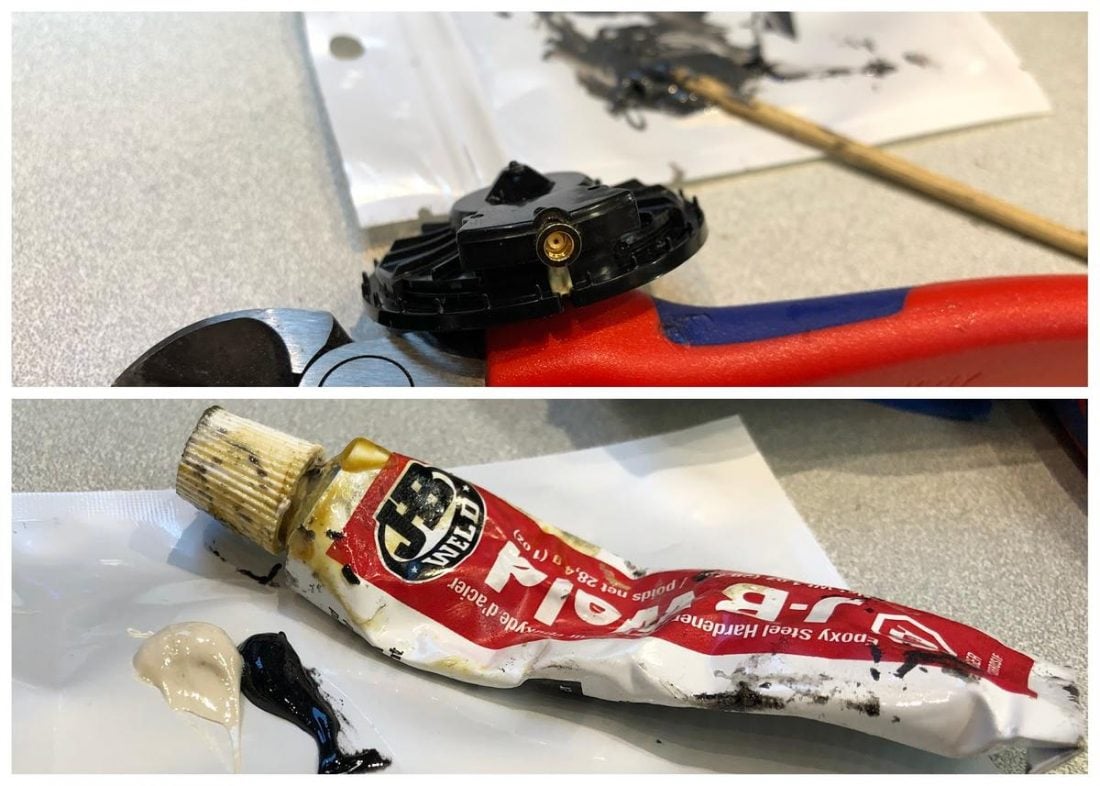
Top Left: Original Porta Pro / KSC35 driver with cable cover removed. Yes, I broke off one of the pegs!
Top Right: Cable cover opening enlarged to fit the MMCX socket. Wires cut and tinned.
Bottom Right: Clamp applied while epoxy is hardening.
Bottom Left: Cover the socket and fill the space with epoxy.
Steps
- Firmly hold the driver in one hand, and pull to remove the driver from the ear band or clip. Repeat all steps for both drivers.
- Carefully pull the foam pad up and off the tiny spikes around the driver.
- Lay the driver flat on the work surface.
- Carefully, with a tiny flathead screwdriver or spudger, pry the small cable cover upwards to remove. It is held on only with two small plastic pegs. It’s not glued on, and easy to remove, but also easy to break the pegs if you aren’t careful. It’s not fatal if you break off the pegs, but reassembly is easier if they are still there.
- The cable cover needs to be modified differently depending on which MMXC socket type you are using. I find the threaded socket easier, but both will work fine.
- Threaded MMCX socket: using a Dremel rotary tool with a small circular grinder bit, enlarge the cable entry hole just enough to insert the MMCX socket firmly.
- Peg MMCX socket: using a very sharp blade (such as an X-acto knife or break-off style utility knife), carefully cut out the cable cover at the cable entry point to fit the peg-style MMCX socket. Note that the socket has a flat side and rounded side, so cut the cover to fit the flat side closely. It should only protrude enough to be flush with the cover. Go slow. It sounds harder than it really is. Shave off a little at a time and continually compare to the socket to fit.
- Remove any excess plastic internal bits from the cover as required to fit the socket.
- If the socket does not have two small wires already soldered on, go ahead and add a couple 0.5 inch long wires to the center pin and one outer pin on the sockets. I used an old, inexpensive USB cable to find ultra-thin and flexible wires, nicely color-coded in four colors. Strip and tin both ends.
- Press the socket into the cable cover. It should hold firmly and be as flush as possible.
- Carefully and quickly (to avoid damage from overheating), unsolder the original cable from the driver. Note that the colored cable goes to the right solder pad. This is the pad you will solder the MMCX center pin wire to.
- Carefully and quickly solder on the new wires from the MMCX socket to the driver’s solder pads.
- Using a compatible cable, test the connection and make sure the driver still makes noise.
- Mix two blueberry-sized parts of the 2-part epoxy on a disposable surface (such as a plastic bag or bit of aluminum foil) with a toothpick until you have a uniform color. The black and white JB Weld blobs become a grey color when mixed together.
- Fill the underside of the cable cover with epoxy, avoiding smearing it on the outside of the driver, yourself, your clothes, a helpful cat, etc. If this is impossible (and it often is) not to worry, a Lysol wipe will easily remove it, and the epoxy doesn’t harden for hours. Make sure you cover the surface of the socket and fill the surrounding space.
- Fit the cable cover back on the peg holes, and it should hold securely in place. If you managed to break off one or both pegs in disassembly, use a small clamp or clothespin to keep it in the desired position.
- Again, using a compatible cable, test the connection and make sure the driver makes noise. This is your last chance to fix any mistakes. Once that epoxy hardens, it is permanent.
- Put the driver down somewhere safe and fight any urge to touch it for 24 hours.
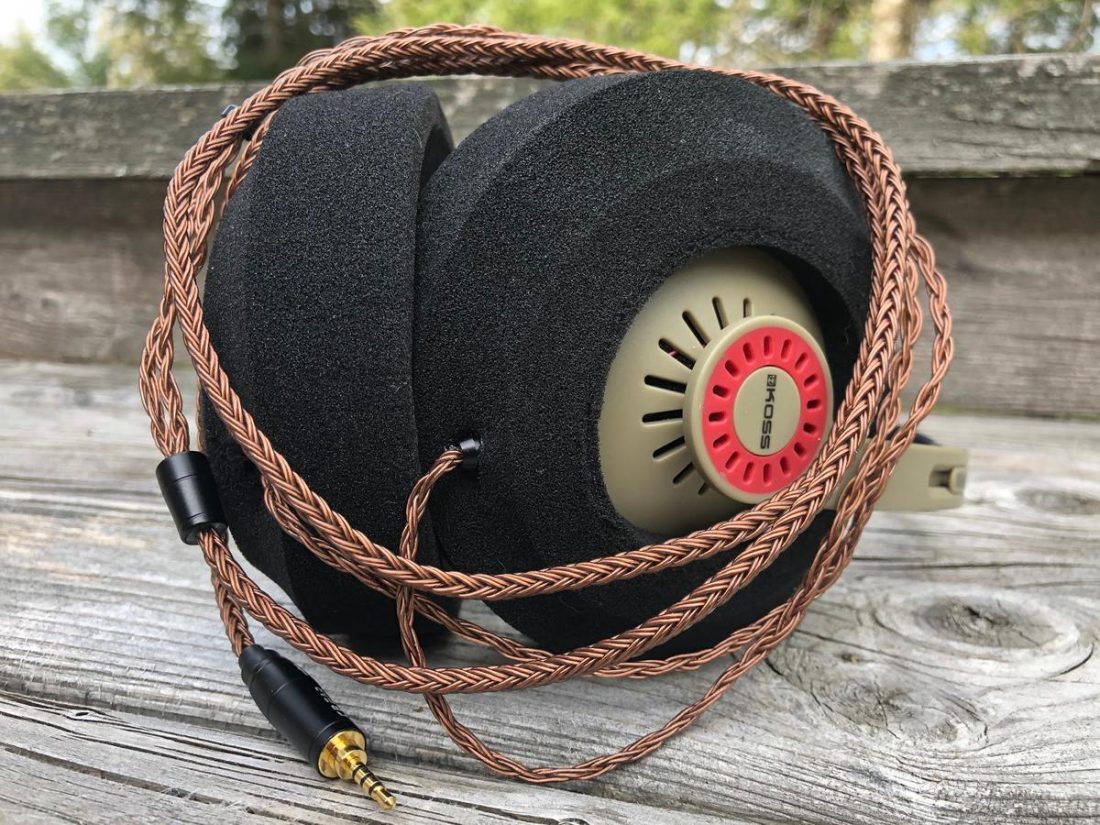
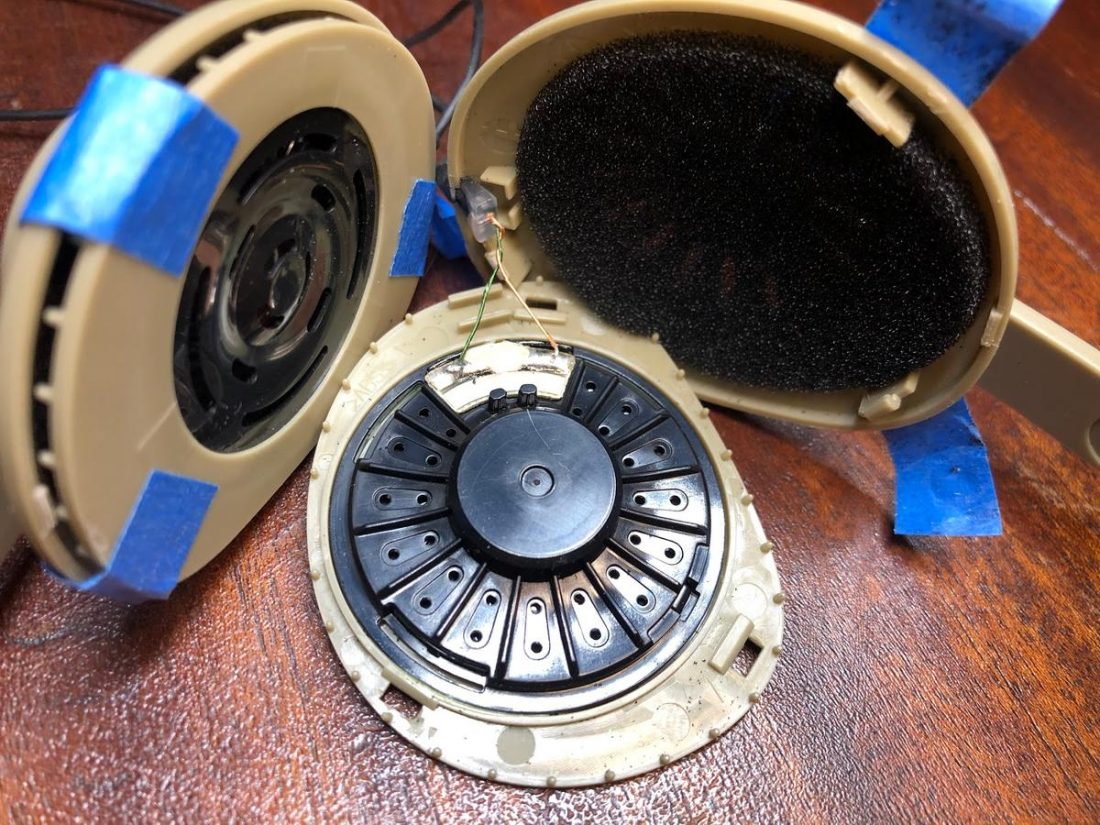
Adding MMCX Sockets to the KPH30i
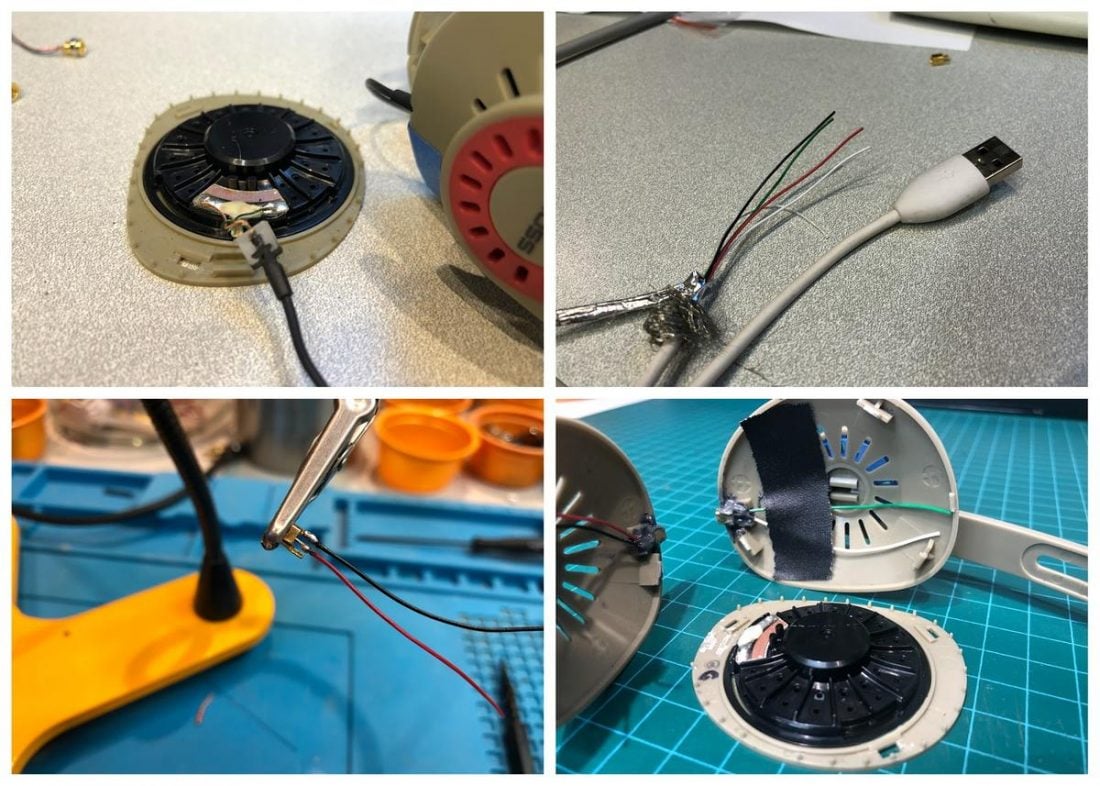
Top Left: KPH30i driver and stock cable.
Top Right: USB cable cannibalized for wires.
Bottom Right: MMCX sockets taped in while the epoxy hardens.
Bottom Left: Wires soldered to the MMCX socket.
Steps
- Use this handy guide to open up the ear cups and remove the foam pads.
- BE CAREFUL AND GO SLOW. I’m usually pretty good at these things, but I managed to snap off 2 of 3 mounting clips on each ear cup. I used a few small pieces of masking tape to hold the cups together for testing purposes, and when I was happy with the end result, I put a small dab of hot glue on each broken tap before final reassembly.
- Due to the shape and size of the ear cups, I found the pin-style MMCX socket to be the best fit. I trimmed off one of the two outer pins on the socket to fit better.
- Once the cup has been trimmed to fit, solder 1” wires to the MMCX sockets. Trim and tin both ends. Do not solder the wires to the driver yet.
- Use epoxy to coat the socket and adhere it to the cup. Tape the wires to the cup to hold the socket in place. Note that the cups aren’t removable from the band, so you must do both cups at the same time in order to allow it all to dry for 24 hours.
- Once dry, solder the wires to the driver (note that the center pin goes to the marked side). Leave the wires approximately 1” long to allow for enough space to maneuver.
- Decide if you are going to include the interior rear foam piece, or install foam pads, and clip or glue the cup front and back together.
Adding MMCX Sockets to the KSC75
The KSC75 is similar to the standard Porta Pro driver but have a unique cup shape and wire cover. Again, the wire cover simply pops off, but the KSC75’s more rounded cup shape makes adding an MMCX socket very difficult.
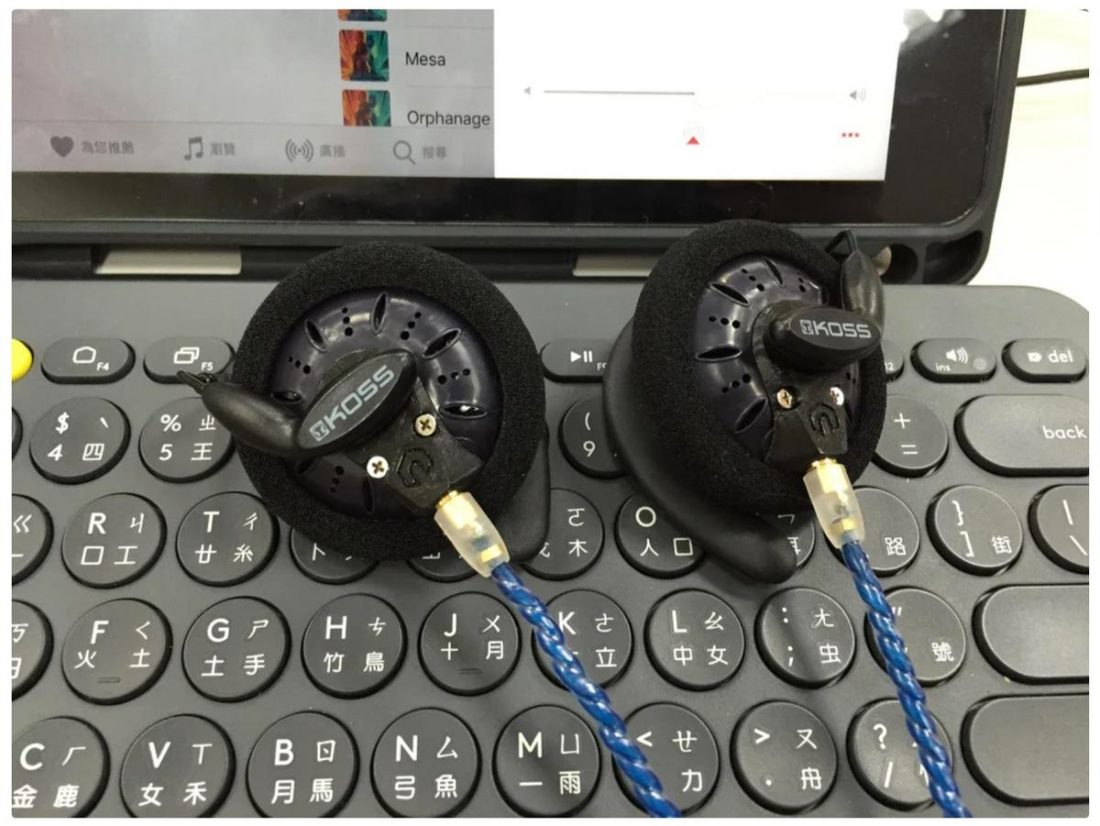
Luckily some enterprising folks out there have created 3D printed wire covers made expressly for this purpose. There are many Koss modding 3D printed designs online. Use threaded MMCX sockets and follow the above steps to remove and replace the cables.
Cable Choices
This project was a great excuse for trying out some of the popular inexpensive IEM cables available from AliExpress. I wanted attractive, sub-$20, 2.5 mm balanced (when available) cables with MMCX connectors.
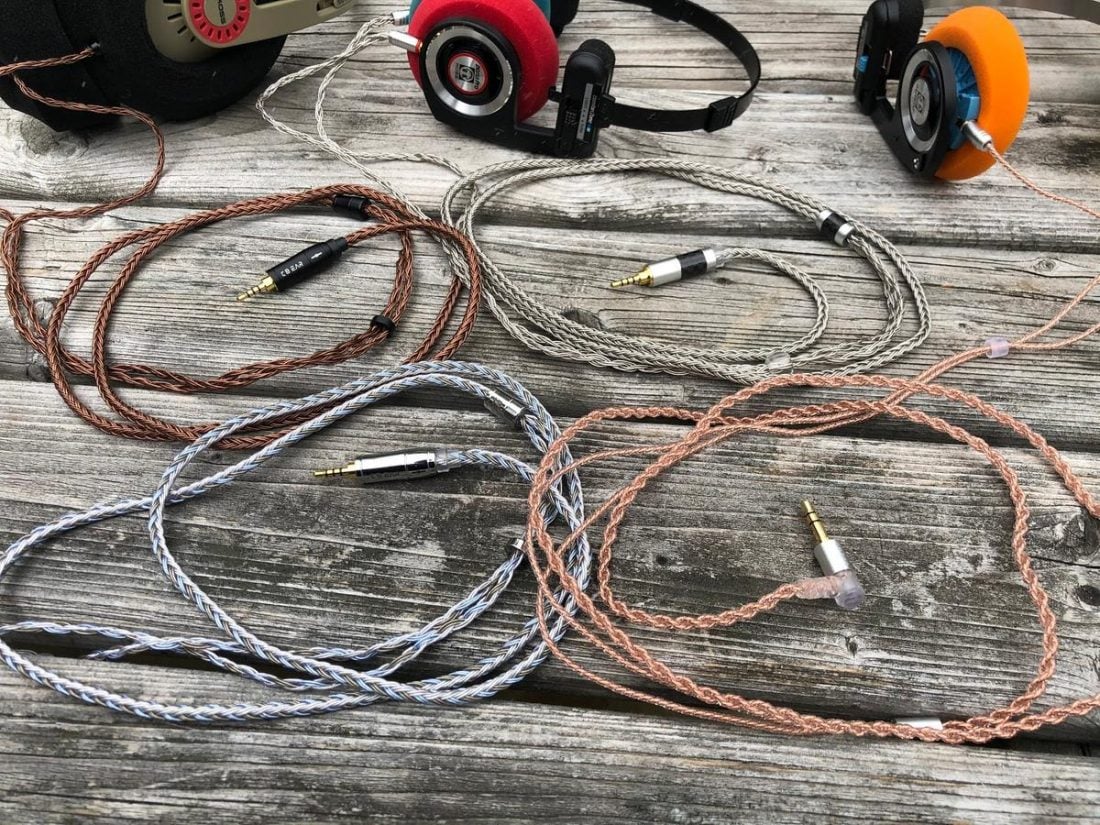
Here’s what I ordered:
| Cable Description | Price (USD) | Plug | Color | Notes |
|---|---|---|---|---|
| KBEAR 4 core Copper cable with metal interface 2 pin/QDC/MMCX with 3.5MM Connector for KBEAR KB06 ZSX ZS10 PRO | $3.61 | 3.5mm | Copper | Least supple feeling. Rubbery finish. Simple 2-wire braid/wrap. Very attractive bright copper color. Rubber and metal 90-degree 3.5mm plug. Silver metal y-split and color-coded MMCX plugs appear high quality. Far nicer than the cost would suggest. |
| TRN Cable Copper And Silver Hybrid Braided Cable 2.5/3.5mm Balance Cable And MMCX/2PIN Connector Trn VV80 V20 V10 x6 v30 zst es4 | $6.35 | 2.5mm | Black and Silver | Attractive 4 wire braid. Fairly rubbery feeling. Nice black metal jacks and y-split. |
| AK KBEAR 16 Core Upgraded Pure Copper Cable 3.5/2.5/4.4mm Earphone Cable With MMCX/2Pin For AS16 ZS10 ZSN PRO TRN X6 V90 ZSX F1 | $15.40 | 2.5mm | Bronze | Beautifully supple with a tight multi-strand braid. Metal plugs and y-split not noticeably better quality than less expensive cables. |
| KBEAR Thorough 16 core Silver plated Cable 2.5/3.5/4.4mm Upgrade Cable With MMCX/2pin/QDC/TFZ Connector with KB06 HI7 ZSX BL03 | $15.73 | 2.5mm | Silver | Very slightly less supple than the bronze and grey cables but much more alike than not. Probably the nicest feeling 2.5mm plug, although again, subtly different than the other two. |
| Tripowin Zonie 16 Core Silver Plated Cable SPC Earphone Cable QDC MMCX 2 PIN FOR KZ ZS10 PRO C16 C12 BL03 | $18.72 | 2.5mm | Grey | Almost identical to the construction of the bronze cable, except with metal and carbon-fiber y-split and 2.5mm plug. |
The only thing you have to do is to remove the approximately 3” rubber heat-shrink type coating that curves the wire near the MMCX plugs. It’s there so that the cable naturally fits over and around the ear for IEMs. It needs to go since I’m going to use the cables with the downwards-facing sockets on the Koss headphones.
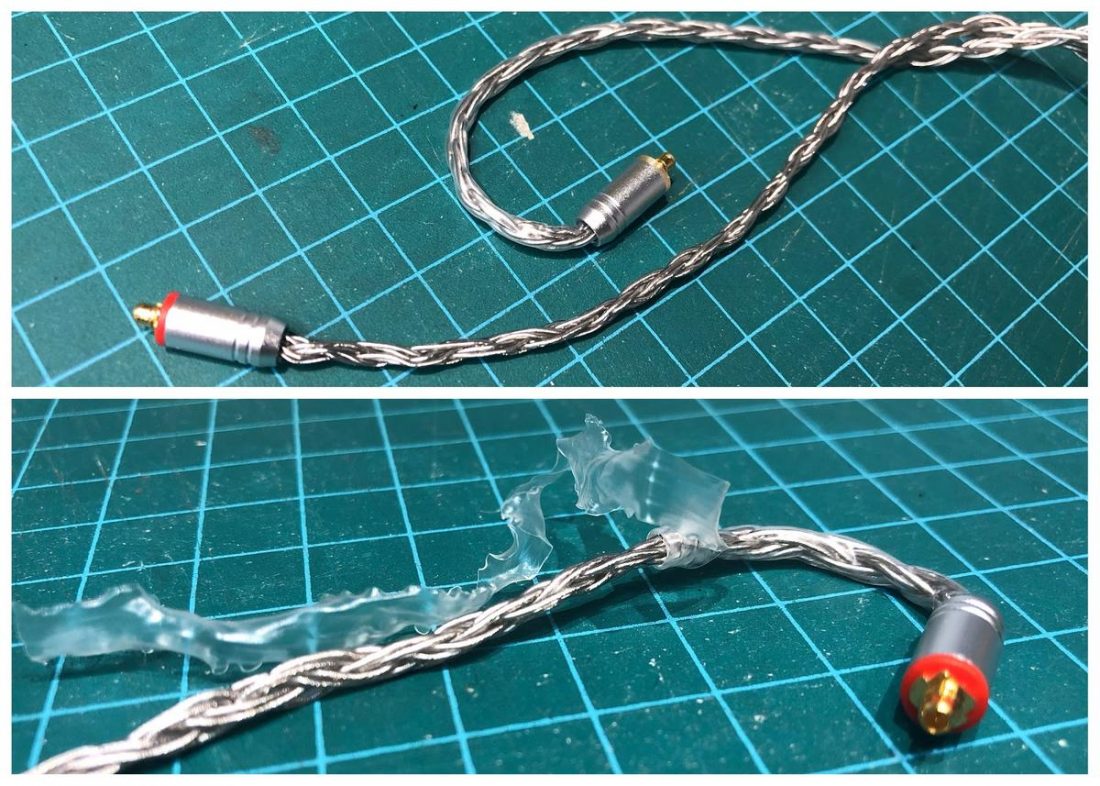
To remove the rubber coating, very carefully insert the tip of an X-acto blade facing outwards between the wire and the coating. Cut a small slit until you have the beginning of a split in the coating. Then holding the coating and wire in each hand, pull apart to further tear the coating along the split. It will likely be necessary to use the knife again as the rubber will tear off as you go.
Remove the rubber coating as close as you can go to the MMCX connector and use the knife to clean up any remaining bits.
Bluetooth cables
Another option for removable cables is Bluetooth. The wireless Porta Pro version is significantly more expensive than the base model, yet it is identical, other than including a (non-removable) Bluetooth module cable. Adding MMCX jacks to a regular Porta Pro makes adding Bluetooth a snap! (Yeah, pun intended.)
There are several decent options for MMCX Bluetooth cables. I use both the Shure RMCE-BT2 pendant and the Shanling MW200 neckband. Both work well with the Koss headphones. However, as they are designed primarily for micro IEM drivers, the 60 Ohm, 35 mm driver is far more challenging for their internal amplifiers. Adequate listening loudness is achievable, but only near the Bluetooth module’s maximum volume.
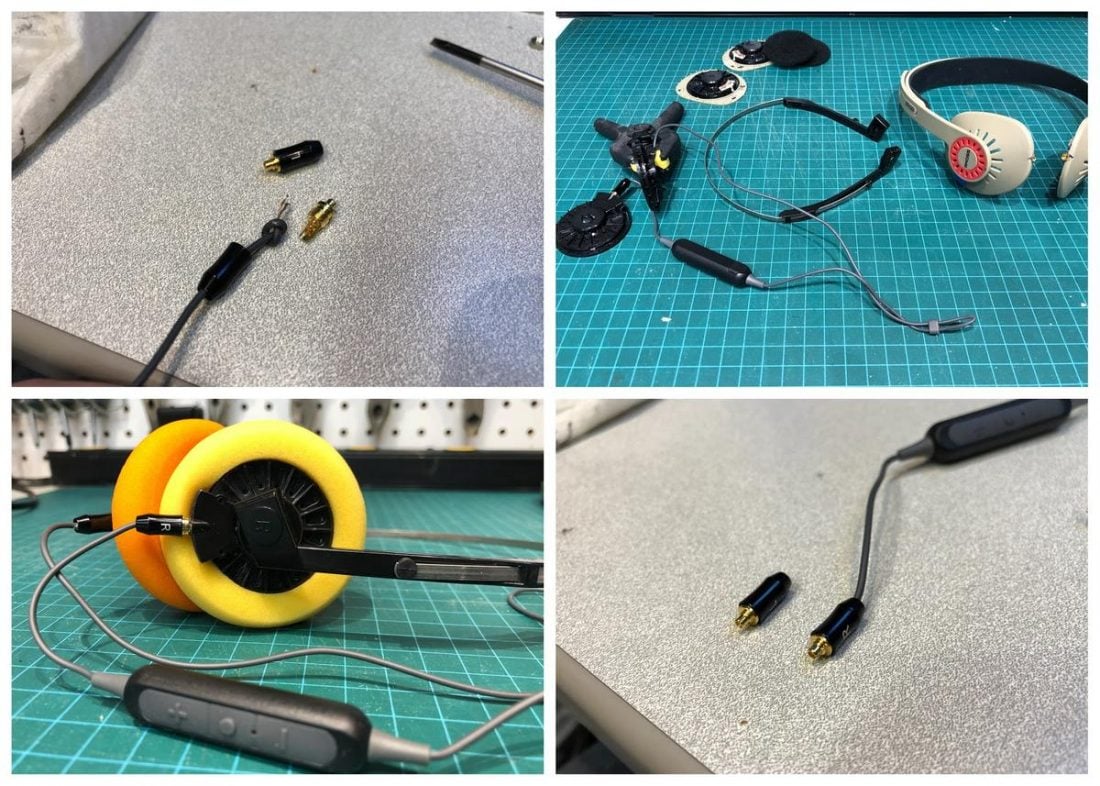
Top Left: Insert the cable through the MMXC plug body and tie a knot to keep it from pulling out.
Top Right: A work in progress. Testing the module while the epoxy dries.
Bottom Right: The MMCX plug attached to the Bluetooth module cable.
Bottom Left: The finished product.
I modified the wireless version of the KSC35. A two-for-one deal! Not only did the KSC35 gain MMCX sockets, but I was also able to create a Bluetooth add-on cable by connecting MMXC plugs to the unsoldered wires.
While the KSC35 Bluetooth module is clearly designed to power the Koss driver (it’s far more powerful than the above options), it’s definitely a step back from the one included with the wireless Porta Pro. The rechargeable lithium-ion battery life is only 6 hours, while the wireless Porta Pro lasts 12+ hours and supports higher quality aptX codecs.
Comfort Modifications
Headphone comfort modifications typically boil down to changing two things:
- Headband
- Ear Pads
If a pair of headphones are heavy, changing the headband, adding a comfort strap, or adding additional padding (such as the Dekoni Nuggets) may be necessary for improving comfort. There may be some change to the sound if the clamping force changes, but the influence would typically be fairly minimal. With the super-light range of Koss headphones, there is no reason to add a comfort strap or additional padding for comfort.
However, the KSC35 and KSC75 are ear-clip style headphones. I’m not a big fan of this wearing style and prefer a good old-fashioned headband. Luckily many of the Koss headphones that share the same driver, also share the same headband mounting mechanism. This means we can easily swap out those ear clips for a compatible band.
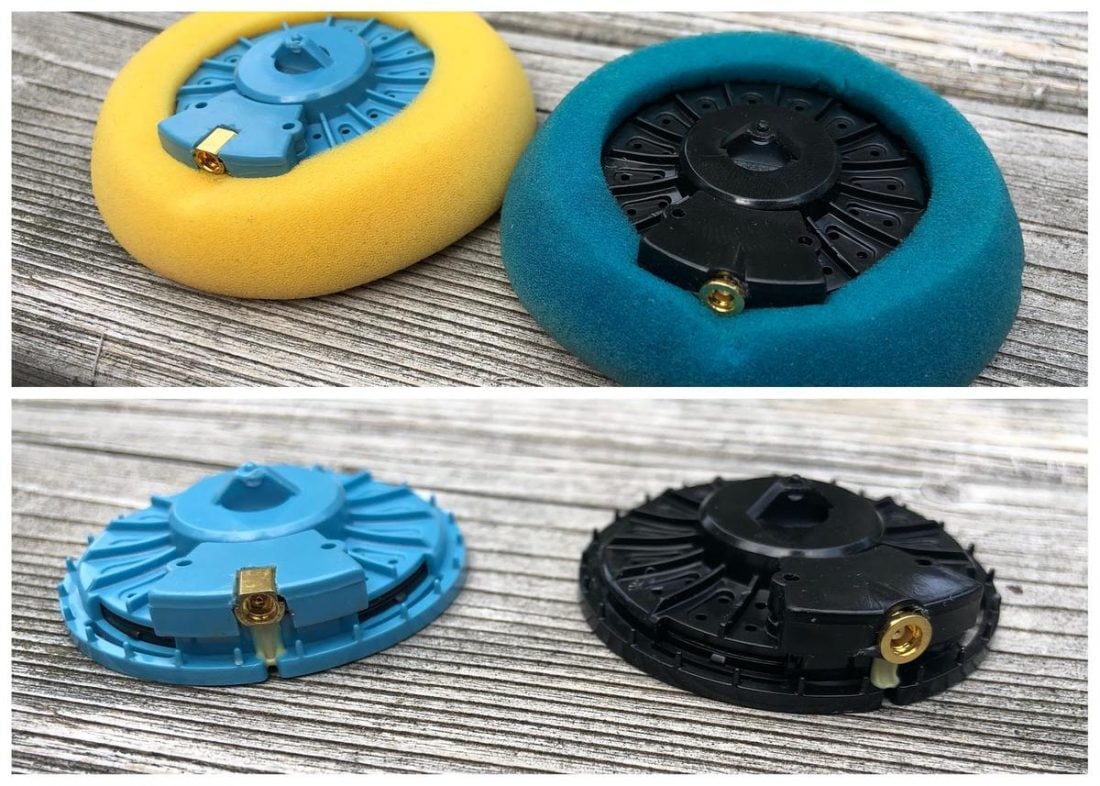
The mounting mechanism found on the KSC35, KSC75, and Porta Pro couldn’t be any simpler. The back of the driver has a small ball-shaped plastic protrusion. The matching band, or ear clip, has a socket that the ball clips into.
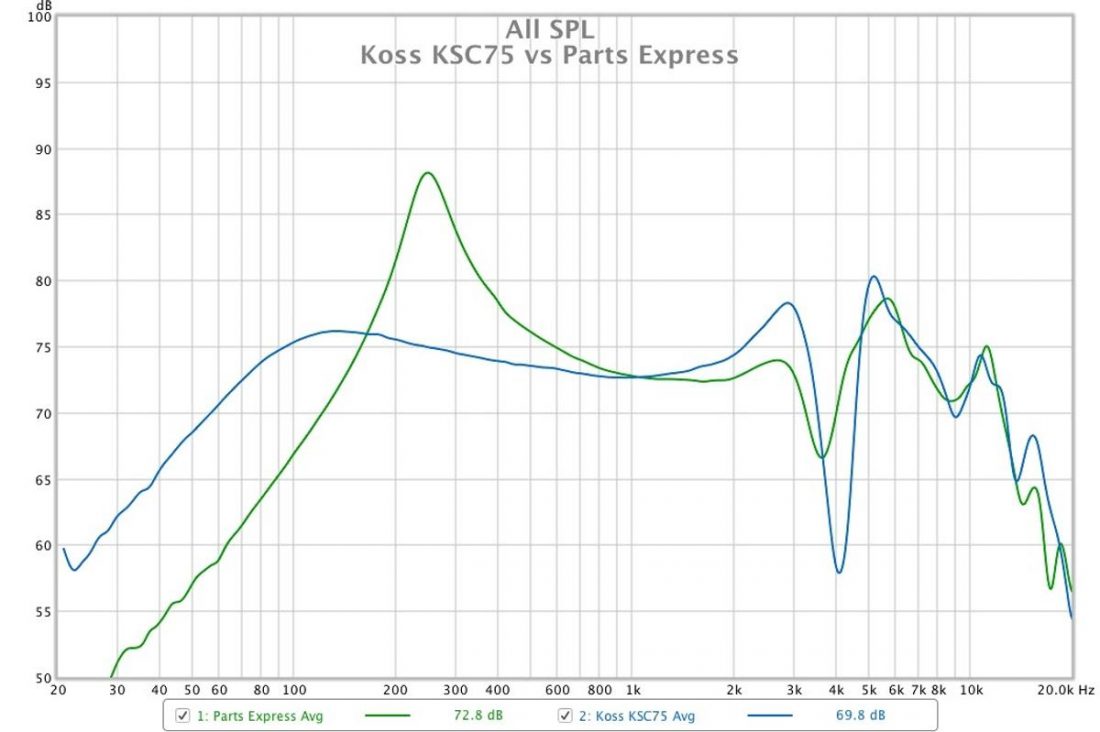
It’s such an inexpensive but functional design that other companies, such as Parts Express, have created sub-$5 headphones with a compatible band. The Parts Express headphone drivers sound awful, but the simple band works well to maintain the light weight and to change the ear clip style headphones to a standard headband style. The low price and poor sound quality means we can dispose of the Parts Express drivers with minimal regret.
Simply grasp the drivers firmly in one hand and the band in the other hand and pull straight out to unclip. To change the band, just reverse the process and pop the driver into the new band. Easy peasy.
Changing ear pads
The next step for improving how the Koss headphones feel on the head is changing the ear pads. While in stock form, the Koss headphones are quite comfortable, their thin foam pads are a bit scratchy and not quite thick enough.
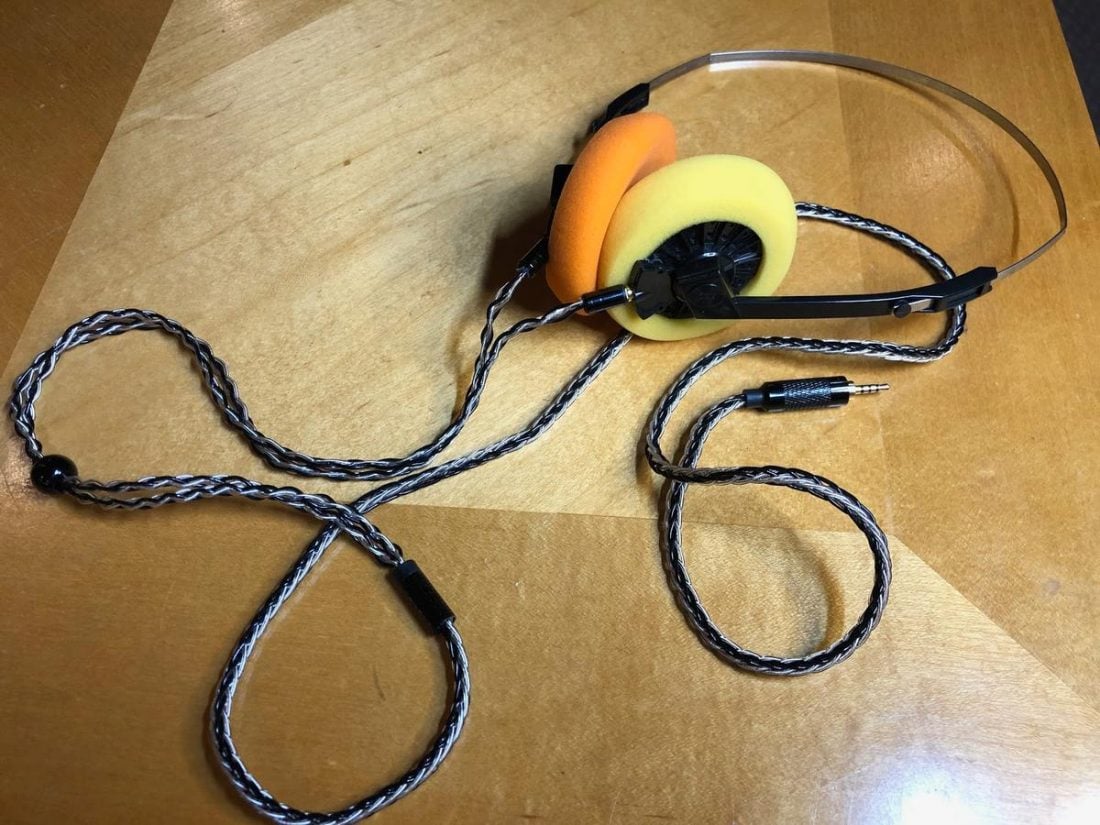
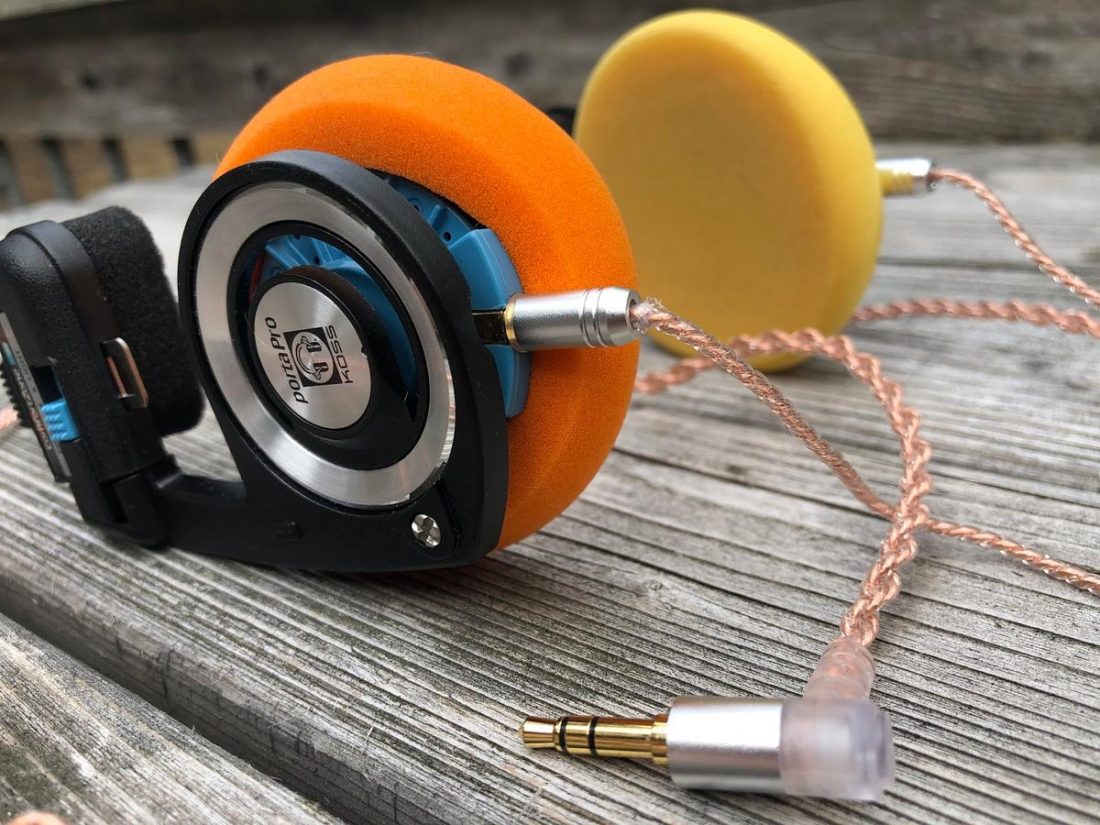
The easy (and ultimately right) solution for Koss headphones is the replacement foam pads made by Yaxi.

The standard Yaxi pads are available in red, yellow, blue, orange, black, and purple. Lots of options to make your Koss headphones look the way you want them to. Yaxi states that the pads will fit a variety of headphones.
Yaxi compatible headphone models
- Koss PORTAPRO
- Koss SPORTAPRO
- Koss KSC75
- Koss KPH30i
- Sennheiser PXC300 (discontinued)
- Sennheiser PX 200-II
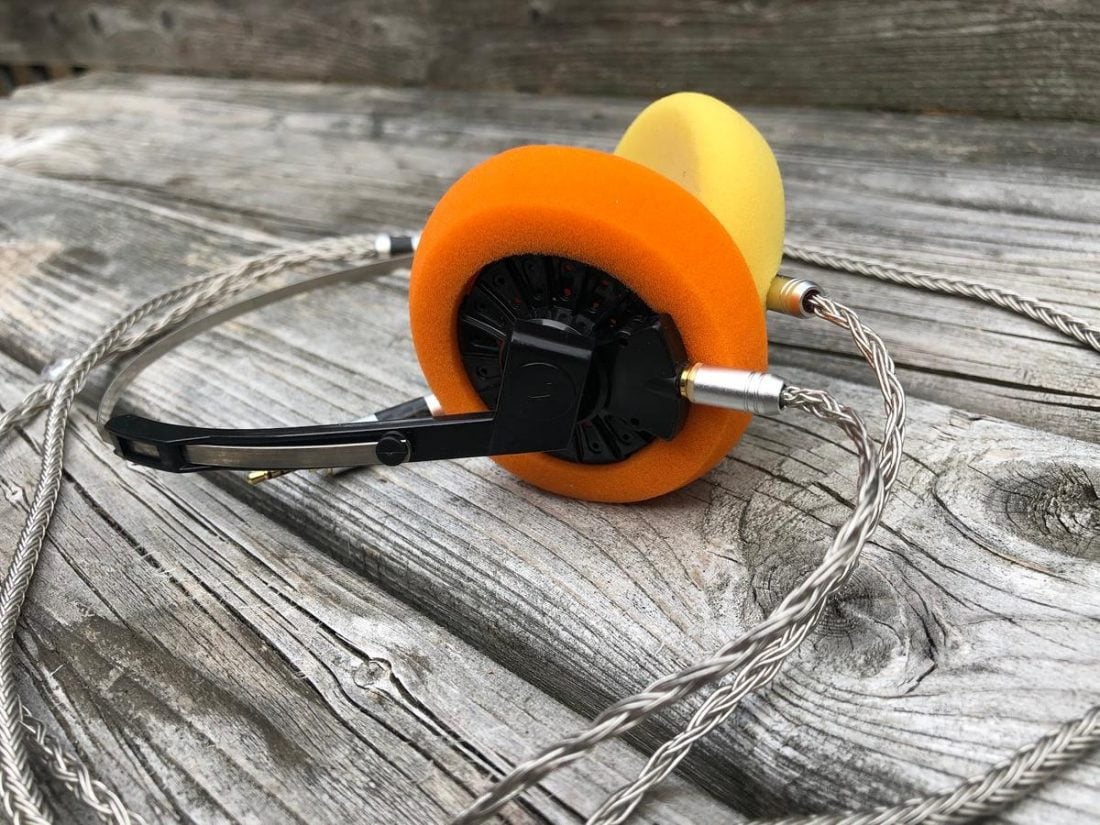
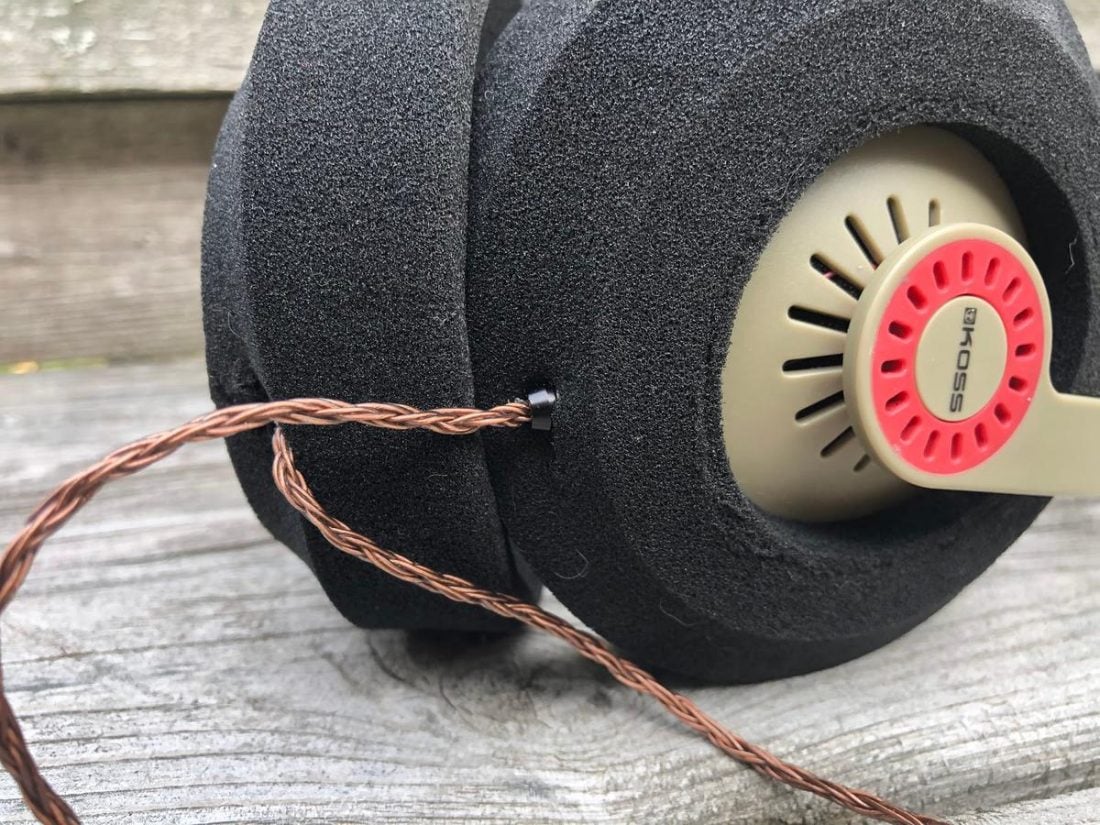
While the Yaxi pads can be made to fit on the uniquely shaped KPH30i, using ear pads made for Grado headphones is an easier tweak. Fitting the large, bowl-shaped, G-cush style pads on the KPH30i have transformed them into one of the most comfortable headphones I’ve ever worn. These pads are my strong recommendation for the KPH30i.
Changing the ear pads on any headphones changes the wearing comfort and has a major impact on sound quality. So, let’s move on to discussing how tweaking these pads changes the sound.
Sound Quality Modifications
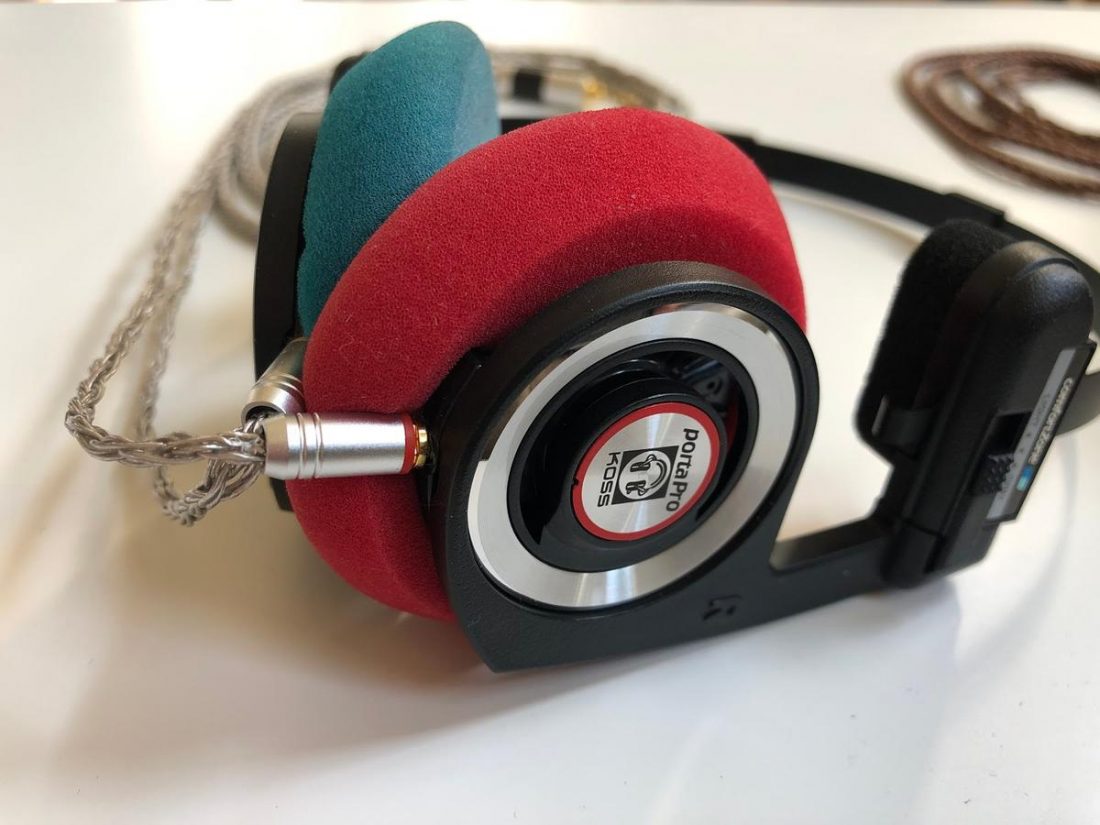
Stock pads, Yaxi pads, Grado pads, or pleather pads? There is no shortage of options for pad rolling on the Koss headphones. Let me rule something out completely. The pleather pad options are THE WORST! In every sense of the word. They absolutely ruin the sound.
The pleather pads sound flat, nasally, and awful. There is a huge new peak in the 1-2kHz frequency range and significant treble drop-off. Hard pass.
Moving on to the better options, there’s only one real choice.
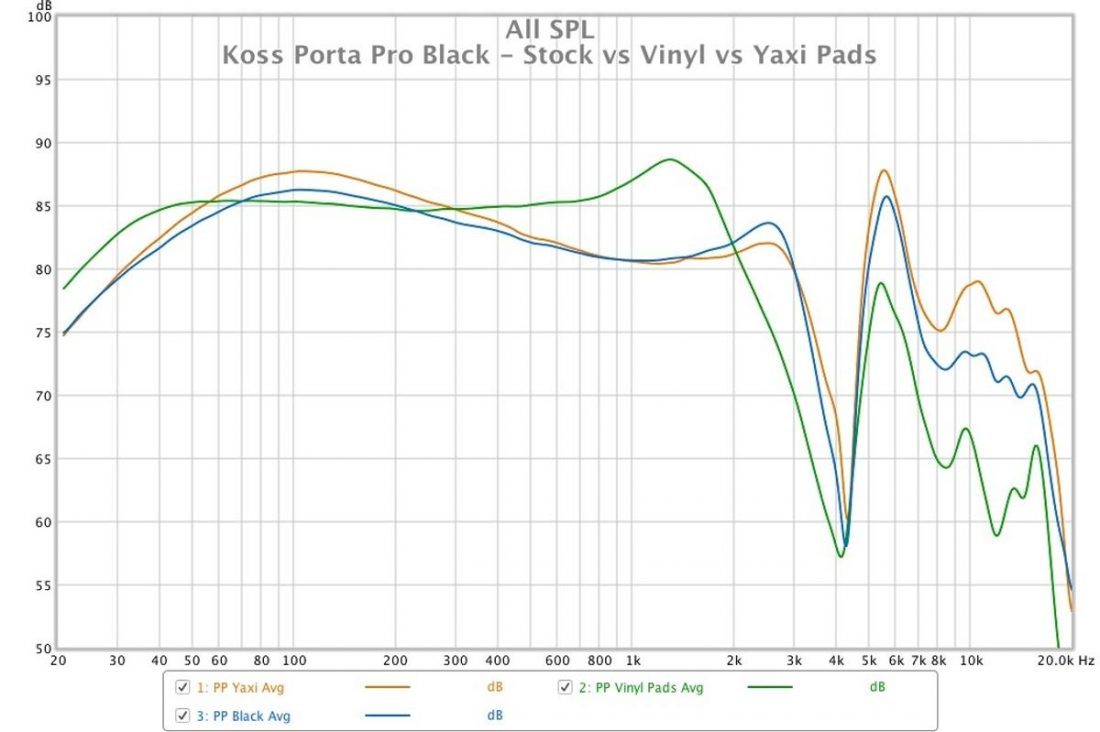
For the KSC75, KSC35, and Porta Pro variants, my recommendation begins and ends with the Yaxi pads.
Comfort is far improved. The Yaxi pads are thicker, softer, and by golly, they even sound better. They also fit the cups perfectly!
The Yaxi pads add a touch more mid-bass and significantly more higher-frequency reproduction while maintaining the sound signature that makes the Koss driver so special.
Better sounding. More comfortable. The Yaxi pads are a ‘must buy’ IMO.
KPH30i ear pads
The unique shape of the KPH30i makes them easier to fit Grado-style pads and far less easy to install Yaxi pads. I compared the stock pads to the Yaxi, G-cush (big bowls), S-cush (flat stock style), and some pricey Beautiful Audio merino wool L-cush (donut-shaped) pads that I have on hand.
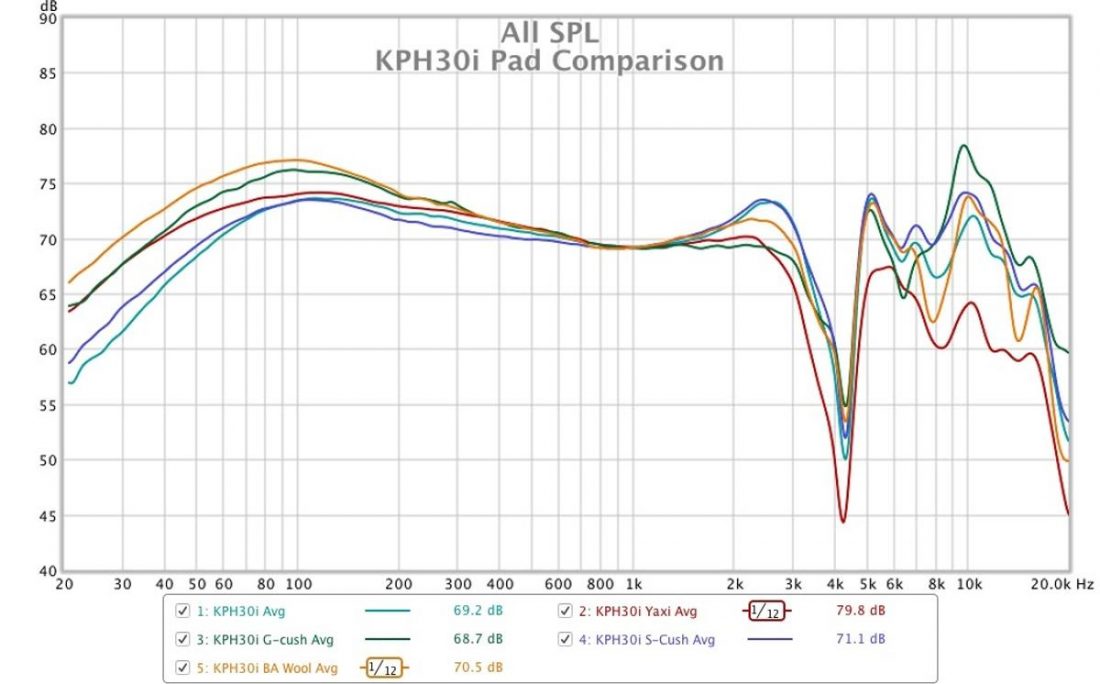
Interestingly, all the pads seem to have increased bass over the stock foams, with far more variance with the higher frequencies.
While it appears on the graph (calibrated at 1KHz) that the Yaxi pads significantly decrease the treble response, I think it is fairer to compare the Yaxi pads as if they were calibrated at around 2.5Khz. To my ear, the treble response is more in line with the others, with a significant increase in bass and midrange.
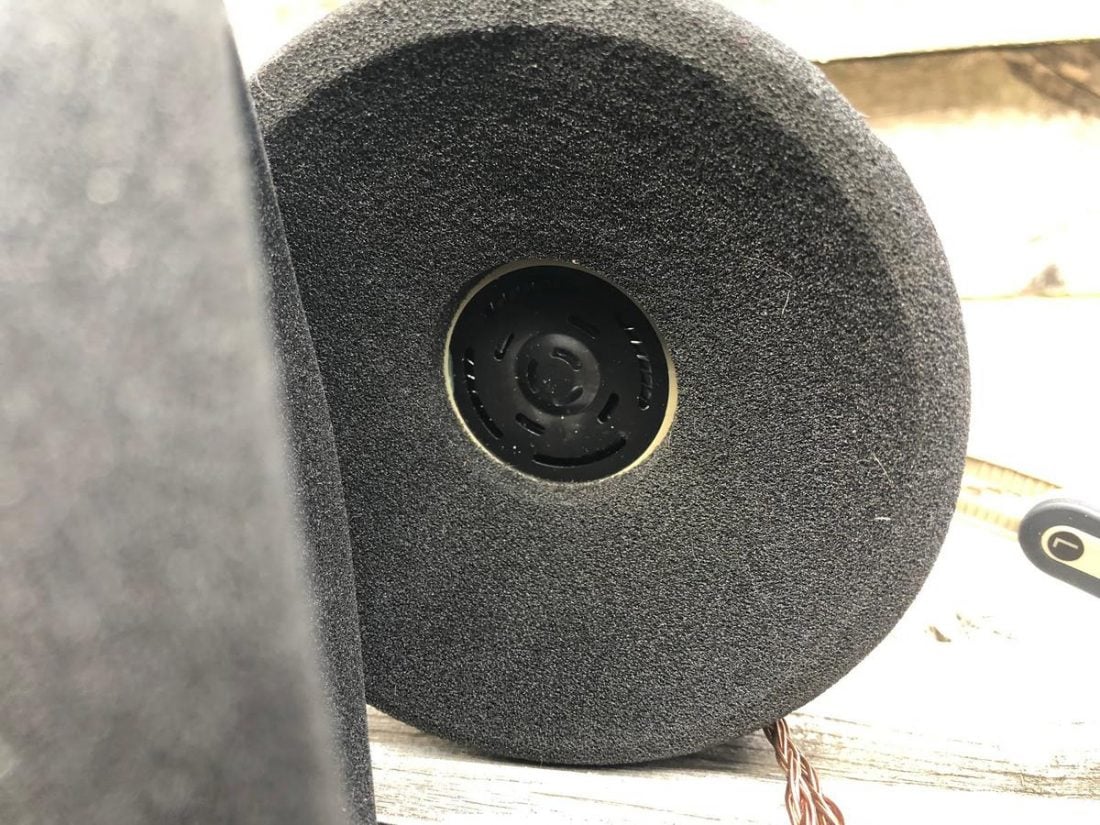
As expected, the large G-cush foams have a distinctive sound quality derived from their unique shape. First off, they do not have any foam between the driver and the ear, and the pre-cut hole fits the driver almost exactly. Secondly, they hold the drivers the furthest from the ear.
Overall, I like their sound the most.
Clear and bright without being sharp, the Koss drivers tend towards a more bassy signature, and the G-cush foams provide a great balance to the sound. And to my mind, the G-Cush pads are the most comfortable of all the Koss modifications.
Removing the KPH30i interior foam
Once I settled on the G-cush pads for the KPH30i, I decided to compare the sound with the interior foam pieces in place and removed. From the measurement graph, it appears that removing the foam lowers the bass a bit, and adds a bit of a peak around 5-6kHz.
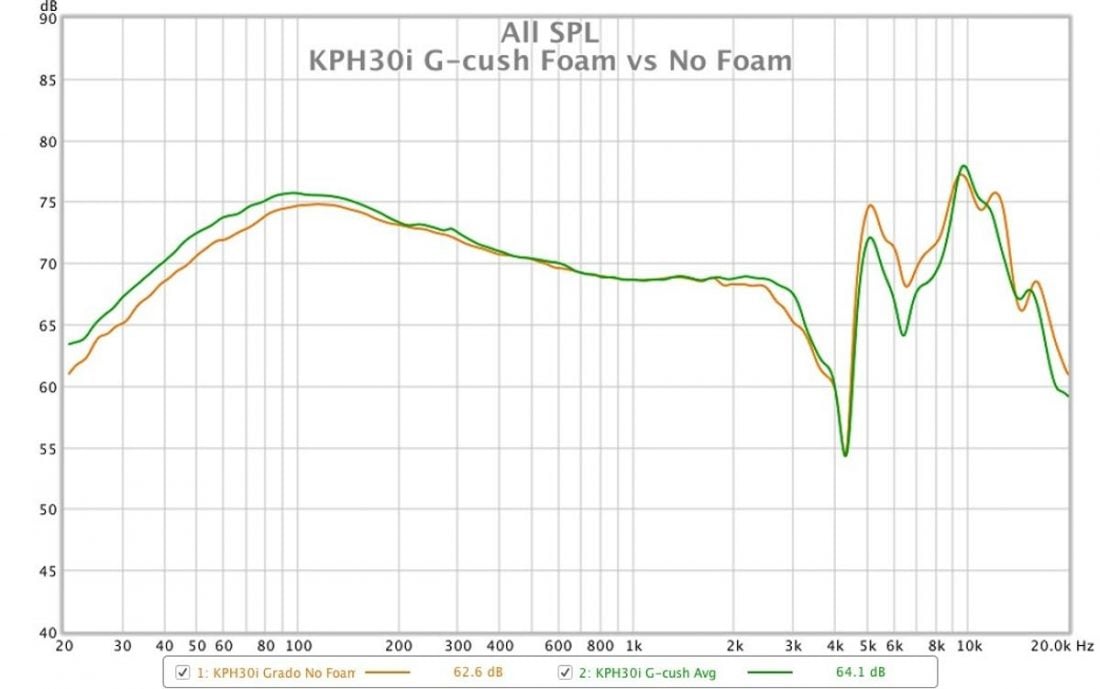
Since the overall signature of the G-cush mod is brighter, I settled on putting the foams back in. The audible differences were quite subtle.
Kramer mod
In 2005, a Head-Fi forum user going by the name Kramer5150 posted their list of modifications for the KSC75. The infamous ‘Kramer Mod’ was born!
That’s it in a nutshell.
Tools needed
- Snap-off utility knife
- Spudger (optional)
- Tiny flathead screwdriver (optional)
- Drill
- Awl
- 9/16” Drill bit
Top Left: The grill popped out of the ear cup. Note the peg on the right of the grill.
Top Right: Drilling locations marked with the awl on the bottom of the grill.
Bottom Right: Completed Kramer mod on the right, stock driver on the left.
Bottom Left: The top of the grill following drilling.
Steps
- Unclip the drivers from the headband and remove the ear pads.
- Locate the small (1-2mm wide) peg that extends through the side of the cup from the grill.
- Rotate the cup exactly 180 degrees opposite from this peg.
- Using a sharp knife tip or very small flathead screwdriver, insert into the small gap between the grill and the side of the cup (on the grill surface side). Do NOT insert too deeply as you can damage the driver underneath the grill.
- Gently pry the grill upwards until you can slide a fingernail (or thin spudger) into the gap.
- Slide your fingernail around the circumference, and the grill should pop out.
- Set the grill face down on a piece of scrap wood.
- Use a sharp-pointed awl to make 9 indentations. 8 centered between each of the existing grill holes and 1 in the center.
- Use the 9/16” drill bit to carefully drill using the awl indentations as guides.
- Clean up any loose bits of plastic.
- Align the grill peg with the matching cup hole and pop the grill back in place.
Kramer recommended cutting a hole in the ear pads to further allow sound to travel without obstruction.
Finally, Kramer’s thoughts on the sound:
“The result is a more open, dynamic sound. Mids jump out and treble really sparkles. Theres some intense treble in these little drivers, but its not intense in terms of amplitude… its more dynamic and ambient sounding. Its like a layer of glitter on top of some stellar mids. Theres some real frequency separation now that was not present before.
Cymbal crashes are more separate from upper midrange guitars and keyboards. Kick drum bass seems to be more “airy”… has more depth to it, as opposed to a solid “thud”. The “thud” is still there, but theres a sense of air around theat fundamental note.” – Kramer5150
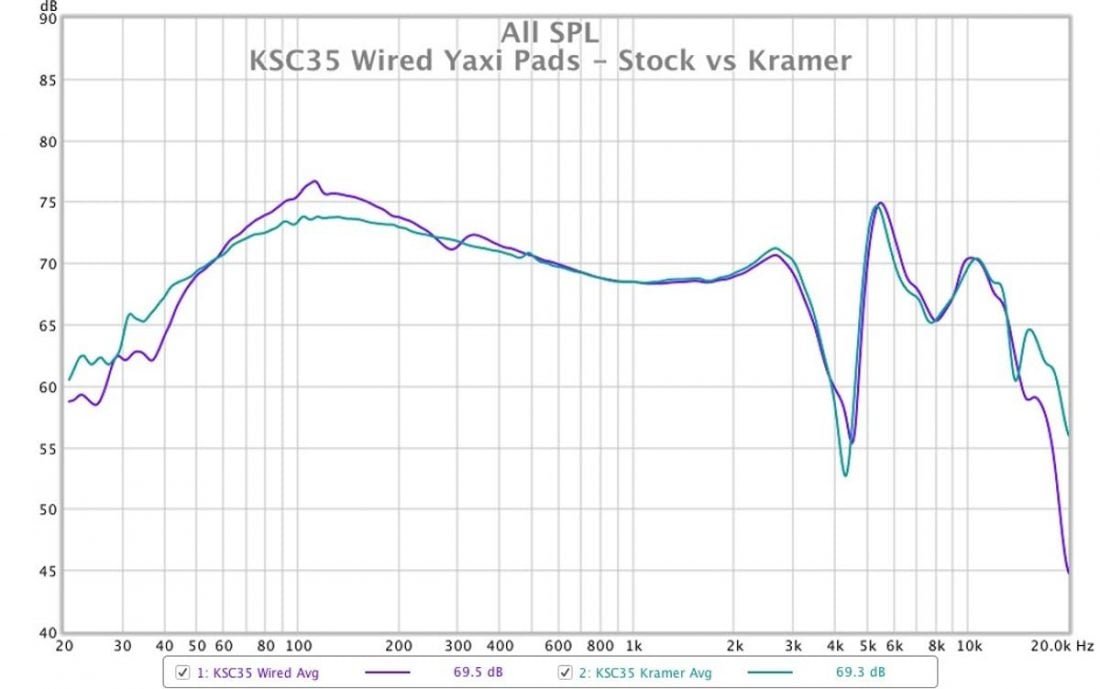
My thoughts are that the results of the mod are far subtler than all that. The measurements seem to indicate a touch less mid-bass, which may result in a slightly brighter overall sound. For me, the Kramer mod is entirely optional, and I can’t say I noticed much change afterward, even when directly compared against non-modified drivers.
Conclusion
Do you have the interest enough to wade through thousands of words regarding modifying inexpensive Koss headphones, and you don’t currently own any? Then do yourself a favor and buy a pair and order the Yaxi ear pads. Full stop. Stop reading. Go do it now.
The excellent Koss driver covered with Yaxi foam is not only ALL you need to do for modifications; it’s what you MUST do to enjoy this terrific line of headphones fully. Comfort and sound quality are undeniably improved. It’s often the most straightforward modifications that yield the most significant results.
Sure, you can take it to the extreme and add MMCX sockets and replaceable cables, or add giant Grado pads to the KPH30i (and don’t get me wrong, it’s great fun to do so). But to hear the magic, there is a simple formula.
Koss + Yaxi = happy.
I love this Koss headphone lineup. I’ve owned Porta Pros for decades, and I will always own a pair, or two, or three, or…
Did the Grado G-Cush pad mod with Koss KPH30i phones and have been very happy with them for a couple of months.
Tonight the plastic snapped.
If you look at the photo at the beginning of the article, you can see where the KPH30i is printed on the side of the headband. The part that snapped was the thinner piece that wraps around the piece with the model # on it. Not surprising, since that is the thinnest part of all, and the G-cush pads are putting additional strain on the plastic.
I’ve noticed that the plastic headband doesn’t clamp them tightly enough anyway. To me, they sound better if I press lightly on each side, so I’m looking for an alternative to the original headband that will clamp just a bit more.
Hi Mike,
I saw you’re looking for another headband.
Check this out:
https://www.prusaprinters.org/prints/51602-koss-kph30i-replacement-headband
Best wishes!
Thanks, Jesh.
There is actually a 3d printer in the building where I work.
I might have to go check it out!
Mine snapped at the same spot with stock pads. I wear small size helmets, so my skull isn’t big either. On the same exact day, the glue holding the right side driver on my Grado GW100 let the driver go, and my KZ IEM’s socket cracked. What a day.
Amazing!
Thanks for the guide!
Just finished adding the MMCX sockets and replaceable cable to one of my 4 sets of porta pros and it is super fantastic. Even easier than it looked. Thank you so much for this idea.
Hey. Glad it worked out for you! Such a huge improvement on these great headphones.
Thank you for the ultimate guide. It was pretty helpful. Today finished my mmcx mod for ksc75 with yaxi pads and rocks.
Right on! Enjoy!
How is the sound from porta pro with balanced cable?
The PortaPro are reasonably efficient headphones to drive and don’t really benefit from the additional power of a balanced connection. Some benefit may be had if the source sounds significantly better via its balanced vs SE output.
Hi,
I need to do something fairly basic (replacing headphone jack that completely broke down on my porta-pro) but have not found any info on wiring.
And I pretty sure you already have that info, given the much more advanced modification you made 🙂
I probably could send them for the “lifetime warranty” but will have to wait and will be more costly just to ship than do a quick fix.
This is the porta-pro model with mic and has 4 wires: Red, Green, Blue and Copper.
Which one is Left / Right / Mic ? ( I assume copper is the common).
( the Fancasee replacement cable I have come with Red Green Black White, so no color match – but I know what those colors map to)
Hey Marc! I’m sorry, I don’t remember what the color coding is. My best suggestion is to invest in a multimeter and use it to make sure. I find I have to every time I tackle a new project.
Why was the Kramer mod for the ksc75 followed by a graph showing the mod for the ksc35 – the wrong headphone? Is there a graph for the Kramer mod on the ksc75? The porta pros always had an exaggerated bass hump while the ksc75 ear clips needed to be removed for a headband to create bass. This really needed to be emphasized that the headband completely changes the sound of the ksc75 headphones.
Kramer did the original mod on the KSC75, but I modified the KSC35 in the article by way of explanation. There may be measurements of the original mod still available online.
Here are a couple of extra mods and some advice. When completing the Kramer mod you can safely “push” the plastic grill off from the other side instead of prying it up.
Now to the good stuff:
1. You can improve the sound of the ksc75 by getting a cheap headband from “parts express” – the ksc75 is almost impossible to get a good fit without a new headband. With the new headband, the bass comes to life.
2. The ksc75 is a semi-open design with many holes in the back. Open-back headphones like Grado often lack bass but sound more open. Closed headphones often sound the opposite. Cut tiny pieces of duct tape and cover up all of the “3 stacked circles” on the outside of the headphone. I did not cover any of the oval slots. The bass improved – experiment and find out if you like it.
3. The ksc75 is 60 ohms. They are not 32 ohms like so many others meant to be used with phones or tablets. I use a headphone amp and the sound noticeably improves. Much fuller base and clarity in the treble. I have the Pocket Amp 2 version PA2V2.
With these modifications, the ksc75 is now superior to my very bright Grado SR80s!
Thanks for adding to the list!
Any mod capable of adding a volume control?
Sure. Just buy an mmcx cable with volume control and an inline mic. Inexpensive options on AliExpress.
I’m curious if you can make a wireless Porta Pro with the Kinera Gramr mic cable. Though I’m worried that if I go wireless, then the mic won’t work. Any suggestions or answers, perhaps?
Thanks.
I assume by ‘wireless’ you plan to use a Bluetooth DAC/amp such as the FiiO BTR7? It’s going to depend on the device on which can use the wired mic vs a built in mic in the DAC/amp. You’ll need to check the specifics to figure out what might work.
My original question was kind of a dumb one, I wanted to know if you mod some wireless FiiO earhooks plus the Gramr boom mib and make a wireless headset, I now realize my mistake, since the FiiO can only use it’s internal mic, though I did follow the guide, and made a wired headset using the Antlion Audio Kimura mic. Thanks for the help though!
Glad you got it figured out! Happy to help!
what if i get something like this from aliexpress instead of original yaxi pads: https://aliexpress.com/item/1005005380594633.html
these are very close in size to yaxi pads; almost identical except the ring shaped foam that stays outwards from your ears is bigger, which means it covers up holes in the back a bit more, idk what consequences would that bring and i can always cut that hole bigger if you say it should not be covered
do you think maybe there is something else to yaxi pads such as the way they built (maybe sponge’s density?) or the plastic material that are used to make it?