Easily create actual audiophile quality headphones, on the cheap.
Introduction
Ladies and gentlemen, welcome to the future. Sure, we’re missing actual robot butlers (don’t tell that to my Roomba – he’s a bit self-conscious), flying cars, and self-tying sneakers (turns out I’m wrong on this one), but we do have the ability to create something from seemingly nothing. 3D printers are becoming near ubiquitous, and although I’m a fairly late adopter, I’m jumping in with both feet.
I love DIY. I love headphones. So, 3D printed headphones? Yes please!
If you are unfamiliar with 3D printing, there are two main components. On one side is the printer itself, a physical device, which essentially consists of a heated nozzle that can be moved in 3 dimensions and that extrudes melted plastic filament. The filament (resembling string trimmer line) typically comes on a 1Kg roll, and is available in a variety of colors and compositions, each with differing properties such as strength and flexibility.
On the other side of the equation is the software that creates a file for the printer to read and translate into a plastic sculpture. I’m firmly in the beginner camp that is capable of downloading a file and using a piece of software to “slice” (a little 3D printing lingo) the file into a set of instructions that the specific model of printer can use.
Of course, someone has to create the original 3-dimensional file. That’s a skill I’m learning to do myself.
So, for now, I’m relying on the hard work of someone else in creating the object file. That’s good news for readers of this article who are new to 3D printing. As they say, if I can do it, so can you. I’ve only had a 3D printer for a few months, and if you are considering one, I can say it’s well worth the investment.
This all led me to investigating the world of 3D printed headphones. For my first attempt, I wanted a certain level of hand-holding. And that meant well documented instructions, easy availability of parts and support, and an active user base. But I didn’t want to spend all that time, effort, and money in creating headphones that only have the potential to sound mediocre. That ruled out using cheap drivers liberated from other inexpensive headphones. I mean, what’s the point?
I found exactly what I was looking for with the Vector Finesse head(amame) headphones.
Tymphany Drivers
During my research, I stumbled across headphone designs that are based on the Peerless Tymphany HPD and HRD headphone drivers. These drivers are available in both 40mm and 50mm sizes, and (if you are lucky enough to find them in stock) are surprisingly affordable.

In headphone circles, it’s fairly common knowledge that Kennerton Audio Equipment uses the Peerless 50N25PR00-32 in their well respected Vali headphones. Just to be clear, these are a pair of approximately USD$11 drivers providing the sonic duties for nearly USD$1000 headphones. Tuned and modified, sure… but clearly the Tymphany drivers are capable of fantastic sound.
3D printed headphones based on Peerless Tymphany drivers seemed like a good place to start my DIY journey.
The head(amame) were originally designed around the 40mm Tymphany version (impedance: 32.9 Ohms, efficiency: 89.60 dBA), but have recently been updated to support the 50mm version (impedance: 31.6 Ohms, efficiency: 98.10 dBA) as well. For this article I purchased both driver sizes and will compare the two.
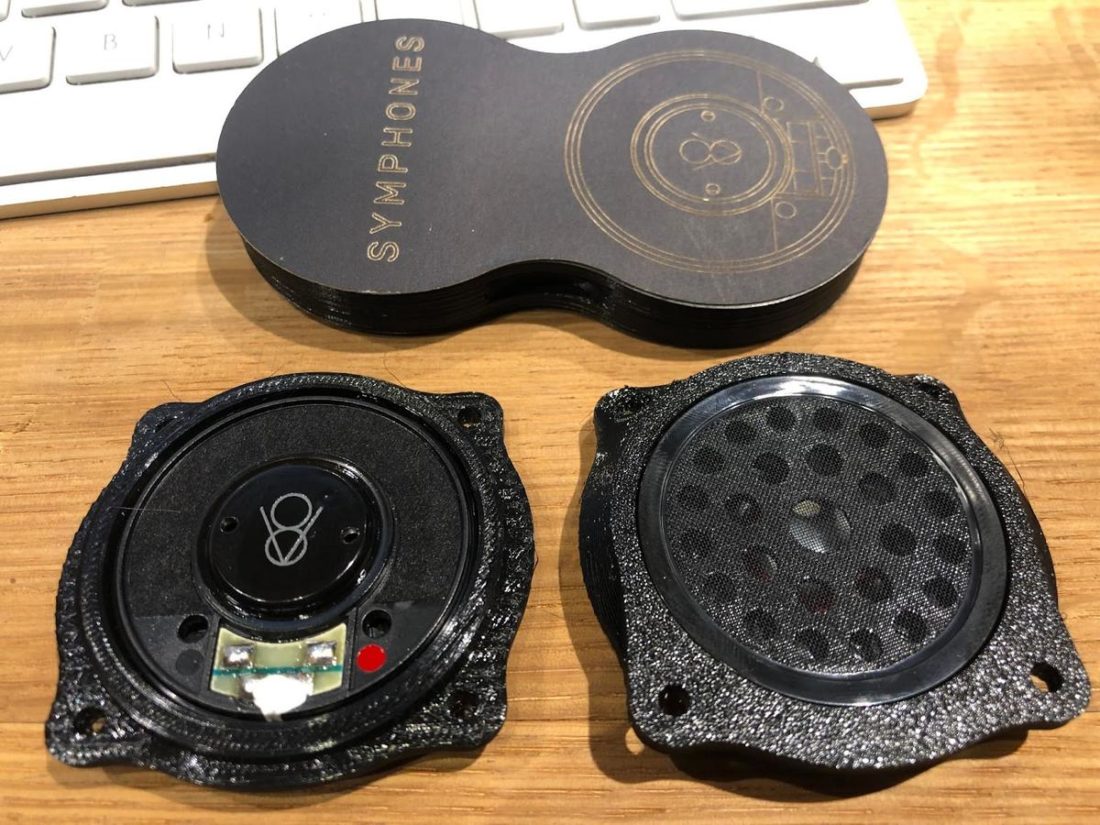
With some internet help I fashioned new driver mounts to hold 46mm drivers, opening up the use of any of the many available aftermarket Grado headphone drivers. I have a new pair of Symphones V8.1 drivers on hand that I’ll try out as well.
The head(amame) Story
Morgan Andreychuk, the creative force behind the head(amame) headphones and Vector Finesse, originally described them as his “main COVID project,” proving something good can come from adversity. About a year ago, he posted his initial design on Reddit, and someone described them as “looks like edamame bro.” Inspiration flashed, and the name stuck.
“After 100’s of design hours, countless spools of filament, and several rage inducing failed prints, we are finally at a point where we are proud to share these beans with the world. In case you are missing out, here is how we got the name “head(amame)”.
A little bit more about the headphones specifically:
- Based on the Peerless by Tymphany 40mm driver (they sound incredible)
- Closed back design
- Leverages slicing software and geometry to cancel out reflections
- Fully 3D Printable on most mainstream printers (Ender 3 and Prusa i3’s)
- Compatible with standard Headphone Earpads”
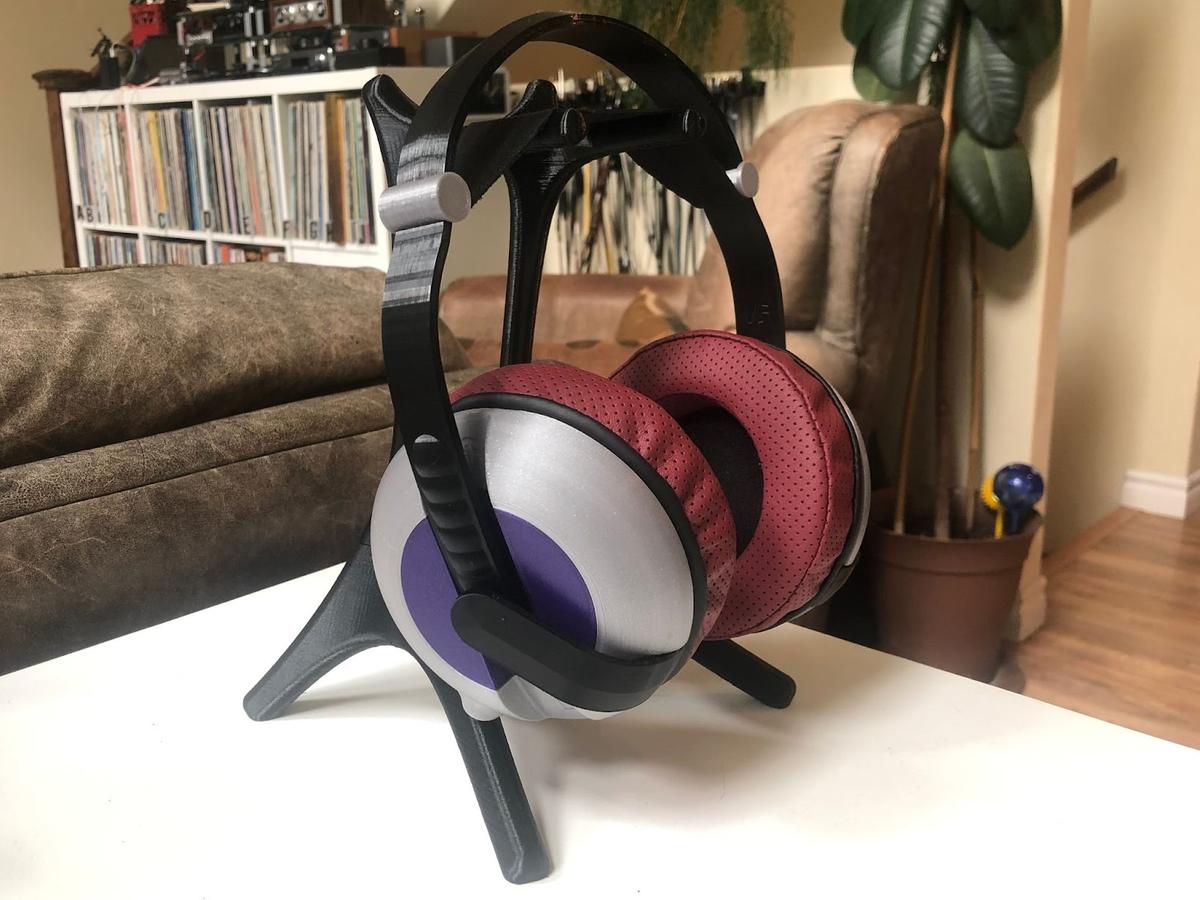
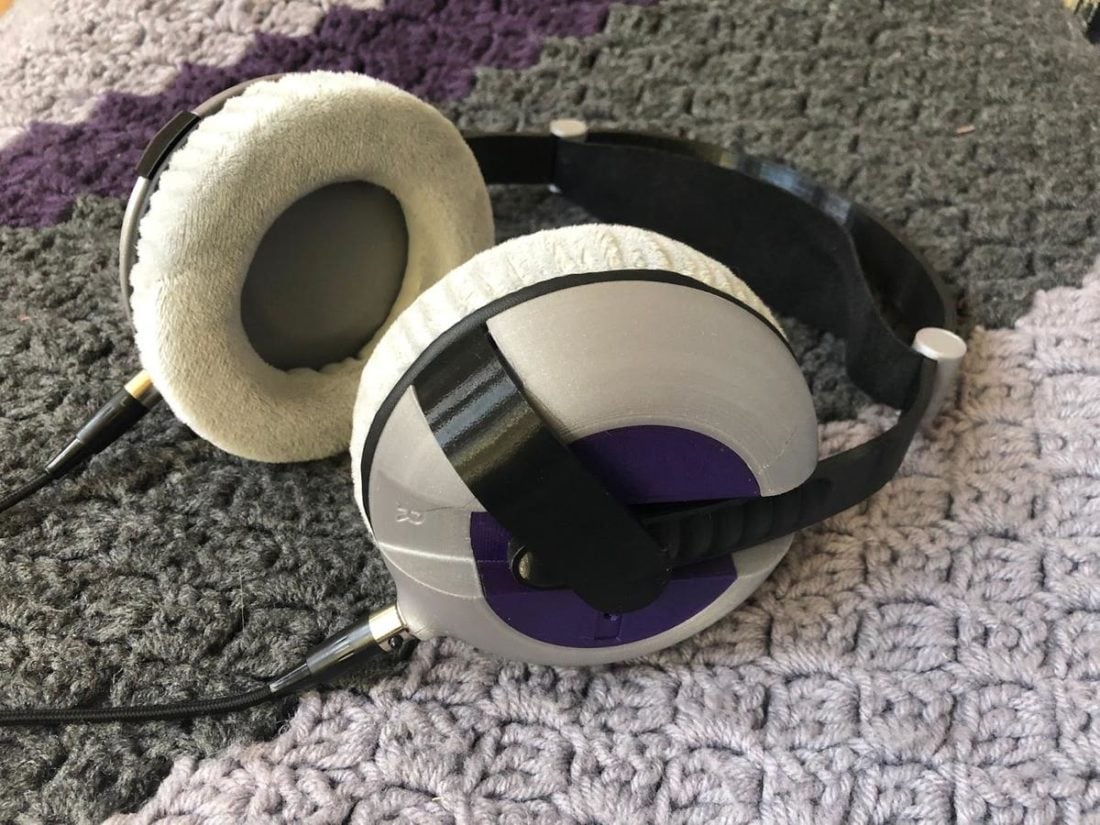
The head(amame) are full-sized, over-ear headphones that use a pair of round 110mm ear pads. Brainwavz XL pads are recommended, but you can use any standard pad of that size. This means that the head(amame) will likely comfortably fit any size of ear, but the overall design is a bit on the bulky side.
Design
For better or worse, the head(amame) look almost nothing like other headphones. This is partially due to the simple but extremely clever headband design intended to be easily created on 3D printers, and because the maker can print them in any color combination they wish. Let’s put it this way, Sennheiser isn’t producing many teal, yellow, and fluorescent orange combination color headphones targeted to the mainstream audiophile headphone buyer.
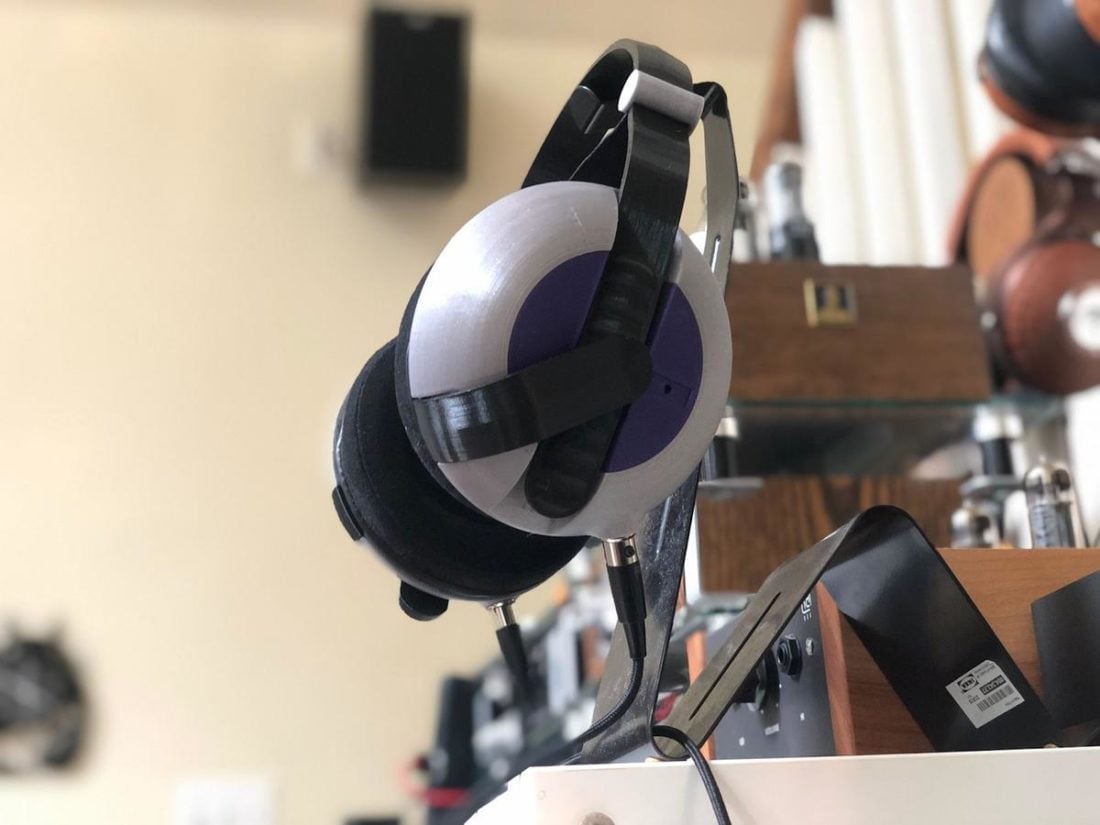
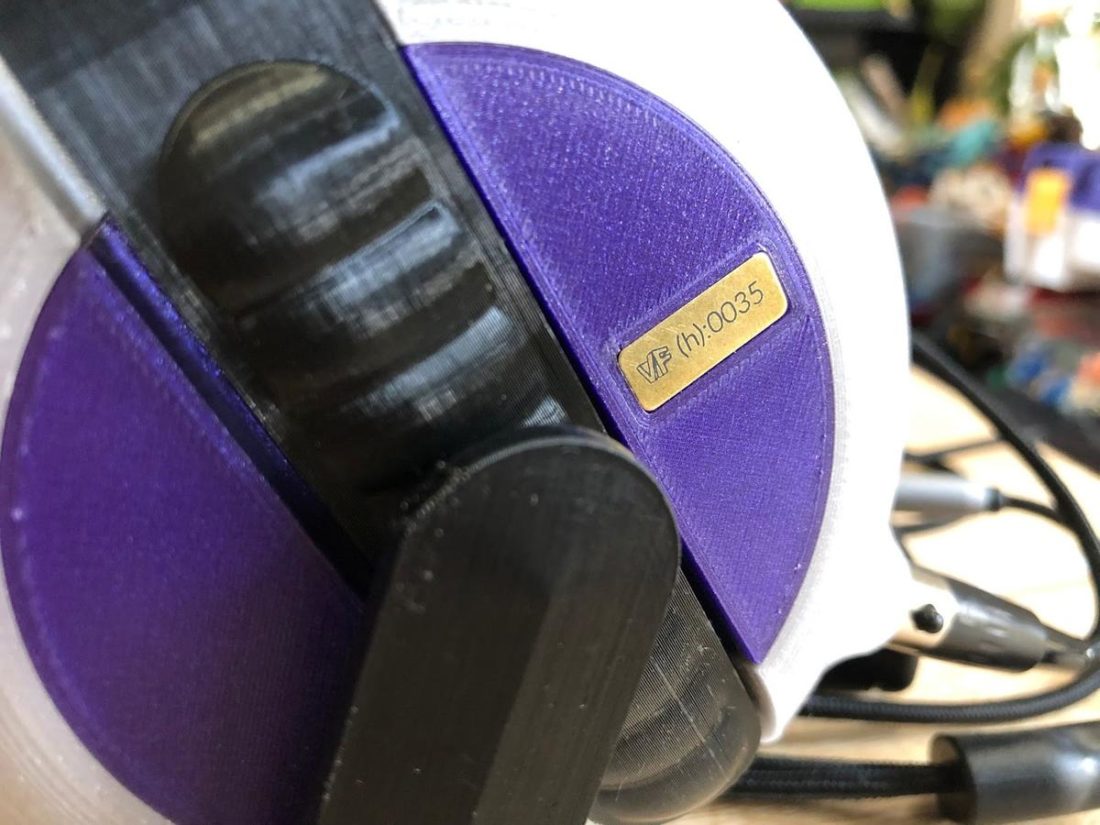
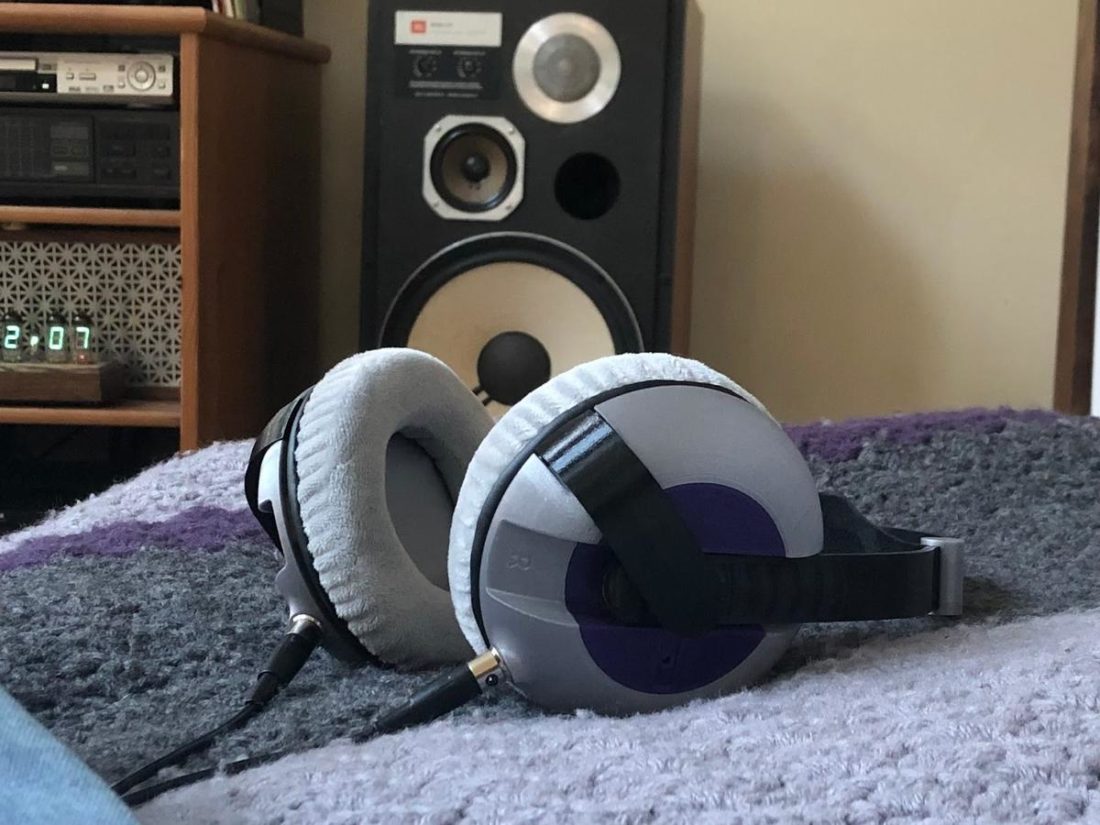
I toyed with the ideas of both basic black, and entirely wild, and ended up trying to strike a middle ground with a black band and silver cups with purple highlights.
Not a bad end result, but I’ve recently seen a pair printed with wooden filament for the cups, and I know my next attempt will be using this type of filament (a first for me). The overall look elevates the head(amame) fit and finish from something that looks quite so obviously DIY.
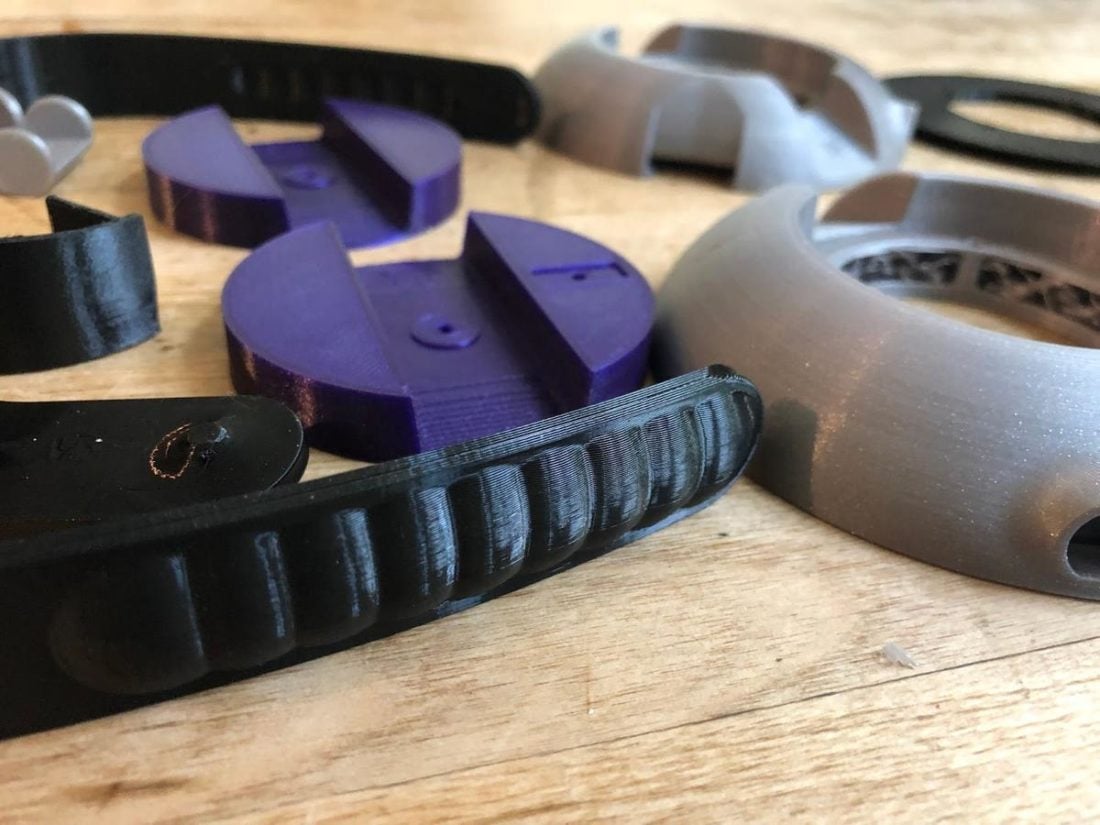
The headband is a single piece with notches near the bottom edges to hold the ear cups at the desired size. The band slides through indents in the outside of the cups and is held in place with a printed spring piece that pushes a rounded rubber bumper into the selected notch.
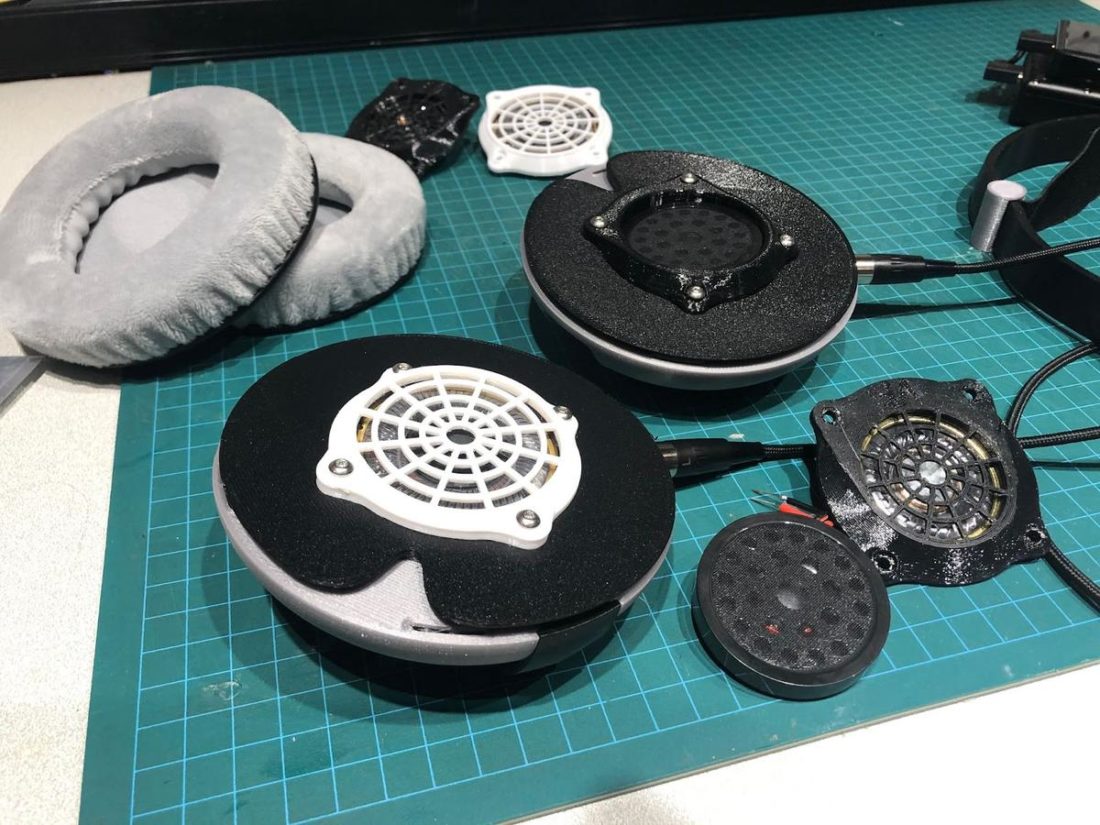
The ear cups consist of four main printed parts (driver mount, pad mount, cup, and cover), held together with only 4 screws! Another screw holds the band spring on the cup. Once printed, assembly could not be easier.
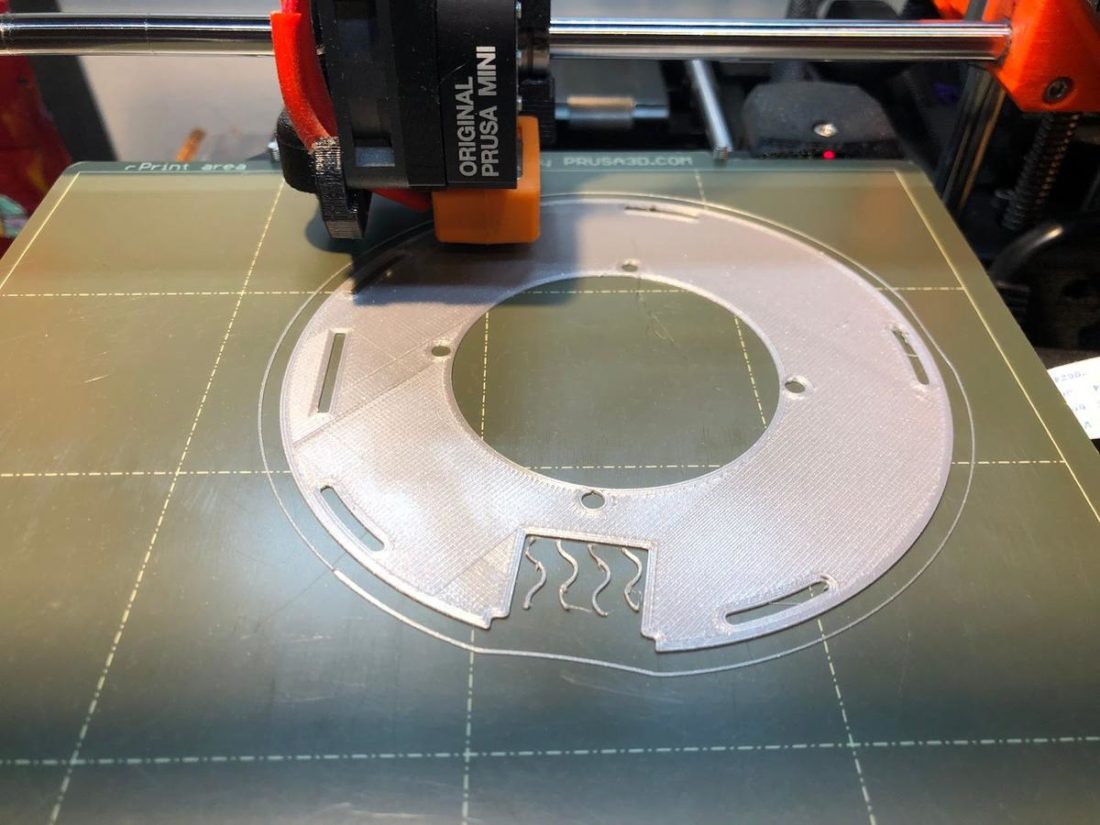
Printing the head(amame)
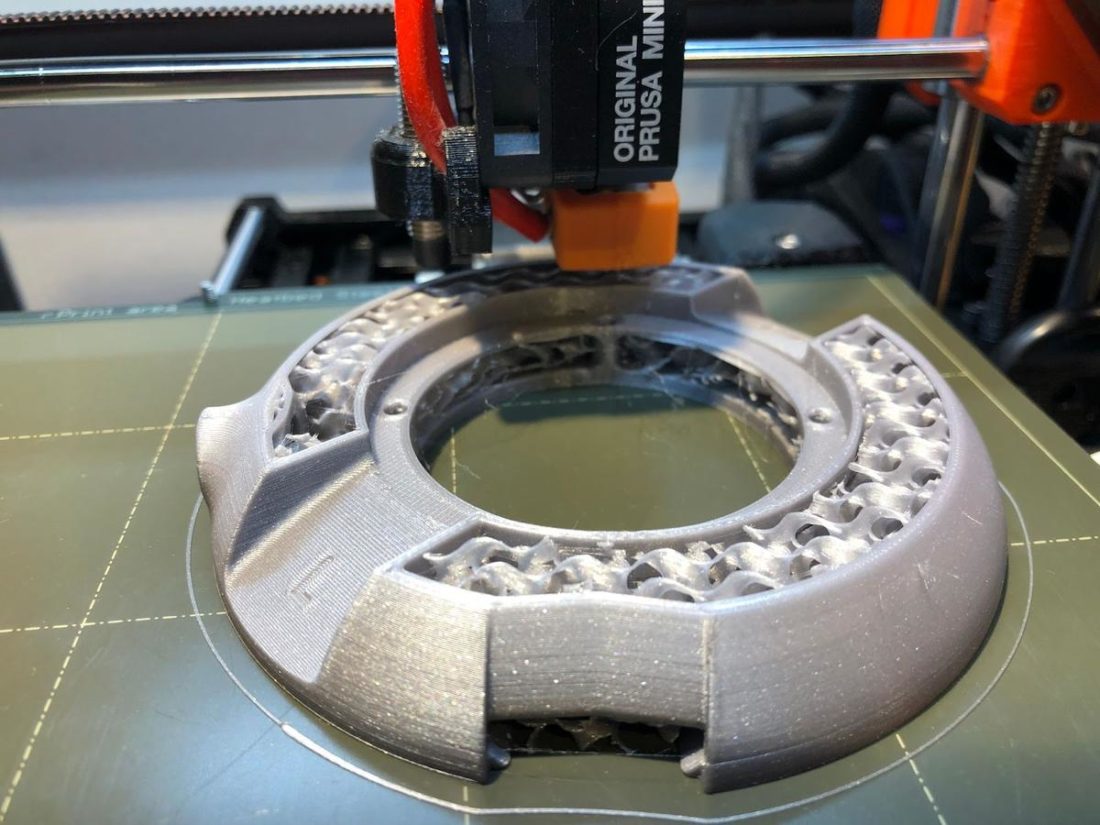
I used version 1.5 of the files to create my pair of head(amame). As a Prusa printer and PrusaSlicer software user, the most current version (1.6) would have made my life far simpler. One of the most interesting aspects of the head(amame) is that it uses an extremely cleverly designed fill pattern (gyroid) inside the ear cups as sound dampening, rather than having to add foam or cotton batting.
This simplifies the build process and standardizes the tuning for all builders. However, the fill pattern is not easily supported by PrusaSlicer and previously required the use of Ultimaker Cura slicing software.
Cura was entirely new and unfamiliar to me. At first glance, it’s far more intimidating and complicated than a beginner (like me) wants. However, thanks to the rather excellent included guide, I simply blindly followed the screenshots, configured my Cura settings to match what Vector Finesse suggested, crossed my fingers, and hit the print button.
Everything turned out fine on my first try.
Project Time
The time it takes to print 3D parts is dependent on the speed of the printer, the complexity of the parts, and the level of detail you choose to print. For this project, it took my little printer about 10 hours or so to churn out all the plastic parts at 0.1mm layers.
Assembly of the parts was far quicker. The drivers and XLR jacks come pre-wired with slide in connectors (no soldering required), and it only takes about a half hour to go from a pile of parts to a set of fully assembled headphones.
Hardware
First, to answer a question that I often hear from 3D printed neophytes, you can only print the plastic bits. The hardware (wires, screws, connectors, drivers, ear pads, cable, and the comfort strap) must all be purchased or fabricated.
Vector Finesse offers builders a wide variety of options when sourcing parts to complete the headphones. You can buy anything from single parts, to kits including electronics, fasteners, and soft parts, to fully completed headphones (for USD$250). They even provide a Sourcing Guide spreadsheet with links and costs compared when purchasing directly from them, North America suppliers, or AliExpress.
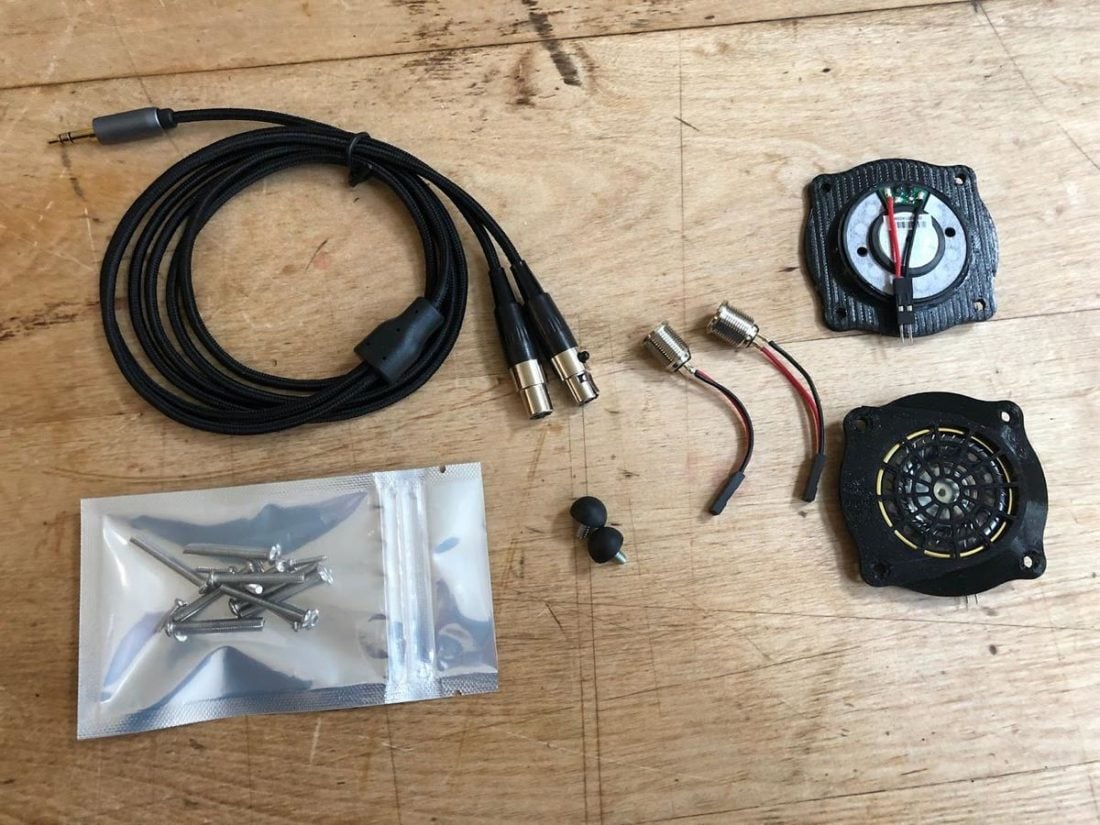
The Vector Finesse cable is of surprisingly decent quality, terminated with dual mini-XLR plugs for the headphone and a metal gold-plated 3.5mm plug at the source end. Its thin black fabric-jacketed wire is a little stiffer than I prefer but it seems tough and is non-microphonic.
Comfort
I used the included template and cut a simple band from a thrift store leather jacket that I’ve used for making comfort straps in the past. Previously, I have folded the leather and used contact cement to glue it together, but for this project I just used a single thickness. I find the soft suede bottom rather luxurious feeling.
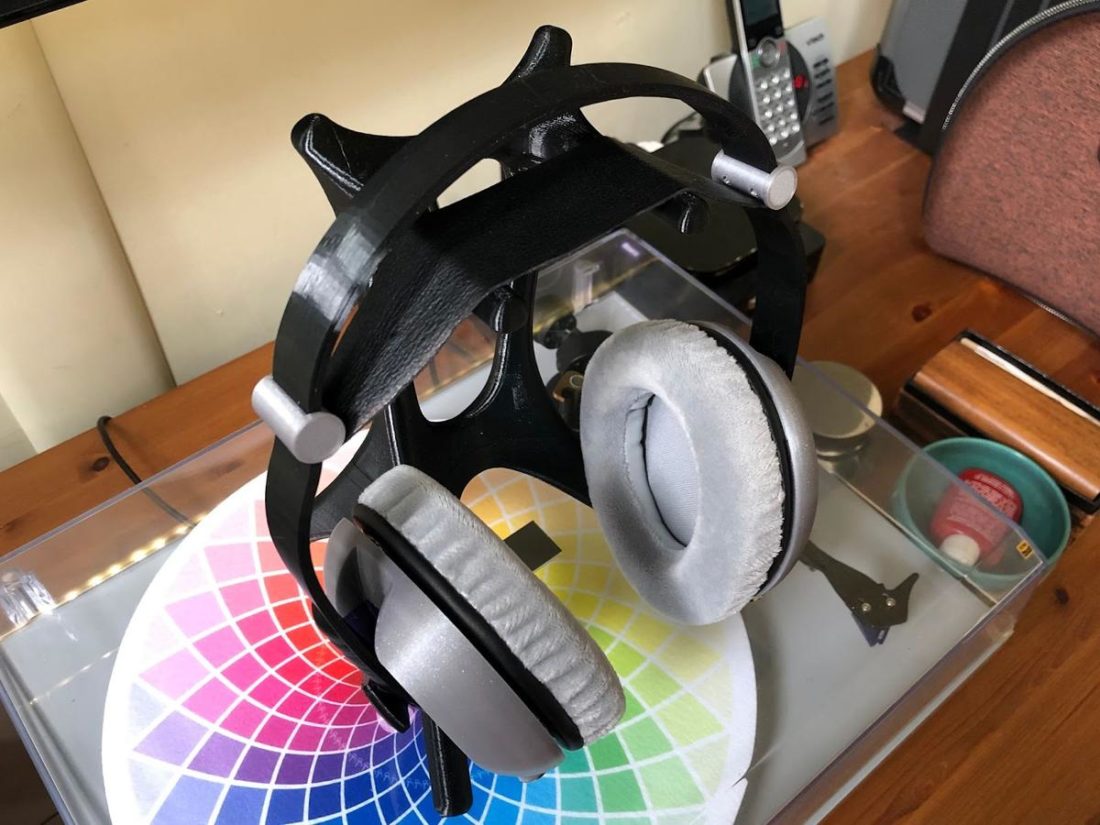
The overall comfort is very good. Of course, much depends on your choice of ear pad as far as heat dissipation or head feel is concerned. The single piece printed headband provides sufficient clamping force, if perhaps a tad tighter than I prefer. After a few hours of listening, I experienced a bit of unwanted jaw pressure. The clamping force is easily adjusted by bending the band after carefully applying heat from a hair dryer or heat gun.
The leather strap, combined with the light weight (~260 grams without cable or pads), means that the head(amame) float on my head with no top hot spots. Pairing them with velour pads makes them feel like putting on a much-loved pair of slippers.
How Do the head(amame) Sound
It’s all well and good that the head(amame) are properly documented and easy to construct, but if they don’t sound good, there isn’t much point. With cautious optimism, I adjusted the band and popped them on my head for the first time. After I plugged into my Chord Mojo, I closed my eyes and pressed play.
I listen to headphones. A lot of headphones. It’s becoming rare that a pair really surprises me, either positively or negatively. Not only do the head(amame) easily live up to their modest build price (approximately USD$100-$150 or so depending on how you decide to go), they compete handily with far more expensive cans. The unusual aesthetics set you up for underestimating the performance. At least, they did so for me.
Of course, much comes down to the driver choice. The $10 Peerless Tympany drivers do punch far beyond their modest price. Boy, do they ever!
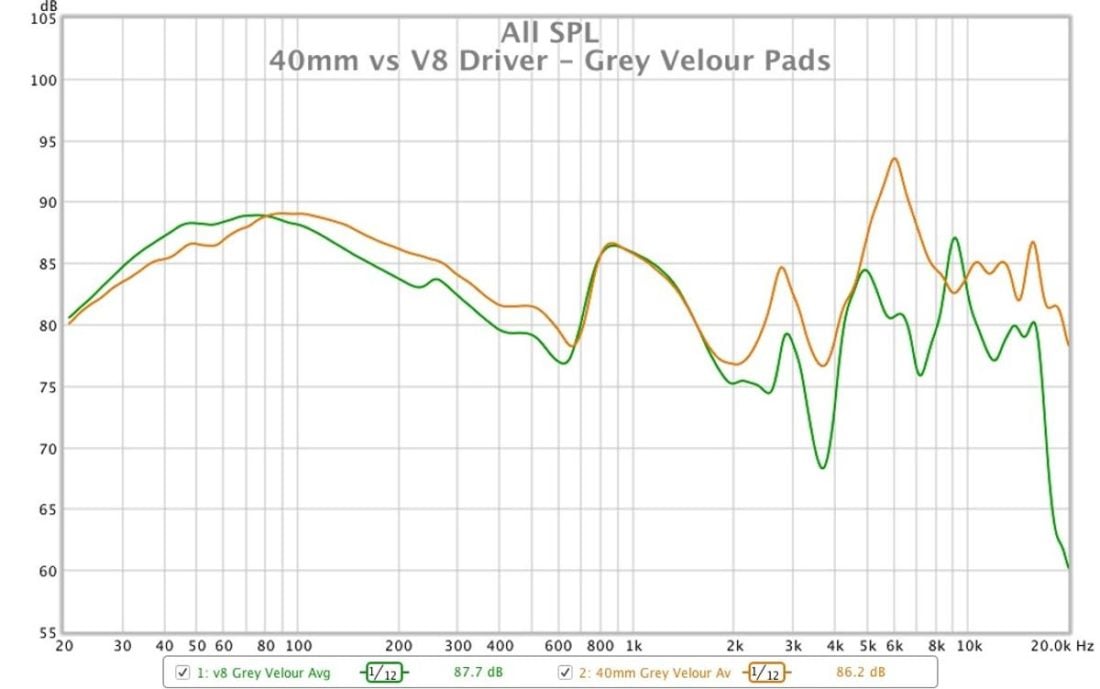
Since the original Head(amame) build features the 40mm Tymphany drivers, I used them as my reference setup and compared different ear pads and drivers from this starting point. Vector Finesse describes the head(amame) as ‘bassy’ sounding, likely a direct result of the closed back design and suggested Brainwavz leather pads. Typically smooth leather pads further boost bass frequencies, so it is no surprise that they would have this effect on the head(amame).

In order to see what tuning variation is possible with pad changes, I tried four alternatives to the smooth leather Brainwavz. I ordered the perforated leather variant (in red) as well as the Brainwavz black microsuede XL round pads.
Additionally I tried the HarmonicDyne Helios v1 fabric pads (which are significantly shallower and smaller than the Brainwavz options and are no longer included with the Helios), and a very inexpensive set of grey velvet pads (similar to Beyerdynamic DT880 pads) from AliExpress.
I am surprised by how significant the audible changes are with the different pads. Most obviously in the lower bass regions, which range from excessively bloated with the Brainwavz micro suede pads to balanced and punchy with the grey velvet pads. The midrange and treble also vary enough to make the listening experience substantially different when using each pad type. The changes are not subtle!
In the end, I prefered the sound signature of the cheapest pad option!
The grey velour pads are super comfy, don’t get too hot over long listening sessions, and provide the most balanced and energetic sound signature for the head(amame). As another bonus for my particular build’s color scheme, they are also the best visual match! These nifty pads are even available in black for a more traditional look.
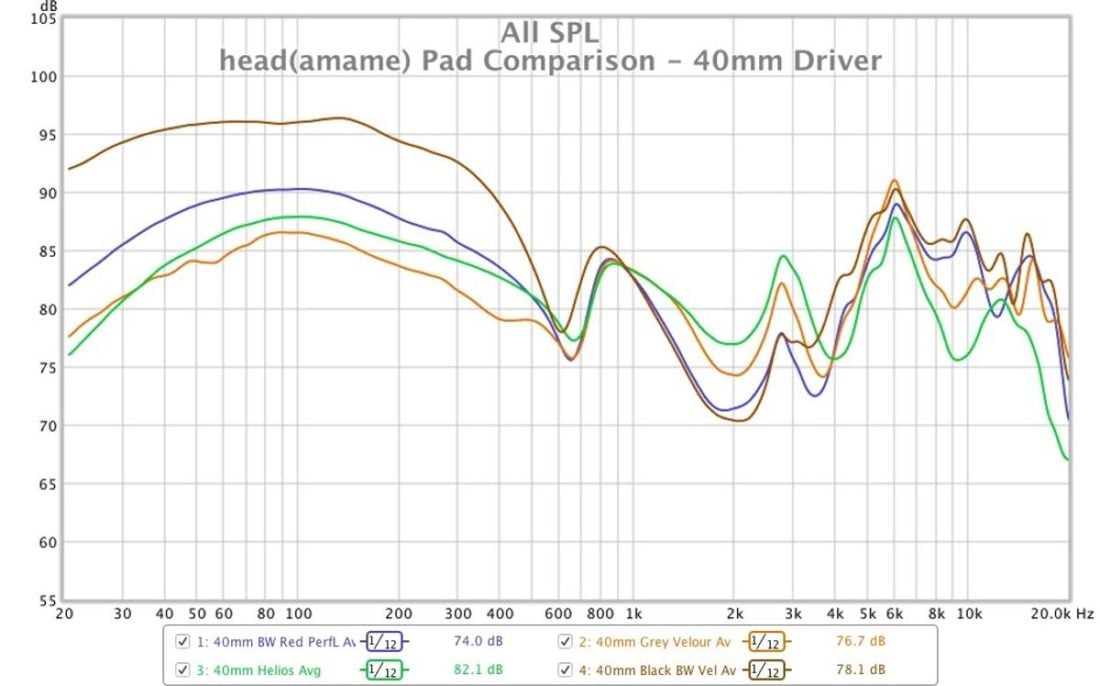
Pad comparison
| Pad | Observations and Notes |
|---|---|
| Velvet gray round ear pad 110mm | These pads are sub-$10 and appear quite similar to the Beyerdynamic DT880 pads. The build quality and comfort is excellent. |
| HarmonicDyne Helios v1 black velour pad | These pads are no longer included with the Helios and do not appear to be available for sale individually. The pads are quite shallow and the least comfortable option of the bunch. |
| Brainwavz XL red perforated leather replacement memory foam earpads | I’m of two minds when it comes to Brainwavz pads. They are undeniably well made and comfortable. However they are far from inexpensive and don’t often end up as my number one choice for any given pair of headphones. This time, my findings are no different.The red perforated pads are my second choice for the head(amame). Ignoring the fact that the red color choice really isn’t a good match (unless you are into Pokemon) they are large, comfy, and a pleasure to put on. They create a more v-shaped sound profile and are a fun listen overall, especially if you want punchy bass. |
| Brainwavz XL black micro suede replacement memory foam earpads | The micro suede pads were the greatest surprise to me. I initially expected them to be a less bassy option from the perforated red leather pads, but I couldn’t have been more wrong. Too much bass. Murder bass. Blah. It’s not my cup of tea, but if that sort of sound floats your boat, you know there is a well made and comfortable option out there. |
Driver comparison
Since the grey velvet pads provided the most balanced sound signature, I used them to compare the three different drivers I have on hand for this project. My expectations were high for the 50mm Peerless Tymphany drivers, as they appear in high-end headphones (like the before mentioned Kennerton Vali and the Aurora Audio Borealis).
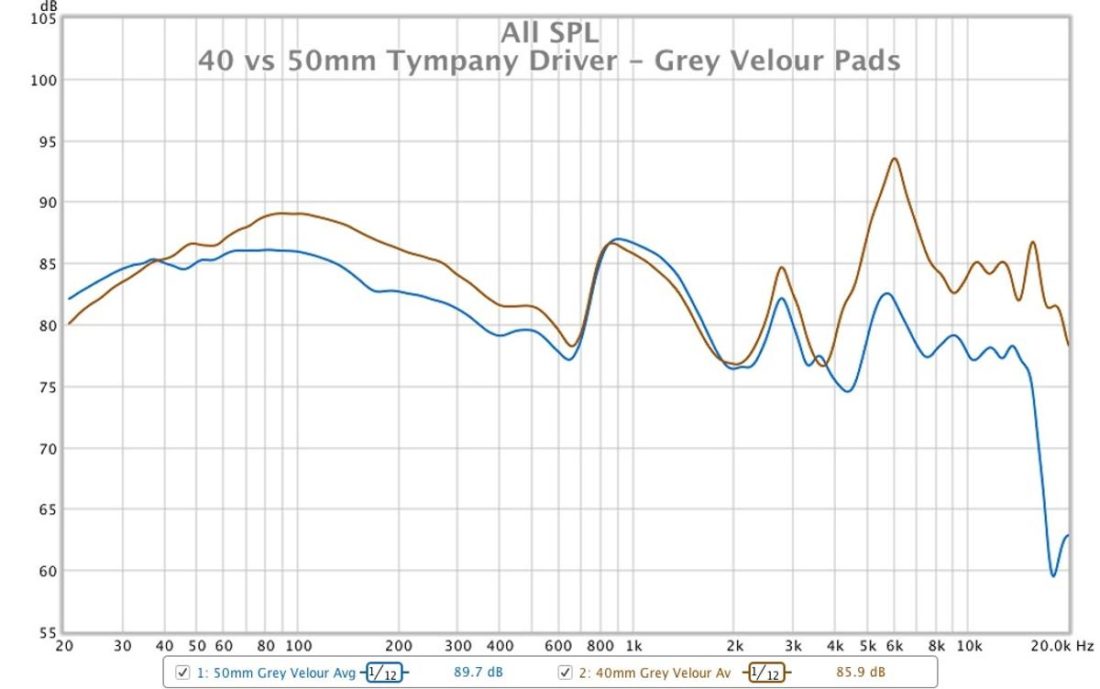
The 46mm Symphones V8 drivers were far more of an experiment, as they are designed for narrow-chambered, open-backed Grado headphones. They are significantly more expensive than the Peerless options, but as it turned out, they were the proverbial fish out of water and didn’t excel in an enclosure that was not designed for them.
This is unfortunate, as there are several high-quality alternative Grado drivers available from a few well respected companies, and it would have been fun to try out some of these options. For now, I highly suggest sticking with the Peerless drivers.
| Driver | Observations and Notes |
|---|---|
| 40mm Peerless Tymphany (HPD-40N16PET00-32) | The 40mm drivers have the most energetic sound signature of the three drivers with a significant 6KHz peak. This manages to avoid the harsh sort of sound that I associate with a 3-4KHz peak, but certainly does skew the overall sound signature a bit brighter and gives the impression of more clarity. Overall, while not as balanced as the 50mm drivers, the 40mm drivers work great in these headphones. |
| 50mm Peerless Tymphany (HPD-50N25PR00-32) | The 50mm drivers have a more balanced sound, with less high-end energy compared to their smaller brethren, but they do maintain a decent feeling of air and detail in the upper registers. My impression of the bass is very similar between the two, if perhaps slightly more punchy with the larger drivers. There are very good reasons that this driver is extremely well regarded and I can’t wait to try it in future projects. |
| Symphones V8.1 | The Symphones drivers just sound flat and not well extended in this (admittedly not recommended) setup. They are smooth sounding, but they don’t give the impression of great resolution, clarity, nor extension. Without unduly dwelling on the negative, they aren’t a great choice for the head(amame). |
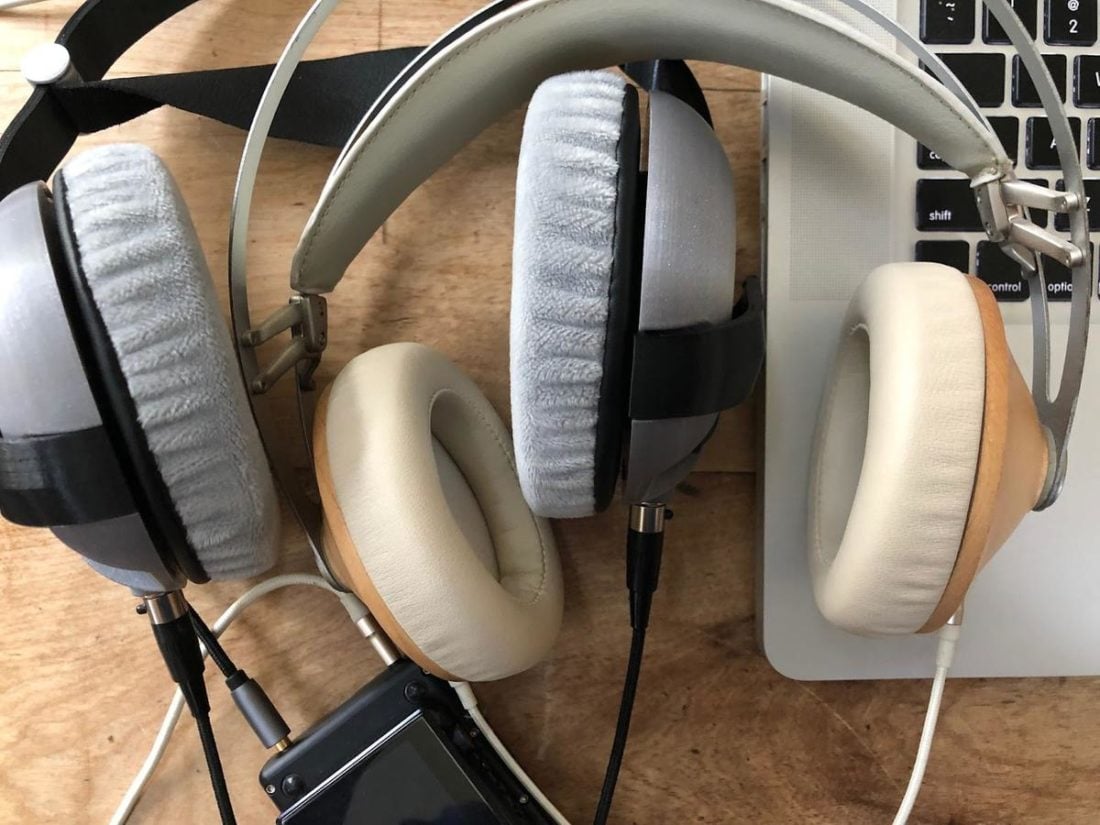
Comparison to the Meze 99 Classics
In some ways the Meze 99 Classics are very similar to the head(amame). Both are circumaural closed-back headphones, with innovative headbands featuring integrated comfort straps. However, where the (head)amame are the very definition of plastic and DIY aesthetics, the 99 Classics are the antithesis – beautiful industrial design married with luxury materials (leather, wood, and metal).
Both are very comfortable, but I have to give the wearability nod to the Meze headphones. That automatically adjusting band is just sublime. The earpads are far smaller on the 99 Classics, and are sufficient to contain my smallish ears, but some users do complain about the limited space within the cups.
Both sound like traditional closed-back headphones, that is with somewhat pronounced lower frequencies and a fairly narrow soundstage. The 99 Classics yield a warmer and more intimate presentation. The 99 Classics sound very much comes from the cups on your head, while the head(amame) give a better feeling of space, likely due to the angled position of the drivers.
The head(amame) (with the 40mm drivers and velour pads) seem a bit less fatiguing than the forward presenting 99 Classics. On bass heavy tracks I find the 99 Classics can get a bit uncontrolled and boomy, but overall they are a very fun pair of headphones to listen to. On busy male-vocal rock tracks, the 99 Classics can seem a little congested at times.
I know I’ve said this before, but it’s amazing how good the head(amame) sound. Ultimately, they are unlike the 99 Classics, but that’s not a bad thing. Clarity and resolution are equally high-quality, and they sound more spacious and less in-your-face than the Romanian beauty queens. It’s a different listening experience, but I’m unwilling to state that one is significantly better than the other.
Are the head(amame) for You?
Pros
- You are responsible for every aspect of the build, so you can tune and style them to best match your personal tastes.
- Sound quality is easily worth the asking price. Detailed and fun!
- Changing ear pads significantly alters the overall sound profile.
- Light and comfortable.
- Break something? Print a replacement part for the negligible cost of the filament.
- Active and engaged online community.
- Updates are frequent and free.
Cons
- Unless you are willing to purchase multiple pairs of ear pads and drivers, you are taking a risk deciding on what options to go with before you have a chance to listen to them.
- Unorthodox DIY looks are not the epitome of refinement nor especially sophisticated.
- The simple headband design is clever but the cups can be bumped off fairly easily when not wearing them.
Where to Buy
Conclusion
The head(amame) officially mark the start of when 3D printed headphones became viable contenders for audiophiles. Hats off to Vector Finesse for creating DIY headphones for the masses. Affordable, easy to build, and above all, great sounding!
Sure, the style will be divisive. Not everyone is going to gravitate towards their unusual looks. Compared to the design marvels of the Meze 99 Classics, they come off a bit like toys. But that’s the price to pay when using common 3D printers. They print plastic after all, and all-plastic designs will have a hard time competing with wood and metal. As consumers, we have the tendency to equate plastic with cheap.
But perhaps that’s the point. Cheap doesn’t have to mean poor sound quality. Cheap can very easily be interpreted as affordable. As bang-for-the-buck. And if there is something that DIY folks appreciate, it’s getting more than you paid for. In that way, the head(amame) are an unqualified success.
Within about a year, Vector Finesse has released six versions of the head(amame) files including many fixes and improvements. They plan on further updates including a microphone add-on, a smaller, more mobile version, an open-backed version, and more tuning options.
It’s here that really illustrates the power of DIY and 3D printing. Oh, your version doesn’t have a microphone mount? Print a new cup and you are back in business. Any changes or updates are easily implemented by the customer base. There is no need for anyone to buy the same thing again just to get the new feature.
I, for one, am very excited about the future of the DIY headphone industry. Nothing beats the satisfaction of making something yourself. Except, perhaps, the knowledge that you got all that performance at a fraction of the cost. Sweet, sweet music to my ears.