Discover the possible reasons why this error occurs and learn what you can do to solve it.
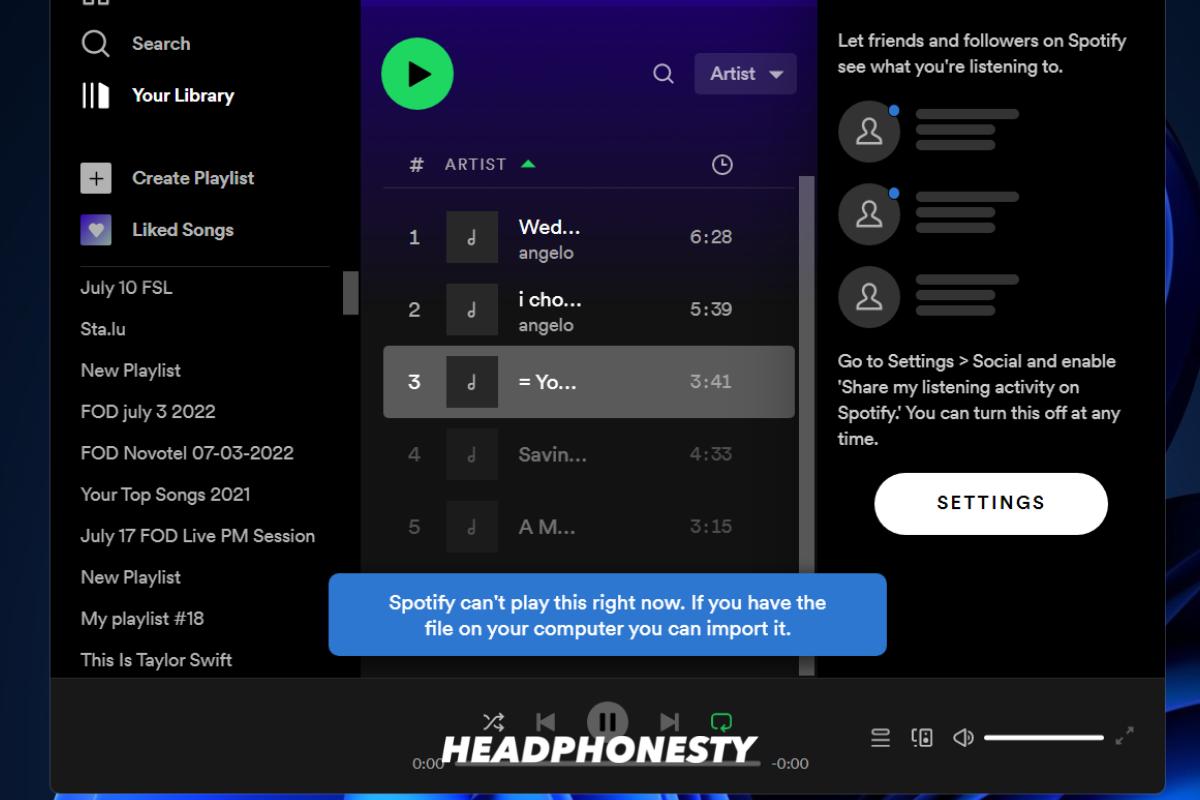
With its user-friendly interface and over 82 million curated tracks and counting, playing your favorite song on Spotify cannot get any easier. That’s why it’s frustrating when you’re greeted by a ‘Spotify can’t play this right now’ error message when all you want to do is immerse yourself in your favorite track.
Unfortunately, Spotify doesn’t readily provide information regarding this error, unless you’re dedicated enough to scour its community pages or user forums like Reddit to locate solutions.
Don’t worry, you don’t have to search wide and deep for the answers. In this article, we’ll go over all the possible causes behind this error and walk you through different ways to fix it.
Let’s dive in!
‘Spotify Can’t Play This Right Now’ Error: Why It Happens
There are several possible reasons why Spotify is, at times, unable to play a song. These can range from Spotify’s copyright restrictions to software-related causes like incorrect settings or bugs.
Let’s examine each reason in detail and understand why they might cause this error.
Copyright restrictions
As a global audio streaming provider, Spotify routinely enters into licensing agreements with music artists, their record labels, and copyright holders to host and stream their songs on Spotify.
Spotify abides by stringent copyright policies that either restrict the streaming of specific songs to certain regions or prohibit it from the platform entirely.
The artists, their music label, or the song’s legal owner are the only ones who can decide to make certain tracks or songs unavailable for play on Spotify. Some of their songs can also be region-locked and only accessible when you’re in a specific country or geographical region.
Alternatively, if the licensing agreements expire and are not renewed, those songs will no longer be available on Spotify.
This might explain why certain current music tracks are unavailable or greyed out and may throw up a ‘Spotify can’t play this right now’ error message.
Outdated software
If you don’t have the latest version of the app or desktop program installed, Spotify may not work properly.
Spotify periodically releases software updates to improve its compatibility with newer devices and the platform’s features and functionality. These software updates also help resolve bugs, errors, and technical glitches in previous versions.
Alternatively, if you’re using a mobile device or computer with an older operating system, there may also be incompatibility issues that can result in errors while trying to play music on Spotify.
Improper device and app settings
Check your Spotify app for any sound or program settings that may be preventing playback. These are audio quality or hardware settings that users can adjust or enable to improve the performance and listening experience on Spotify.
Unfortunately, some of these settings can interfere with streaming and lead to the ‘Spotify can’t play this right now’ error.
Software bugs
Sometimes the Spotify app can act erratically and not function as it should.
It may be software bugs, corrupted files, or cache errors causing Spotify to not play songs or tracks properly.
How to Fix the ‘Spotify Can’t Play This Right Now’ Error
Now that you’ve identified the possible causes, let’s look at different ways to fix the ‘Spotify can’t play this right now’ error.
Let’s get right to it!
- Update Spotify
- Restart Device
- Clear Spotify Cache
- Disable Hardware Acceleration
- Change the streaming quality
- Use a VPN
- Troubleshoot Local Files
- For Spotify Web Player: Enable Protected Content
- For Windows App: Setup Output Device
- Set Default Audio Format
- Reinstall Spotify
Update Spotify
You can try updating your Spotify app or desktop program to the latest version to resolve any bugs or errors.
The steps to update may vary depending on your device. Ensure you have a stable internet connection before starting the upgrade.
On desktop:
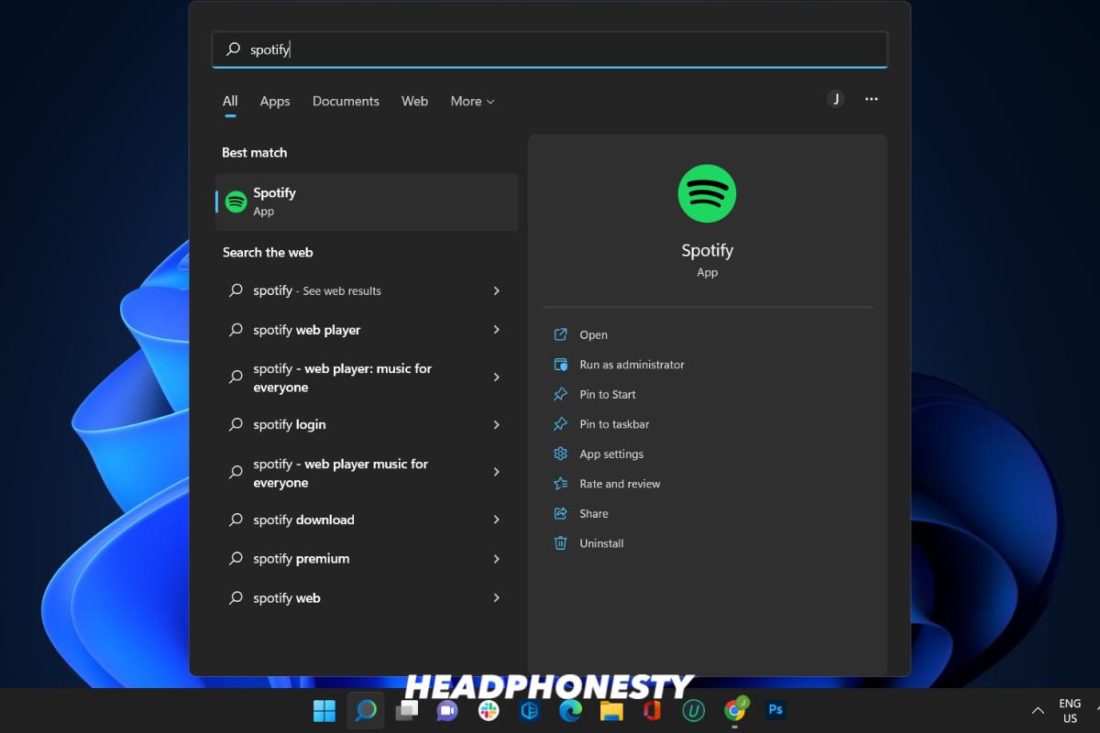
- Open your Spotify desktop app.

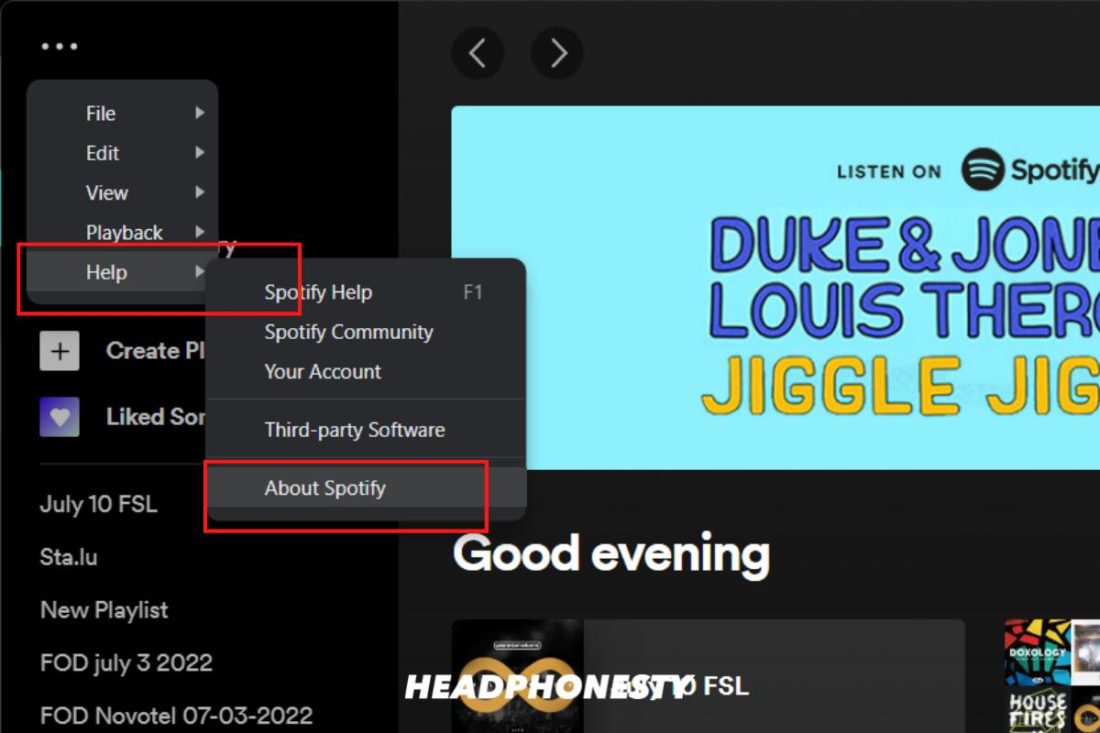
Opening Spotify desktop app via search bar - On the top left corner of the app interface, click on the three dots.
Going to Spotify desktop app menu - Then, go to Help > About Spotify.
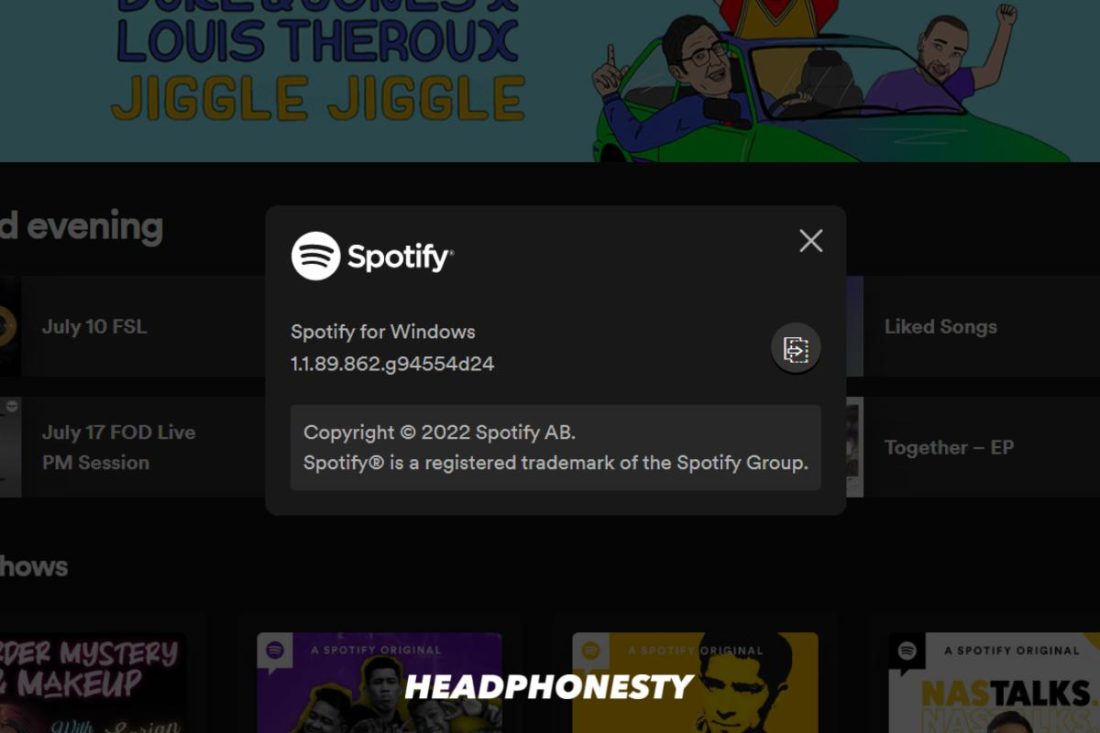
Going to ‘About Spotify’ - A dialog box will open with your current version. If your app requires an update, a button with a download link will appear just below the app version number. Click on the link to download the update.
Spotify desktop app’s current version

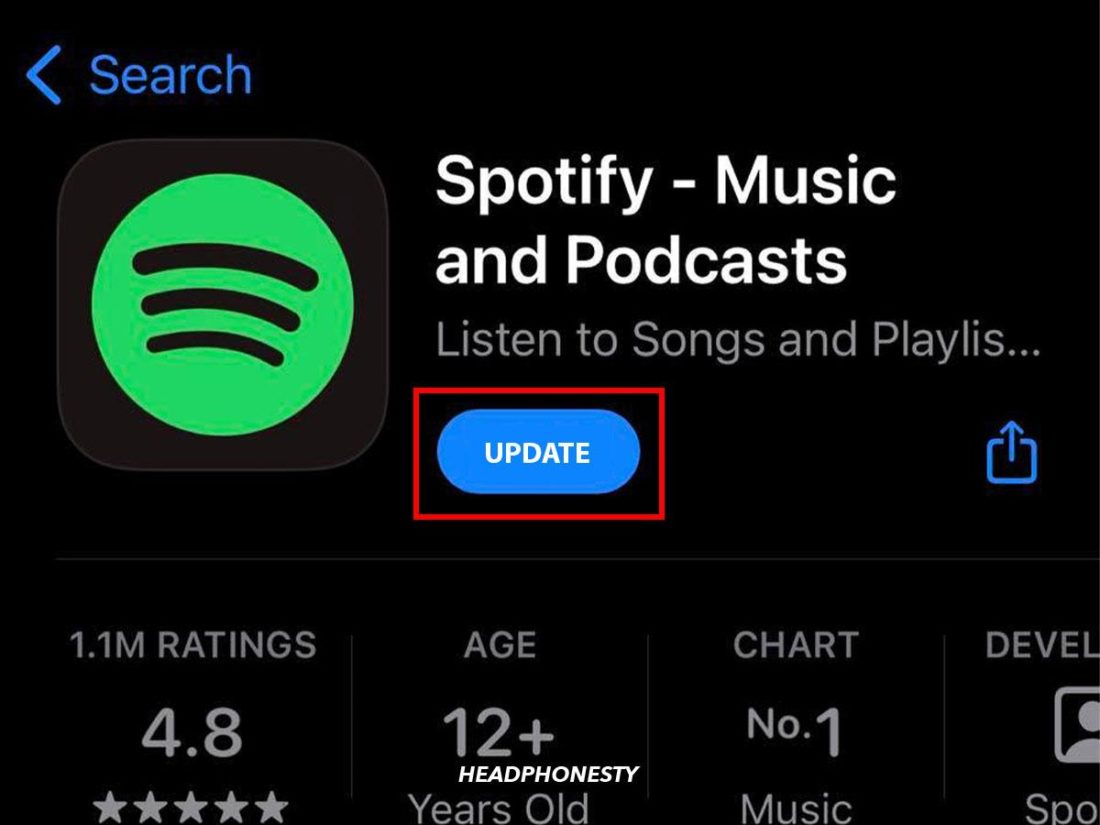
On iOS:
- Open the App Store.

Go to the App Store. - Tap on your Apple ID avatar at the top right-hand corner.
Click on your Apple ID image at the top. - If an update is available, you should see Spotify among the list of apps. Tap ‘UPDATE’ next to it.
Update Spotify.
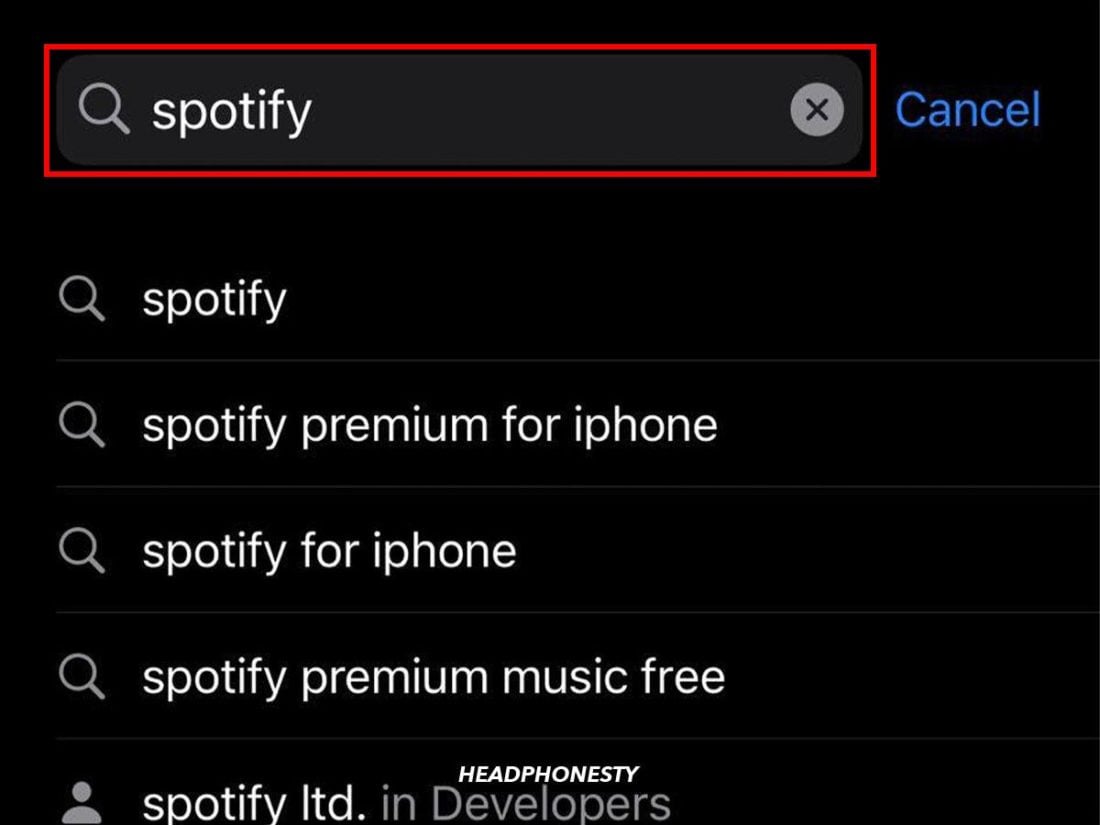
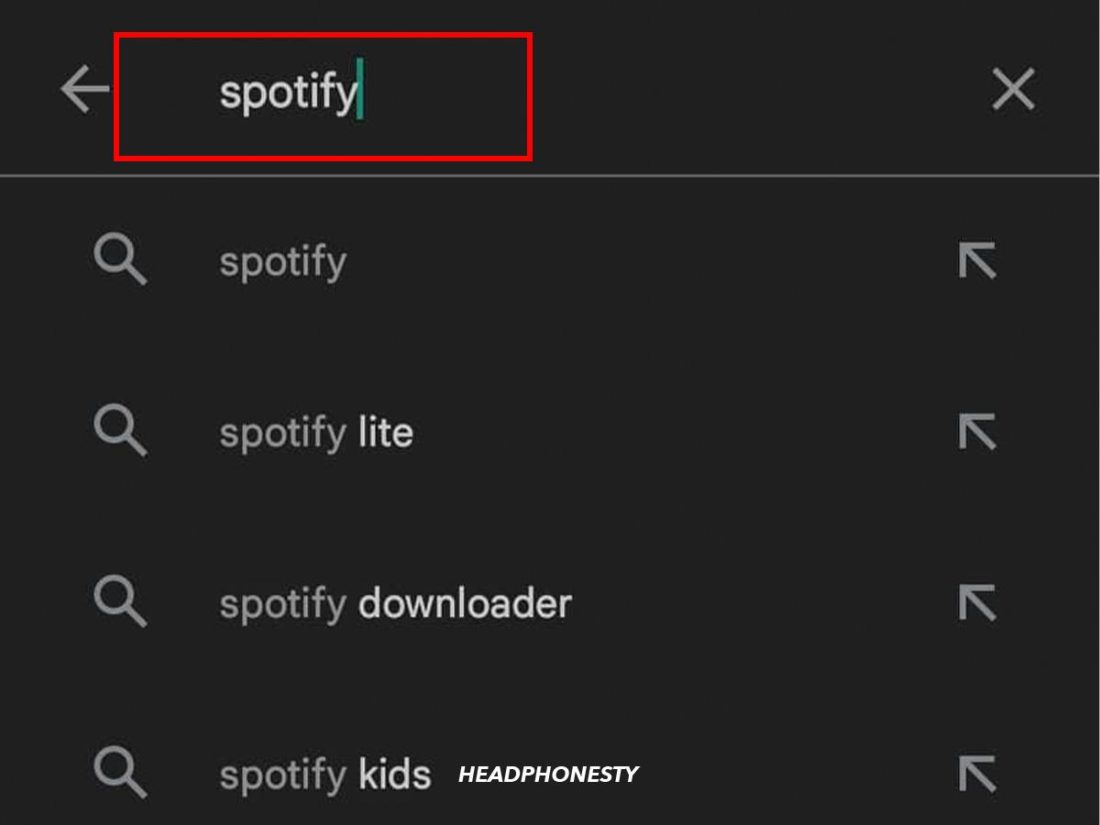
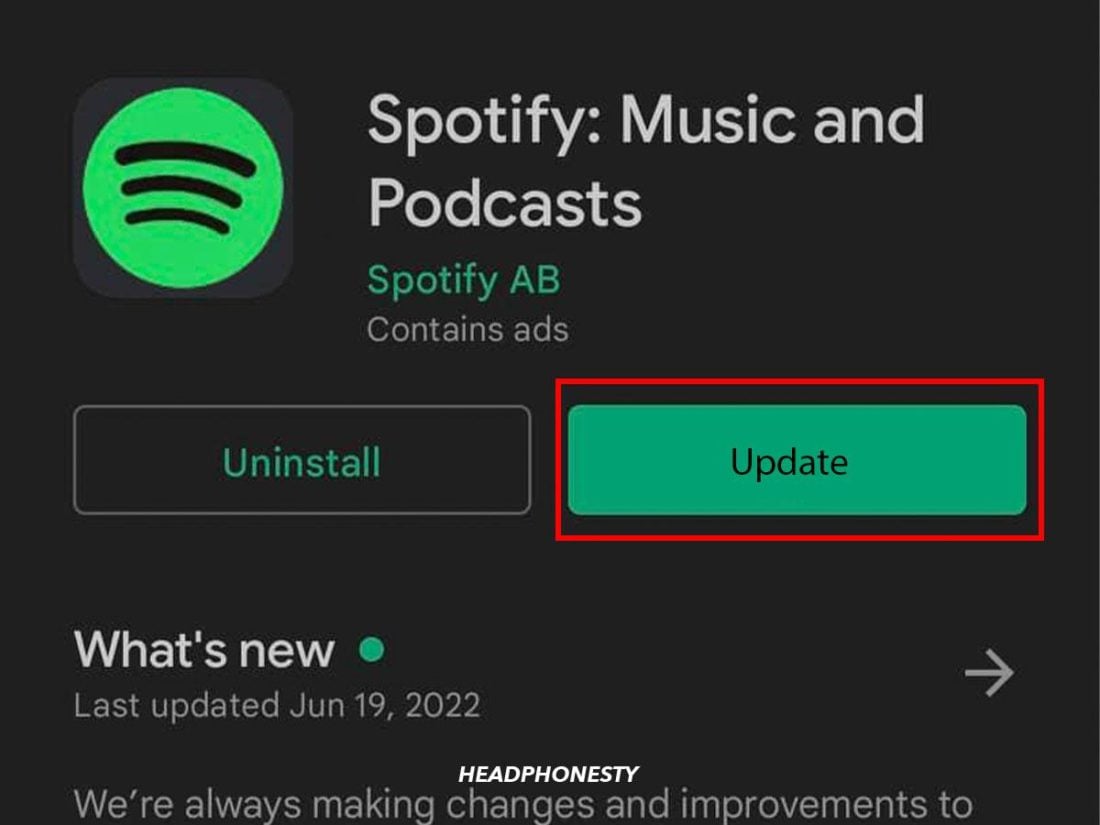
On Android:
- Open the Google Play Store.
Tap Google Play Store on your screen. - Type Spotify in the search bar.
Look up Spotify in the search box. - Unless your app is the latest version, an ‘UPDATE’ option will be available. Tap on it to start the process.
Click on update to install the latest version.
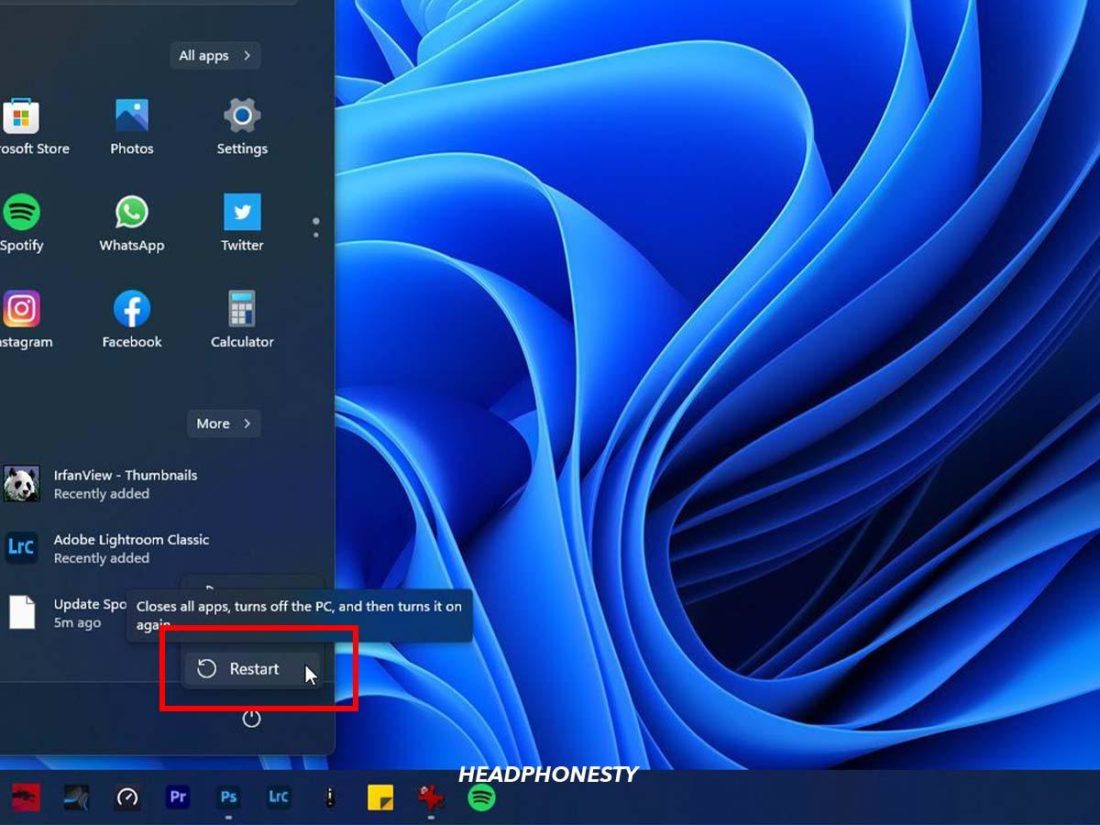
Restart device
When your computer or mobile device is slow, unresponsive, or generally buggy, restarting is a common remedy that can fix most issues.
This is because restarting a device helps to clear its internal random accessory memory (RAM).
Once you restart a device, all background apps will be stopped, allowing it to clear the RAM. Since it’s now running on a clean slate, your device should feel snappier, less glitchy, and more responsive.
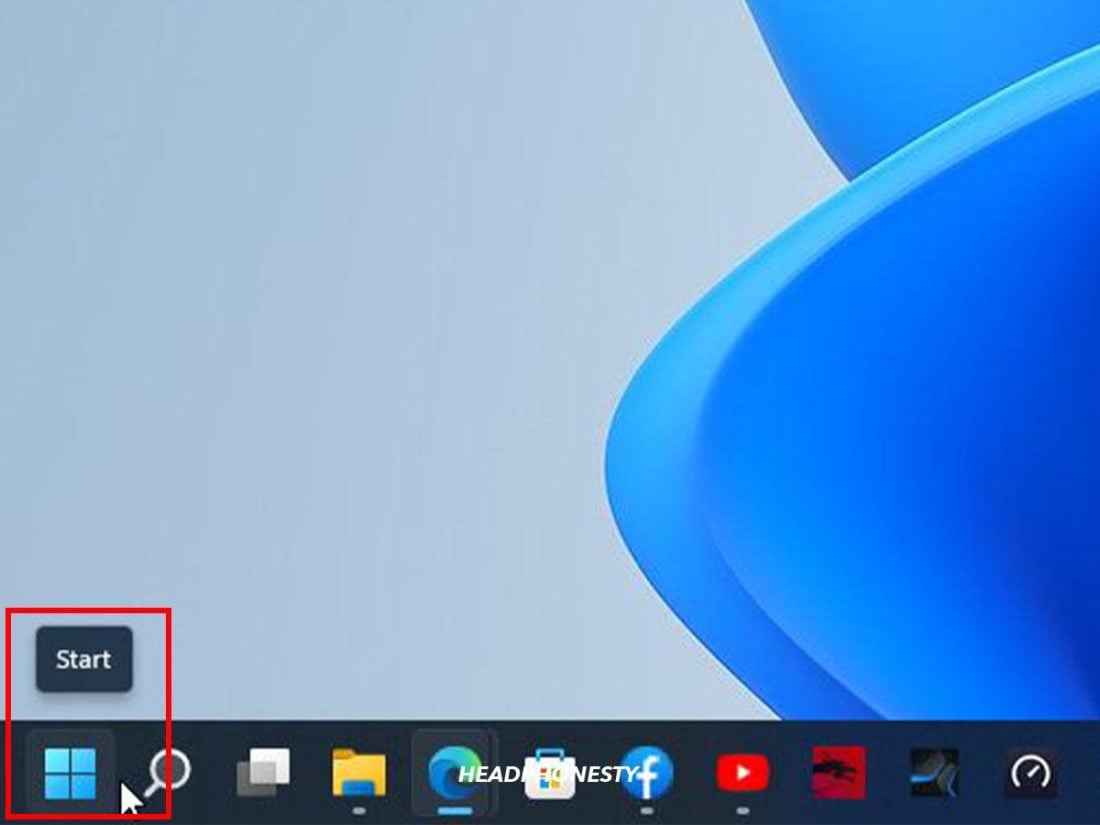
The steps to restart will change according to the device you use Spotify on. But purely as an example, here’s how to restart a Windows 10 PC:
- Click the Start button on the taskbar at the lower-left corner of the screen.
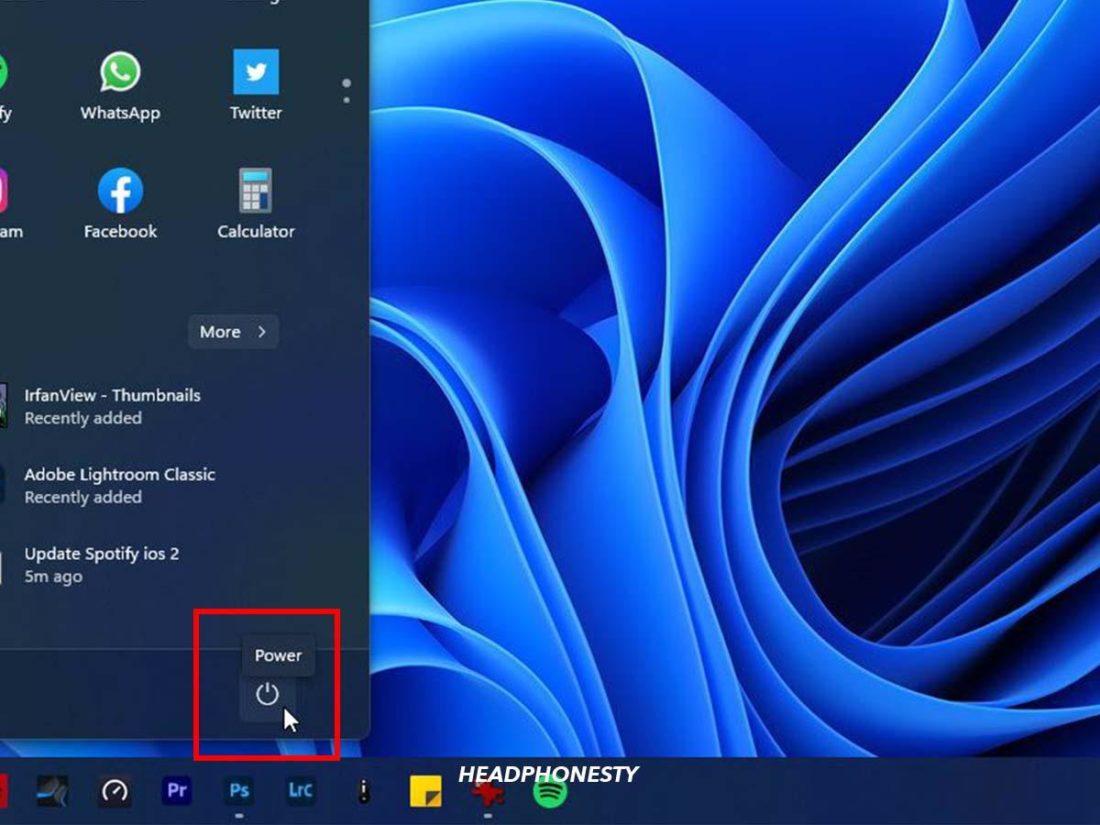
The ‘Start’ icon on the bottom-left side of your desktop. - Click on Power.
The circular ‘Power’ button. - Click Restart.
Restart process initiated.
Clear Spotify cache
Like your computer, Spotify also has its own cache that stores data like your frequently played songs, passwords, search terms, downloaded music, and more.
Spotify stores this cache of temporary storage on your device and accesses it whenever you play your favorite songs, which allows the app to run faster.
Unfortunately, the cache memory can quickly overload if you don’t clean it periodically. This can cause your device to lag and reduce its storage capacity. Worse, Spotify’s cache files can become corrupted and cause errors when playing songs.
Here’s how to clear your Spotify cache files on some standard devices:
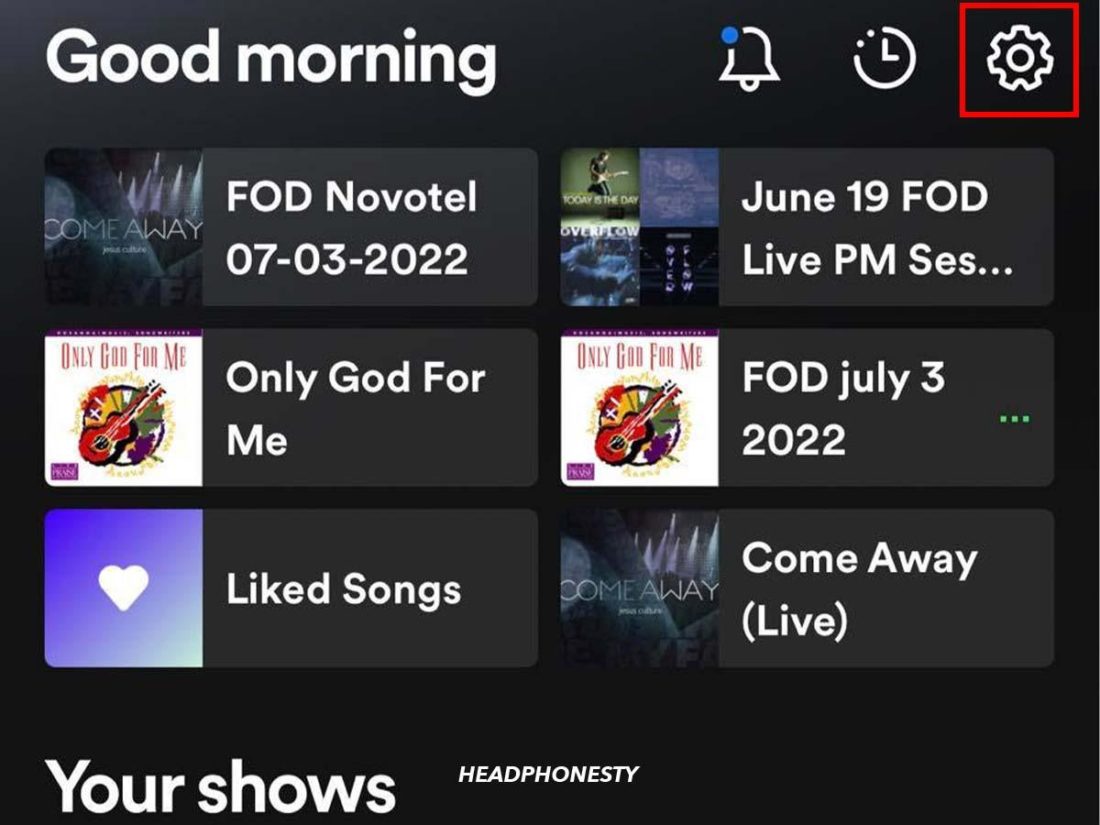
On iOS
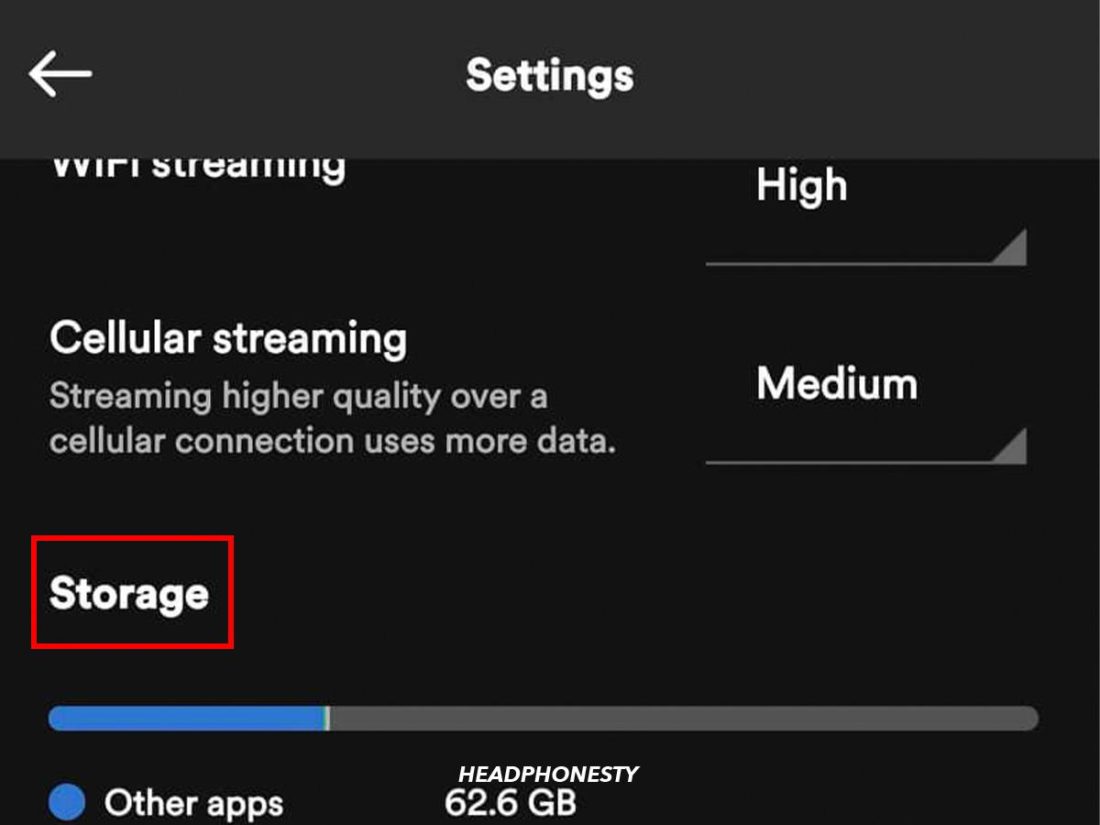
- Tap on the Home button on Spotify, then navigate to Settings on the top-right corner.
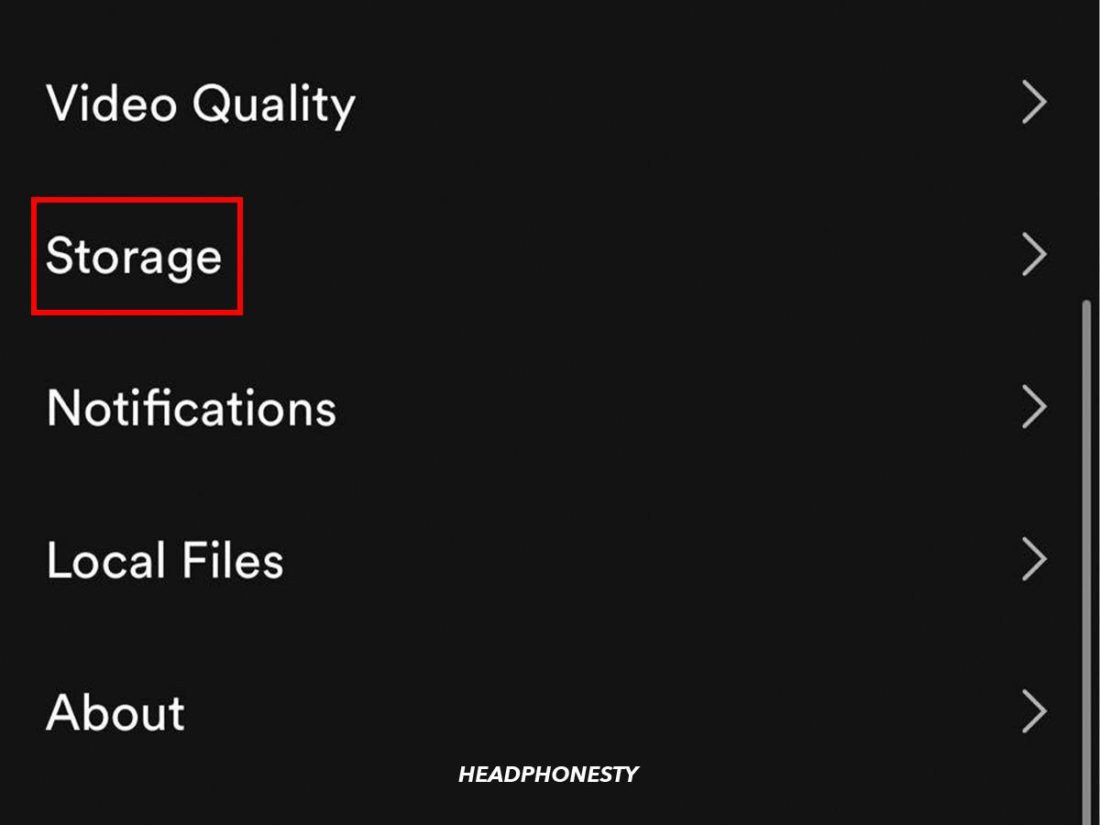
Click the Spotify ‘Settings’ option on the top. - Tap on Storage.
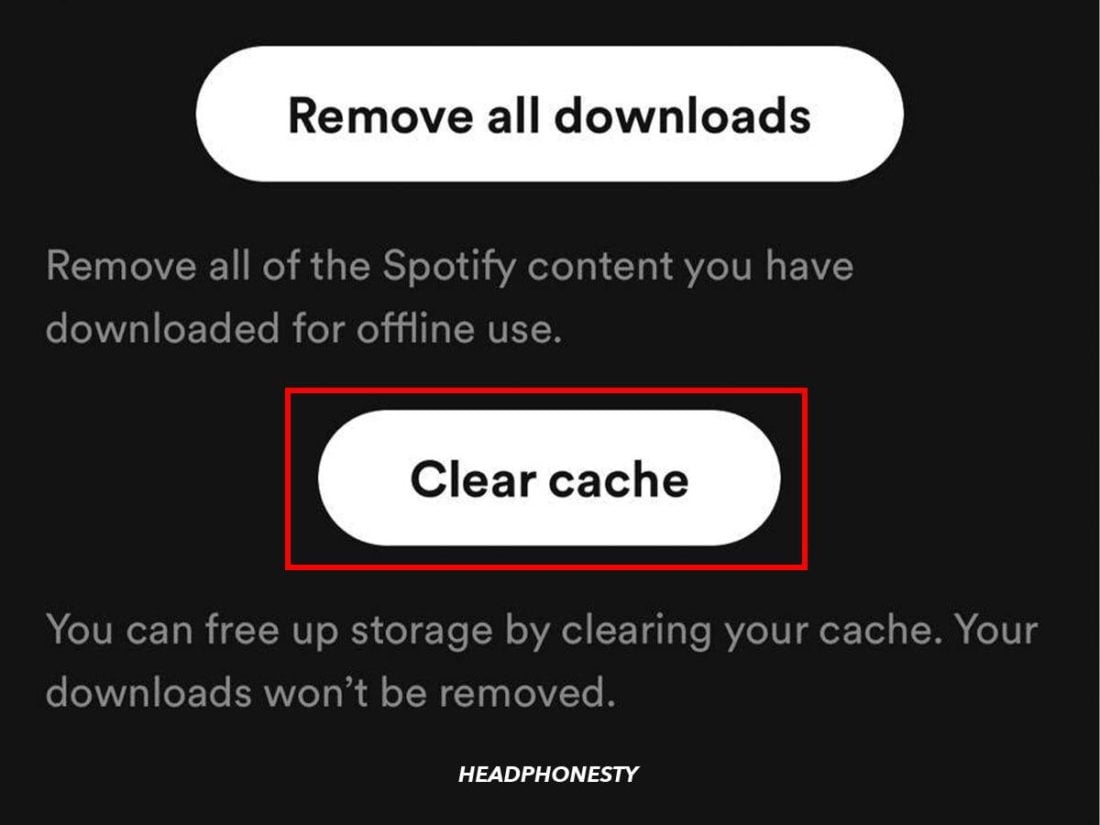
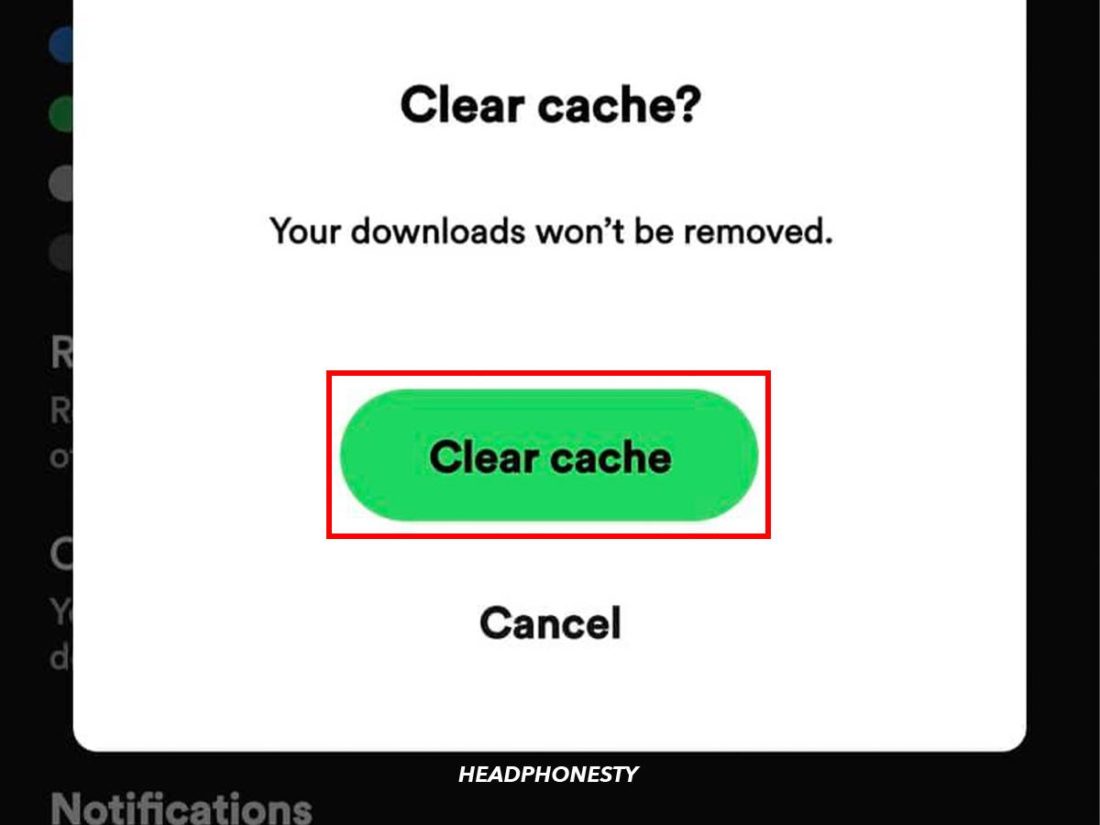
Go to ‘Storage’ under Settings. - Tap on Clear cache.
Start clearing cache files on Spotify.
On Android:
- Open Spotify and tap on the Settings icon in the upper right-hand corner.
Click ‘Settings’ on the Spotify app. - Tap on Storage.
Click the ‘Storage’ option under Spotify Settings. - Tap on Clear cache and OK to confirm
Your cache files will now start getting deleted.
On Windows PC
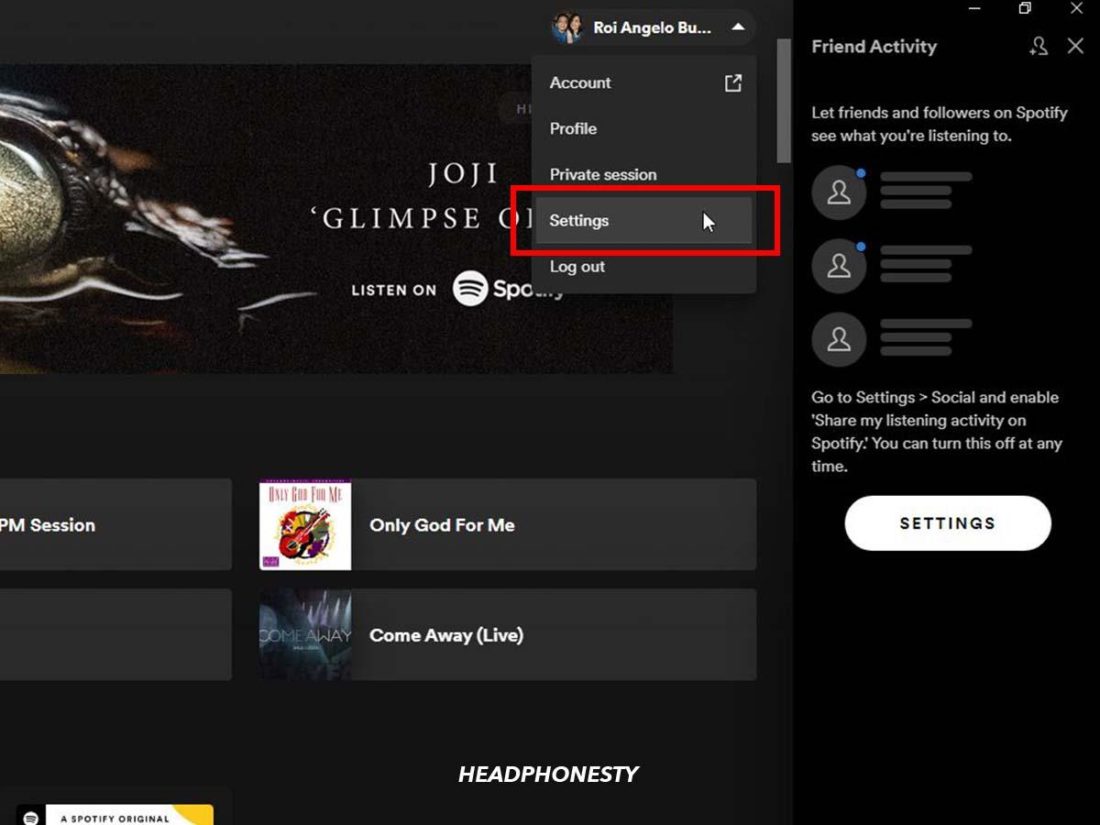
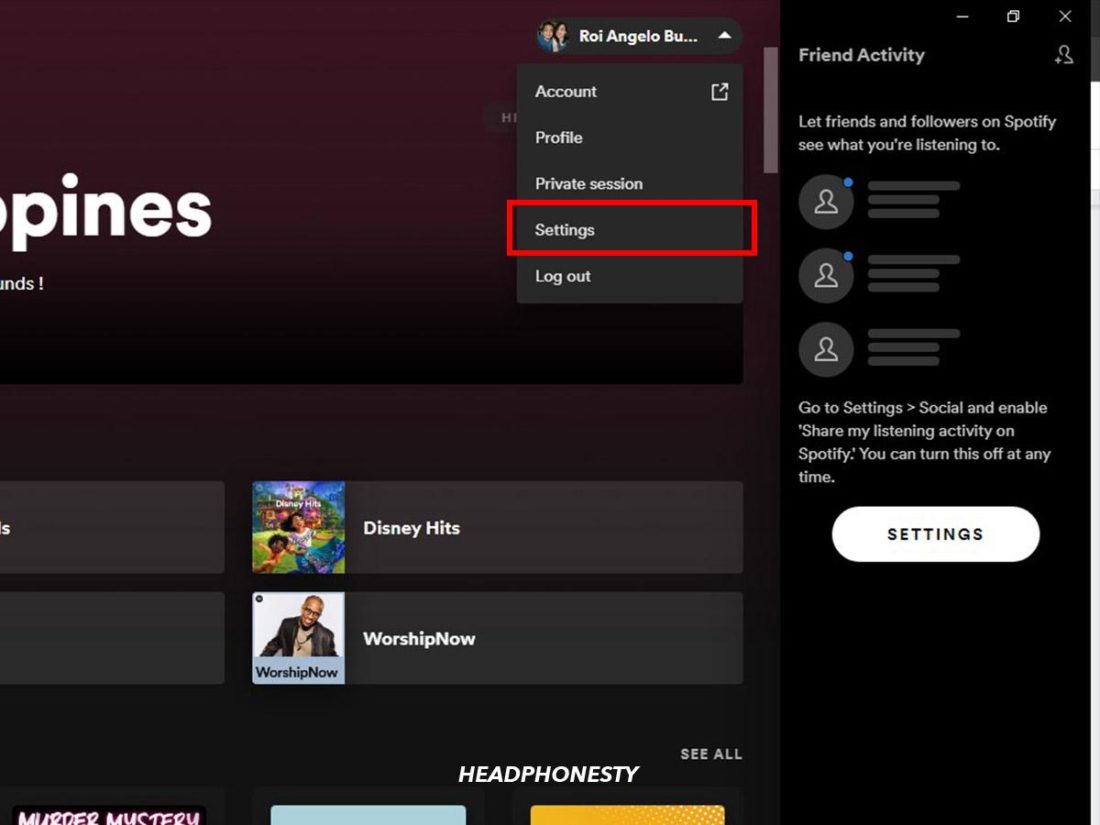
- Open the Spotify program on your desktop.
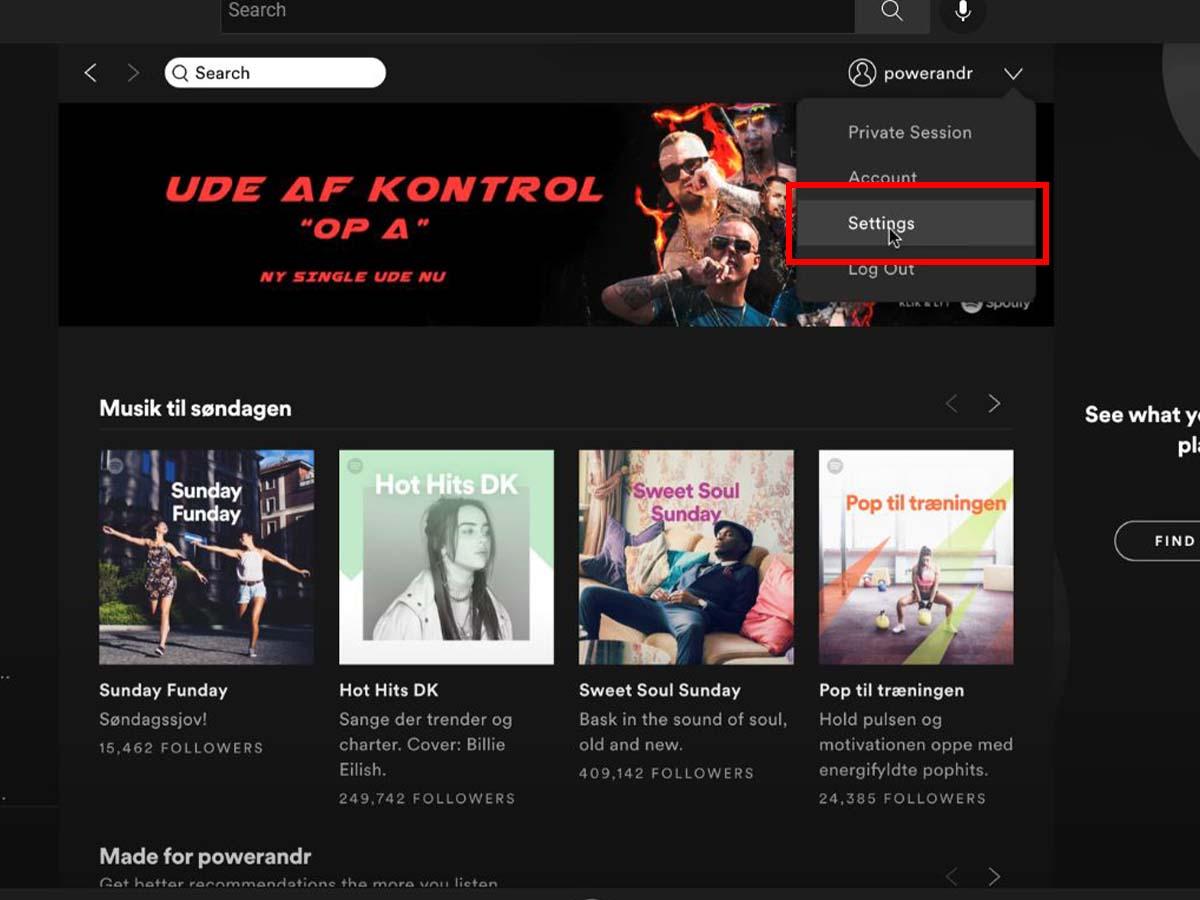
Open Spotify on your PC. - Click on your avatar in the top right, and select Settings from the drop-down menu.
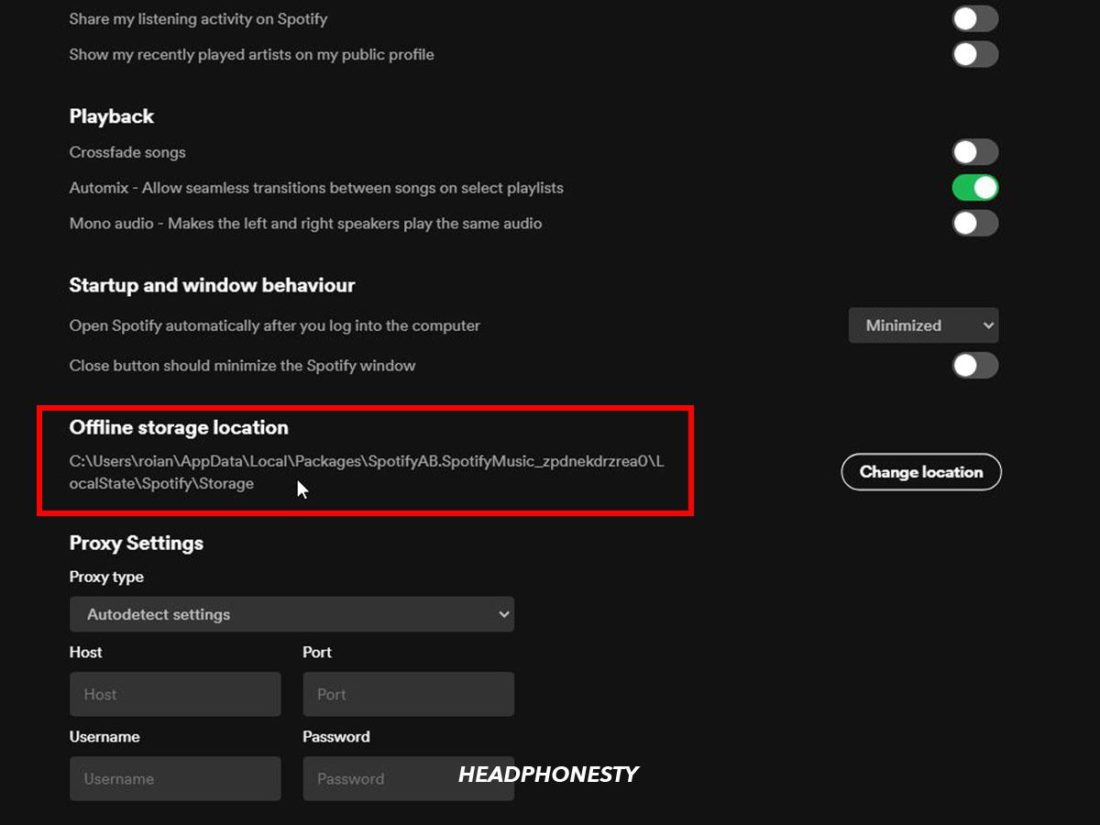
Head to ‘Settings’ under your user icon. - Click on Offline storage location to see the folder where your cache is stored. Note down this location.
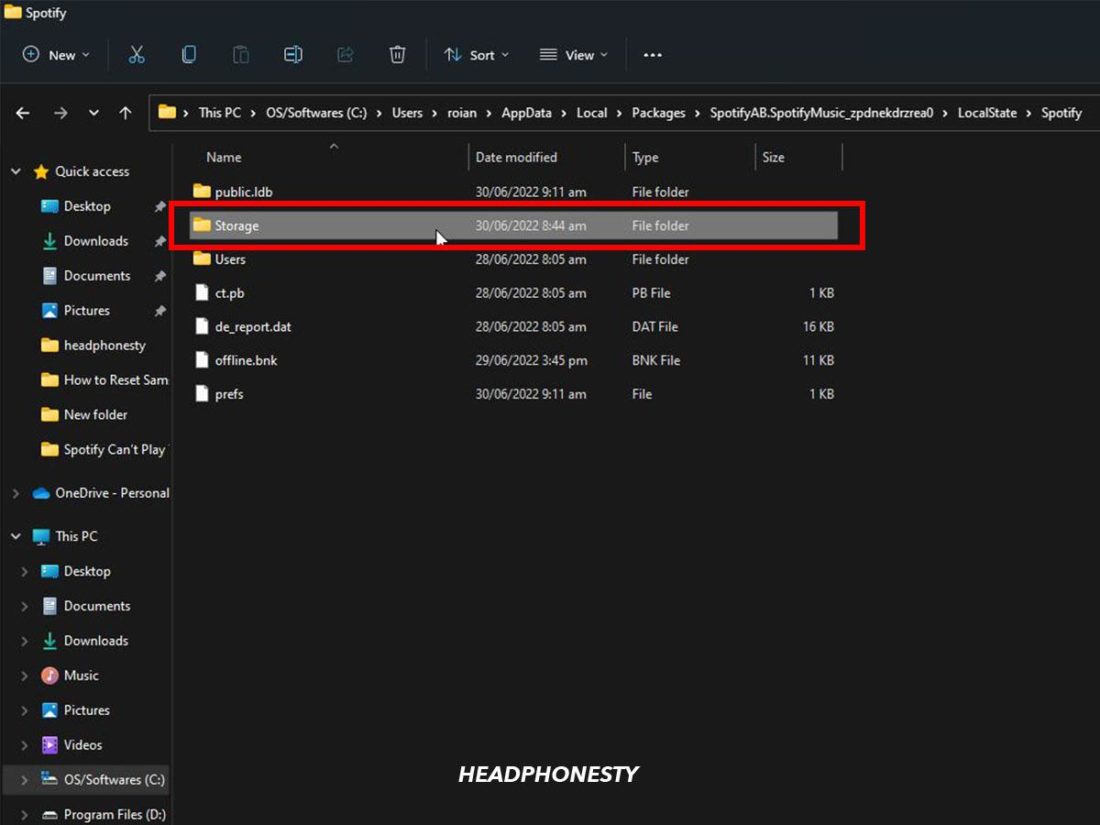
Locate your cache files folder under ‘Offline storage location.’ - Open ‘File Explorer’ on your taskbar and navigate to that location on your drive.
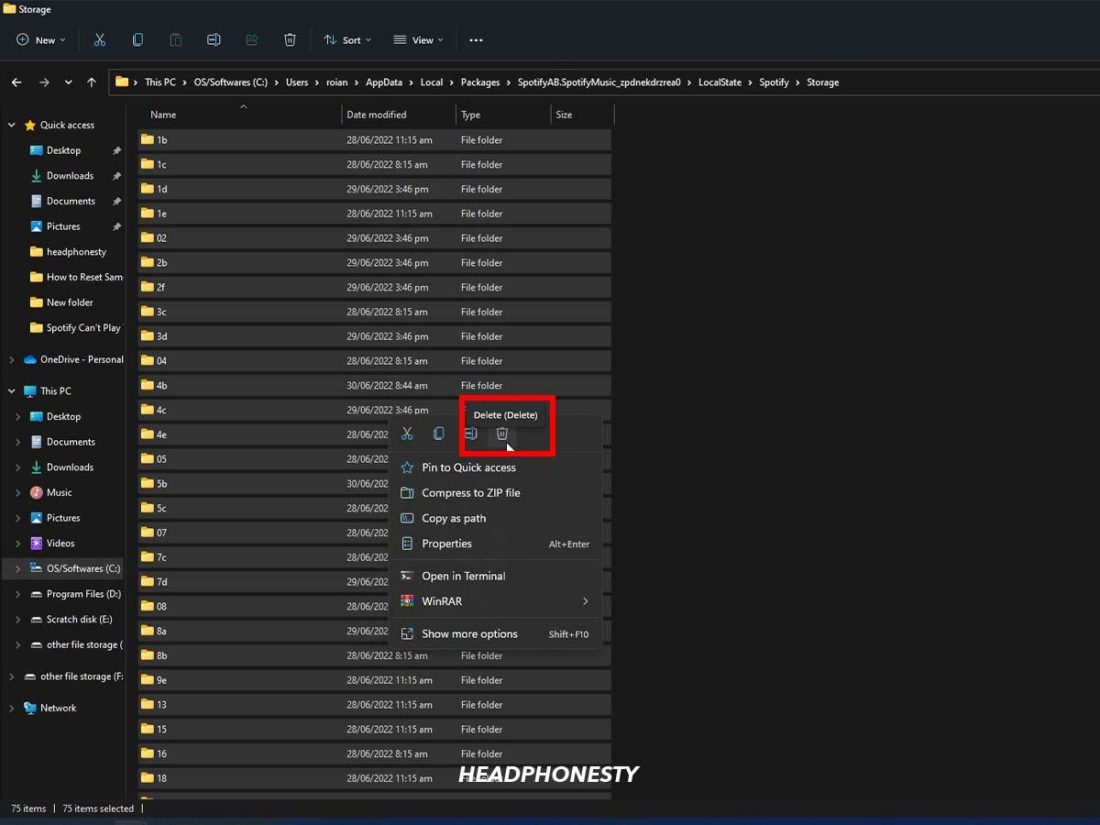
Navigate to the previously located folder on your drive. - Select all the files within that folder and delete them.
Delete all files in that folder.

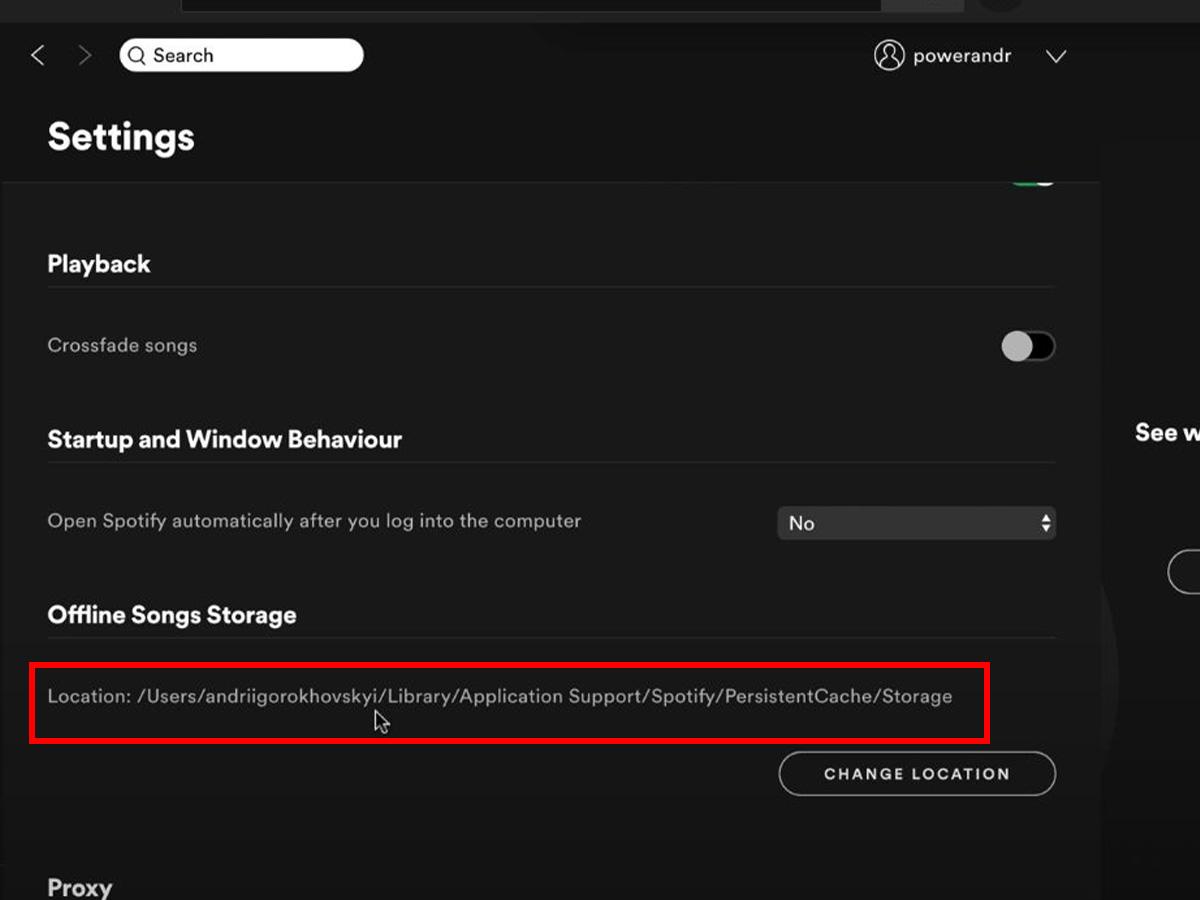
On Mac
- Open the Spotify app.
- Click on your avatar in the top right, then select ‘Settings’.

Open Spotify Settings. - Under Offline Songs Storage, take note of the pathname.
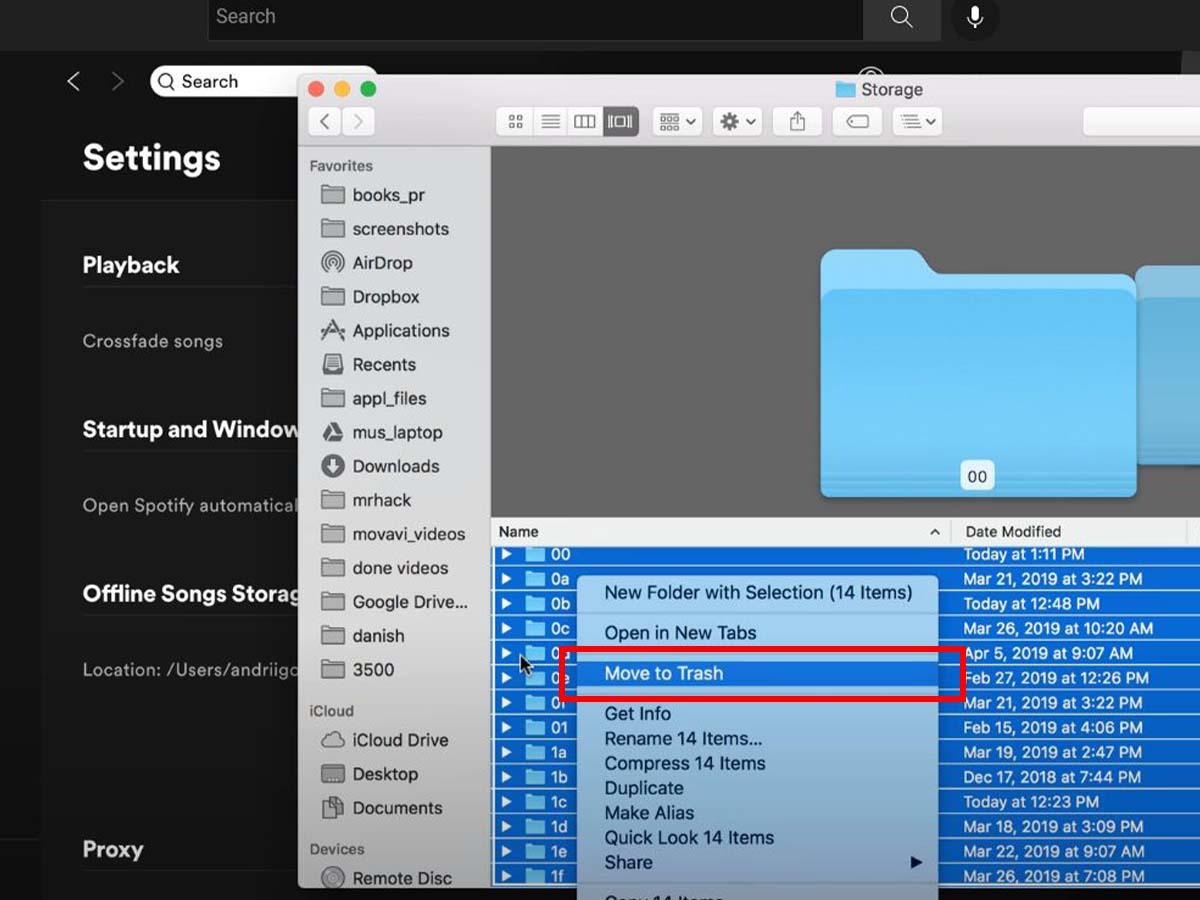
The pathname under ‘Offline Songs Storage’ - Open Finder, and select ‘Go’ from the Finder menu.
- Click on Go to folder.
- Type in the pathname to access the Spotify cache folder.
- Select all the files inside the folder and delete them.
Deleting files from the Spotify cache folder.
Disable hardware acceleration
The hardware acceleration feature is enabled by default, allowing your computer to use its graphic processing unit to improve Spotify’s performance.
However, this may not work on older machines, especially those with lower-end video cards and hardware that cannot support this feature. You may end up with stuttering, lag, or issues with playing songs.
In such cases, it’s better to disable the hardware acceleration. Here’s how to do it:
On Mac
- Open the Spotify program on your desktop.
- Click on the three dots in the top left-hand corner.
- Navigate to View, then uncheck the label Hardware Acceleration.
- There will be a warning notification that Spotify might run slower. Click OK to confirm
- Restart Spotify for the changes to take effect.
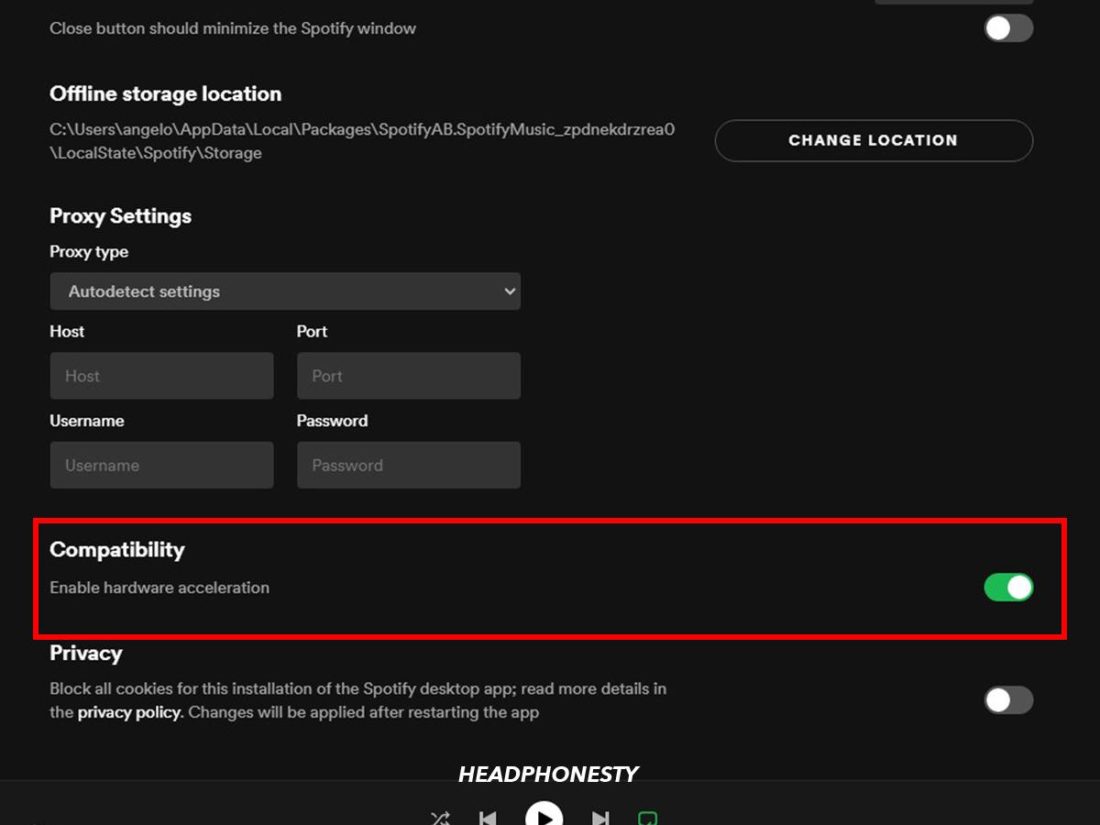
On Windows
- Launch Spotify on your Windows PC
Start the Spotify program on your PC. - Click on your username at the top right corner. Select Settings from the drop-down menu.
Click ‘Settings’ underneath your user avatar. - Under Compatibility, toggle off the button beside Enable hardware acceleration.
Turn off ‘Enable hardware acceleration’. - Hardware acceleration is now disabled.


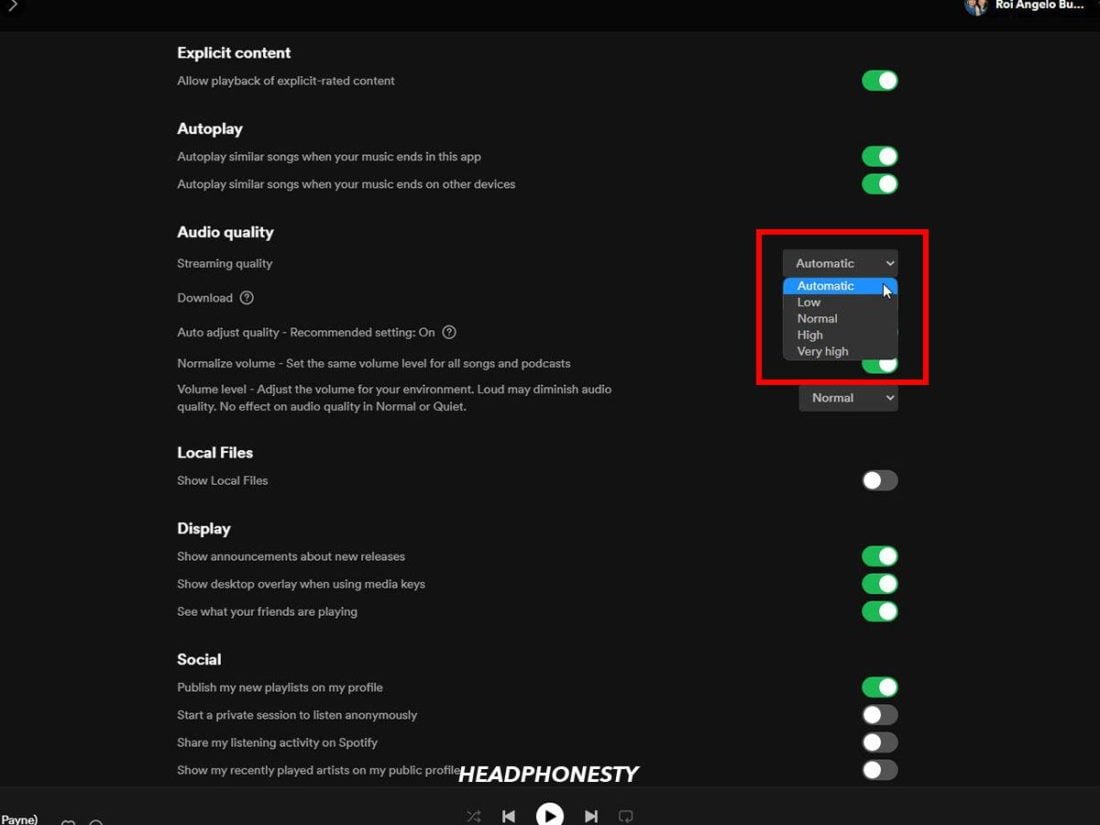
Change the streaming quality
High-quality streaming audio is only available to subscribers of Spotify Premium.
If you happen to cancel your Spotify Premium subscription, Spotify automatically moves you to the free plan. Unfortunately, this also disables high-quality streaming on your account, which might explain why you suddenly cannot play songs.
To rectify this error, you can manually adjust your streaming quality. Here’s how to do it:
- Open the Spotify program on your desktop. Click on your avatar at the top right corner.
Tap your username on the Spotify app. - Click Settings from the drop-down menu.
Go to ‘Settings.’ - Go to Audio Quality and click on the drop-box. Change it to Automatic or a lower option.
Choose a lower option under ‘Audio Quality.’

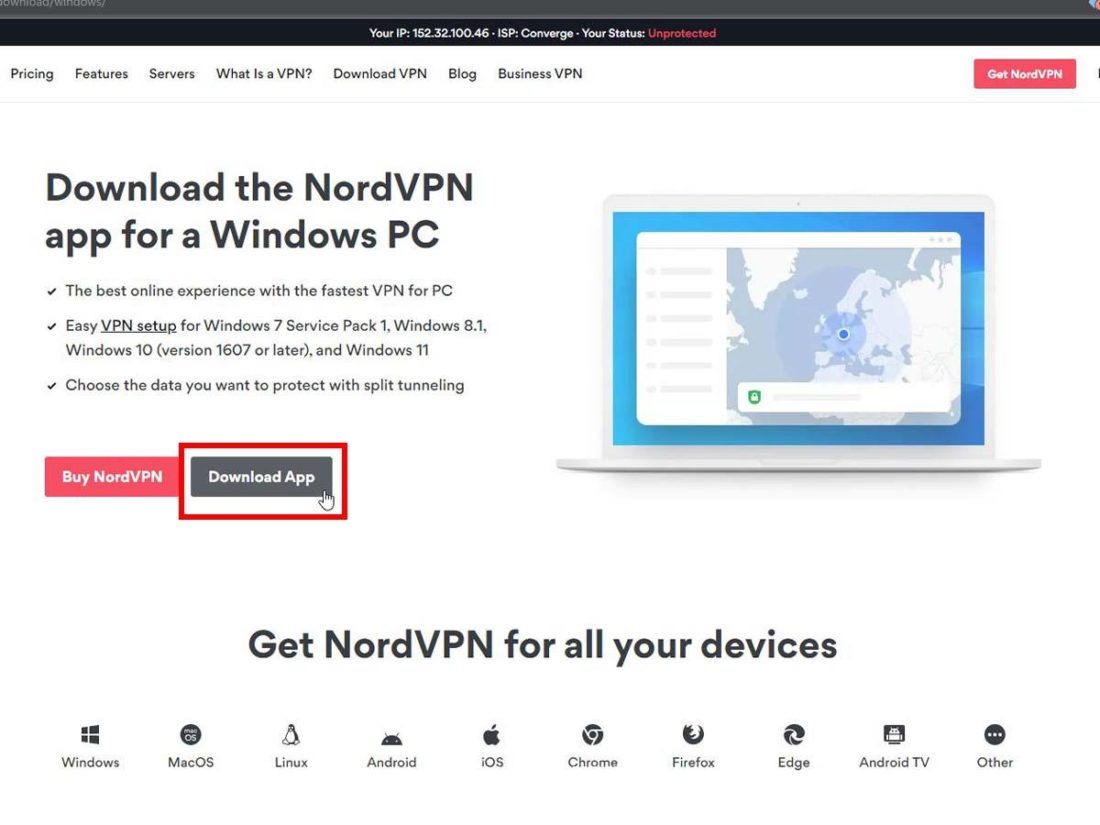
Use a VPN
As previously mentioned, you might be unable to play a song because it’s not available in your region. Platforms like Spotify can detect your IP address and restrict access to certain songs or content depending on its geographical location.
Using a Virtual Private Network (VPN) in this scenario can help you bypass these country restrictions.
However, using an unverified VPN can expose your network and connected devices to external cyber threats like malware and spoofing attacks.
That is why it’s recommended to go for reputable providers like NordVPN and ExpressVPN. Both work well with other popular streaming services like Netflix and YouTube and have servers in over 50+ and 90+ countries, respectively. They offer good speeds for streaming while also encrypting your connection for privacy and security.
Here’s how you can use NordVPN with Spotify:
- Download NordVPN and select a plan.
Download NordVPN and choose a plan. - Connect to a server in the location of your choice.
- Spotify is now unblocked from your country’s restriction.
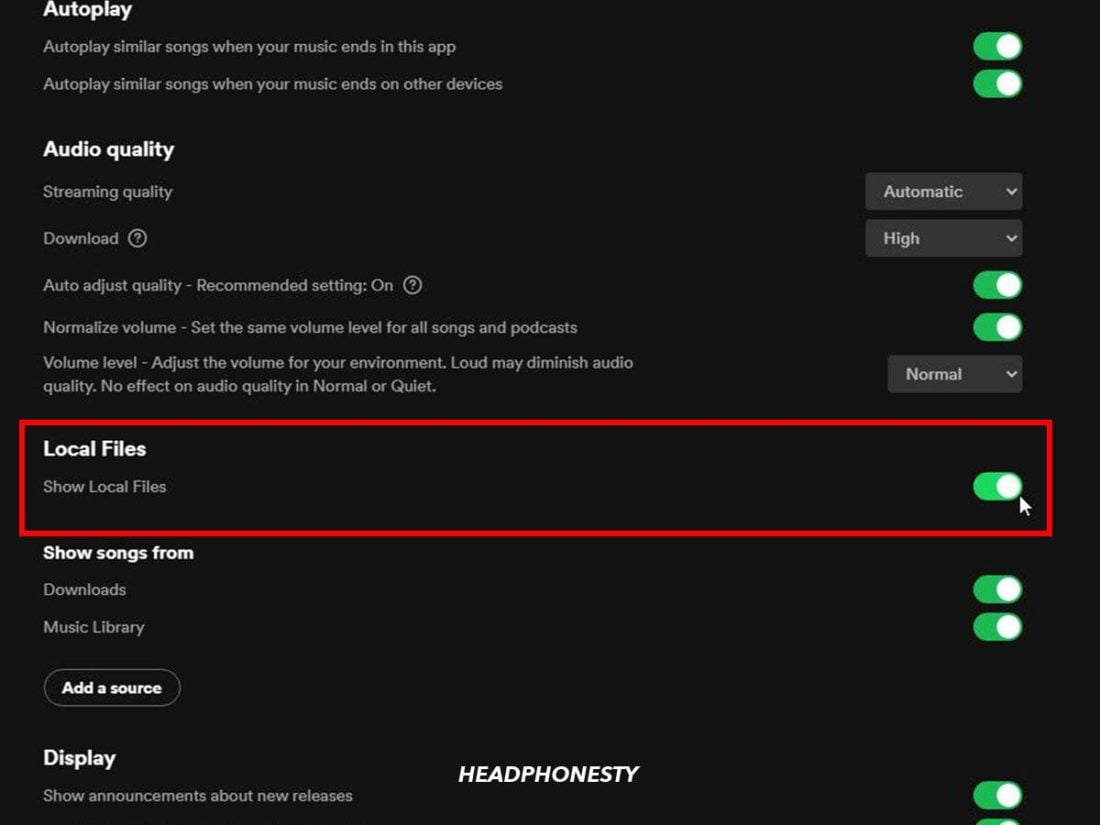
Troubleshoot local files
If you’re a premium subscriber, Spotify has a feature that allows you to play audio files stored locally on your computer. These might be your favorite songs from independent artists not yet available on Spotify.
You can do this by importing local files to Spotify via the Spotify desktop app (Windows and Mac).
However, there might sometimes be glitches where Spotify doesn’t recognize changes in your file settings, which can cause your local files to not sync correctly. As a result, you may be unable to play or stream those songs.
When this happens, the best way is to refresh your Local Files Settings. This will make Spotify register any changes or updates to your preferences, allowing you to load and play those audio files.
The following steps to refresh local files settings apply to both PC and Mac users:
- Launch the Spotify program.
Open the Spotify app on your desktop. - Click on your username at the top-right corner and select Settings.
Go to ‘Settings’ under your user avatar. - Under Local Files > Show Local Files, manually toggle the switch off and on again.
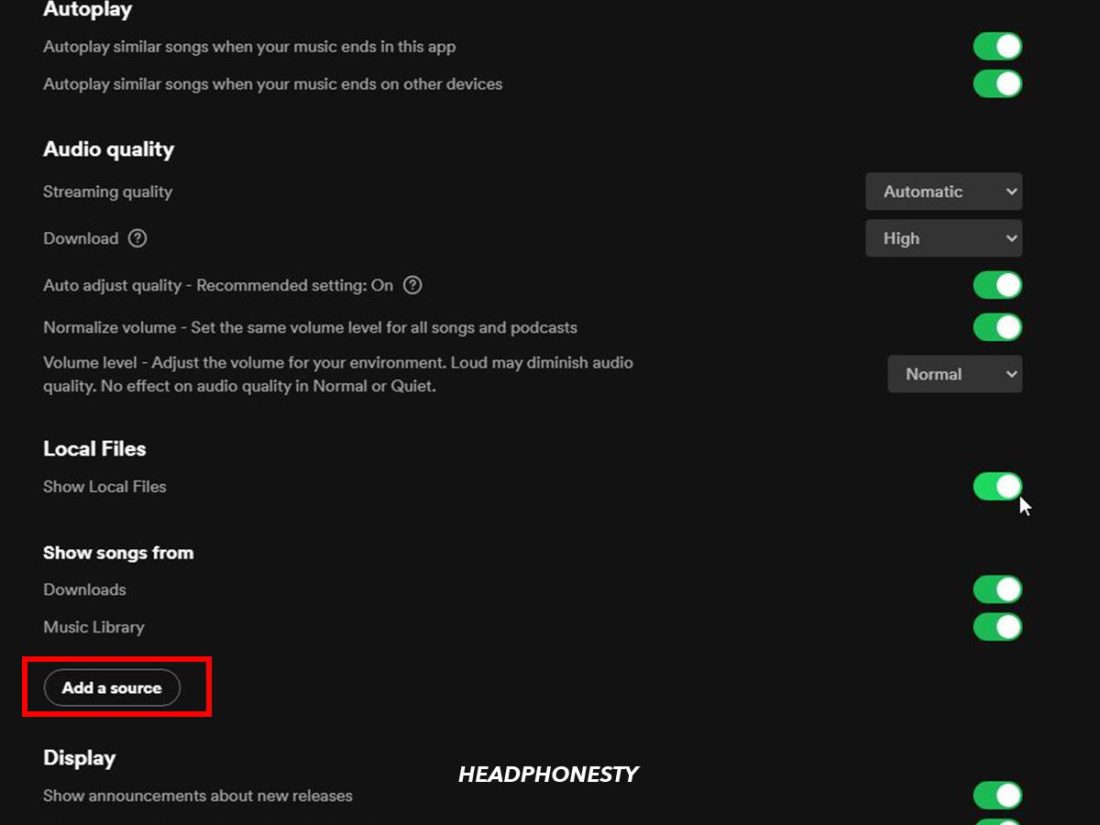
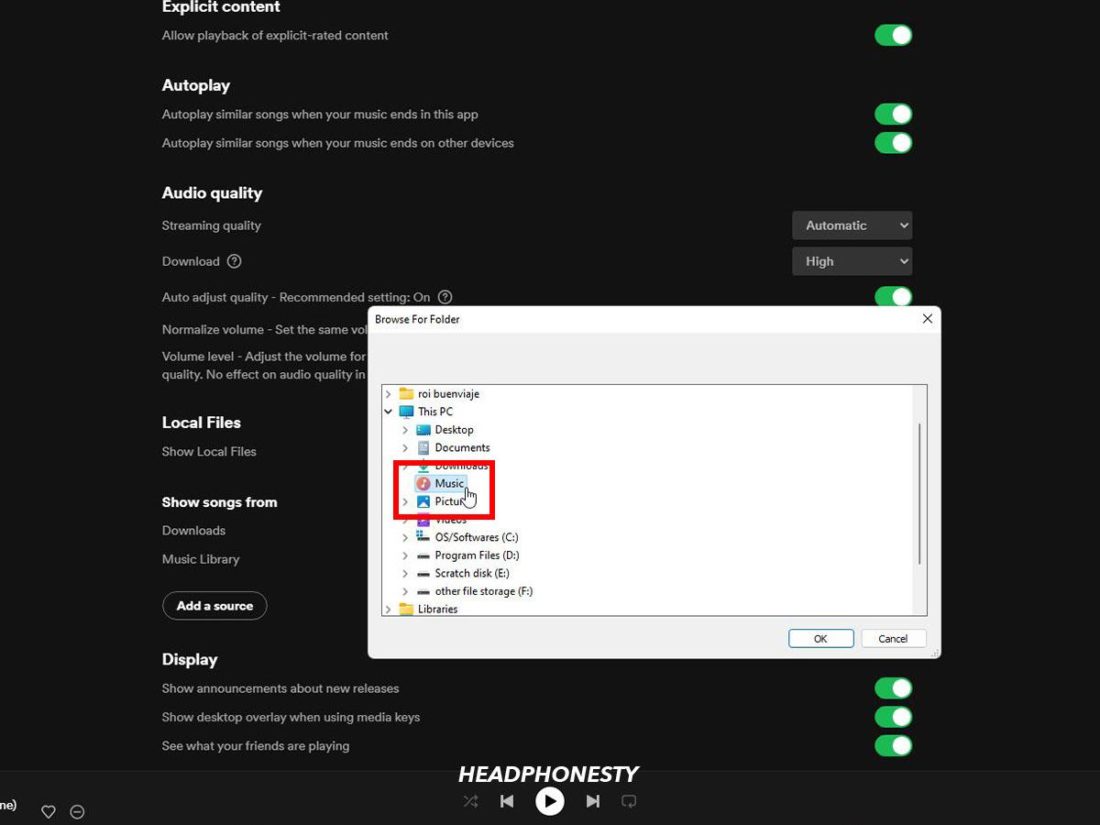
Turning off and then turning on ‘Show Local Files’ option. - As an additional step to confirm any changes and updates, click on Add a source.
‘Add a source’ to confirm changes. - Navigate to the folder on your local drive containing those audio files you want to play. Reselect it to make sure Spotify registers the location of your local files.
Reselect audio files on your local drive. - Your local file settings should now be refreshed.


For Spotify web player: enable protected content
Some web browsers have built-in permission settings that may prevent you from playing or watching protected content like songs or movies under copyright.
This might explain why you get the ‘Spotify can’t play this right now’ error when using the Spotify web player to listen to your songs.
To fix this, you’ll need to enable viewing of protected content. The steps may differ depending on your web browser and the operating system.
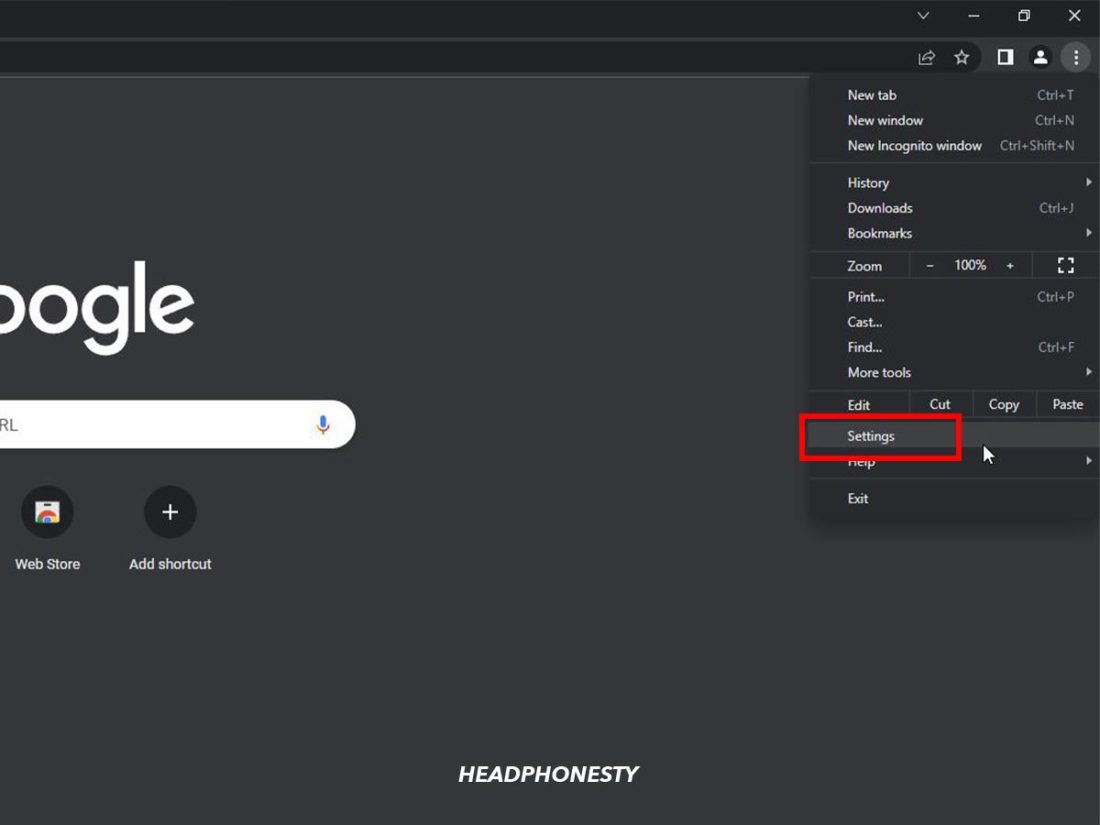
On Google Chrome on Windows:
- On Chrome, click on the three dots at the top right corner, then select Settings.
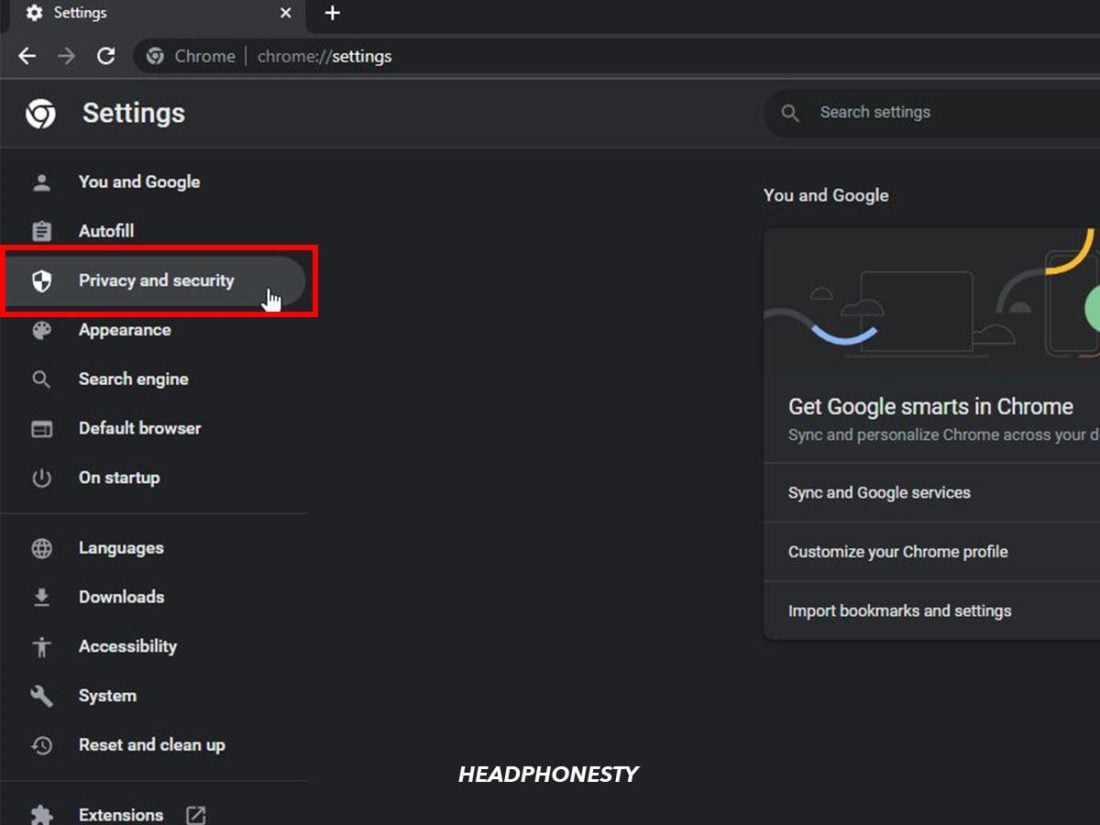
The ‘Settings’ option on Chrome under the three-dots icon. - Select Privacy and security from the options on the left-hand menu.
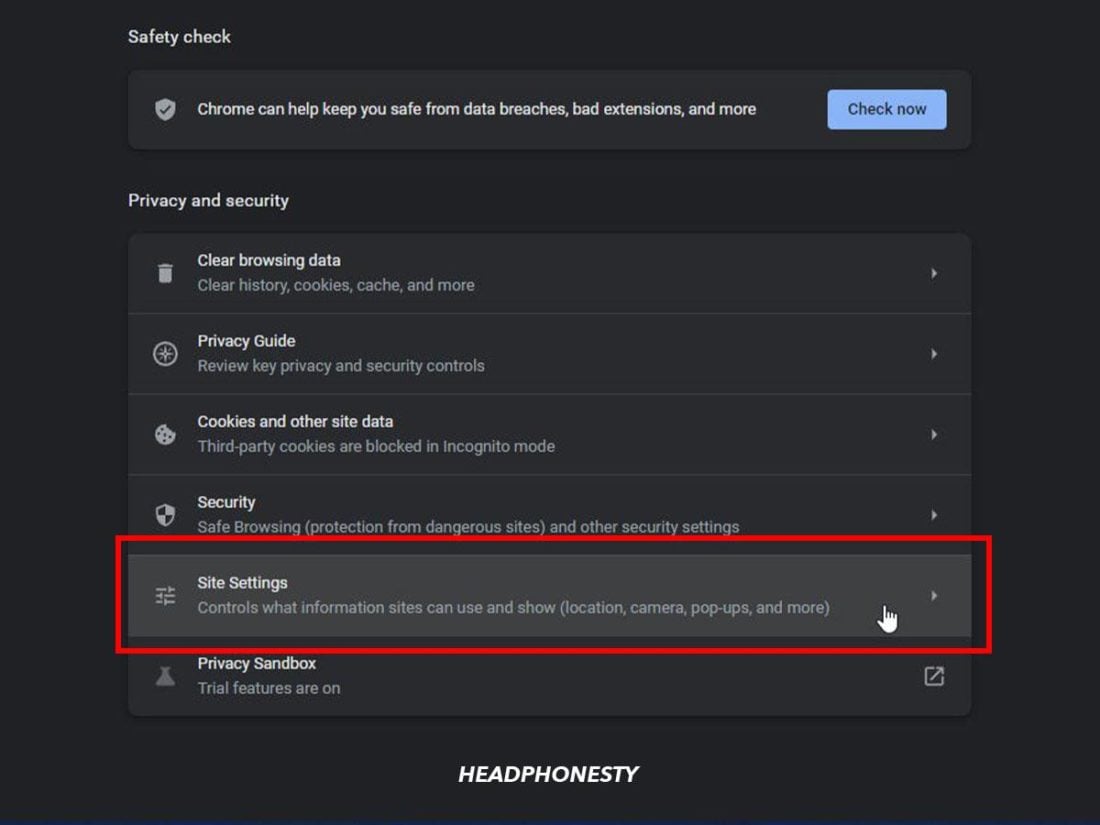
Tap on ‘Privacy and security’ under Chrome Settings. - Select Site Settings.
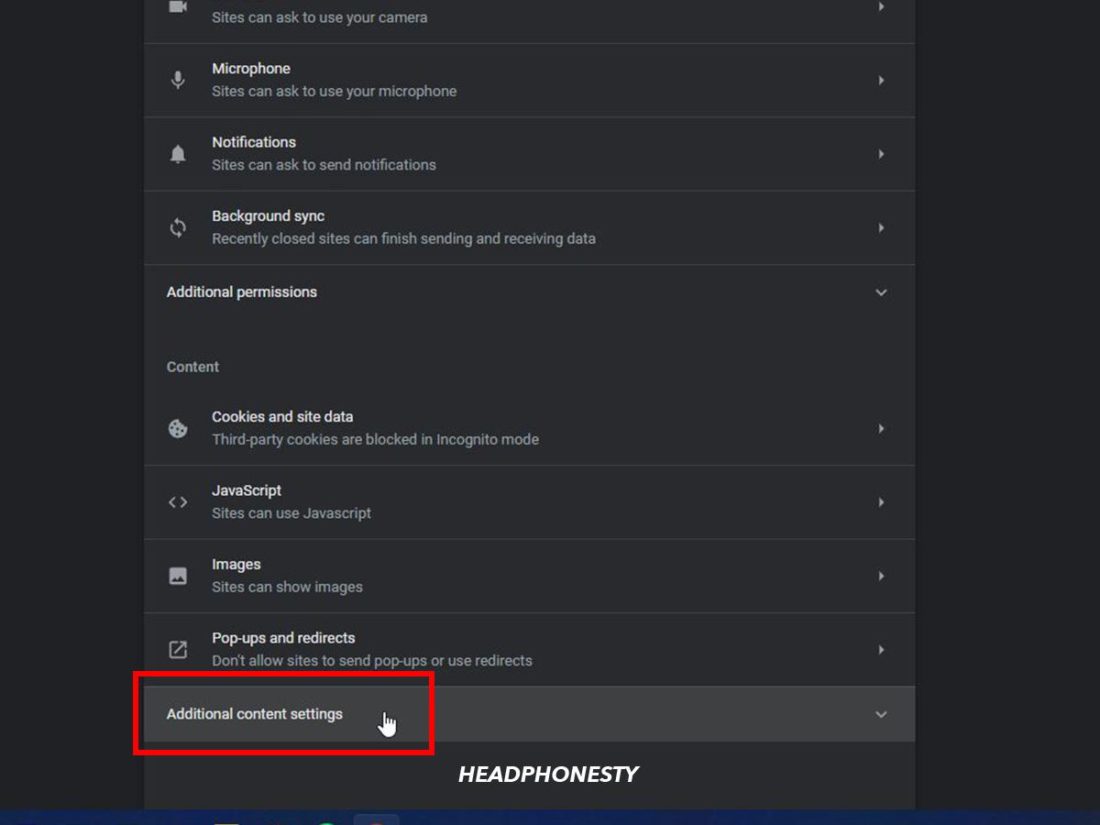
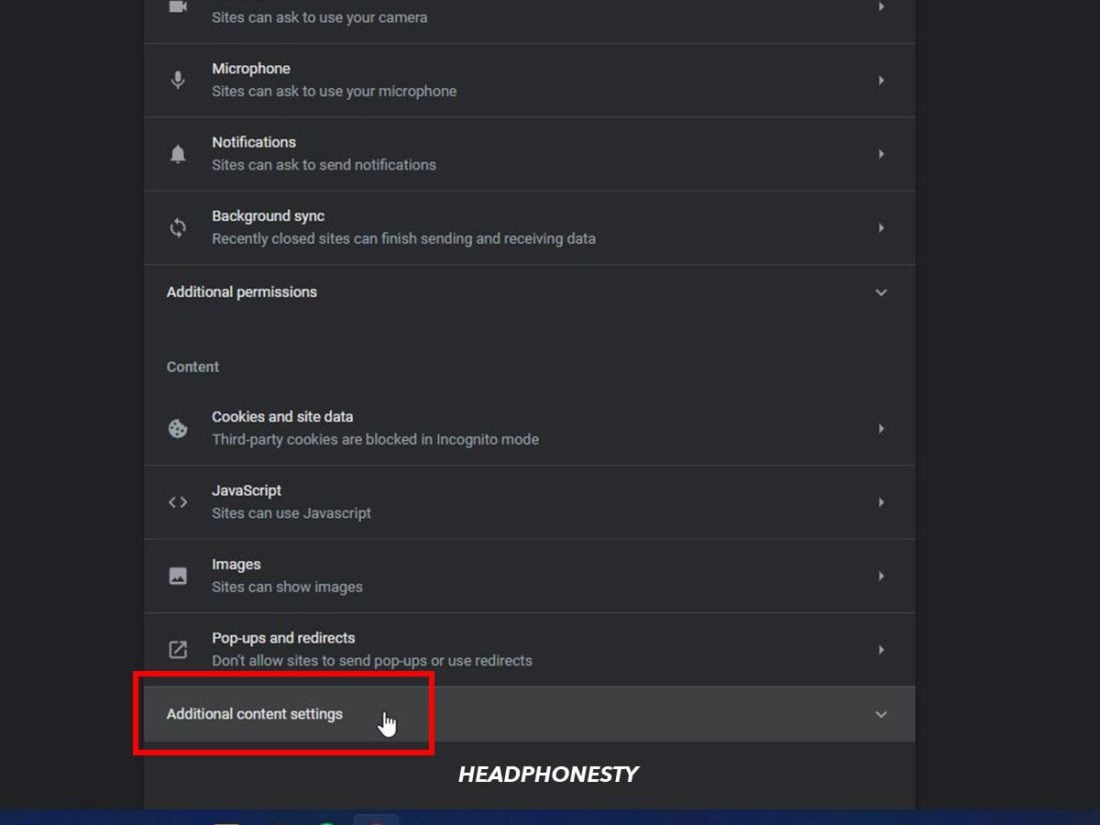
Click on ‘Site Settings’ under the Privacy tab. - Select Additional content settings.
Select ‘Additional content settings”. - Under Protected content, turn on Allow sites to play protected content.
Turn on permissions for sites to play protected content.

On Google Chrome on Mac:
- On Chrome, go to Preferences.
- Select Privacy and security.
- Select Site Settings.
- Click on Additional content settings.
- Select Protected content IDs.
- Make sure Sites can play protected content is enabled.
For Windows app: setup output device
For whatever reason, your sound output device could have been incorrectly or accidentally changed on Windows. Because of this, Spotify’s audio signal may be sent to an invalid or incorrect device instead, which explains why you can’t play certain music tracks.
To fix this problem, you need to manually select the sound output device for Spotify. Here’s how you can do it on Windows 10:
- Launch Spotify on your computer.
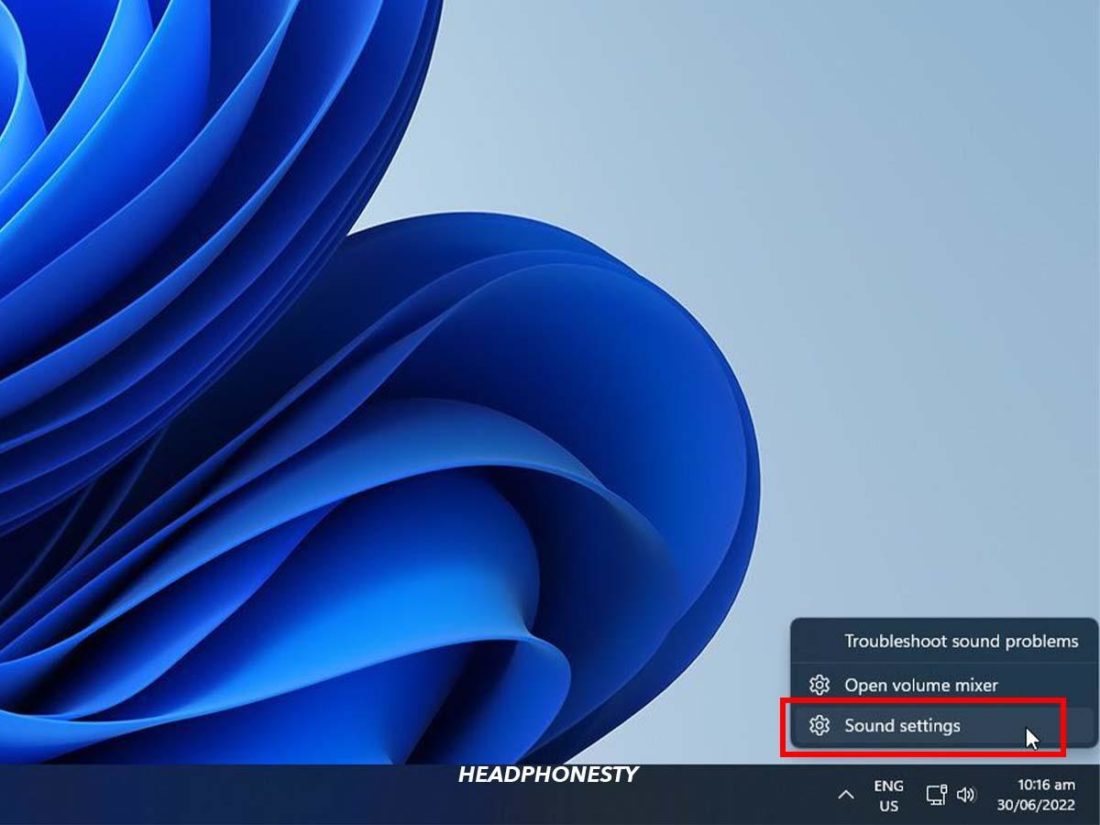
Open Spotify on your Windows 10. - Right-click on the volume icon at the bottom right of the taskbar and select Sound settings.
Select ‘Sound Settings’ at the bottom right of your taskbar. - Under Advanced sound options, click Volume Mixer.
Click on ‘Volume mixer’ to specify your sound output device. - Scroll down till you see Spotify under the list of applications, then select your desired output device from the drop-down box on the right-hand side.
Choose your sound output device under ‘Additional content settings.’ - Restart Spotify for the change to take effect.


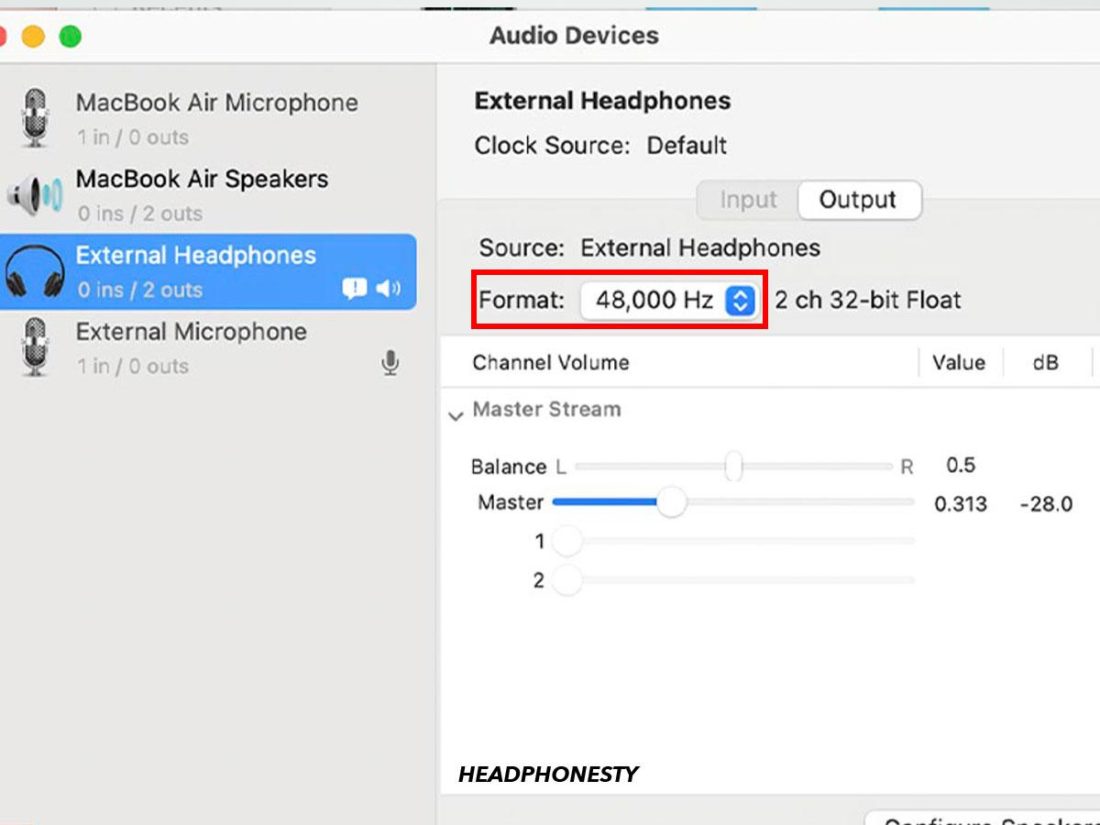
Set default audio format
Some Spotify users have reported that using an external digital to analog converter (DAC) at higher sample rates like 384 Khz can cause the program to not play certain tracks.
Simply put, sample rates are the number of samples of a sound per second in its digital form. With a higher sample rate, you can get a more accurate reproduction of the original analog sound.
So, if you’re an audiophile or you just prefer higher fidelity audio, it may be your audio format’s sample rate that is incompatible with your existing computer hardware. This could be the reason why Spotify can’t play your tracks.
Either way, changing the default audio format is an effective way to check if this might solve the problem.
There are different steps to do that on Windows and Mac respectively.
On Windows:
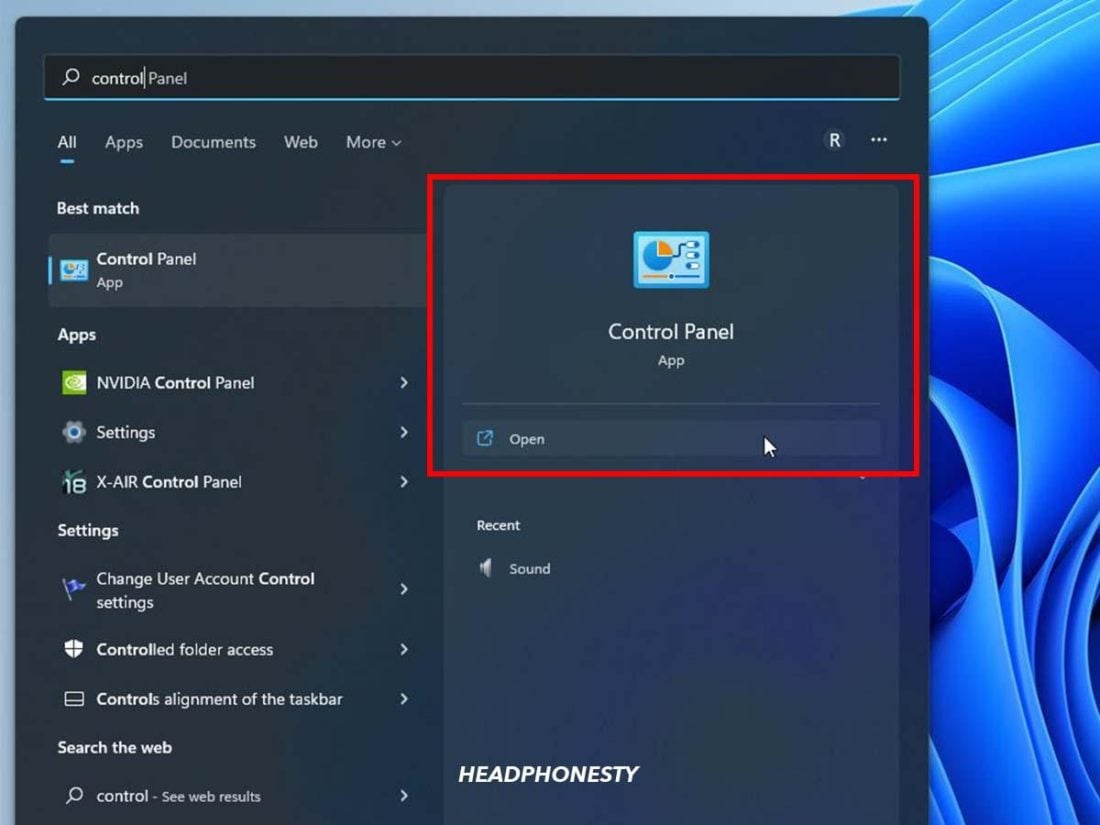
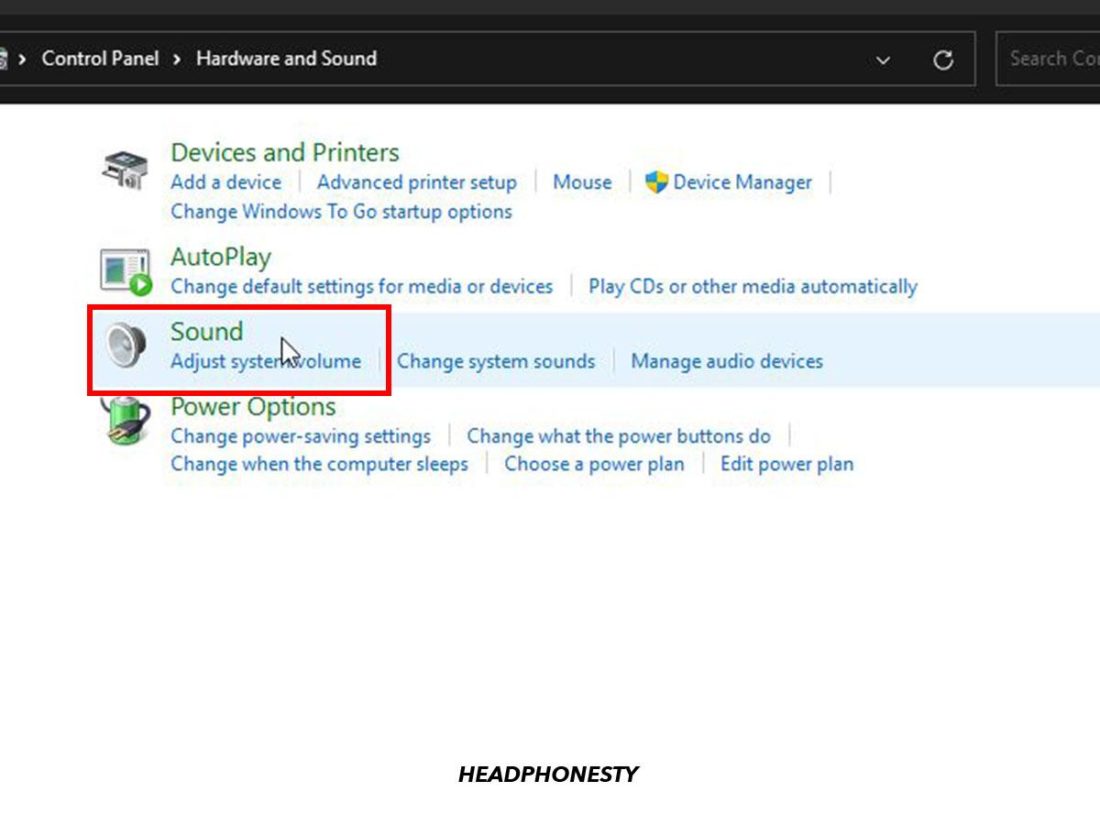
- Go to Control Panel.
Navigate to the Control Panel on your Windows. - Select Hardware and Sound from the left-hand menu. Then select Sound.
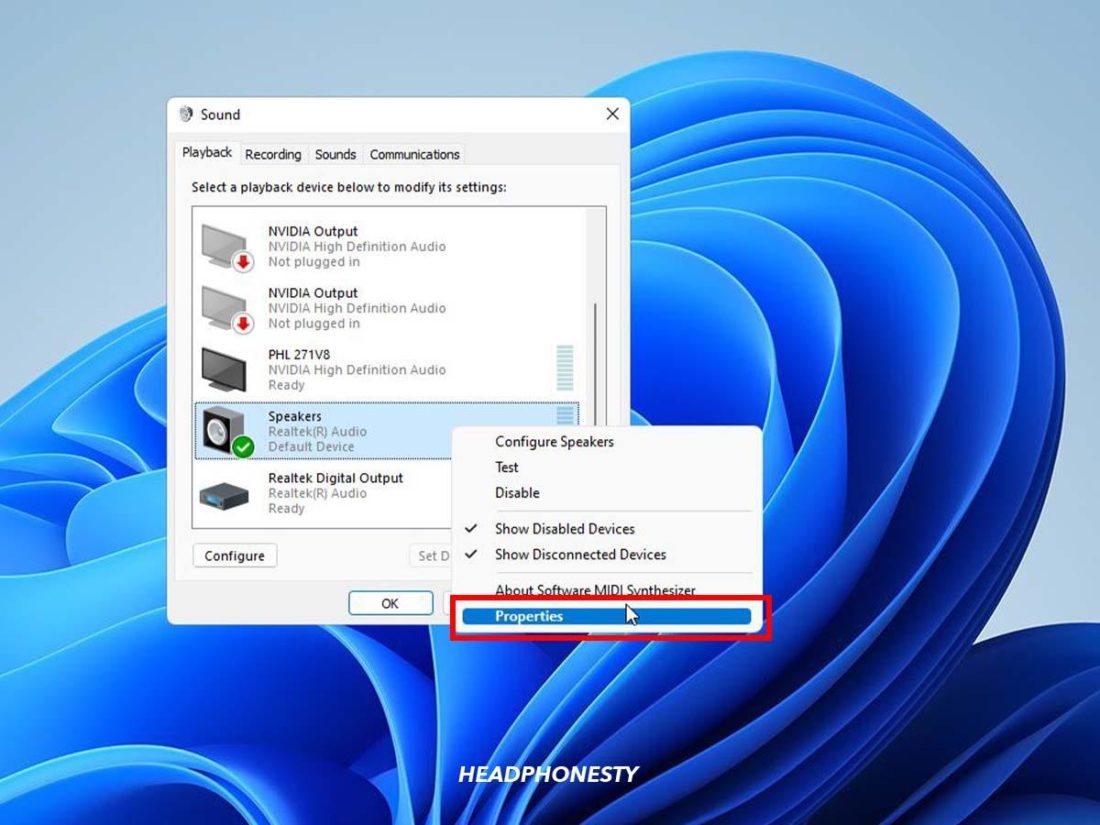
Click on ‘Sound’ under the ‘Hardware and Sound’ tab. - Under the Playback tab, right-click on your audio device. Select Properties.
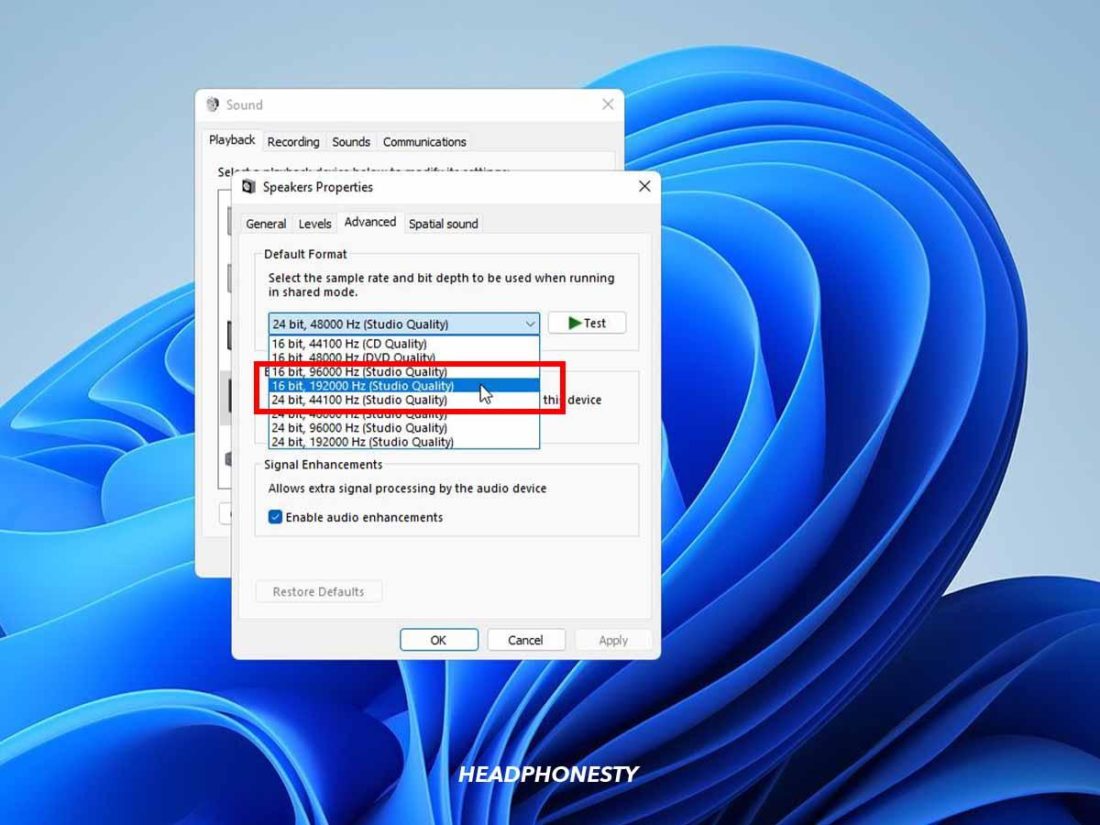
Select ‘Properties’ under the Playback tab. - Under the Advanced tab, you should see a list of bit rates and sample rates under default format.
Choose a lower sample rate under the Advanced tab. - Now select a lower sample rate like 192 Khz and launch Spotify to test.
On Mac:
- Use Spotlight (Command + spacebar) and search for Audio MIDI Setup.
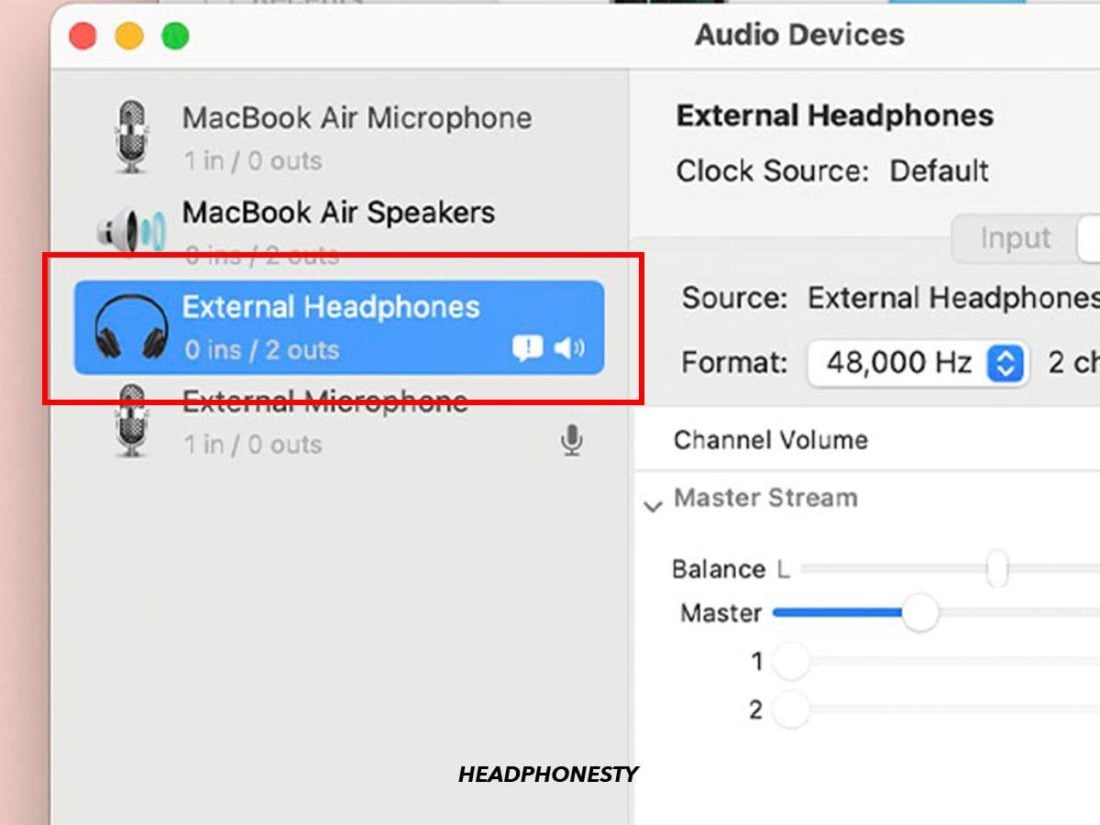
Navigate to Audio MIDI Setup on Mac. - Launch Audio MIDI Setup. Select your output device from the left-hand menu.
Click on the headset icon to select your output device. - You should see several tabs like Channels, Bit Depth, Format, and Rate. Try a different sample rate and relaunch Spotify to test.
Try another sample rate and test it on the Spotify app.

Reinstall Spotify
When all else fails, the best option is to uninstall and reinstall Spotify. Doing this will wipe out bugs or glitches and allow you to start afresh with the latest version of Spotify.
As with most reinstallations, the exact steps will differ depending on the device that you’re using.
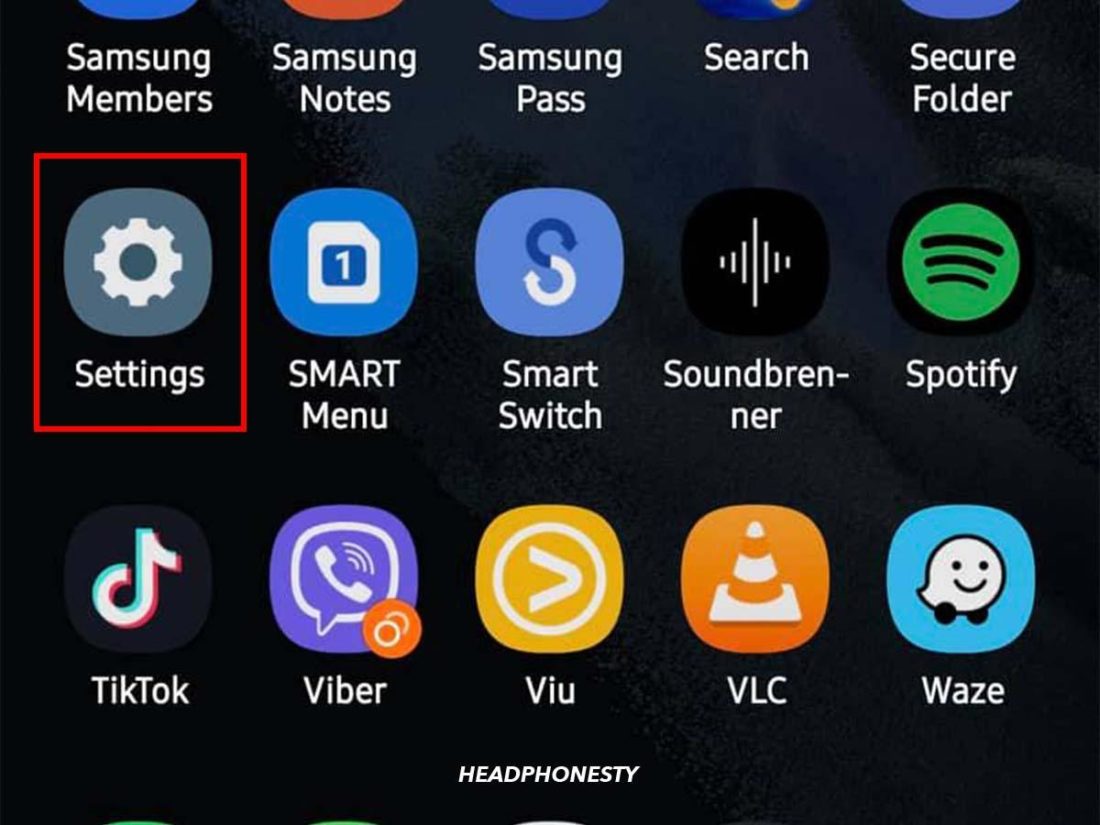
Bur for reference, here’s how to uninstall/reinstall Spotify on Android:
- Go to Settings.
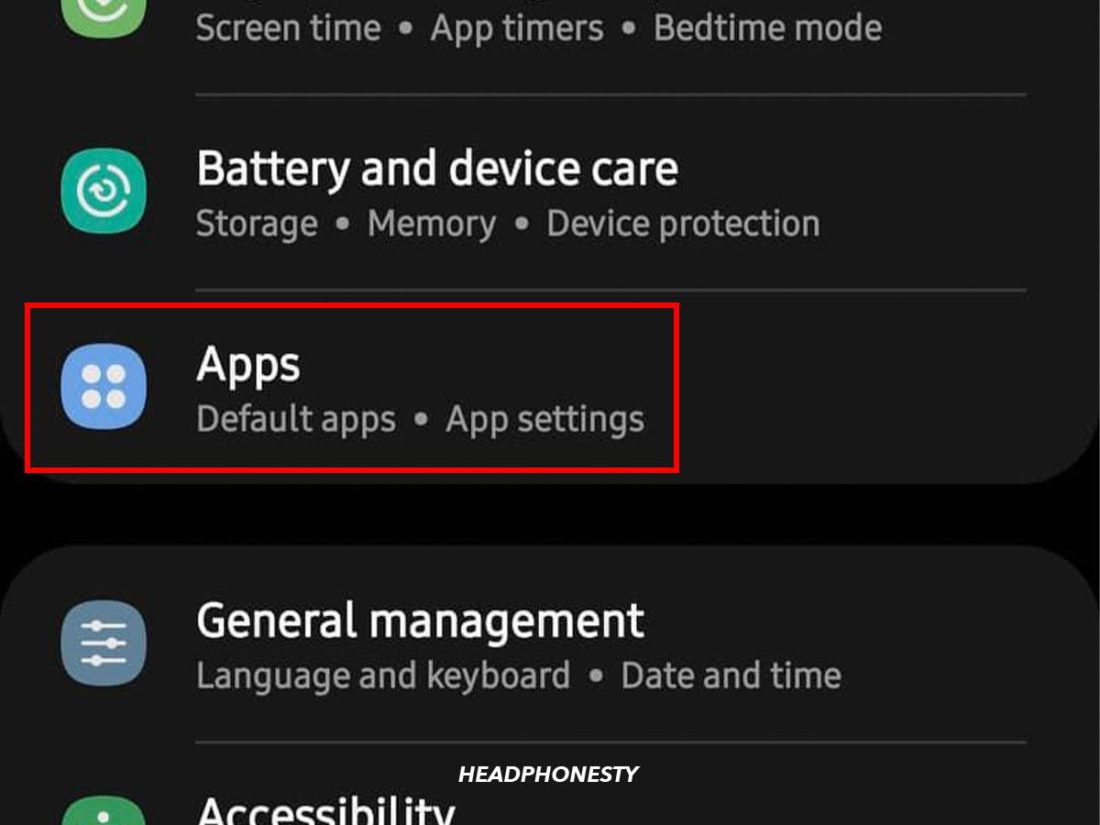
Click on Android Settings icon. - Select Apps.
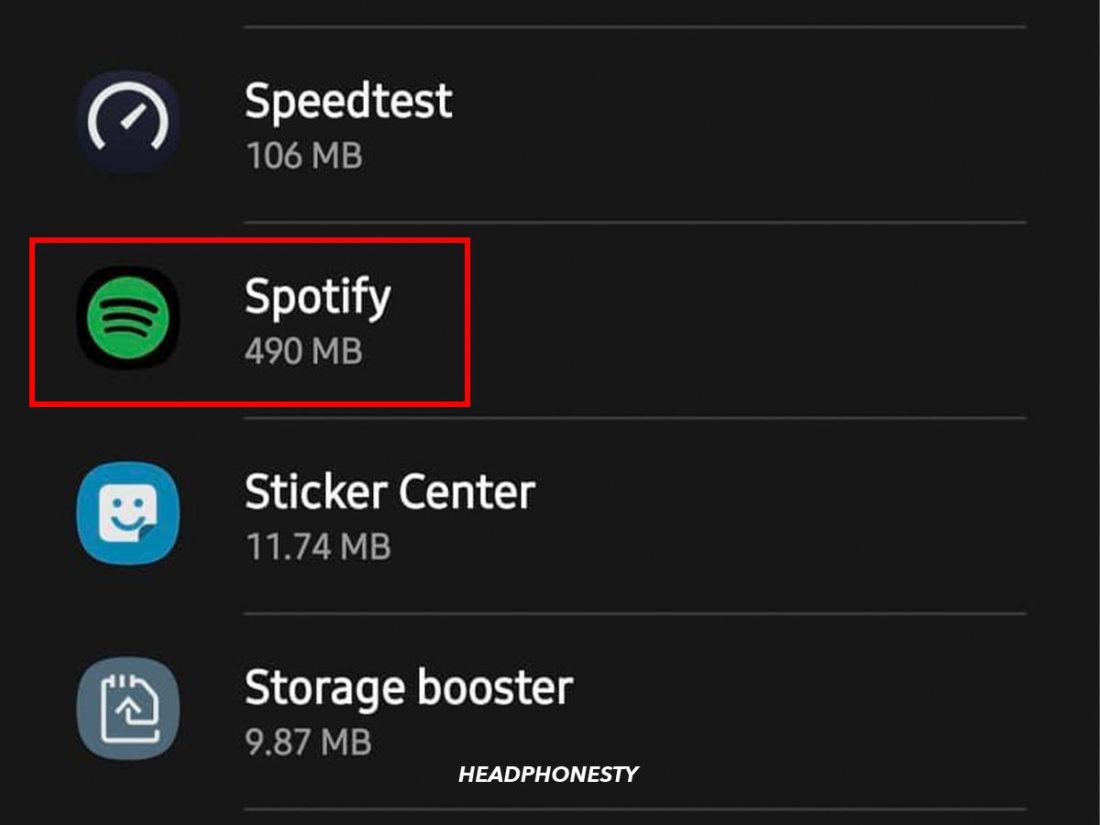
Navigate to the ‘Apps’ folder. - Search for Spotify.
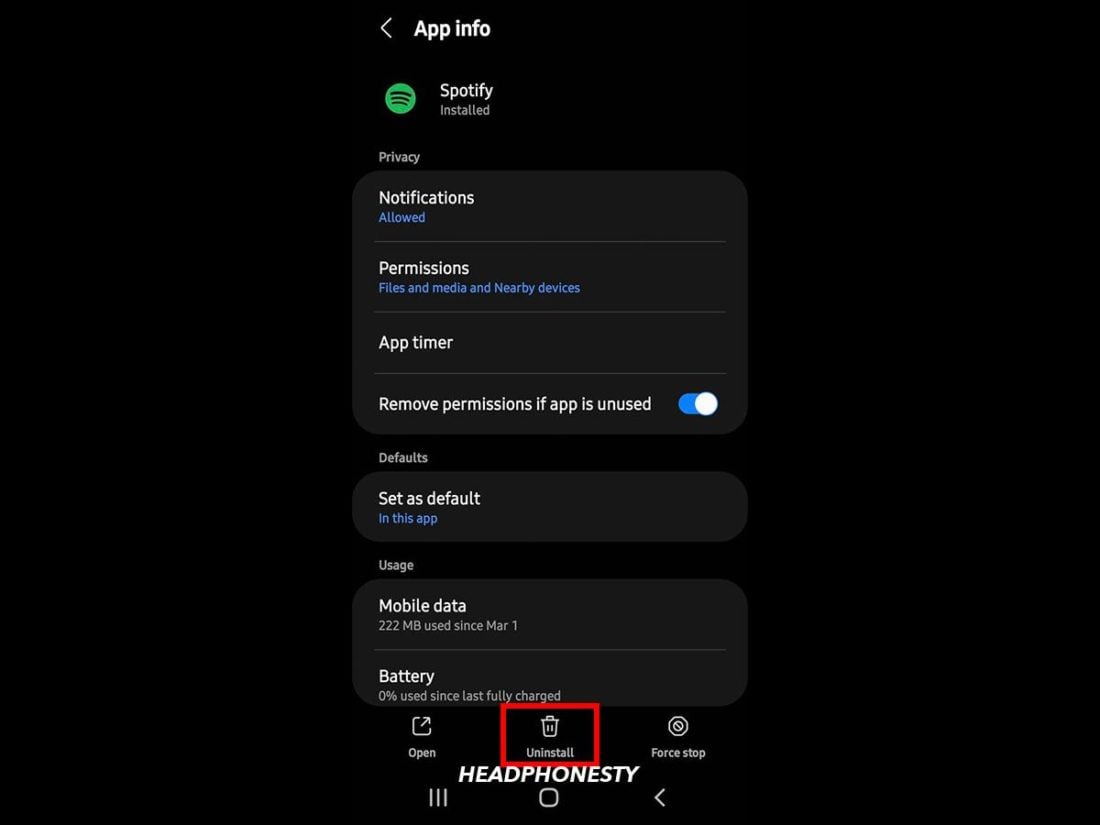
Look up Spotify under Apps. - Tap Uninstall.
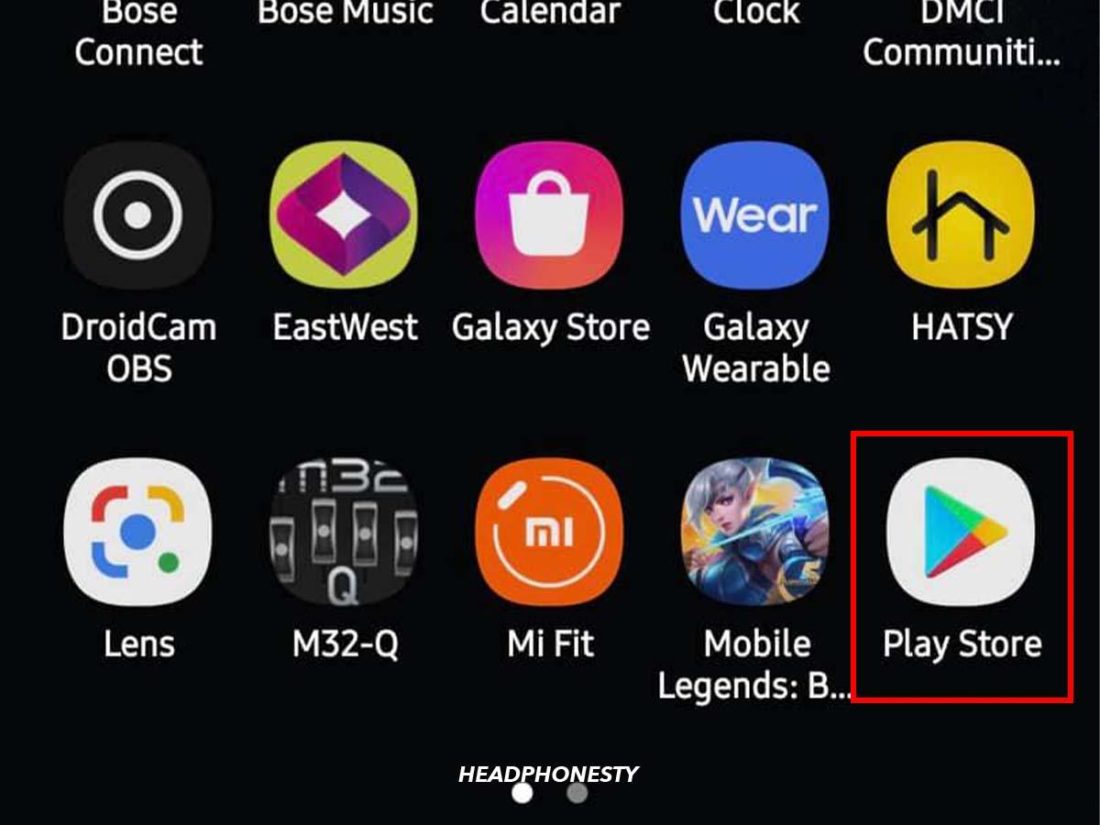
Uninstall Spotify. - Go to the Play Store.
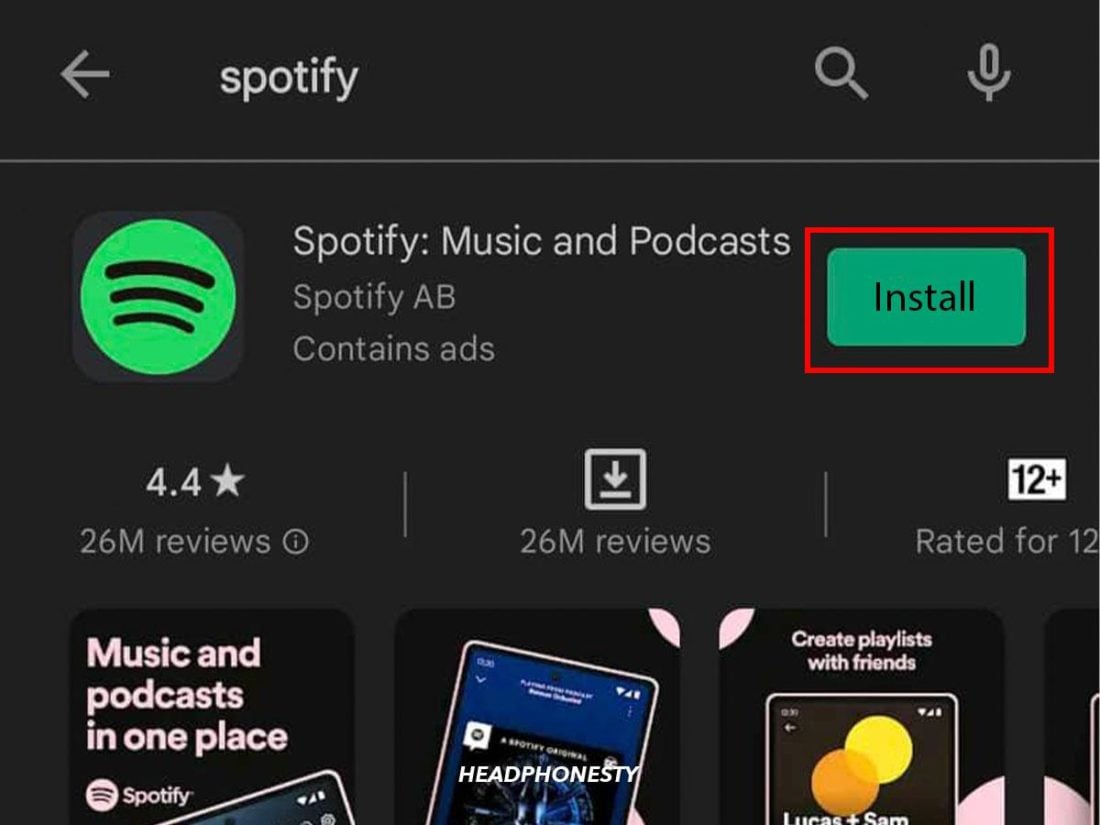
Tap on the ‘Play Store’ icon. - Search for Spotify and reinstall it again.
Look up Spotify in the search bar to reinstall it.
Conclusion
When it works properly, Spotify is one of the best music streaming services you can use. However, like all software applications, you are bound to encounter unexpected problems from time to time.
Now that you’ve read this guide, we hope that seeing the ‘Spotify can’t play this right now’ error message will no longer annoy you.
You can finally relax and just resume listening to your favorite songs!
What did you think about our suggested fixes? Were they useful or did you find something better that helped you solve this problem? Share with us in the comments below!
A Million Thanks! You are the only guys that at had the answer
Tried all that, still no luck.
Hallo, Callum,
wenn du eine Lösung findest: ich habe seit 3 Wochen das gleiche Problem. Spotify auf dem Handy kein Problem, aber auf dem PC nur über den Webzugang. Die App funktioniert nicht mehr.
Also: falls du was findest, gib bitte Bescheid!
Nope. Just tried all of the above and it’s still not working.