We compare DIY, 3D printing, and retail options for modding Grados by building three unique pairs of headphones.
In my Introduction to Grado Modifications article, I explored the basic options owners can change on their beloved Grado Labs headphones to transform them into customized works of art. BUT, if Grados are so great, why would anyone want to change them?
Make no mistake: Grado is a decisive brand in the headphone industry.
Many, like myself, found their way into the personal audio hobby via the gateway drug of affordable Grado cans. While many folks move on to discover new companies, products, and sonic flavors, most keep a respect and fondness for their first love.
But let’s be honest. There’s a lot to criticize about Grado build quality.
Shared plastic parts from the low to the high end of the lineup. Questionable comfort from basic headbands and foam ear pads. And that chunky, non-removable cable. Sigh.
There is good news.
Shared parts mean that Grados are modular. Almost every part, from earpads, gimbals, cups, drivers, and most everything in between, is easily swappable and replaceable.
Parts Options
There are a few ways to go when choosing options to customize your Grados.
You can forgo the Grado part of the equation entirely and use a fully custom set of parts to craft your own ‘Grado-inspired’ pair of headphones. This approach can be successful – the ultra-high-end company Spirit Torino has flourished with this “imitation is the sincerest form of flattery” approach to headphone design.
Most of us are limited by budget, so perhaps Aliexpress and 3D-printed options may be the way to go for you. On the other hand, boutique wooden cups paired with aluminum gimbals with hand-sewn leather pads look so oh-so luxurious – similar, but even better than, the Grado Reference and Statement lineup.
A few companies (such as Symphones and Elleven Acoustica) offer purpose-made replacement drivers, which can significantly change the sonics from the original Grado house sound. However, I will primarily focus on the aesthetic, build quality, and comfort side of things.
So, let’s travel along the modification spectrum – from basic to deluxe – and compare the alternatives. We will examine the ‘whats’ and the ‘whys’ behind three different builds. I will include DIY and retail part options, and I’ll do my best to present what is worth doing from the perspective of a Grado fan.
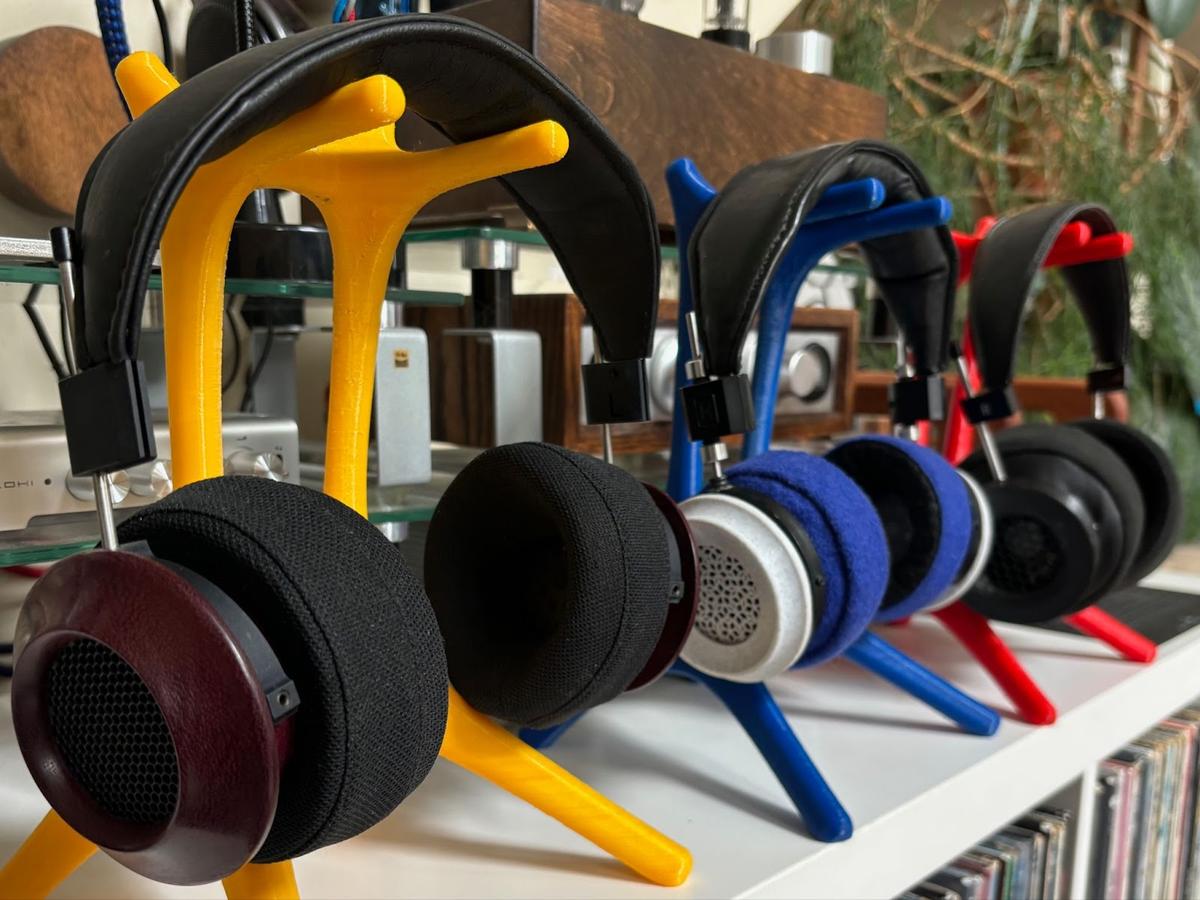
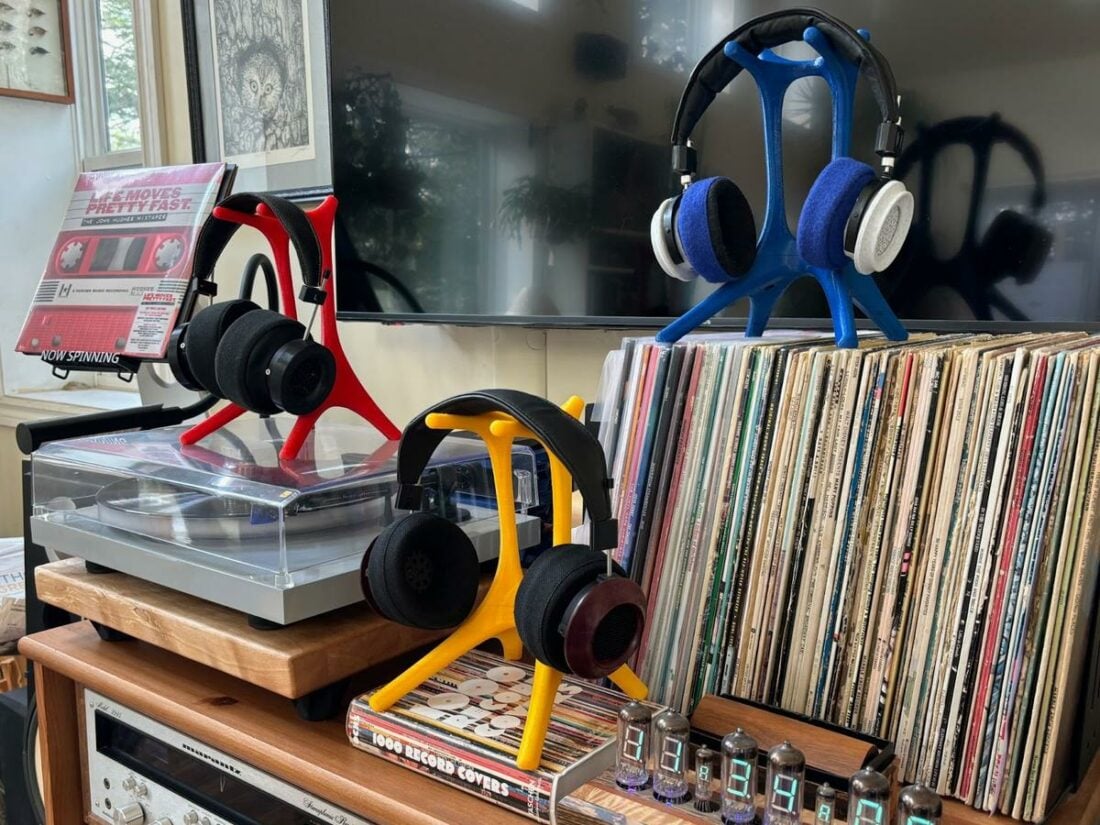
1 – Budget Build
Parts list
- Aliexpress headband assembly, including headband pad, rod blocks, and gimbals
- 2x Symphones v8.1 drivers
- 2x 3D printed full cups
- Overture PETG filament – black color
- Aliexpress fabric ear pads
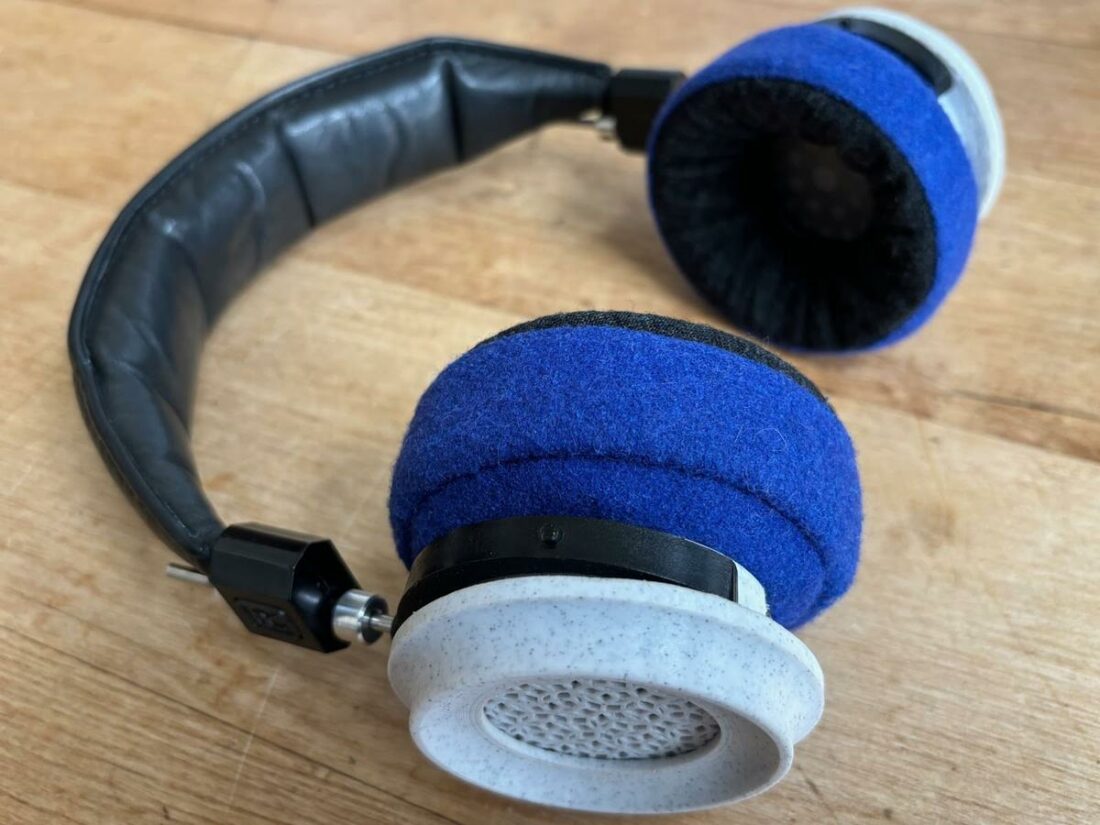
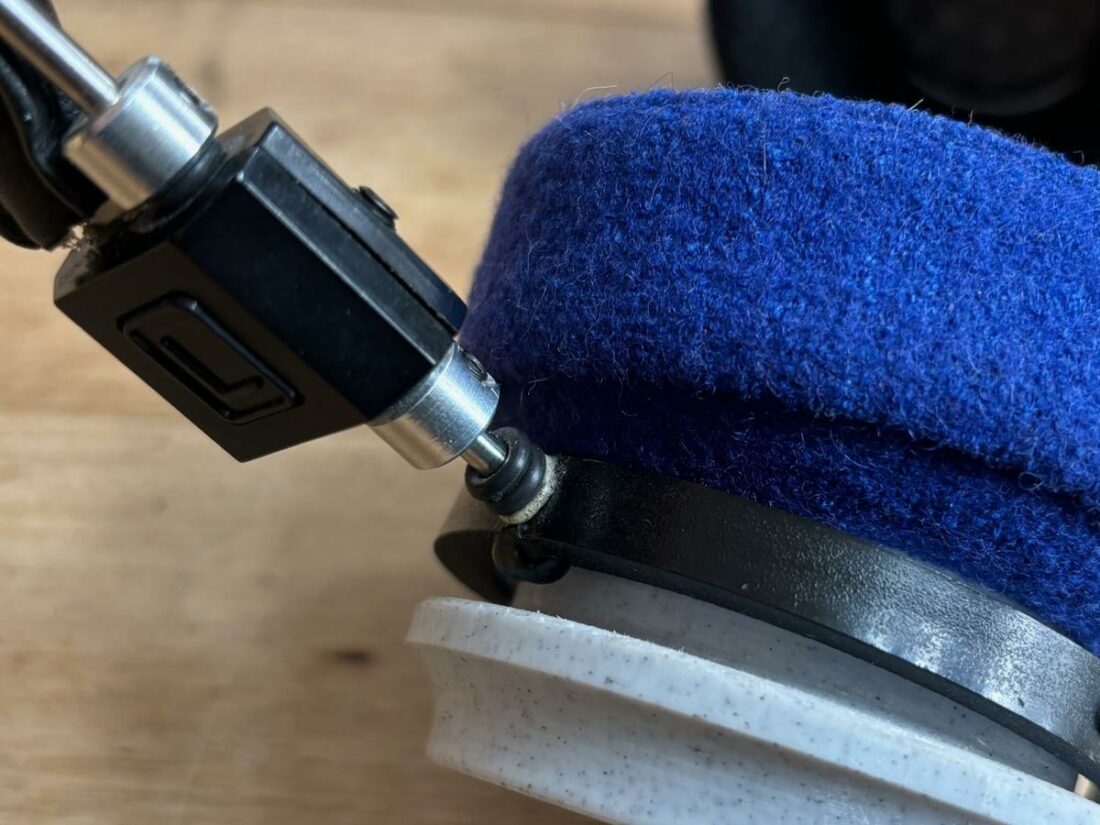
To satisfy my curiosity about what can be done inexpensively and easily, I turned my attention to Chinese mega-retailer Aliexpress. I soon discovered a wealth of replacement headbands and ear pads.
Headband
I searched the list for the least expensive but functional headband. The “360 Degree Rotatable DIY Headphones Headband” stood out as astoundingly affordable, priced at around USD$20.
My low expectations were greatly exceeded, and indeed, the headband more than fits the bill. The faux leather strap is textured, lightly padded, and attractive. The gimbals are simple curved metal bands with holes for the cup bolts.
The color-coded metal rod blocks are the star of the show and put the stock plastic Grado versions to shame. They hold the rods rather too firmly, making adjustments a struggle, but on the flip side, once properly sized, they do not move.
For the price, I have no significant complaints.
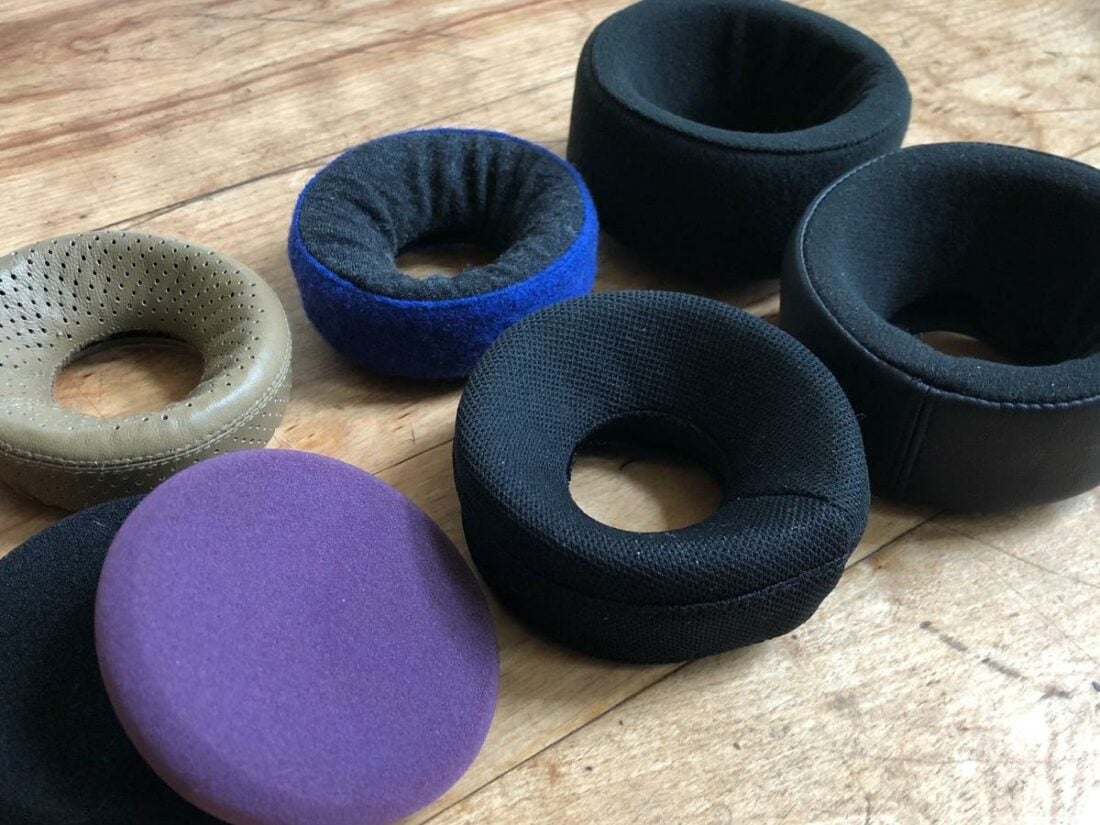
Earpads
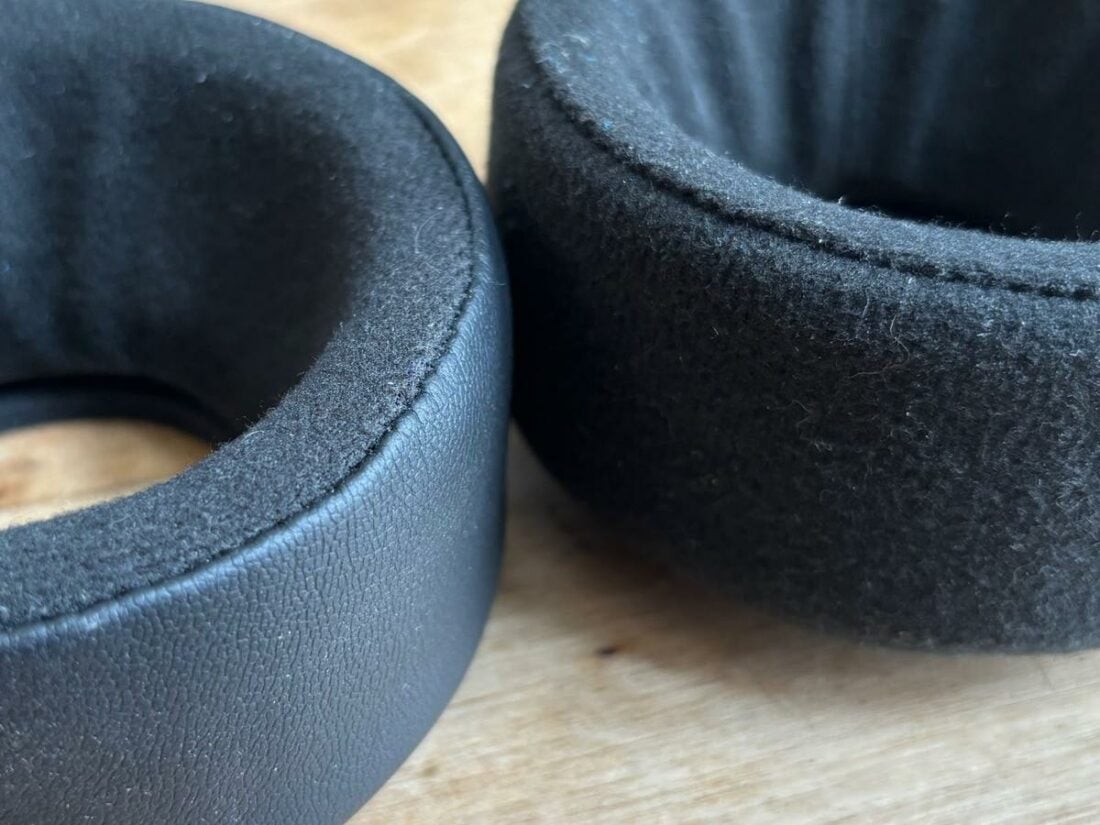
I have covered the foam ear pad options fairly comprehensively in my previous Grado modification article, so I set out to find a pair of ear pads that were genuine upgrades in style, comfort, and materials without breaking the bank. Rule 1: no foam this time.
I settled on the “Ear Pads Cushion Velvet Earmuffs for GRADO” pads. For less than USD$20, I ordered a pair of all “Velvet” and a pair of “Velvet Protein Skin.”
My first impressions were that they were remarkably well-made and BIG. Both share a soft ear-side fabric and faux leather lip to fit around the cup. The Velvet Protein Skin version is constructed of hybrid materials with faux leather on the outside surface, whereas the Velvet version is all fabric.
The diameter is spot on, gripping the cups tightly and efficiently transforming Grados into an over-ear fitment. Still, the significant (~42mm) pad height pushes the drivers further out from the ear.
The inside of the pad is white foam, which is less soft and squishy than the memory foam used in higher-end pads. This relatively stiff foam is acceptable from a comfort perspective but doesn’t compress much when worn, so paired with the generous pad height, the cups stick prominently off the sides of my head.
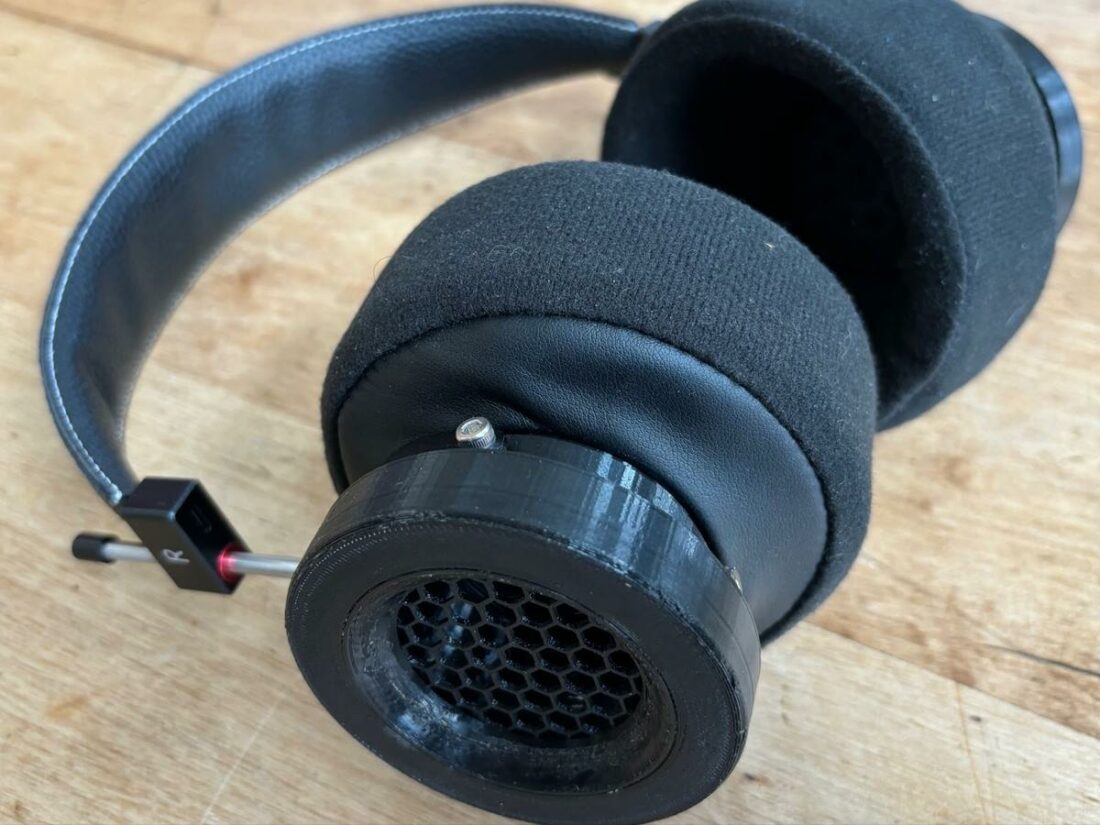
Cups
There don’t appear to be cheap replacement cups available for purchase. Uh-oh. I did not want to reuse the stock Grado cups.
3D-printing to the rescue.
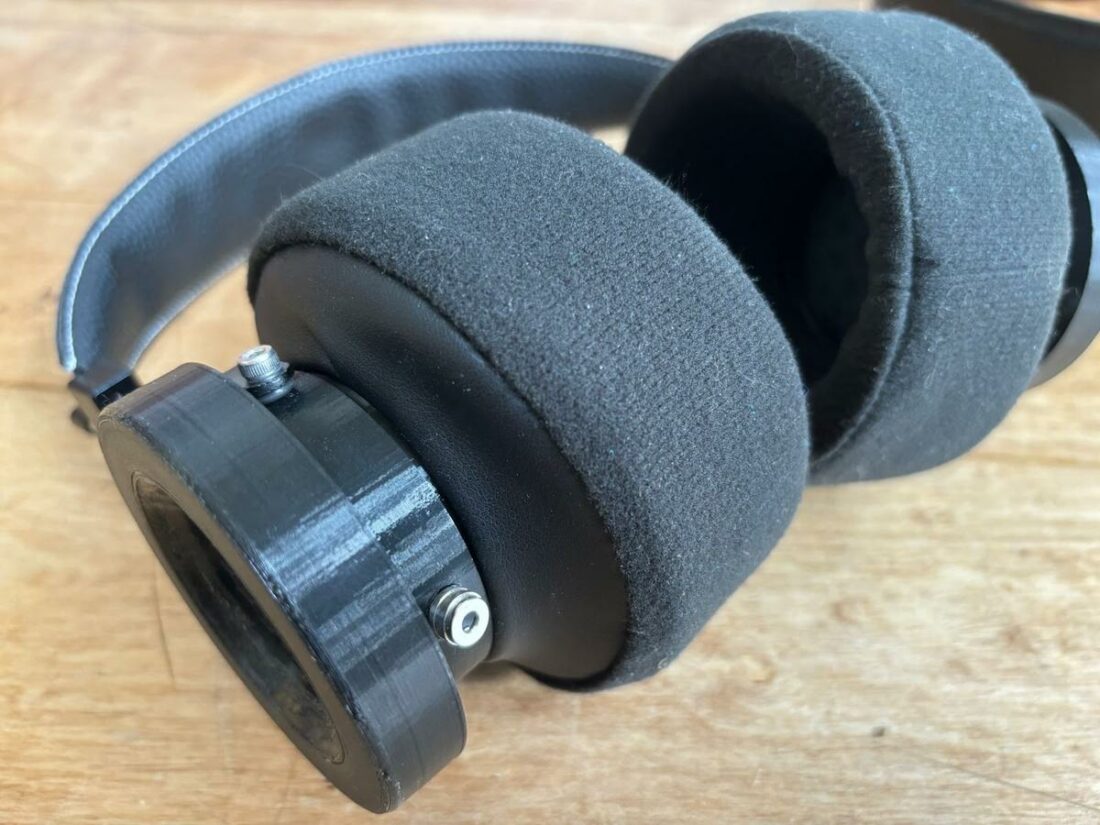
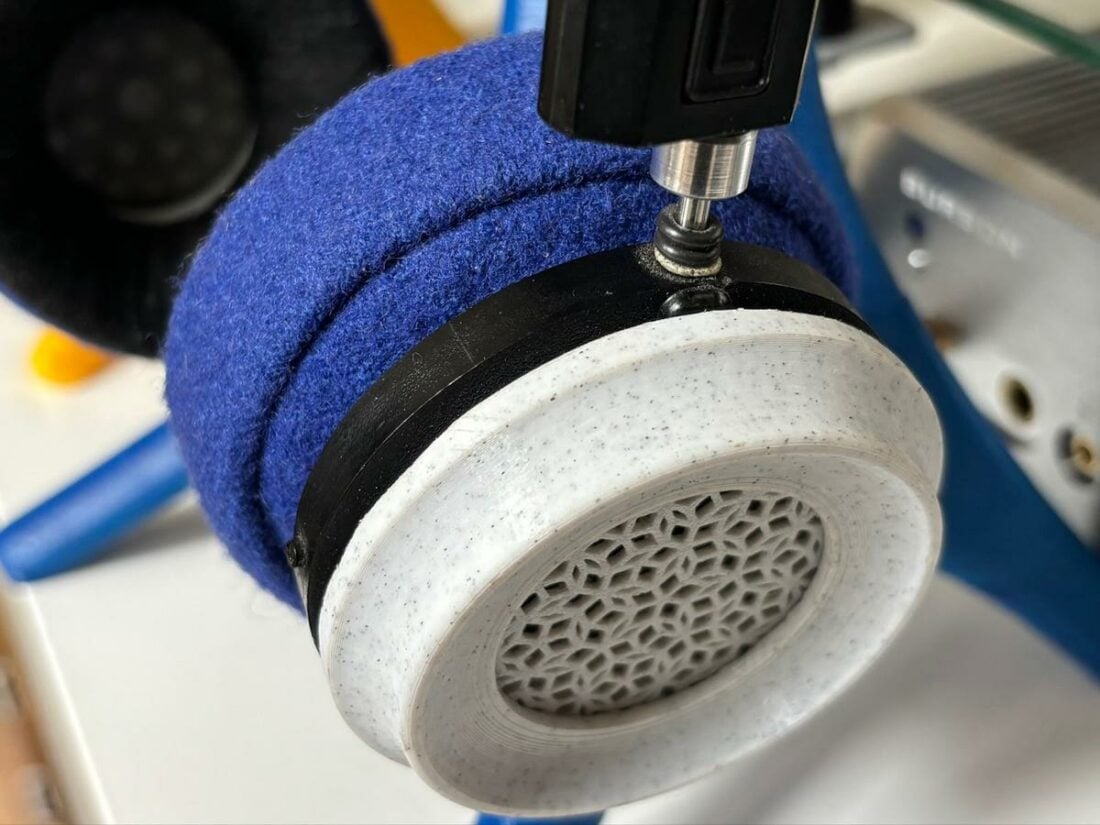
All my replacement parts are black, so I followed that theme and printed cups using black PETG filament. However, since basic Grado headphone cups are black plastic, I desired a cup shape and style that would stand out from stock.
Off to Thingiverse for inspiration and free plans.
I decided on a cup design from user IronAwe, and printed a basic honeycomb mesh for the grill material.
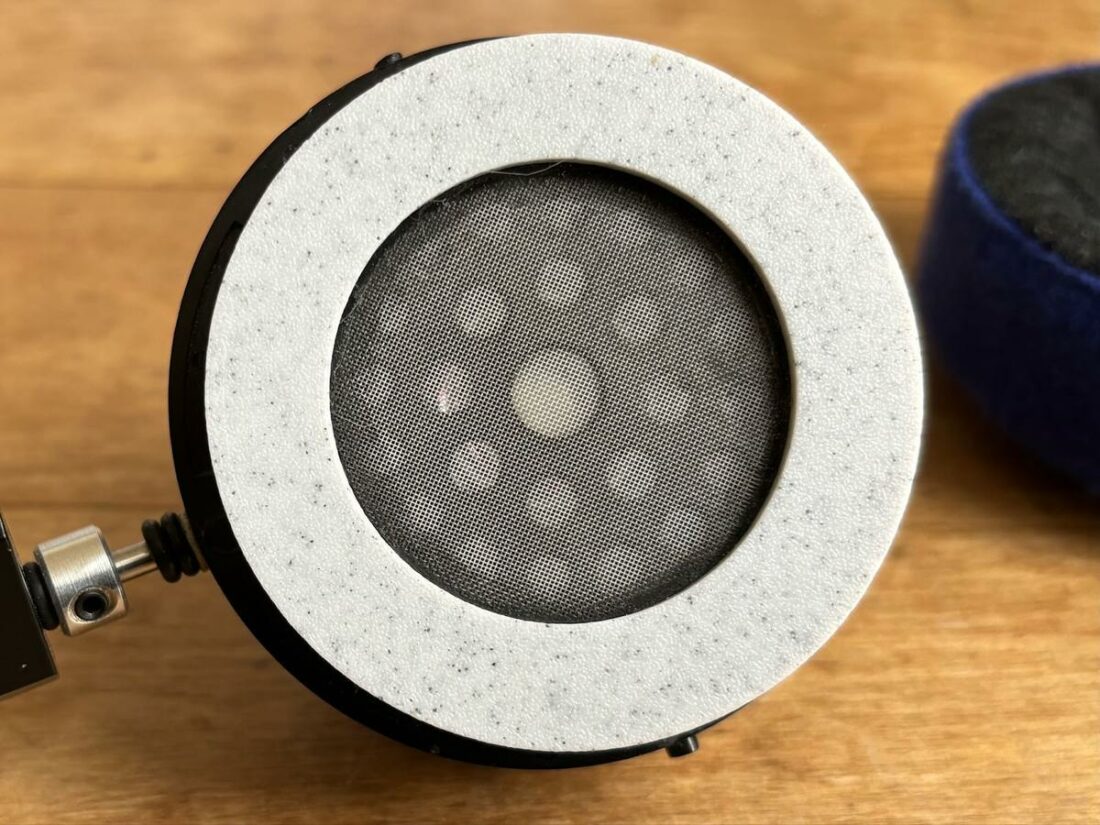
The only drawback of the IronAwe designs is that they are meant to use a 50mm driver rather than the stock 43.8mm (sometimes referred to as 44mm or 40mm membrane) Grado driver. Printing a basic ring to fit around the driver with a 50mm outer diameter to mount it in the cup is necessary.
I printed these cups with 90% infill (mostly solid) to ensure they were rigid and reasonably inert. The result is very solid and has a no-nonsense and heavy-duty feel. The headband gimbals and ear pads fit the cups perfectly.
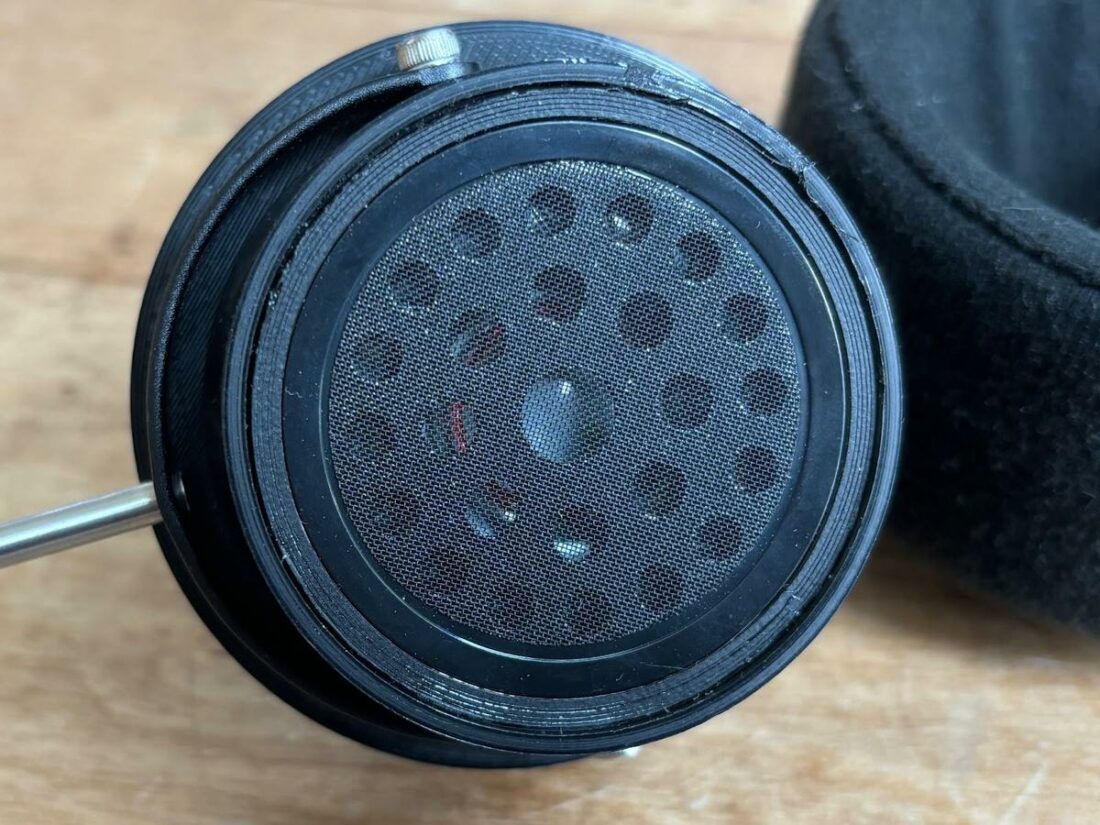
Drivers
Inside the cups, I used a pair of Symphones V8.1 drivers that Rhydon (the man behind Symphones) graciously provided. No, they aren’t strictly a budget option. Reusing the stock drivers from a donor pair would be cost-conscious; however, if you are building from scratch, you will need to source drivers to fit.
Likely, the safest, inexpensive option is the Peerless by Tymphany (Manufacturer Product Number HPD-40N16PET00-32) 40mm driver. This model is a go-to option for many DIYers and is used in the fully 3D-printed head(amame) headphones since they punch far harder than their ~USD$25 price tag (per pair) would indicate.
Comfort
Without cables, the Budget Build weighs 211g. Although the headband is minimally padded, the light weight makes things reasonably comfortable. With extended listening, a hot spot can cause some discomfort on the top of my head.
The pads circle my ears, and the clamp force is low. This keeps them comfortable, but they will move around or fall off with quick head movements and aren’t a great pair for walking around or working out.
2 – Junk Drawer Build
Parts list
- Stock Grado headband assembly, including rod blocks and gimbals
- 4x ⅛” ID shaft collar with set screw
- 4x ⅛” rubber o-rings
- Nyczaj Classic leather headband pad
- 2x Grado SR80 drivers
- 2x 3D-printed outer cups
- 2x 3D-printed inner cups
- Overature PETG filament – stone grey color
- Beautiful Audio wool ear pads
This isn’t as cohesive a build as the other two, and the Junk Drawer Build sits somewhere between a basic low-cost build and a higher-cost option. Honestly, this build was primarily motivated by cleaning up the odd bits that I had kicking around and transforming them into a unique pair of headphones.
The cheeky name isn’t indicative of the quality of the parts.
Most commonly, modders will pick up a pair of inexpensive used Grados with the plan to use the parts in a final upgraded product.
The result? A pile of unloved headphone parts sadly sitting in a drawer.
Since you are already a modder at heart, you’ll likely think about those discarded parts and, at some point, decide they’d function as the basis of a new build. At least, that’s how it worked for me.

Headband
The stock Grado parts I had were a pair of SR80 drivers and a complete headband assembly. If you are familiar with the Grado rod blocks, you know they allow the cups to rotate freely and could be far better at keeping the rod in place once you set the size. They are annoying.
The Grado rods are ⅛” in diameter. You can sandwich the rod block between: ‘shaft collar – o-ring – rod block – o-ring – shaft collar.’ This allows you to dial in the exact size to fit your head and lock it all down. However, adjustments do require an Allen key to fit the set screws.
It’s not perfect, but it’s inexpensive, and it works.
I slid a luxuriously padded Nyczaj Classic leather headband pad over the stock steel band as an immense comfort and aesthetic upgrade. The thin, unpadded, faux-leather stock ‘pad’ was discarded.
Earpads
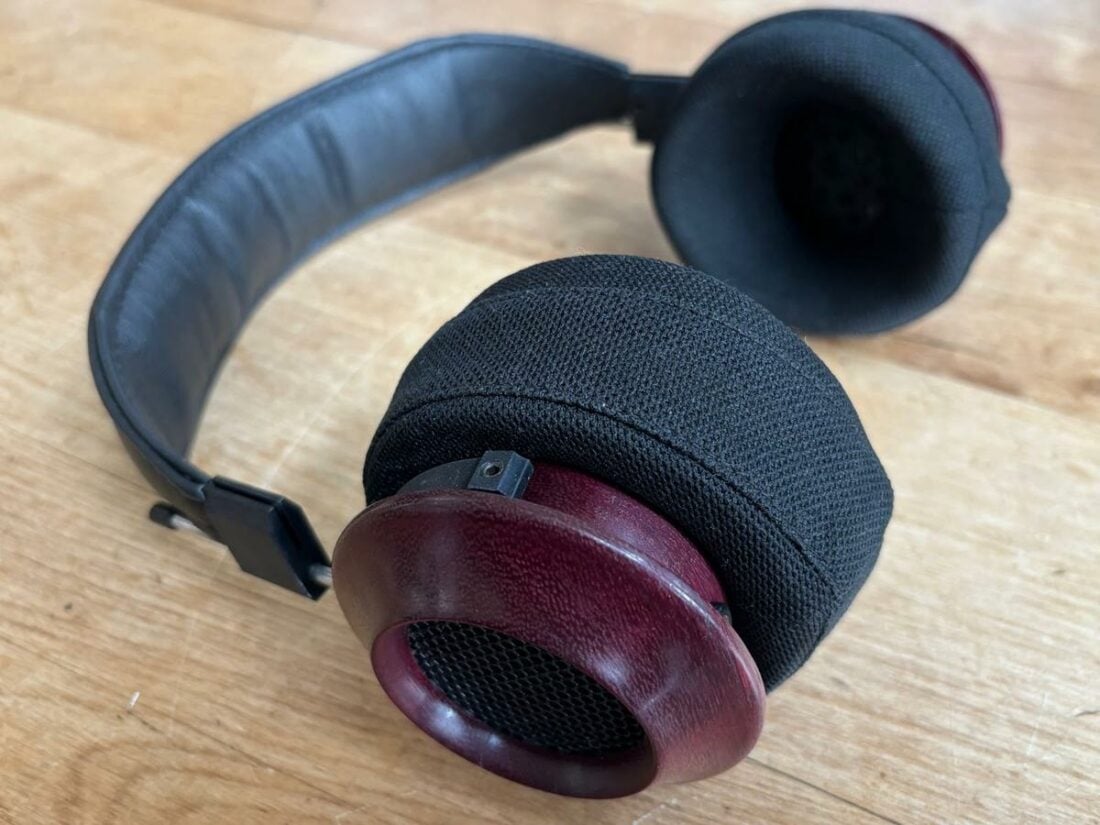
Silvian at Beautiful Audio makes gorgeous hand-made products in New Zealand. But they aren’t cheap. The pads alone cost more than the basic Grado models. But I had an extra pair of all-wool Beautiful Audio earpads, so I used them in this build.
These pads are incredibly well-made and have held up for years. Sure, they’re a splurge and an extravagance, but if you love your Grados, they may be worth it to you as they significantly improve comfort and style.
Cups
I didn’t have any extra cups, so I went back to Thingiverse for another 3D-printed model.
I found an attractive outer cup piece by WhenGeeksCraft and a unique mesh model by rmayf for the grill. I still required the inner cup piece to hold the driver and earpads. Failing in my search, I modeled my own and glued it all together.
For a different look, I decided on a stone-flecked-grey colored PETG filament. Obviously, headphone cups would never actually be made of stone, but the texture looks great.
Drivers
These are the drivers I initially fell in love with. Now, the old SR-80 drivers live again in this new format. Phoenix or Frankenstein’s monster? I’ll let you decide.
Comfort
Without cables, the Junk Drawer Build weighs 212g, merely 1g more than the Budget Build. It is a surprise as the materials are quite different between the two.
The padded leather headband is significantly more comfortable than the minimally stuffed one on the Budget Build – a noticeable improvement over long listening sessions.
The Beautiful Audio pads are smaller than the Aliexpress options, somewhere between over-ear and on-ear in use, but are softer and more securely placed on my head. They are approximately 35mm deep. They get warmer with extended use – likely not a surprise with wool.
Overall, the Junk Drawer Build is more comfortable than the Budget Build.
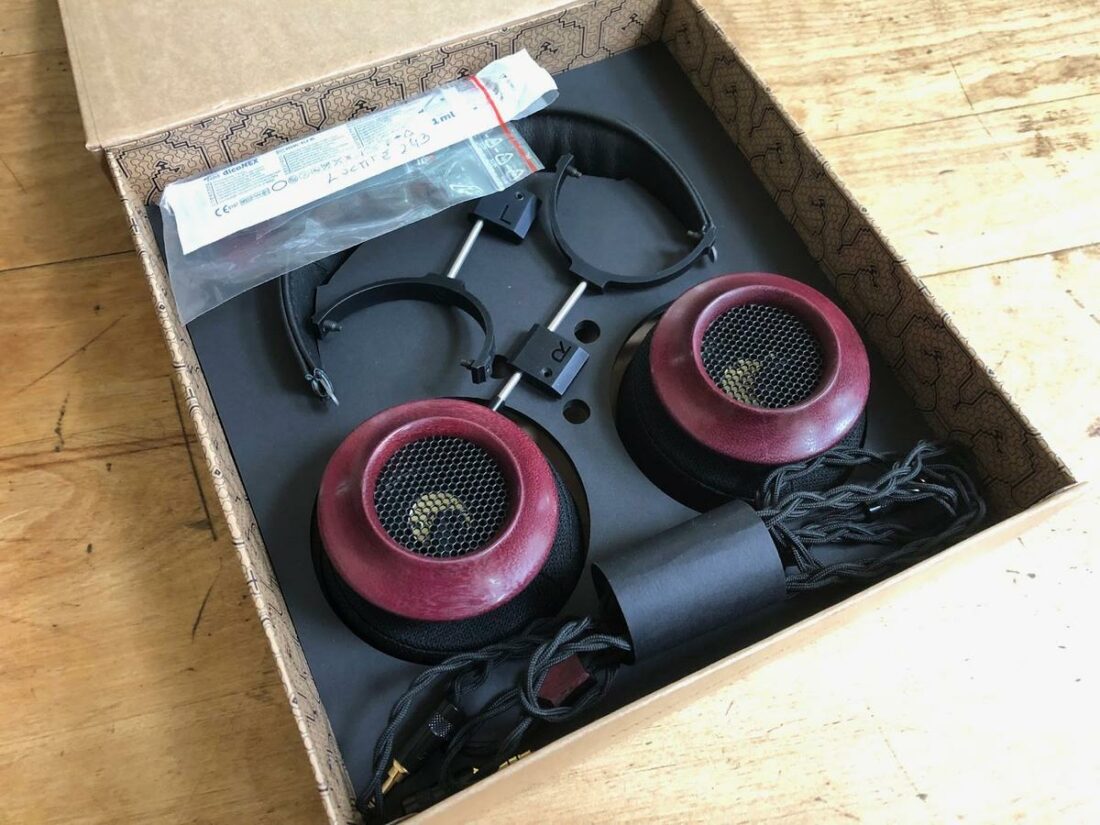
3 – Luxury Build
Parts list
- Nyczaj Short Aluminum Gimbals and Rod Blocks set (black)
- Nyczaj Wide Comfort padded leather headband pad
- 2x Symphones drivers (ShipiboAudio custom version)
- 2x ShipiboAudio purpleheart wooden cups
- 2x Nyczaj EP01 ear pads
Sometimes, you want the best. To this end, I went with a full Nyczaj / ShipiboAudio selection of hand-made parts.
Now he’s on his own, creating metal gimbals, rod block sets, fabric ear pads, and leather headbands. Luckily, he still had some extra ShipiboAudio parts left for this build.
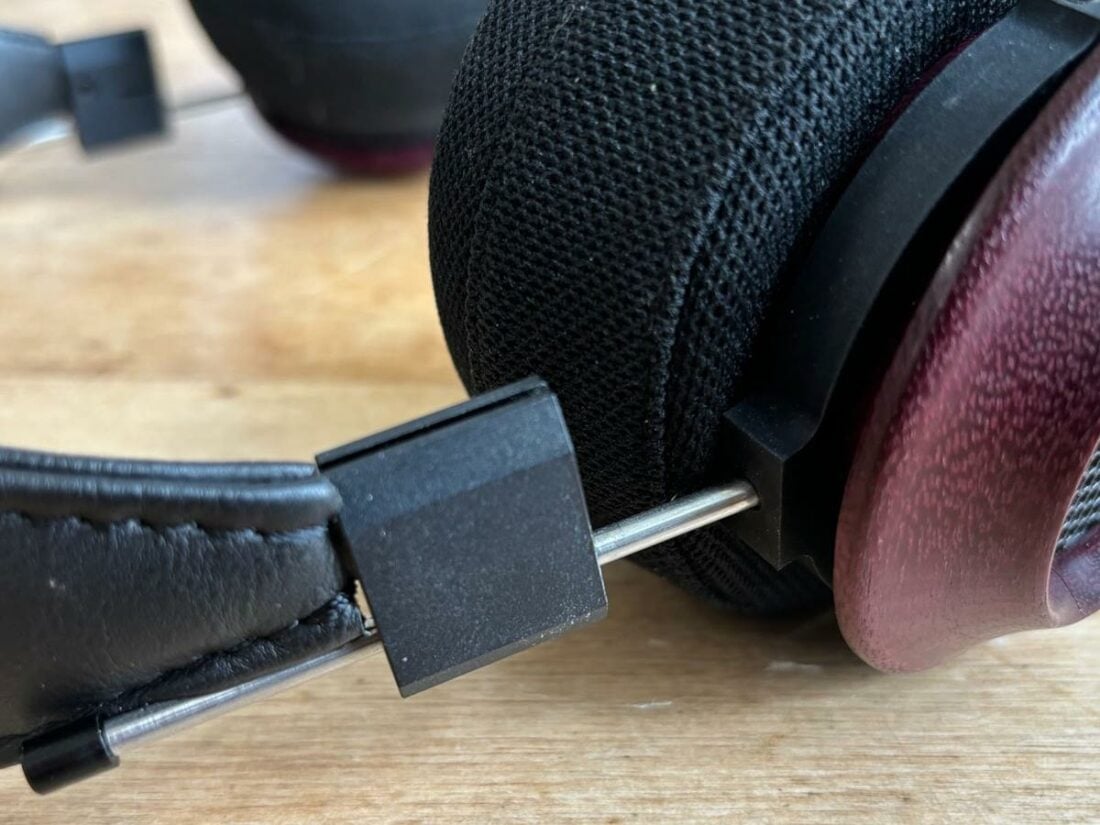
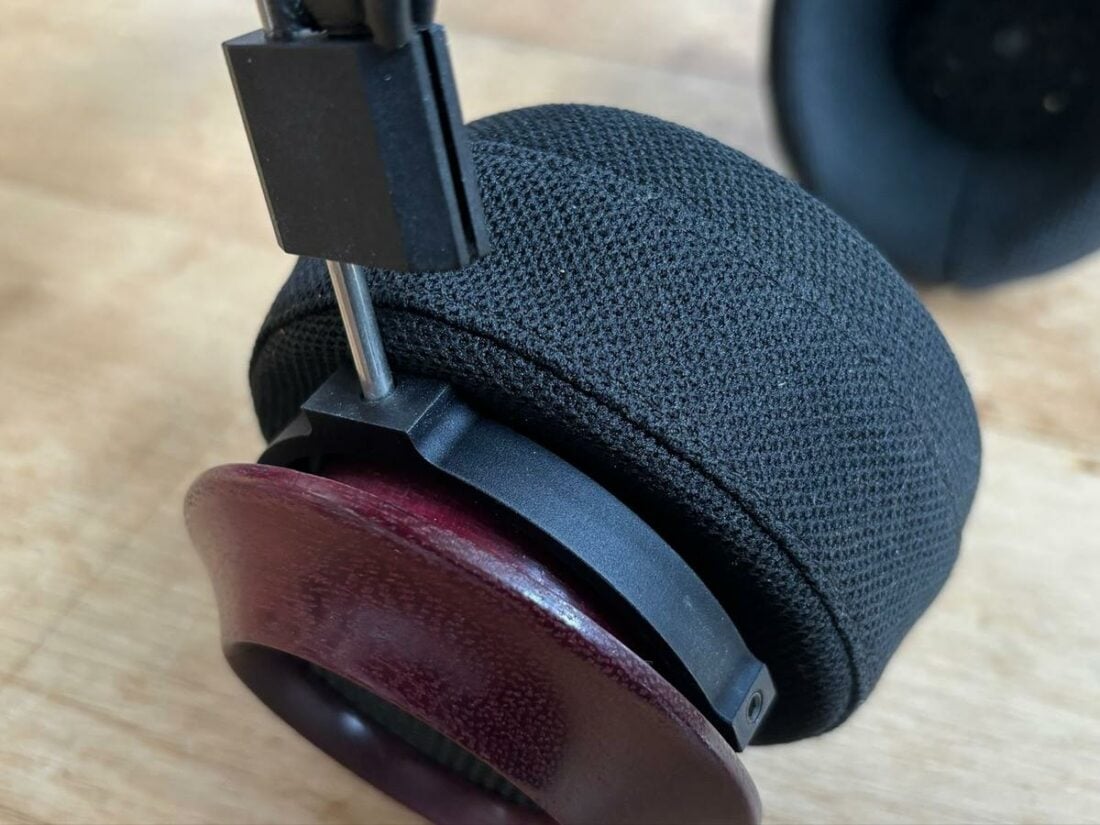
Headband
If Grado made extraordinarily nice headbands, this is what they would look like.
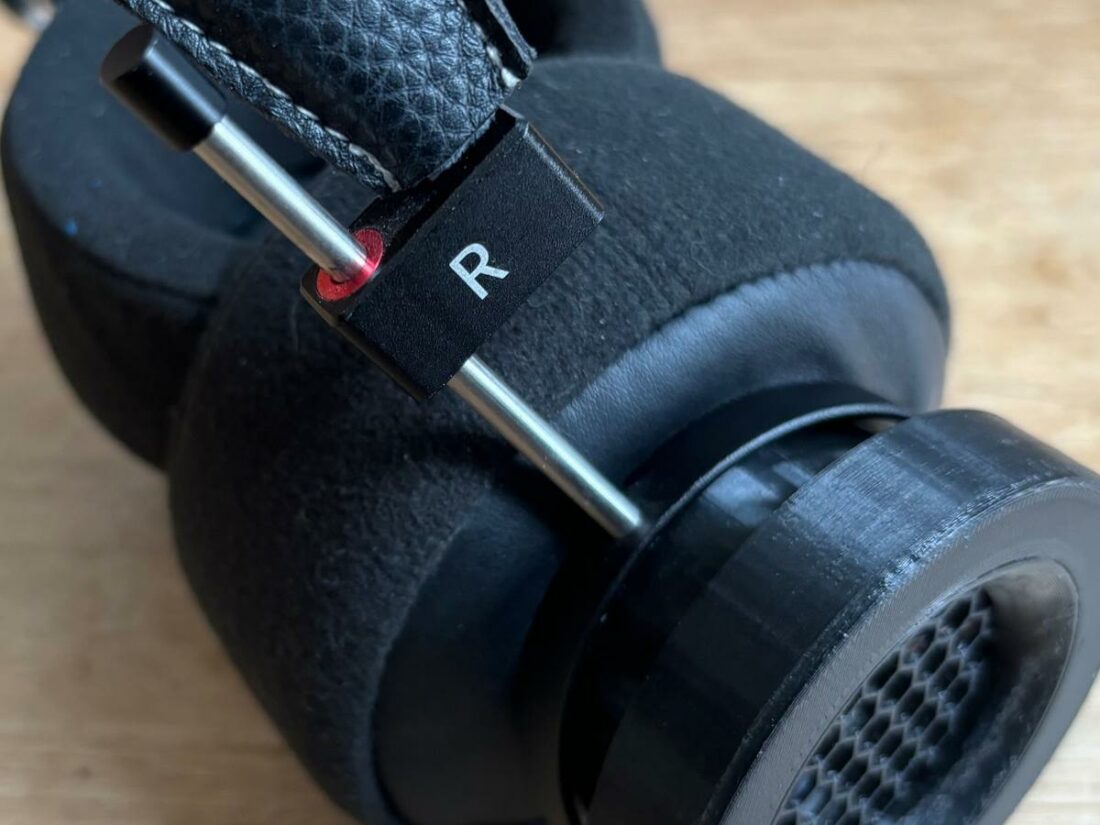
The black anodized gimbals and rod blocks are perfectly CNC machined from aluminum. They look and feel much better than stock, are more durable, and weigh under 50g. The band and rods are held in place with set screws, so adjustments require an Allen key.
The rods are topped with small black caps, and ‘L’ and ‘R’ are cleanly engraved inside the rod blocks. It’s small details like this that set these apart.
The wide leather comfort strap is attractive and perfectly sewn. It lives up to its name, as it is 6-7mm more expansive than the standard version and has sufficient padding to avoid hot spots and not look too bulky.
The looks and construction are absolutely top-notch!
Earpads
The handcrafted EP01 ear pads have reportedly been in development for five years and are comprised of open-cell PU memory foam covered with acoustically transparent fabric. The fabric has a woven texture that feels different than typical smooth pad fabric, although this is far more noticeable on my fingers than on my ears.
The memory foam inside is more similar in feel and shape to the Aliexpress pads than the Beautiful Audio version – it is stiffer and larger than what’s inside the Beautiful Audio pads.
There’s a hand-made quality to these pads that helps reinforce this build’s ‘special’ nature.
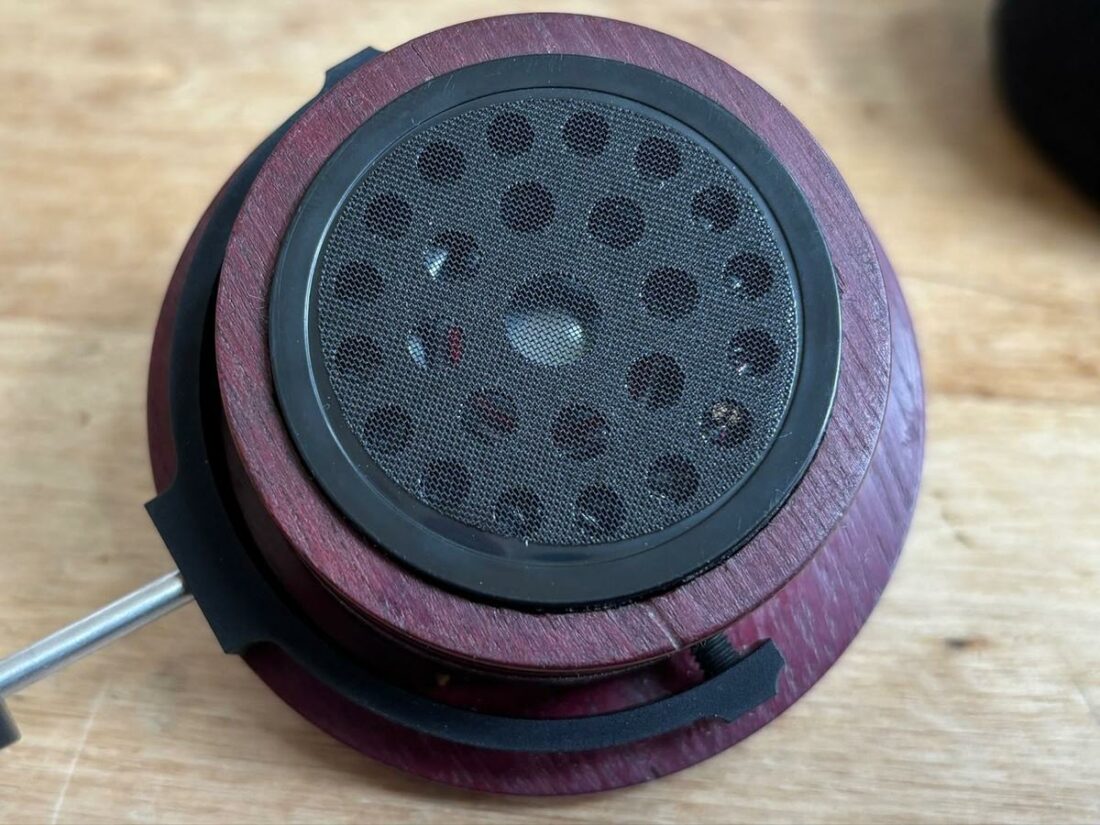
Cups
Unfortunately, ShipiboAudio is not currently producing wooden cups and only has cables available on the Etsy storefront as of the time of writing (early 2024). I fell in love with the purplewood cup variants years ago, and I’m so pleased to have one of the last pairs.
The ShipiboAudio cups are meticulously constructed and feature gold-plated 3.5mm jacks.
Sure, 3D printed cups can be great, but they can’t compare to the beauty of wooden cups. I believe this look captures the hearts and imagination of most modders.
Drivers
I used a custom pair of Symphones drivers created in conjunction with ShipiboAudio. A gold decal over the back of the driver’s centerpiece is adorned with the ShipiboAudio logo.
The revised drivers reportedly have a stronger magnet, an improved diaphragm, a new motor system, and a different coating. There’s little specific information about them to be found, and they are pretty rare birds. I can report they do not sound the same as the v8.1 drivers. More on that later.
Comfort
The Luxury Build is the heaviest of all the builds at 234g – although this is a negligible difference on my head, and the padded strap easily offsets the weight. These are still very light headphones.
The clamping force is initially higher than the other builds, but bending the inner spring-steel band to suit your head is quickly done. Tweaking the clamping force is always a balance between downward pressure by the band and inward pressure by the ear pads.
The volume of the interior space between the driver and ear created by the pads sits somewhere in the middle of the two other builds. I would prefer the memory foam to be a touch softer to maximize comfort.
Regardless, these headphones are very comfortable for long listening sessions, and again, it’s the headband pad that makes the largest difference compared to the Budget Build.
How do they sound?
I expected the Junk Drawer Build with the stock drivers to sound very different from the Symphones drivers, and I expected both the builds with Symphones drivers to sound quite similar. Turns out, I was wrong.
Driver choice is the most significant factor in how these headphones sound.
Ear pads come in a strong second regarding their impact on the overall sound. Materials, seal, positioning, distance to the ear, etc., will all make audible changes. The pads create the chamber for the sound waves between the driver and the ear, and we can absolutely discern differences here.
External cup shape and material have minimal sound influence as long as the internal shape and size of the cups remain reasonably constant. Changes to the internal chamber behind the driver will have some (if perhaps minimal) influence.
The rear grill shape can change the sound depending on how free-flowing (open) the design is. In this case, the Junk Drawer Build’s grill is the most constricting, and the Budget Build is the least.
As mentioned above, the revised Shipibo/Symphones drivers in the Luxury Build sound very different from the v8.1 Symphones drivers. There’s no way you would get the two mixed up. The revised drivers are far more ‘in your face’ than the laid-back v8.1.
Oddly, there is less difference between the SR80 and the revised drivers than between the Symphones variants. (i.e., Junk Drawer sounds closer to Luxury than to Budget.)
The Junk Drawer Build with the stock Grado drivers also sounds more forward and loud than the v8.1 in the Budget build.
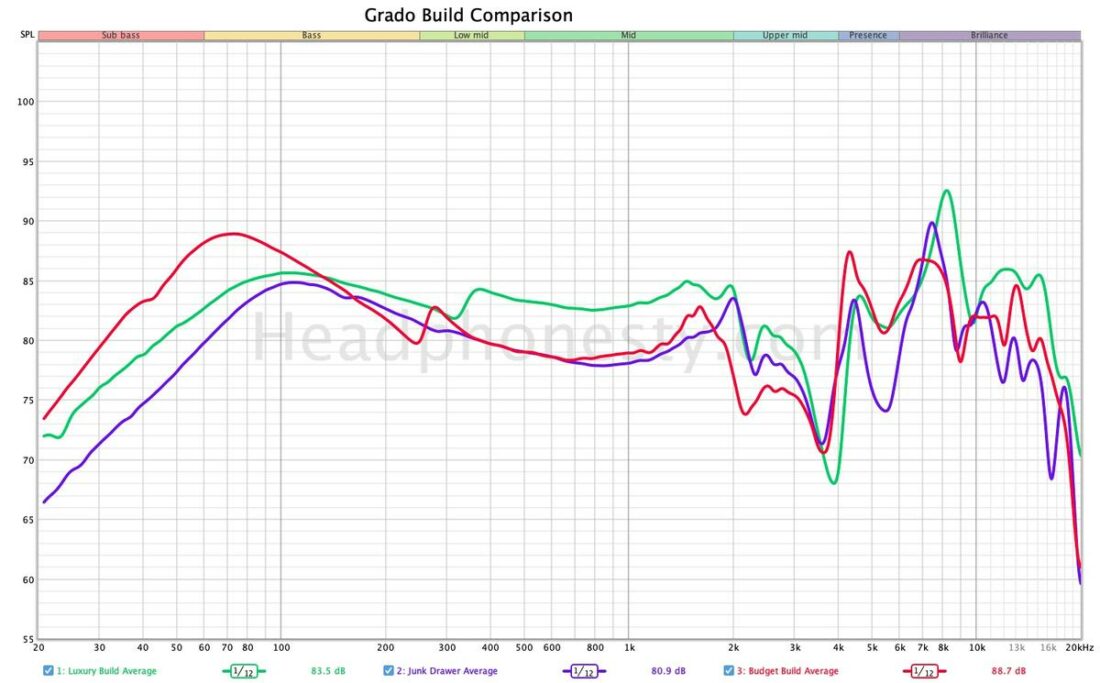
All the builds have similarities, with rolled-off sub-bass, a 3-4k dip in the upper mids, and a peak around 7-8k. This may be due to the overall alike design of the headphones or driver similarities, or a bit of both.
The Budget Build (v8.1 drivers) is the (mid-)bassiest option, with a somewhat scooped-out midrange.
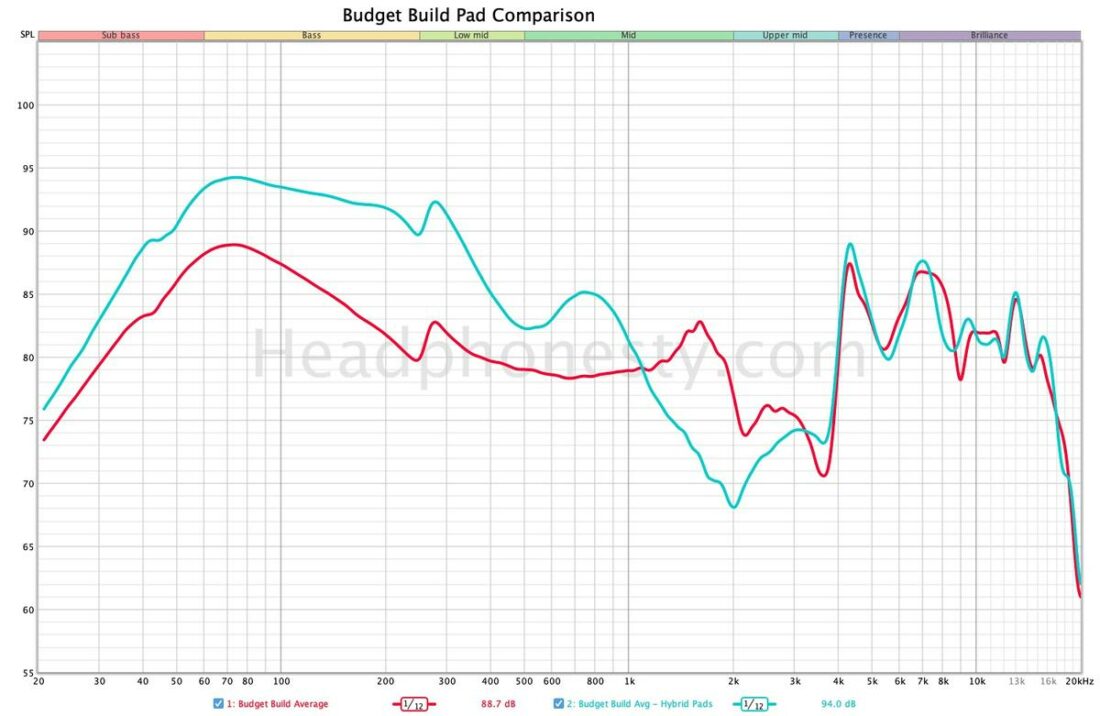
In case you wondered if pads really make a difference in sound quality, the Aliexpress hybrid pads with the protein leather outers greatly boost the bass frequencies under 300Hz compared to the all-fabric version.
Ear pads are the easiest and least expensive way to tune headphones.
While I prefer the sound of the all-fabric pads over the hybrid versions on the Budget Build, I’m not going to declare a definitive sound quality loser between the different builds. Mostly, they are flavors from the same family, and generally, all are good.
My favorites are the Luxury Build using the ShipiboAudio / Symphones drivers, as there seems to be more midrange presence and clarity – but all are very pleasurable to listen to.
Conclusion
The Luxury Build is everything a Grado modder could want – stellar build quality, gorgeous looks, and detailed sound. These headphones fairly ooze luxury and are clearly a cohesive and planned product. If the aesthetics of the end product are the highest priority, and the cost is the least important aspect for you, then this is the way to go.
The Budget Build is, perhaps surprisingly, not the opposite end of the spectrum from the Luxury Build. While nowhere near as ‘expensive’ looking, these still look great. The black-on-black color scheme is cohesive and appears no-nonsense and purposeful. The minimally padded band means comfort is the real drawback here, but certainly, the bang-for-the-buck factor is the highest with this build.
Unsurprisingly, the Junk Drawer build is the least cohesive and makes the least sense when considered as anything beyond using up the parts I already had on hand.
Certainly, the Nyczaj headband pad and the Beautify Audio pads stand out in comfort and build quality, but the stock Grado band assembly really is the pits and lowers my overall satisfaction with the Junk Drawer build.
With the Aliexpress headband’s low cost, there is no reason to stick with the stock version.
Ditch the Grado band and buy a better headband pad.
This may be a hot take, but if you are considering going down the Grado modification path, I suggest skipping buying a pair of Grados to modify unless you are set on the Grado house sound. In the end, you’ll only use the drivers.
For comfort, you need to replace the headband pad and ear pads. The stock rod blocks and gimbal headband assembly need to go for build quality and usability. And no one wants a fixed cable.
As far as replacement cups go, there’s a great middle-ground for cost-conscious modders in the world of Grado modifications. If you have access to a 3D printer, this is a terrific option – unless you have your heart set on wooden cups. Any color or shape is inexpensively available via 3D printing.
I hope this article answers a few questions and inspires you to embark on your own Grado modification journey. Likely, I haven’t built the perfect pair for you, and that’s the point. The quest to make an ideal pair of headphones is the fuel that drives the passionate modding community.
Excellent overview, had a lot of fun reading it! 🙂
Thank you!
Excellent explanations and great builds, I’m having issues with my grado sr60x, I’m just finding the clamping force on them too hard, would changing the headband and getting some softer earpads (yaxi s pads) reduce the clamping force on my ears?