
This article will put an end to the frustrating situation where your headphones are plugged in but the sound is still coming from speakers.
While we all enjoy listening to music with speakers on full blast, there are scenarios when we’d have to savor our music privately. This is especially true when we’re out in public. That’s where our headphones come in handy, right?
But what if you plug in your headphones and the sound still continues to stream through the speaker?
Obviously, this can be embarrassing if it happens in a library or classroom. But what’s worse is that this can hinder you from enjoying your music for the time being.
But, wait! There’s no need for you to buy new headphones/audio device just yet. This article can help you address this issue. Continue reading to learn about its usual causes and corresponding fixes.

Do Some Preliminary Checks
Before diving deep into your device’s settings, do some preliminary checks first. Here are some simple troubleshooting techniques you can try:
Check for a loose connection
Headphone connections usually become loose when headphone jacks accumulate too much dust, dirt, or lint. This unwanted debris can physically block your headphone jack, preventing the plug from clicking in completely.
Try taking the dirt out using a cotton swab or a tape-wrapped paperclip. If you want to find out more about the potential causes for loose connections and their corresponding solutions, check out our article on how to fix a loose headphone jack.
Try your headphones on another device
If you’re unsure whether the problem lies with your headphones or audio source, it’s best to isolate the root cause of the problem first.
Try plugging in your headphones onto another device. If your headphones work, your other audio device may be causing the problem. Alternatively, you can also plug in another set of headphones onto your device’s audio port to see if it works.
Restart your audio source
Both a tech newbie and a professional tech support person will tell you the same thing: “Try rebooting/restarting your device.” While most people don’t necessarily know why it works, people do it all the time because it’s so easy yet so effective.
The not-so-simple explanation behind this is that restarting your device clears up its Random Access Memory (RAM).
See, when you use your device, you unconsciously ‘leave’ logs and temporary caches in the background processes created. These digital leftovers hog your RAM space, which sometimes leads to a memory leak. These memory leaks cause slowdowns and errors on your device.
When you restart your device, the RAM gets cleared up, giving your system a clean slate and fresh start.
Depending on your device, the ways to reboot or restart the system may vary. Check your device manual for instructions on how to restart or reboot your device.
Continue reading the article to find out more about these fixes.
Headphones Plugged In, but Sound Coming From Speakers: Windows 10 Solutions
As we know, different problems require different solutions. For headphone issues on your Windows 10 PC, you can deal with them in three ways. You can:
- Manually set your headphones as the default audio device
- Update the sound card driver
- Run the troubleshooter
Here’s a step-by-step guide on how to get these done:
Set your headphones as the default audio device
If you have multiple audio output devices connected to your Windows 10 PC, your device might stream the sound in the wrong output even after you plug in your headphones. To prevent this from happening, set your headphones as your PC’s default audio device. Follow these steps:
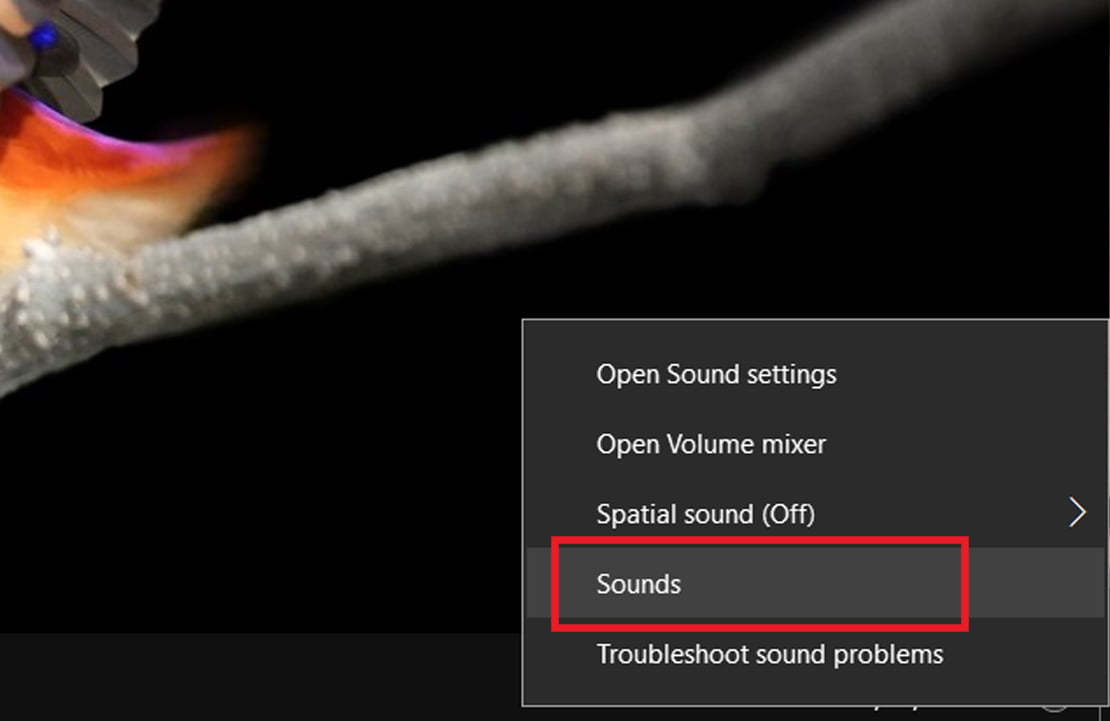
- Look for the sound icon on the bottom-right corner of your PC’s screen. Right-click on it and select ‘Sounds’.

Access Sounds settings - Click on the ‘Playback’ tab and select your headphones from the list of devices. Right-click on it and tap on ‘Set as default device’. Once done, your headphones should appear as your default device.
Set headphones as default device

Update the sound card driver
Sound card drivers are responsible for translating audio info. into audible noise between sound cards and computers. When left malfunctioning or outdated, sound card drivers can cause PC audio troubles.
If after setting your headphones as your default audio device, your “headphones plugged in but sound coming from speakers” issue still persists, try updating your PC’s sound card driver. Here’s how to do it:
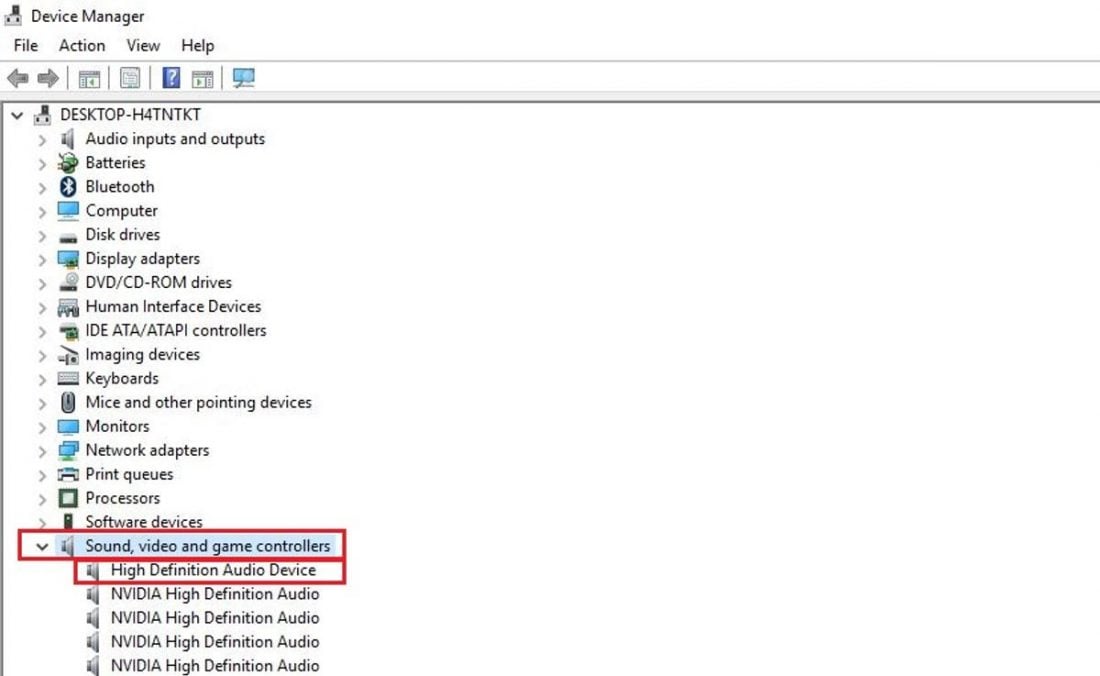
- Right-click on the Windows logo. Select Device Manager.
Go to ‘Device Manager’ - Locate Sound, Video, and Game Controllers and click on the drop-down button beside it. Next, choose your sound card driver.

Sound, Video and Game Controllers - Right-click on your sound card driver and select Update Driver Software.

Update Driver Software


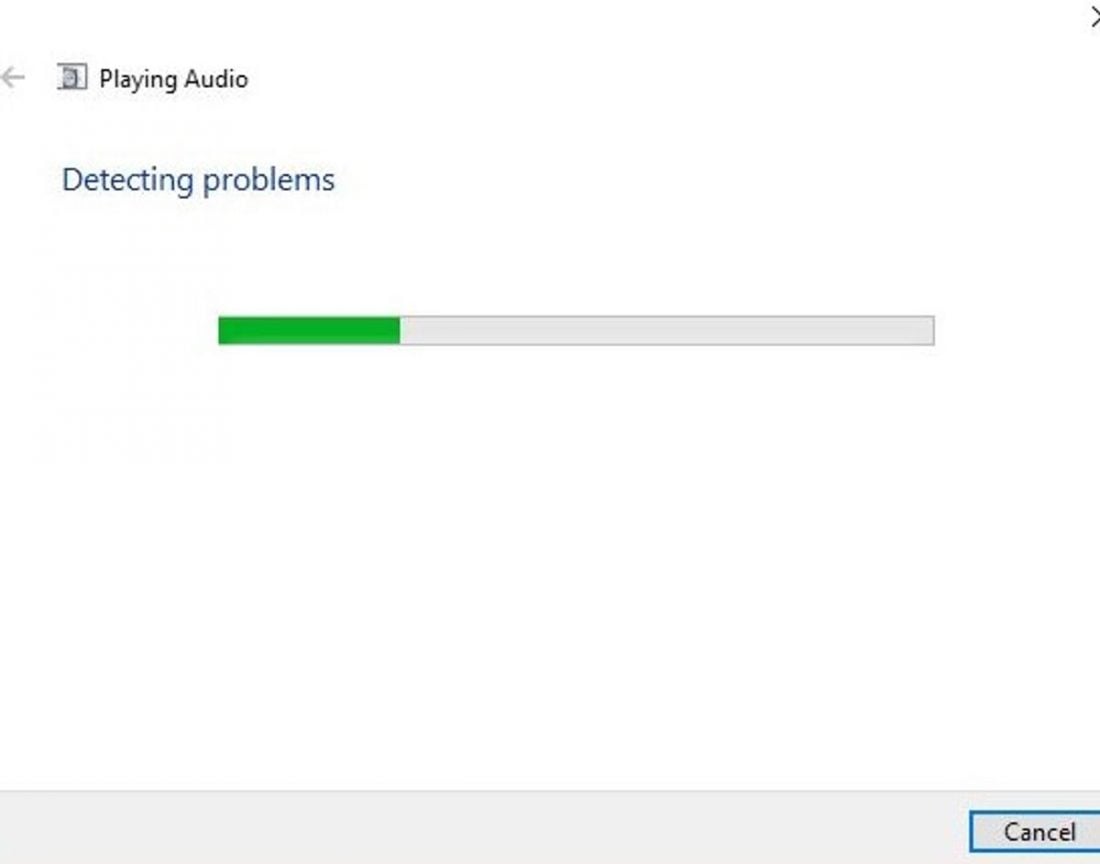
Run the troubleshooter
If all else fails, try running Windows’ built-in Audio Troubleshooter. This is a helpful tool that can diagnose and fix common Windows PC audio problems. Follow the steps below:
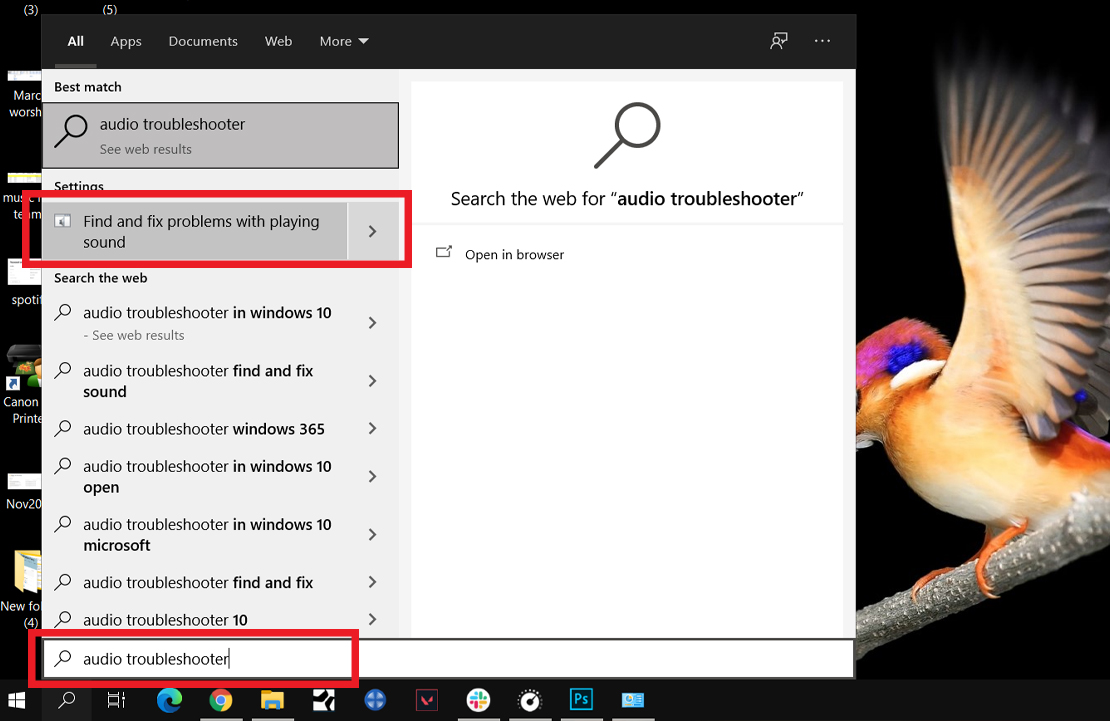
- Type in ‘Audio Troubleshooter’ on your Windows search bar.
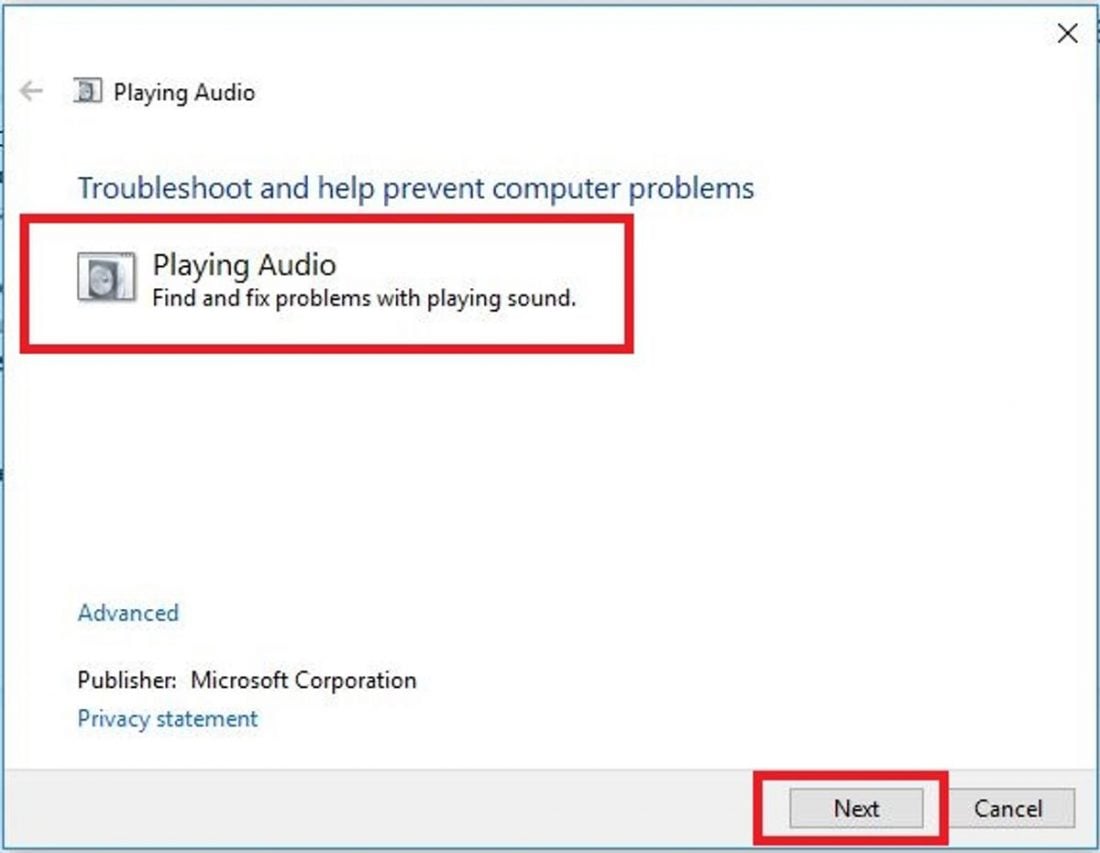
Find the audio troubleshooter - Select ‘Fix and find problems with playing sound’, then select Next.

Fix and find problems with playing sound - Wait for the scan to complete. If it detects some problems, it will automatically try to fix them.

Wait for the scan to complete.
Headphones Plugged In, but Sound Coming From Speakers: Mac Solutions
If you’re sure that this isn’t a hardware problem, fixing the headphones plugged in but sound coming from speakers issue on macOS is fairly simple. You can try addressing it either by manually choosing your audio output device on the settings or by updating your macOS to fix some bug issues.
Here’s a guide on how to do both:
Select your headphones as the audio output on Mac
When you have multiple audio devices connected and/or paired with your Mac (i.e. Bluetooth speakers, wireless earphones, built-in speakers), your Mac may play audio through the other audio output devices.
To address this, follow the guide below:
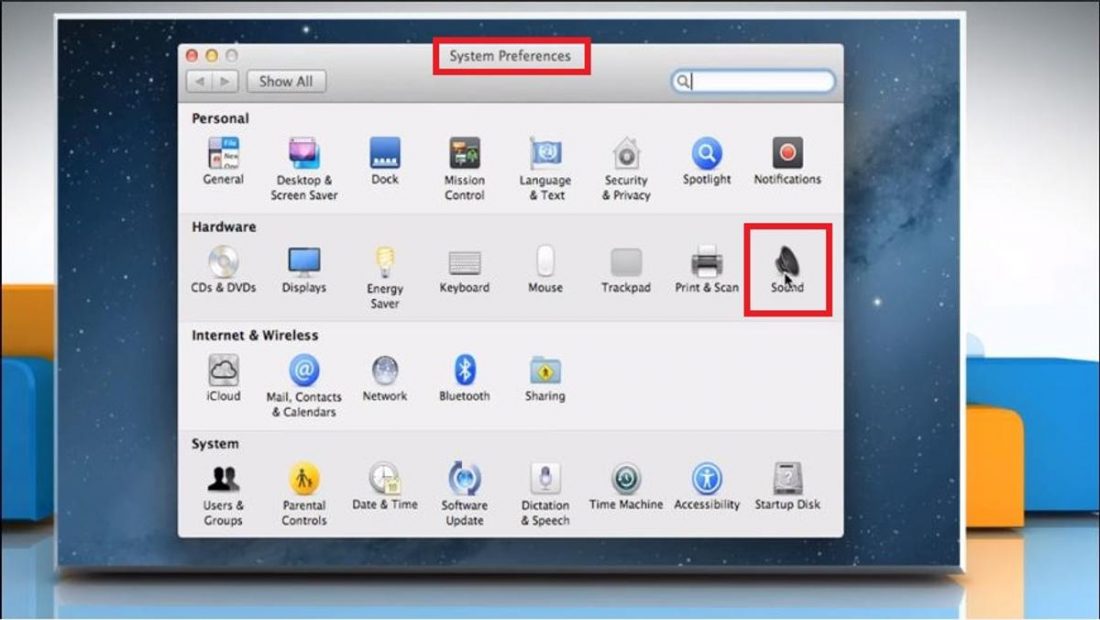
- Open the Apple menu and click on ‘System Preferences’

System Preferences (From: How-To Guide/Youtube) - Under Hardware section, click on ‘Sound’

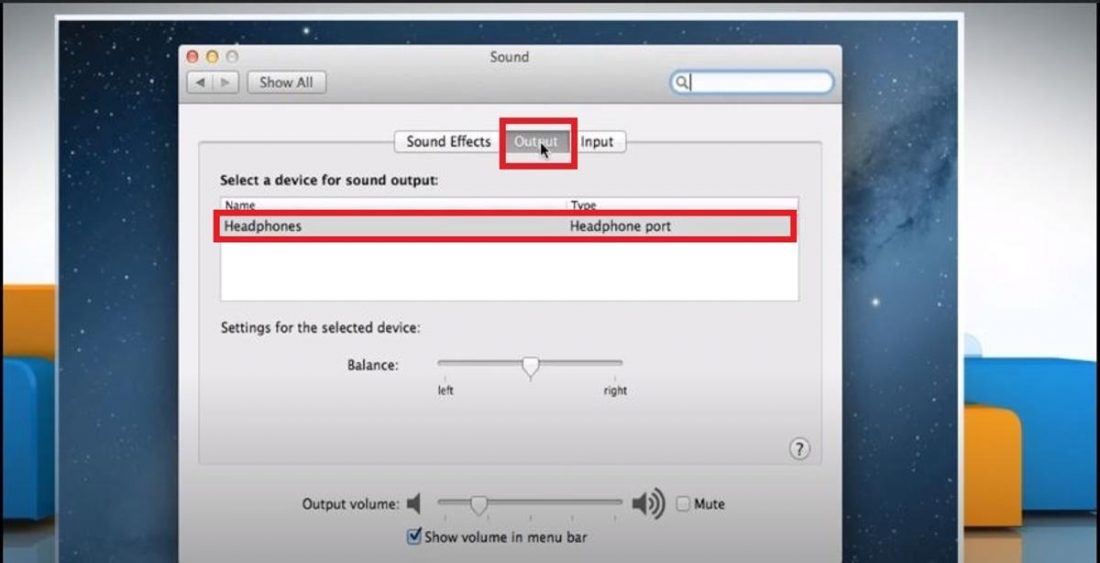
Sound (From: How-To Guide/Youtube) - Click on the ‘Output’ tab and select your headphones from the list.

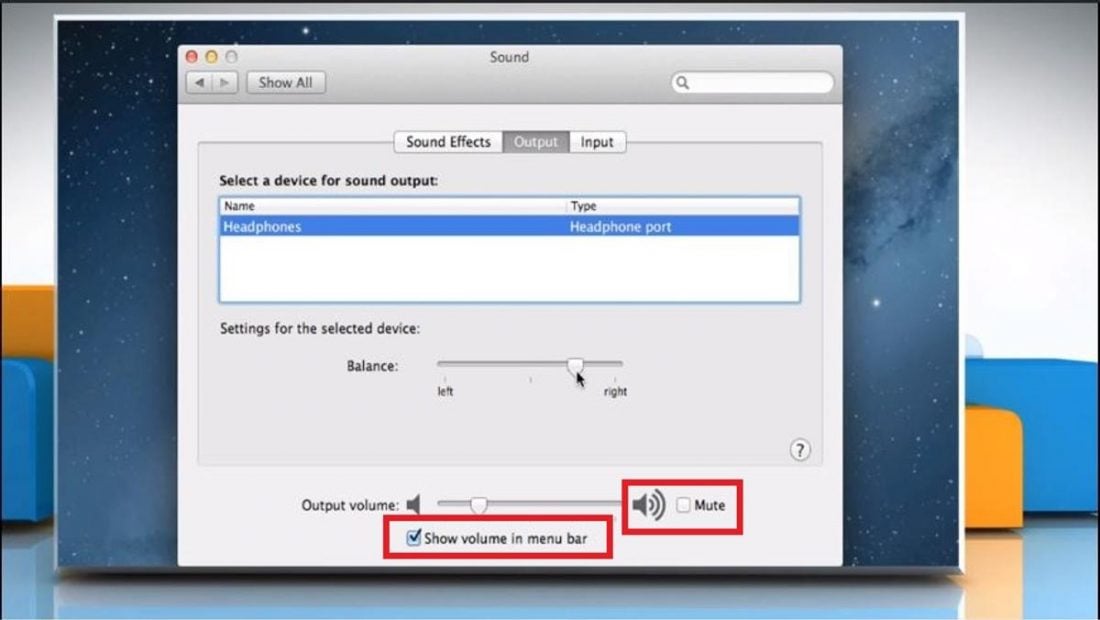
Output tab (From: How-To Guide/Youtube) - Ensure that the checkbox next to the Mute icon is unchecked. Also, ensure that the checkbox next to ‘Show volume bar in menu bar’ is ticked.
Mute and Volume Bar (From: How-To Guide/Youtube) - Adjust the volume according to your preference.

If you need more help, check out this youtube tutorial to see how it’s done.
Check and install updates on MacOS
Keeping your MacOS up to date isn’t only important for maintaining the proper and smooth function of your audio output, it’s also necessary for addressing several security vulnerabilities and fixing existing bugs.
Here’s how to check and install updates for MacOS:
- Connect to the internet using WiFi.

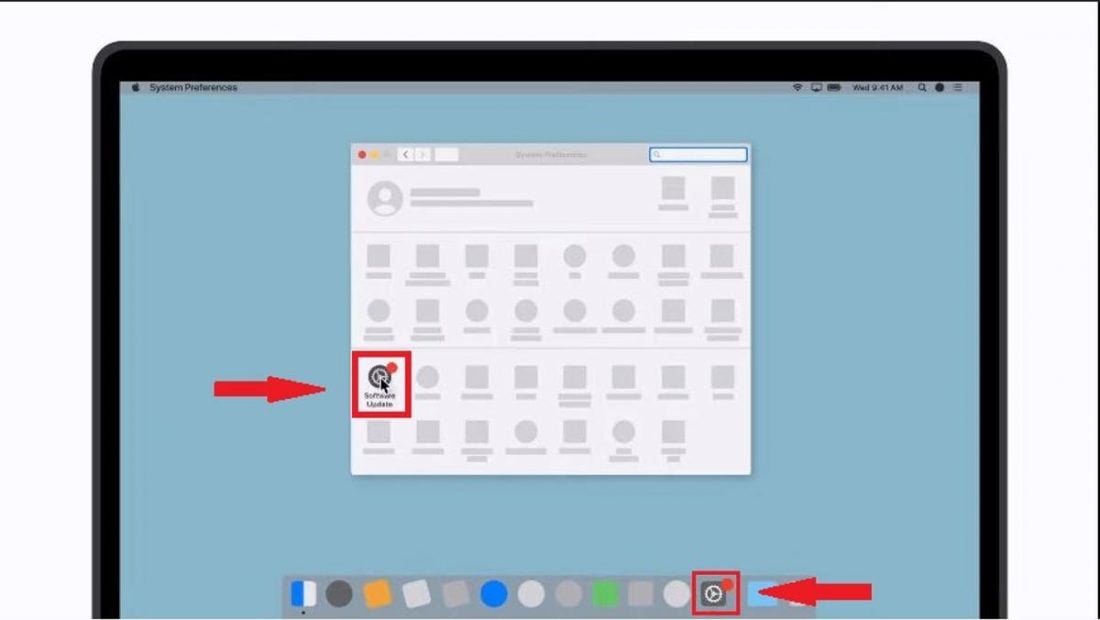
WiFi (From: Apple Support/Youtube) - On the Apple Menu, go to Settings > System Preferences > Software Update.
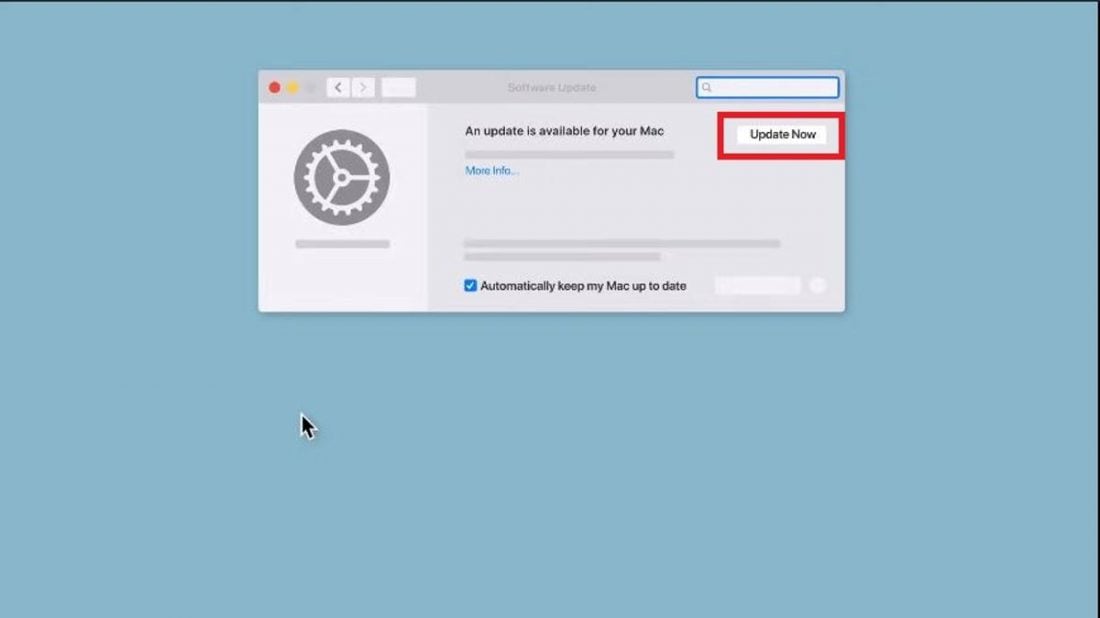
Settings – System Preferences – Software Update (From: Apple Support/Youtube) - If a software update is available, it will appear on your screen. Select ‘Update Now’.
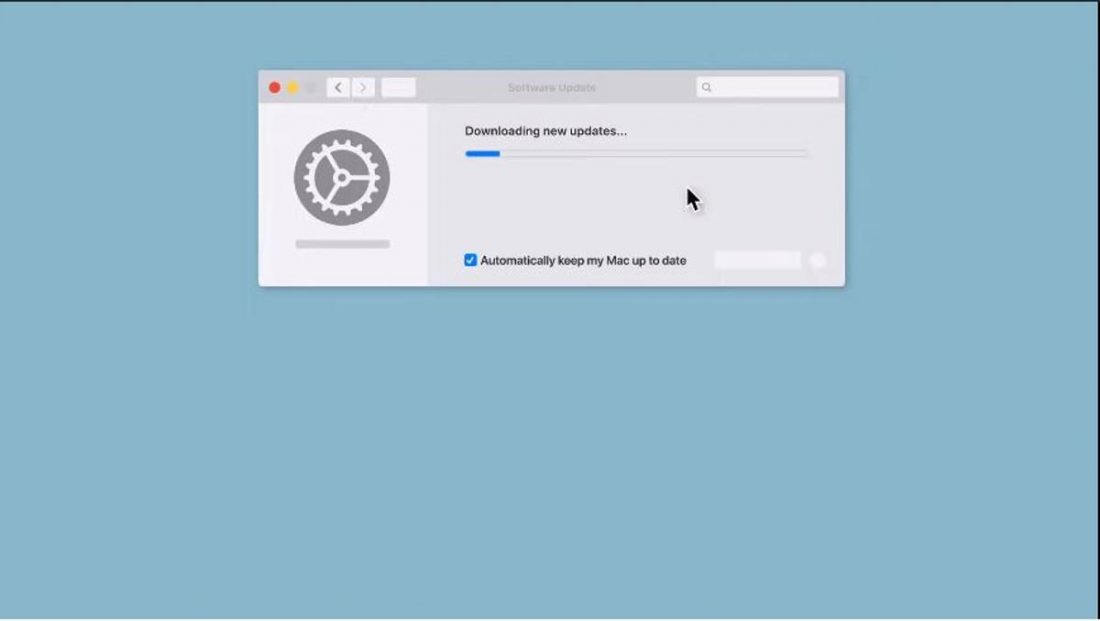
Update Now (From: Apple Support/Youtube) - The update will start right away. Wait for it to complete.

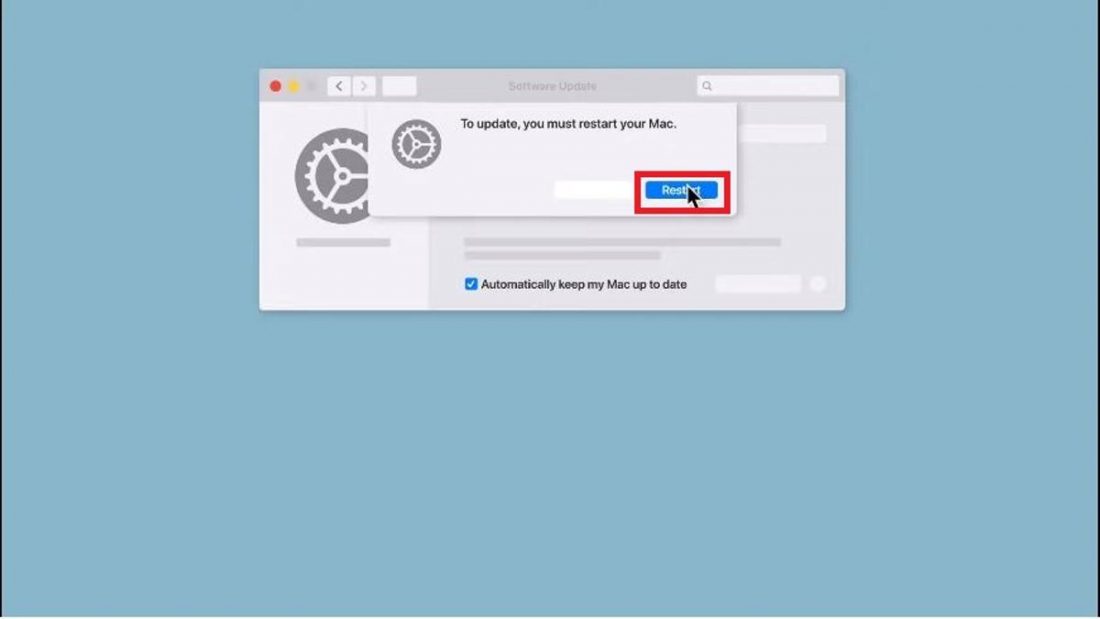
Download the updates (From: Apple Support/Youtube) - In some cases, your Mac may need to restart to finish the installation.

Restart (From: Apple Support/Youtube)

For a video illustration, refer to this Youtube tutorial.
Headphones Plugged In, but Sound Coming From Speakers: Mobile Devices Solutions
For both Android and iOS mobile devices, the issue can usually be solved by cleaning the headphone port and/or restarting the device. But if these don’t do the trick, it could be indicative of a software problem that can only be addressed via software updates or hard reset.
Follow the steps below on how to update/reset your device.
Update your iOS device
Sometimes, updating your device’s iOS is all you really need. These updates offer several bug fixes that are necessary for the smooth and secure use of your device. Whenever a new iOS update is available, a notification will appear on your iPhone. You can either choose to ‘Install Now’ or ‘Install Later. But if you want, you can do it manually.
Follow the steps below:
- Connect your device to the internet using WiFi or cellular data.
- Plug your device into a power source.
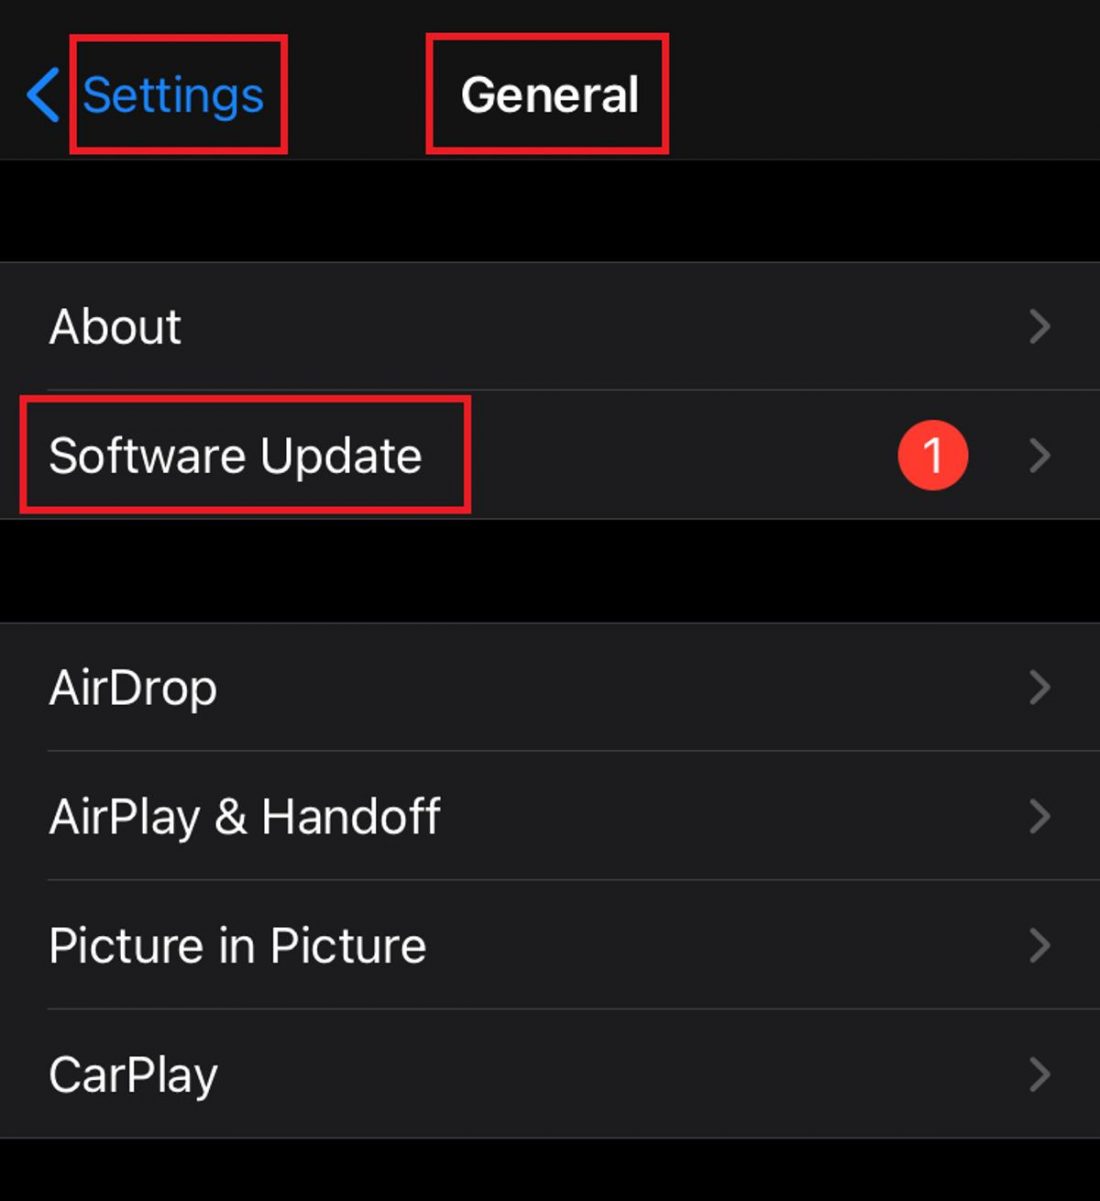
- Go to Settings > General > Software Update.

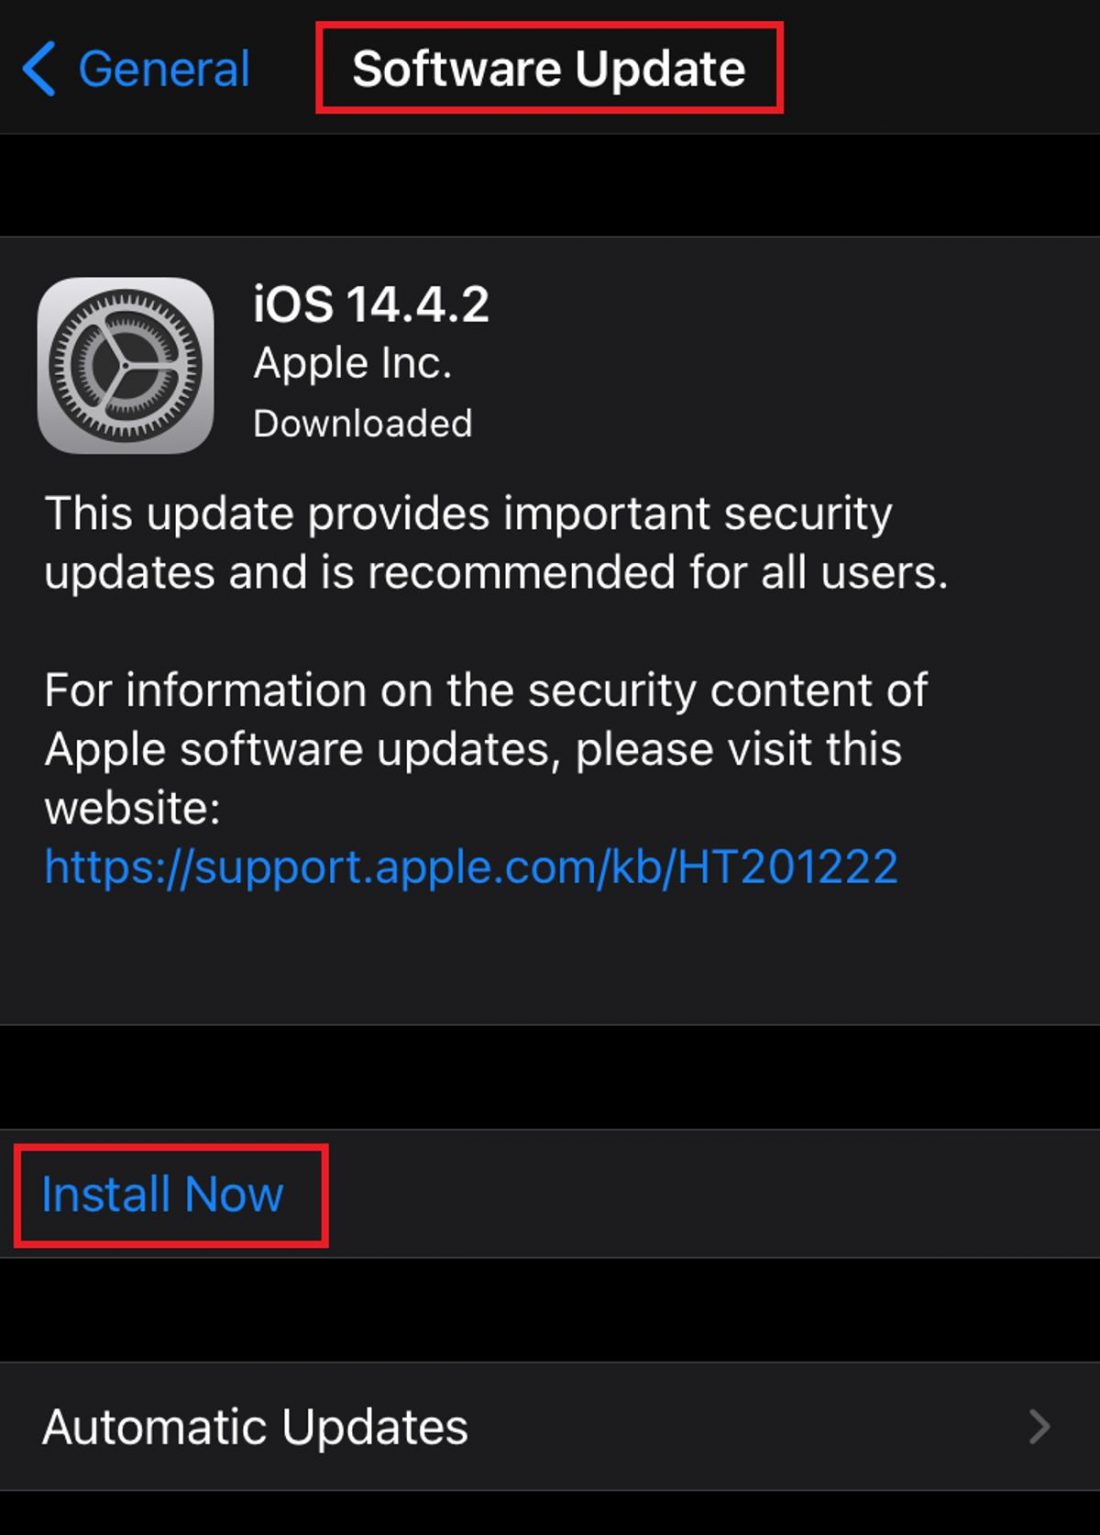
Settings – General – Software Update - Click ‘Install Now’.

iOS – Install Now - You may be asked to input your personal passcode. Once you’ve entered it, the update will start immediately. If you forgot your passcode, head on to Apple Support.
- Sometimes, a message pops up asking you to free up some storage space for the update, you can either click on ‘Continue’ or ‘Cancel’.
If you choose ‘Cancel’ or if your storage space still isn’t enough to do a wireless update, try updating your iOS manually via computer. Alternatively, you can also free up some storage space by manually deleting content or by managing your storage space with the help of recommendations from your device.
Update your Android device
Like iOS devices, Android devices also need constant operating system updates. To ensure that your device won’t encounter security holes, bugs, and other issues (including audio troubles), always update your device’s OS.
Here’s how to update your Android device:
- Connect your device to the internet via WiFi or cellular data.
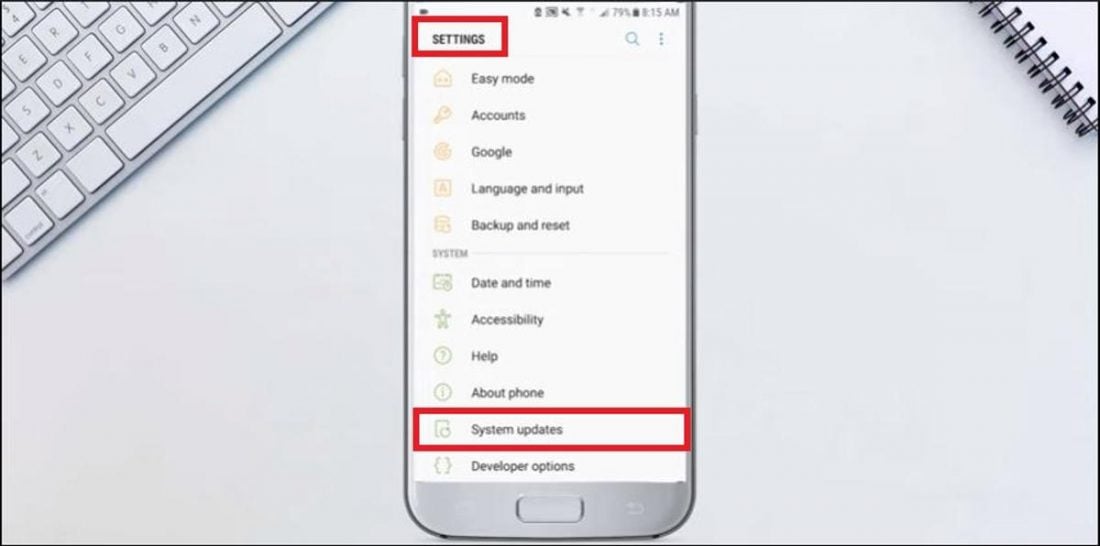
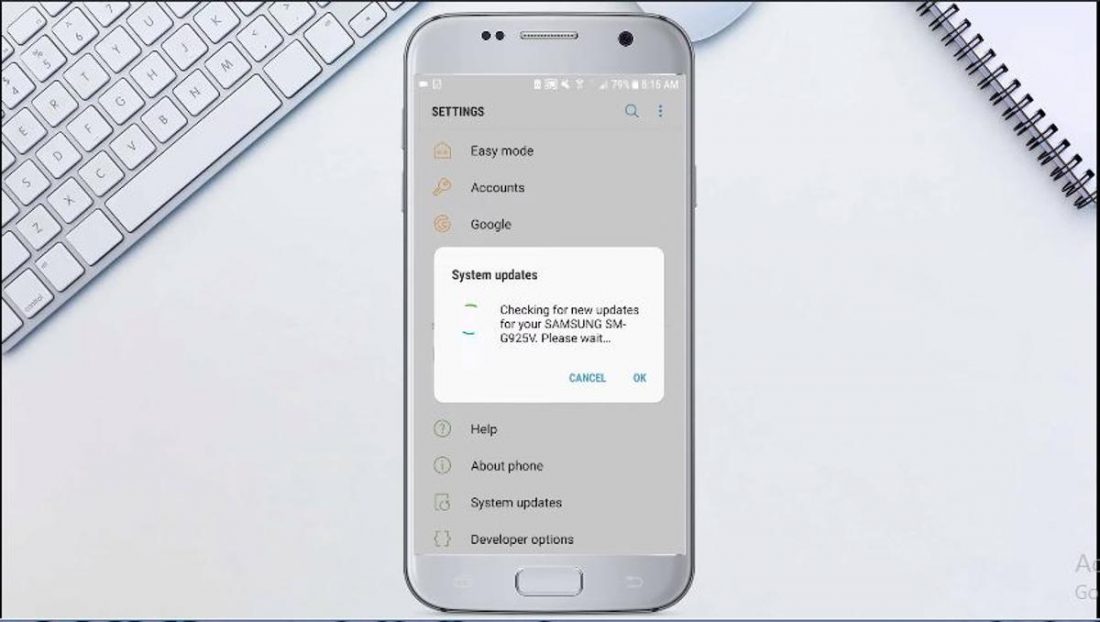
- Go to Settings > System Updates

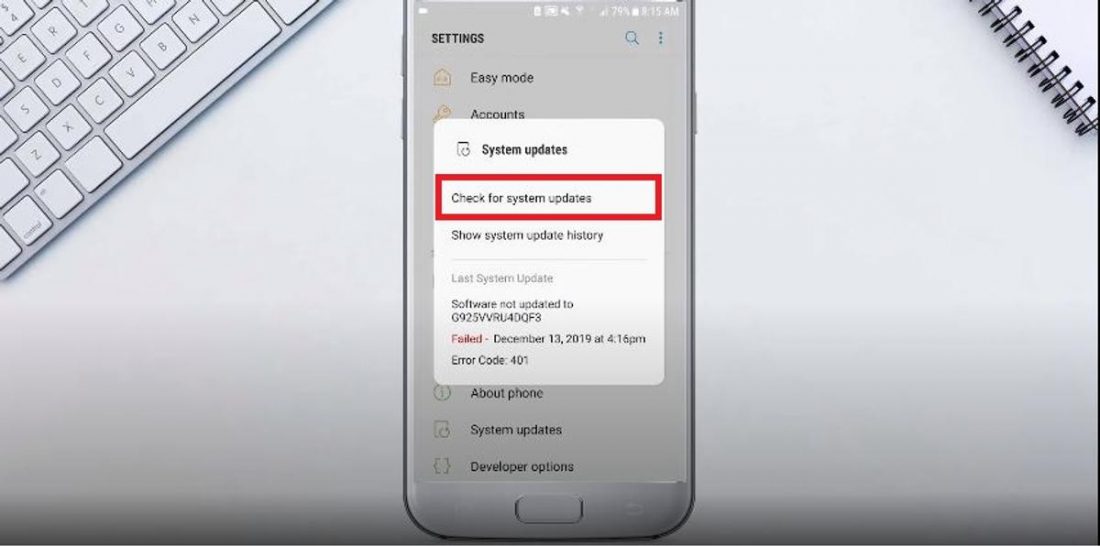
Settings – System Updates (From: HOWTECH/Youtube) - Next, click on ‘Check for system updates’
Check for system updates (From: HOWTECH/Youtube) - Wait for your phone to finish searching for system updates.

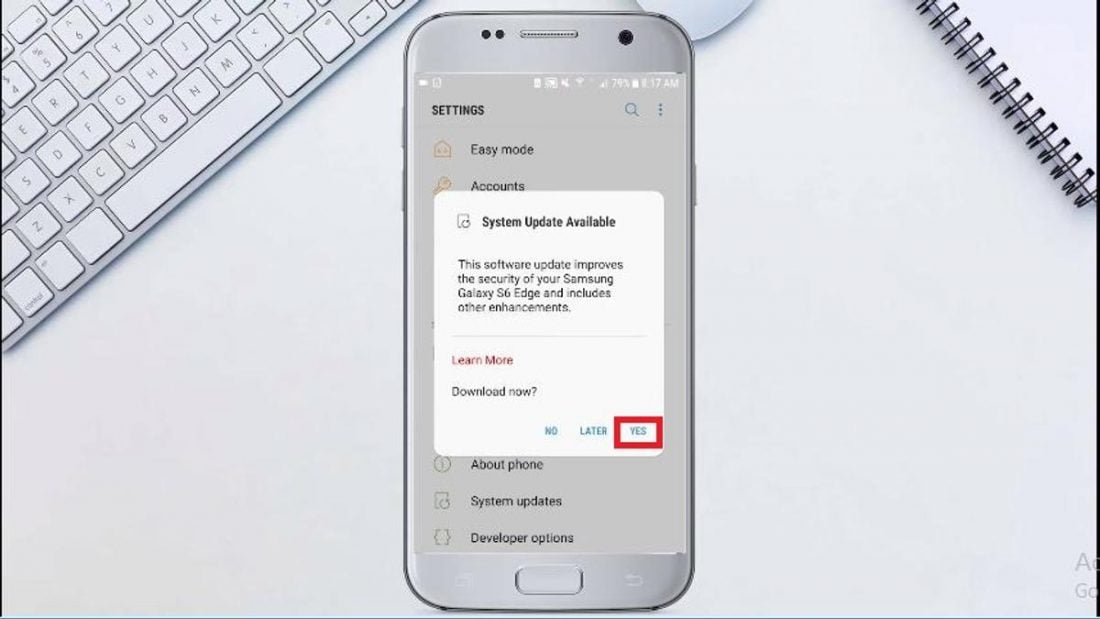
Wait for the search to finish (From: HOWTECH/Youtube) - If a system update is available, it will show up on your screen. Click ‘Yes’ to initiate the update process.
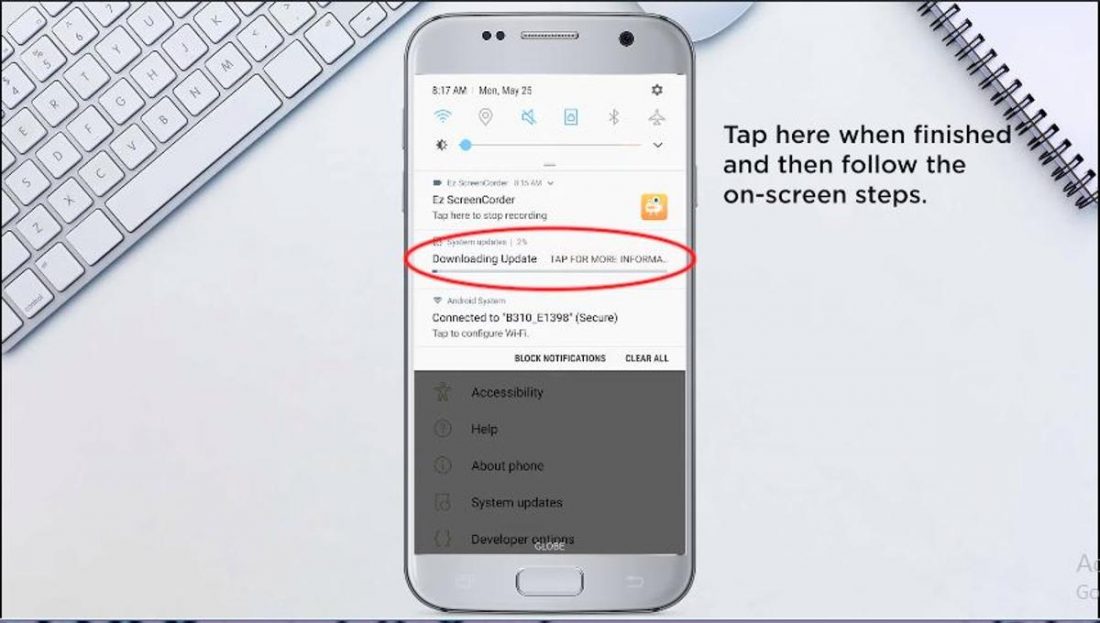
Click Yes (From: HOWTECH/Youtube) - Swipe down from the top of your phone’s screen and follow the onscreen instructions. To complete the installation process, you may be asked to restart your phone.

Follow the onscreen instructions (From: HOWTECH/Youtube)
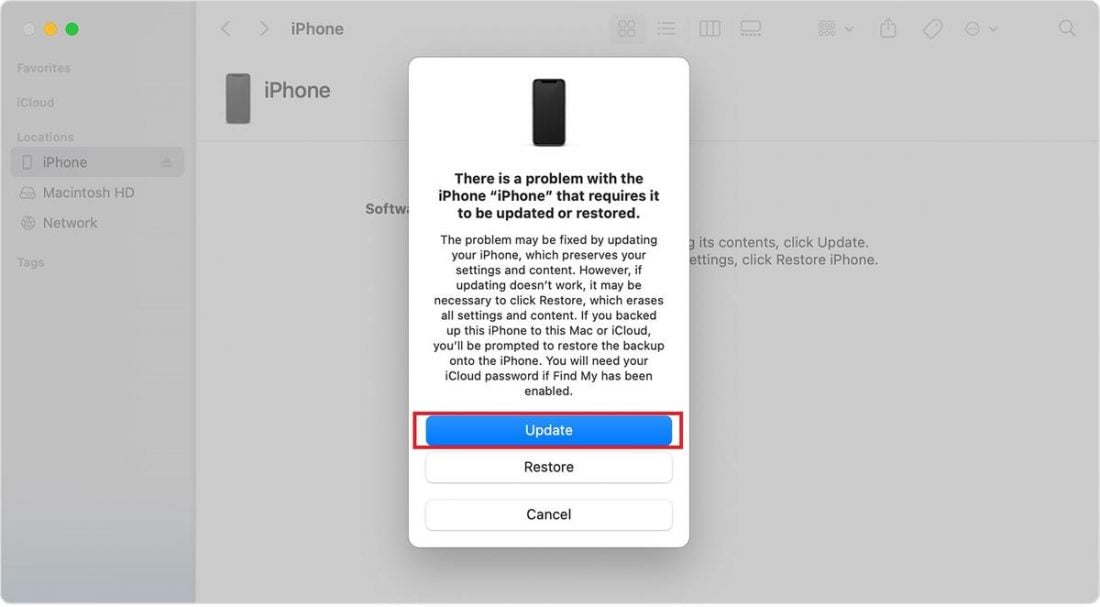
If your device has a damaged iOS, won’t update, or is stuck on the Apple logo for several minutes with no progress bar, you may have to resort to recovery mode to restore your iPhone.
Here’s how to activate it:
- Connect your iPhone to a trusted computer and run iTunes. (Note: Make sure to update your iTunes to the latest version.)
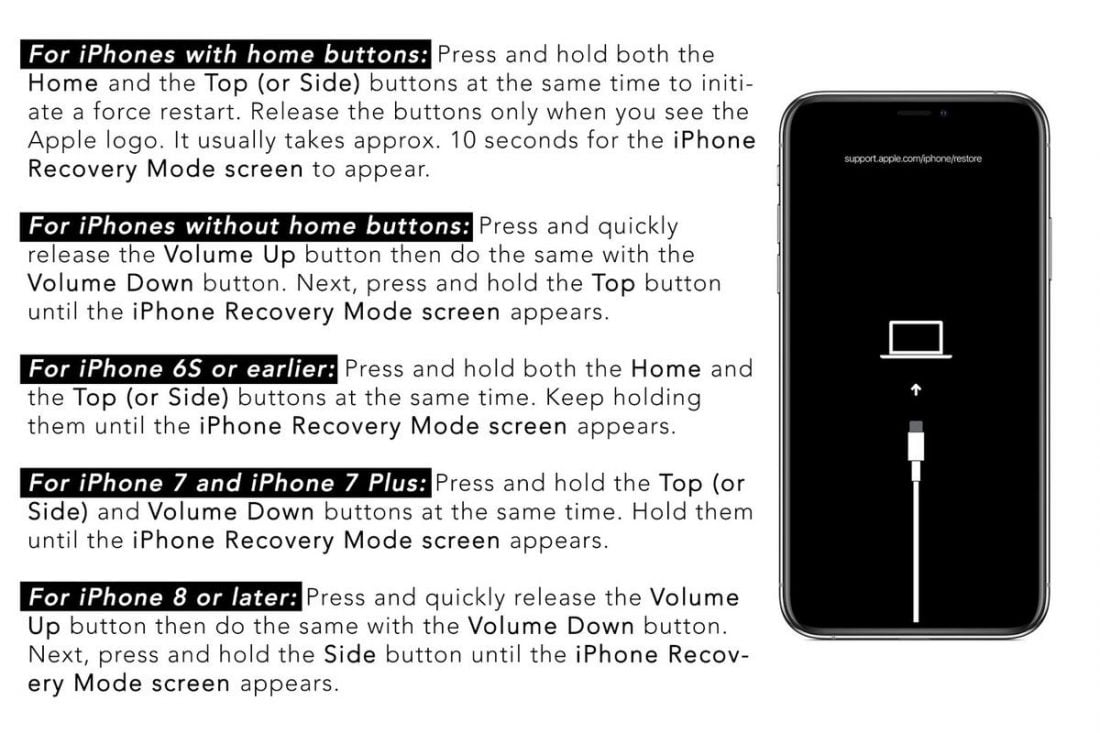
- Do the necessary steps to access the iPhone Recovery Mode screen. This depends on the model of your iOS device.

How to access iPhone Recovery Mode Screen - Once the Recovery Mode screen appears, you can choose to ‘Restore’ or ‘Update’. For now, choose Update. With this, iTunes will reinstall your device’s iOS without deleting your existing data.

Update (From: Apple Support) - If the update takes more than 15 mins. and your device exits the recovery mode screen, let the download finish. After this, repeat the steps above but this time, choose Restore instead.
- Once the restoration process is done, proceed to device set up. Afterward, you may retrieve your backed up data from your iCloud or iTunes.
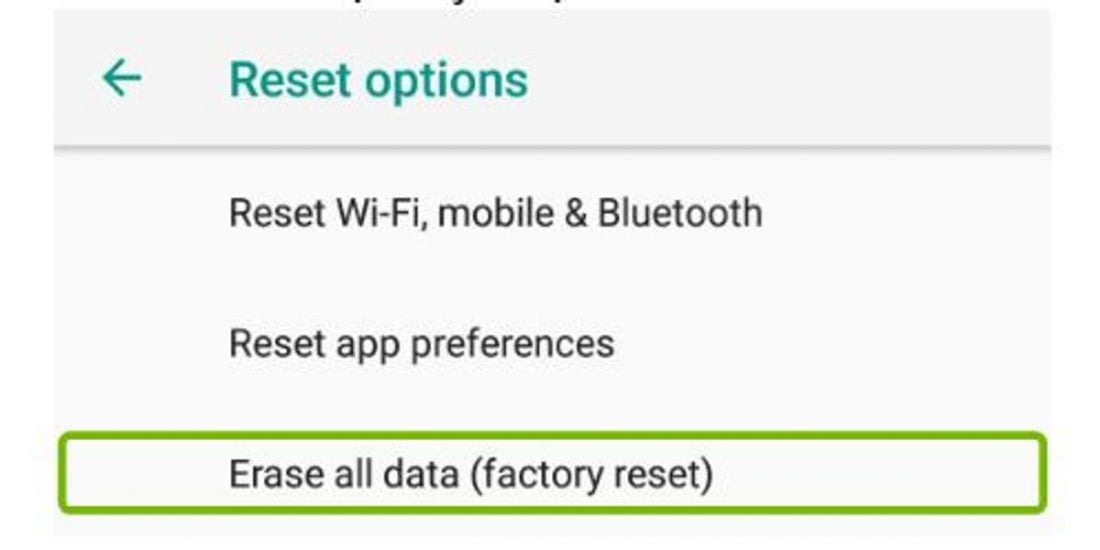
Reset your Android device
Depending on your Android device, the steps for doing a factory reset may vary. But for a general guide, you may refer to the steps below:
- Go to Settings > System > Reset Options.

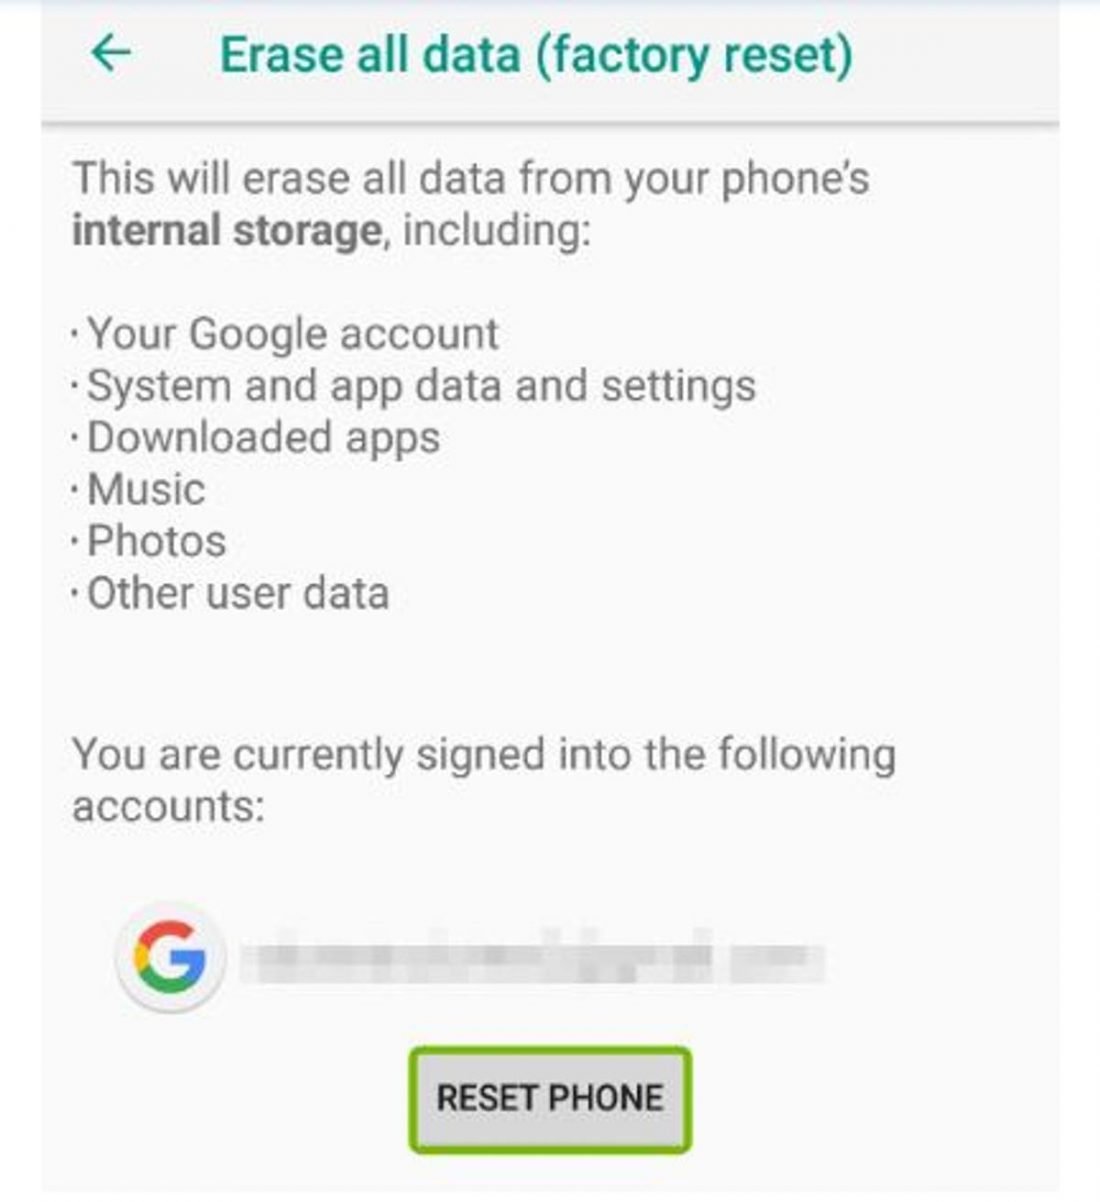
- Select Erase all data to initiate the factory reset.

Erase all data (From: support.com) - Click on ‘Reset Phone’.

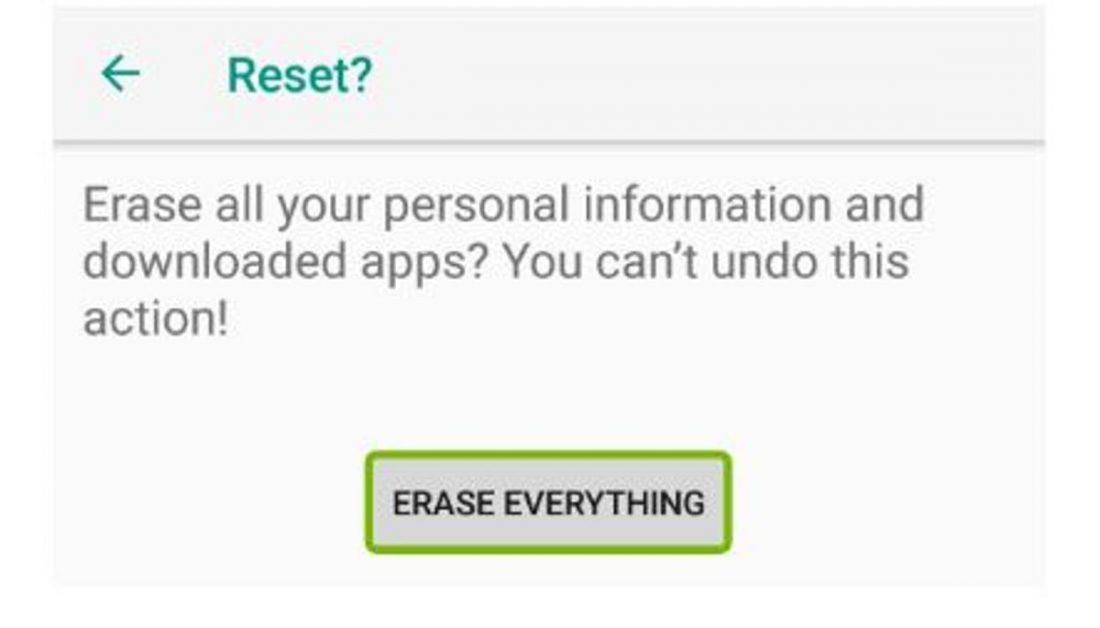
Reset Phone (From: support.com) - You will be asked for a confirmation. Select ‘Erase Everything’.

Erase Everything (From: support.com) - The device will start the factory reset process. Once this is done, you will have to set up your phone all over again.

Conclusion
With these tips, you can now enjoy a hassle-free headphone listening experience without speakers uselessly ruining the moment for you. No more unexpected embarrassing moments in the library and no more hindrance to your listening pleasure. You can now shamelessly listen to your wacky guilty pleasures even when you’re out in public. Don’t worry, it will only be between you and your headphones!
So, did any of these tips work for you? Did we miss out on anything? Let us know in the comments section below. We love hearing from you!
I tried a few of your tips regarding my difficulty with activating my wired headphones for use with my recently acquired Galaxy Tab S7 FE. Nothing seemed to work until I re-started the tablet and the problem was gone. Headphones are working perfectly now but I can’t be precise about the tip that worked.