Discover the different factors affecting your mic audio quality and learn more about how to make your mic sound better.
Have you experienced playing online but all your teammates keep saying, “What?” in everything you say? We all did. And it can turn a good game sour in no time.Similarly, no one wants to watch the live stream of someone with horrible mic quality. You may showcase the latest rotation tricks on League of Legends but no one will know since no one can stand your microphone.
If you’re unfortunately one of these people, then this article is perfect for you. Read on to learn more about the different factors affecting your mic quality on any platform. Plus, how to easily deal with them.

Why Does Your Headset Mic Sound Bad?
Many different factors can cause terrible audio input. Your poor mic audio may be occasioned by one, some, or all these factors. For us to better address this frustrating situation, let’s discuss each of the following causes below.
Bluetooth connectivity problems
While Bluetooth is now the standard connection used by most devices, it still has some unresolved drawbacks. These are:
- Overcrowded frequency bands: These are usually caused by different devices using the same frequency bands as your Bluetooth device. Some samples are WiFi connection, microwave ovens, power cables, etc.
- Physical obstructions: Major obstructions between your headset and your device can result in serious connectivity issues. Materials such as metal, concrete, and plaster pose high interference potential to Bluetooth connections.
- Outdated firmware: Firmware incompatibility issues can occur when you don’t regularly update your device. This can affect your device’s overall performance, including your Bluetooth connectivity.
- Bluetooth codec transmission: Audio data lost during Bluetooth codec transmission can decrease your output audio quality.
Diaphragm size
A microphone diaphragm is a thin membrane that is responsible for converting sound into mechanical data.
Basically, the larger the diaphragm is, the more audio data it can pick up. This allows for clearer sound quality for the other end of the call/recording.
However, headphone manufacturers can’t exactly put gigantic microphones on headphones. That’s why most of them use micro-electromechanical systems (MEMS).
Headphone mics come in different sizes and forms. The most common are in-line and boom mics. See a quick comparison of the two below:
In-line Microphone
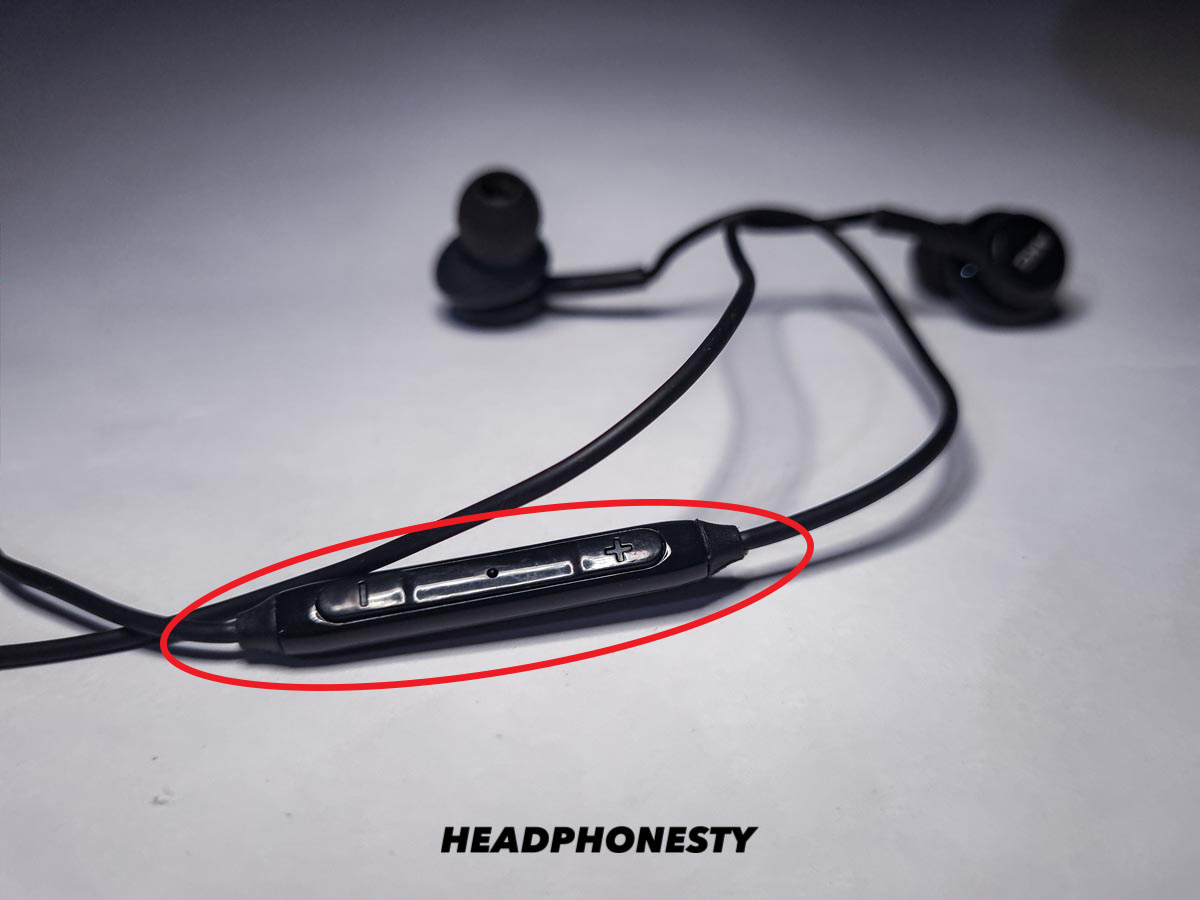
An in-line Microphone is a kind of mic that is built ‘in-line’ with the headphone wire. Most of them come with built-in controls for volume and playback. In-line microphones are light and compact. Their mics are usually positioned between the chest and the neck.
Boom Microphone
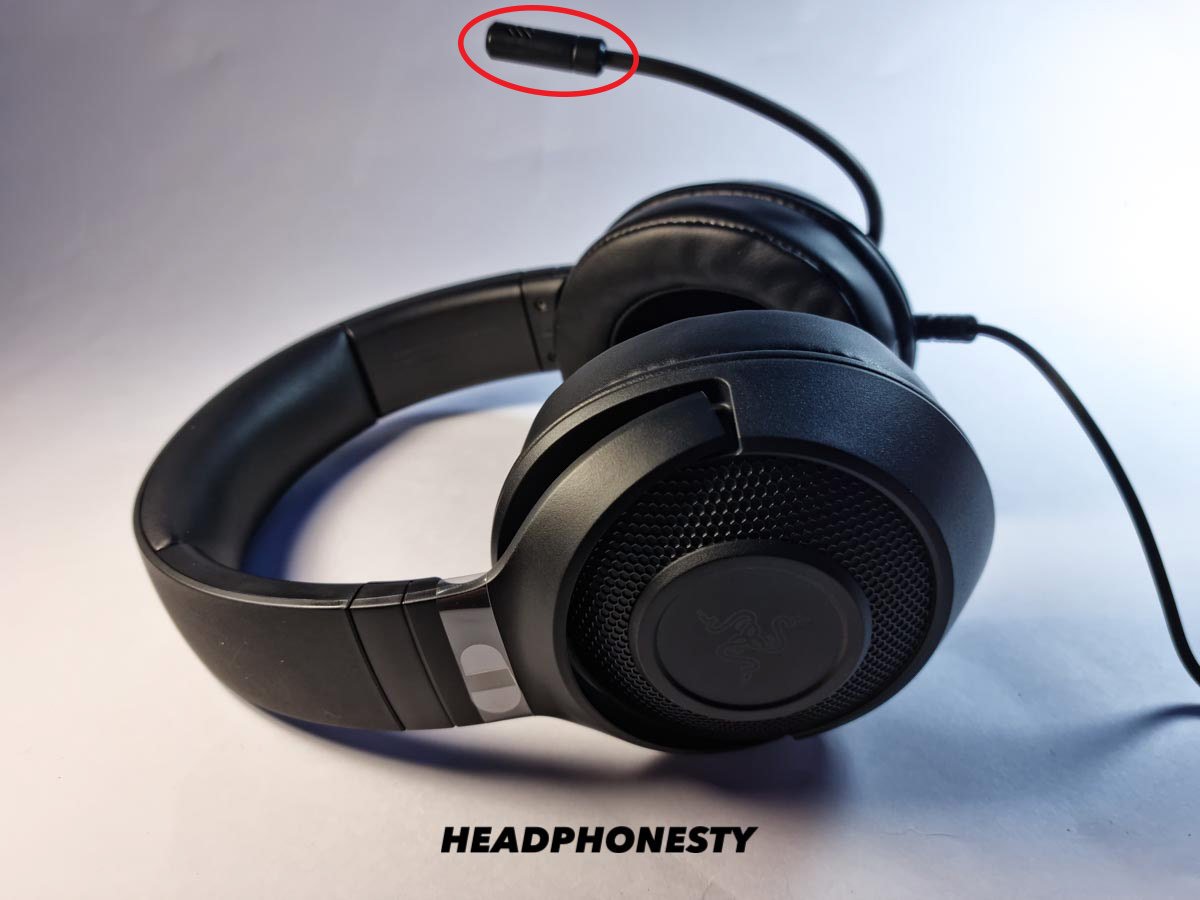
A boom microphone, on the other hand, is mounted at the end of the headphone’s boom pole. It is positioned near the mouth and the mic of this type tends to be relatively large. They offer great quality mic audio that is highly directional and accurate.
Between the two, boom microphones offer better and more directionally-accurate mic audio. Because of its size, it’s able to gather more audio data than in-line microphones. In terms of cost, in-line microphones are more affordable than boom microphones.
Boom microphones also offer more stability than in-line ones. Because in-line mics lie on headphone wires, it’s more susceptible to physical disruptions. Some sudden movements can produce unnecessary rubbing sounds. This can inevitably affect your mic audio quality.
Too much background noise
When you’re using your headset in a crowded or busy place, there is a high chance that your headset mic will pick up all those sounds. This is especially true if your headset’s mic doesn’t have a built-in noise-canceling technology.
This is worse for highly-sensitive microphones. Sometimes, these background noises can even overpower your voice.
Device or app settings
Your device and app settings also play a vital role in your input sound quality. If you want to improve your mic audio, you may have to do some digging and tweaking.
You can do this by altering some internal settings. With the right approach, you can make your mic sound better on any platform. Whether it be on PC, Mac, Xbox, or PS4 (and even on Discord and Streamlabs), we’ve got the cheat sheet you need.
Physical mic damage
If your headphones have experienced a bad fall or two, some visible or non-visible mic damage might have occurred. Run a mic test to ensure that your headset mic is still working properly.
- Check the connections. Sometimes, the problem may be solved using the simplest of ways. If you have choppy or intermittent mic audio, check your headset if it’s properly plugged into your device. Also, look out for any physical damage like frayed cables or broken parts.
- Record yourself. If you have sound recording software on your device, try turning on your mic monitoring setting. Then record yourself while speaking and making sounds. During the playback, you’llknow if your mic is compromised.
- Do a Skype Mic Test. If you have a Skype account, you can use it to test your Skype mic audio. Simply search for Echo/Sound Test Service on your contact list. Call Echo and record your message. Click on the playback option to hear your voice message. If your voice is clear, then your mic is working just fine.
3 Tips on How to Make Your Headset Mic Sound Better
Now that we’ve identified the most common reasons, let’s proceed with the solution! Here are some modifications you can do to make your mic sound better.
Ensure a stable connection
If you’re using a wired headset, a snug plug fit will ensure a stable connection to your device. Sometimes, however, headset jacks become loose and headset plugs get bent. If this is what you’re facing, you should fix your headphone jack by cleaning, adjusting, and repairing it. But if all else fails, then you might have to consider buying a new one.
Meanwhile, if you’re using a wireless headset, you can improve the stability of your connection by following the tips below:
Fix interference issues
Bluetooth runs under a 2.4GHz radiofrequency. However, it isn’t the only one that runs under that frequency band. Other devices and appliances also use the same frequency. Because of this, interference issues can sometimes occur.
To counter this, try taking the steps below:
- Remove all physical barriers: Make sure no such barrier separates your audio source from your Bluetooth headphones. Try to get your devices as close as possible.
- Move away from microwaves and fluorescent lighting: Stay away from microwaves and fluorescent lights. These run on the same frequency band as your Bluetooth headset (2.4 GHz) and can cause interference issues.
- Close apps not in use: Running too many applications on your device may also affect your Bluetooth connection. Close applications that aren’t in current use to avoid interfering with Bluetooth transmission.
- Check your WiFi connection: Most WiFi routers run under the same frequency as Bluetooth. Because of this, one may overpower the other one that’s farther away. Try moving closer to your WiFi router to make your connection more robust when on call.
This way, both your WiFi and your Bluetooth device will have strong but balanced connections.
Match audio codecs between device and headset
Bluetooth codecs are responsible for encoding and compressing the audio data from a device. The compressed audio data then gets sent to another device for decoding. At the end of this process, the output audio is produced.
Unlike common misconceptions, Bluetooth codecs do not only affect sound quality but also the mic input quality.
Ideally, all audio data would get transmitted smoothly and without any problems. However, Bluetooth technology has its limitations. There are several types of codecs and not all can process and transfer data seamlessly.
The rule is, your headphones should support the same codec as your audio source. Otherwise, it will change to the default SBC codec, which isn’t the most reliable.
You can refer to our informative guide to learn more about Bluetooth codecs and how to match them with your device
Adjust mic positioning
Mic positioning refers to the placement of your headset microphone; i.e. how far it is from your mouth. This creates a big impact on the overall mic audio quality. It can dictate the difference between echoey mic audio or clear audio input.
Moreover, placing the microphone at its most optimal position will avoid annoying audio feedback and interference.
For the best microphone placement, follow the steps below:
- Place your headset on your head. Be sure to find the most comfortable position for it.
- Ensure that the front side of the mic is facing you.
- Bend the headset microphone and position it at the edge of your mouth. The distance between the side of your mouth and the microphone should be at least 1 inch.
- If it goes out of place, adjust accordingly.
Aside from the abovementioned factors, optimal mic positioning can also depend on the users’ anatomy. There really is no hard and fast rule of measurements when it comes to mic positioning.
Mic distances can be influenced by the breathiness of a person’s voice production, the frequency of the user’s facial movement, or even the size of a person’s cheek. Even constant smiling can displace the headset mic. In these cases, it’s best to move the mic a little farther away.
Adjust microphone sensitivity & volume
When different mics are exposed to the same sound source, their output levels (volume) will not be the same. This is because different mics have different levels of mic sensitivity.
Platforms like PC, Mac, PS4, and Xbox have settings that can be customized to improve your mic sensitivity and volume levels. Softwares such as Streamlabs and Discord also have these settings.
Read the detailed guide below to learn how to do this.
For Windows PC
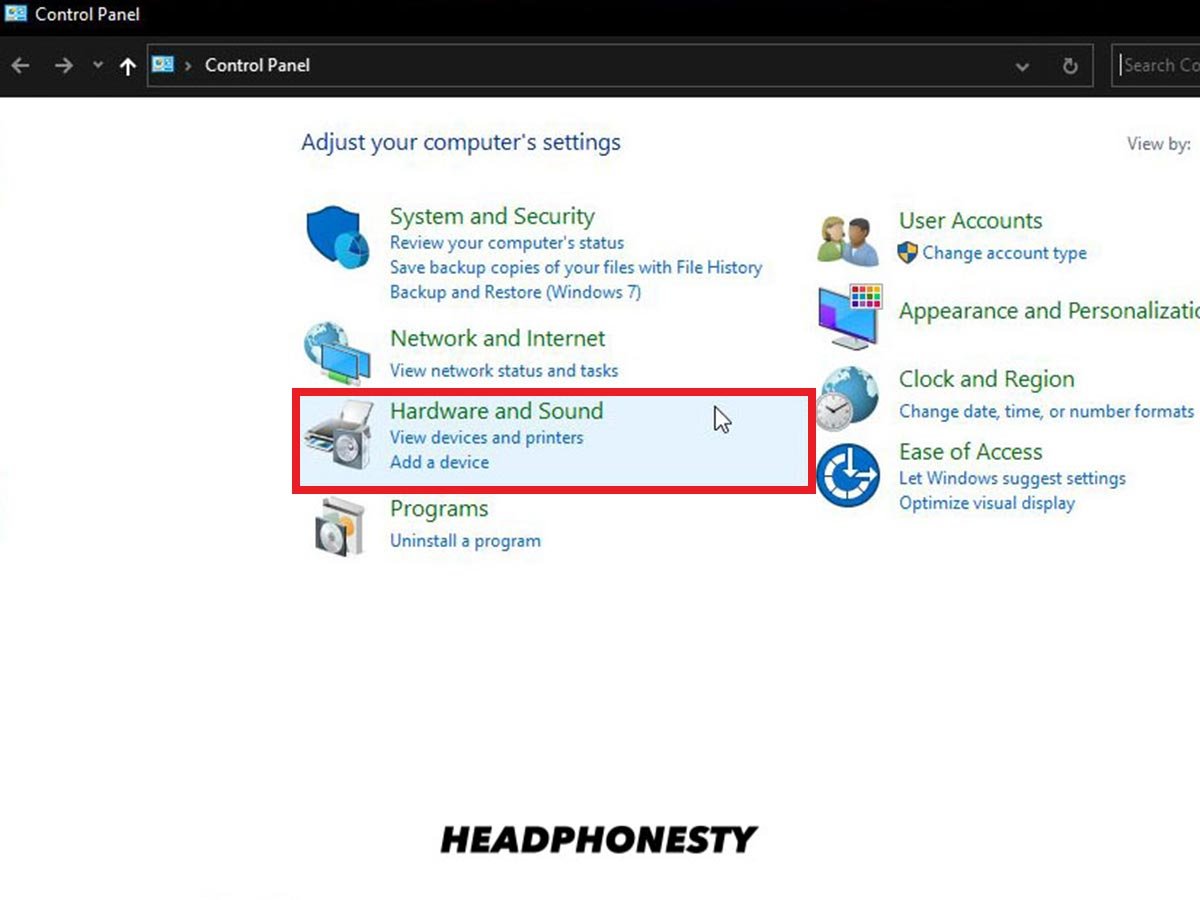
- Go to the Control Panel. Click on Hardware and Sounds.

Control Panel - Select Sound.
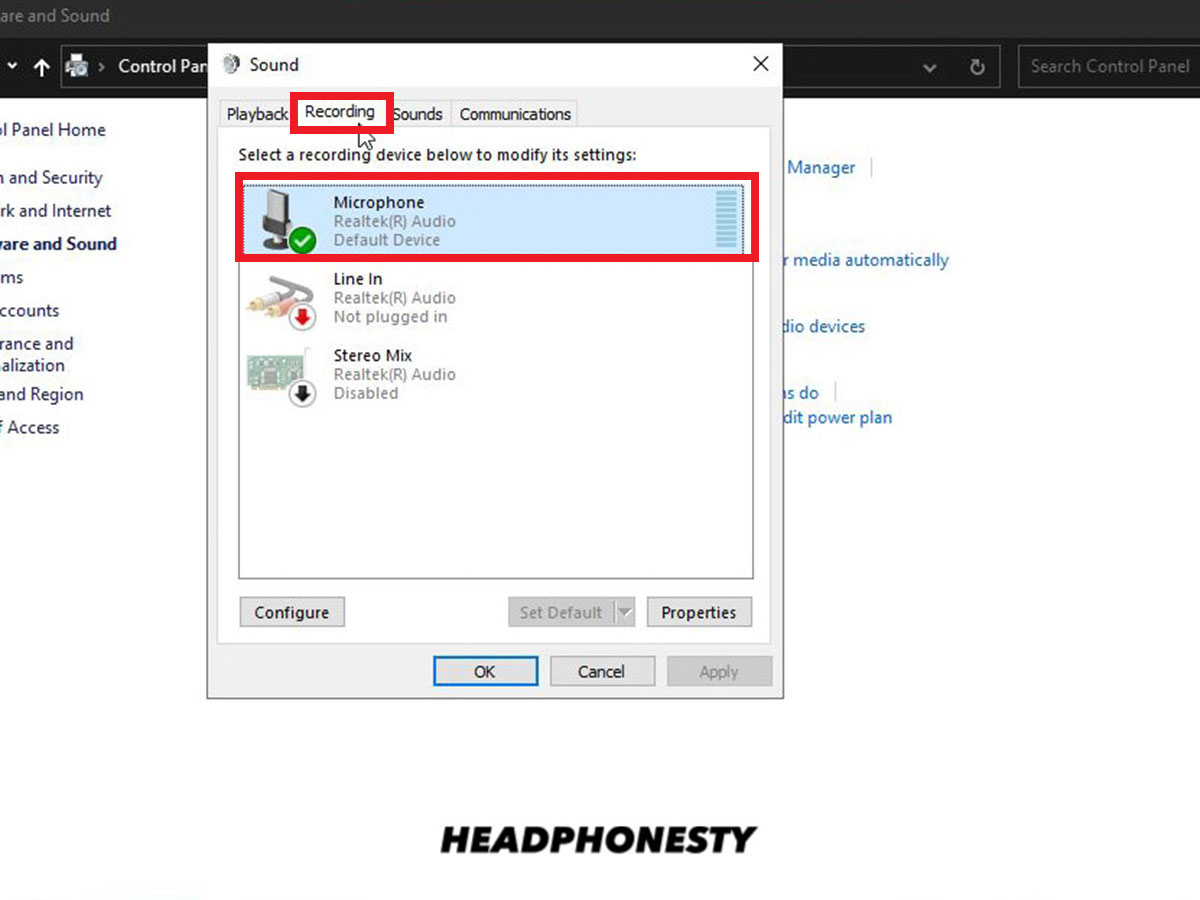
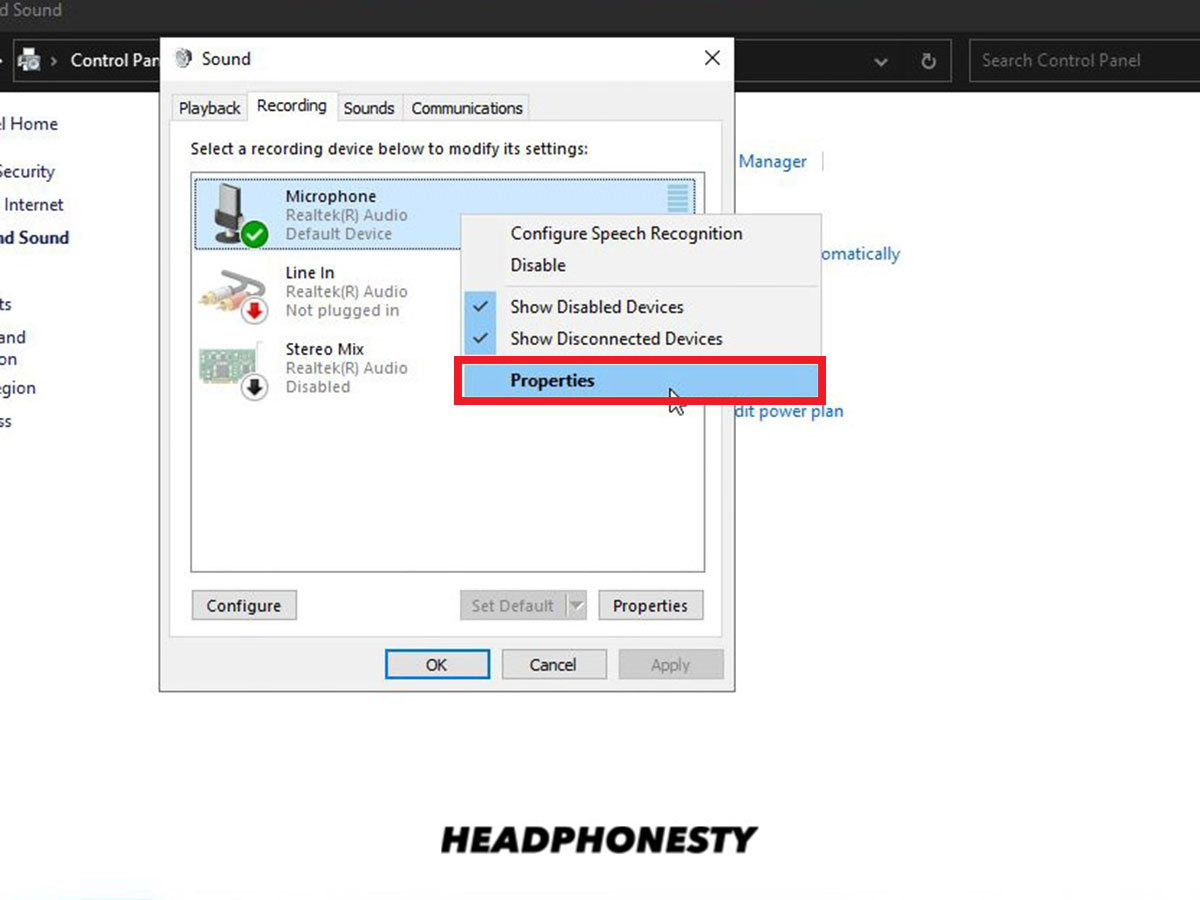
Select Sound - Click on Recording and choose your active headset mic.
Recording tab - Right-click on it and choose Properties.
Properties - Click on Levels. Adjust your mic sensitivity as desired. Drag the pointer to the right to increase mic sensitivity. Drag it in the opposite direction to decrease it. Optionally, you can make use of the mic booster setting. Take note, however, that too much mic sensitivity can lead to sound distortion and echo.
Adjust sensitivity


For Mac
Mac has a built-in feature that lets you customize your mic sensitivity setting. Follow the steps below to make your headset mic sound better on Mac:
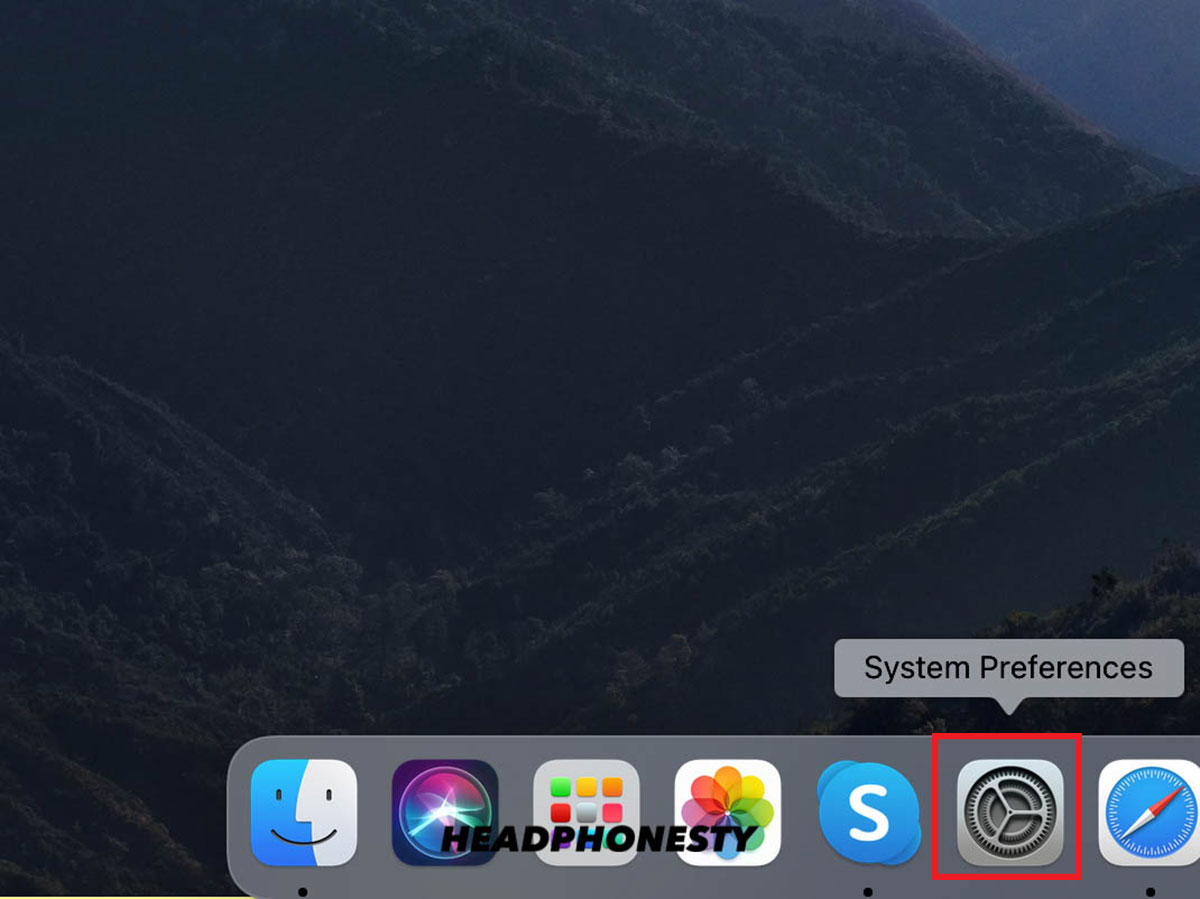
- Go to System Preferences.

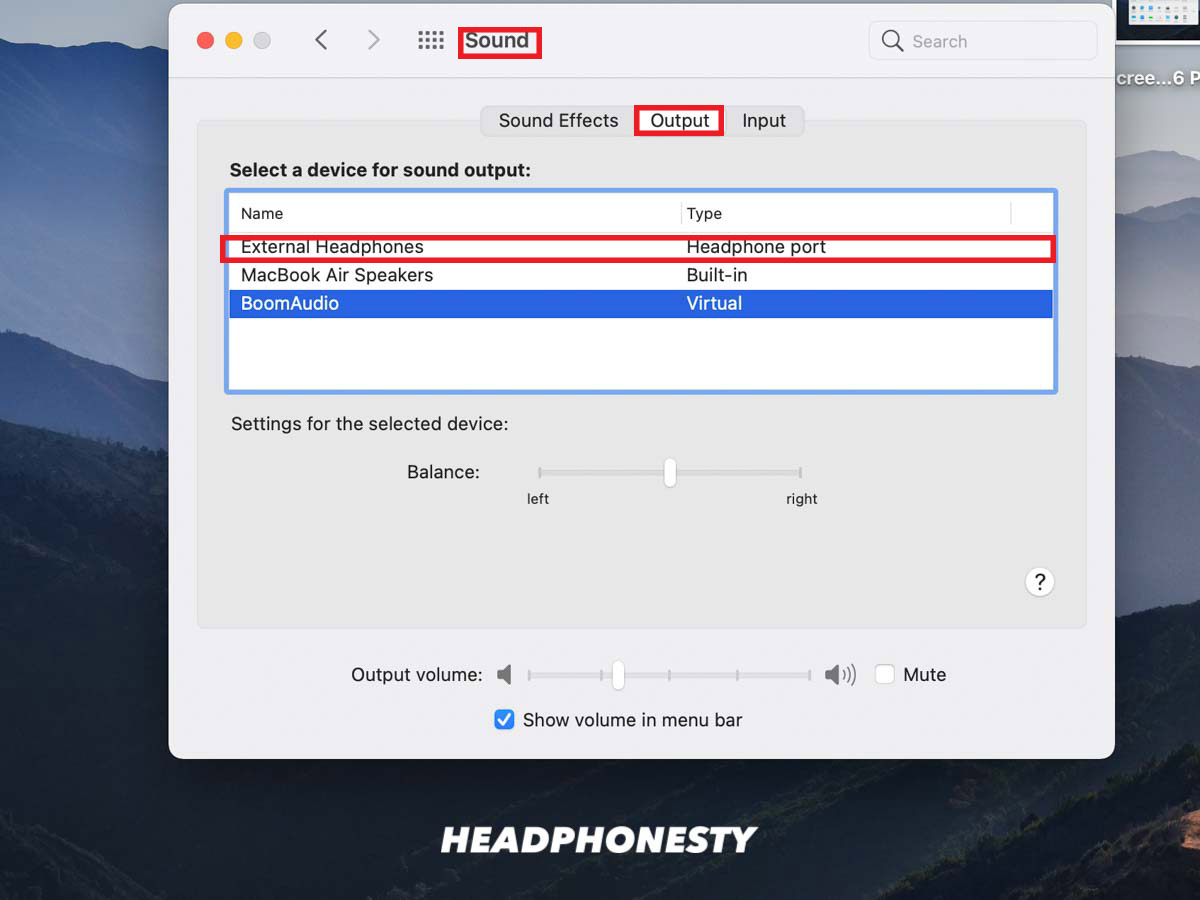
System preferences - Click on Sound.
Select Sound - Select Output and click on your active headset/microphone.
Select your headset - Select Input. Adjust mic sensitivity by dragging the arrow to the left or the right.
Adjust settings


For PS4
If you’re having trouble with background noises and echoes on your headset mic when you’re playing or live-streaming, the problem might be in the mic level setting of your PS4. Try these easy steps to solve these mic audio problems:
- Hold down the PlayStation icon on the controller to access the Quick Menu.
Go to Quick Menu - Choose Sound/Device and click on Adjust Microphone Level.
Quick Menu - Adjust your microphone level accordingly. The farther you drag it to the right, the louder your mic will get and vice versa. If your microphone level is too high, your background noise will be much more noticeable. This may even cause unwanted mic echoes. To prevent this, try to keep your mic level on the low-middle ground.
Adjust mic level


For Xbox
If your Xbox mic and chat mixer levels aren’t balanced enough, it may cause you to lose out on a good gaming experience. To help you with this, here is a step-by-step guide on how to make your mic sound better on Xbox:
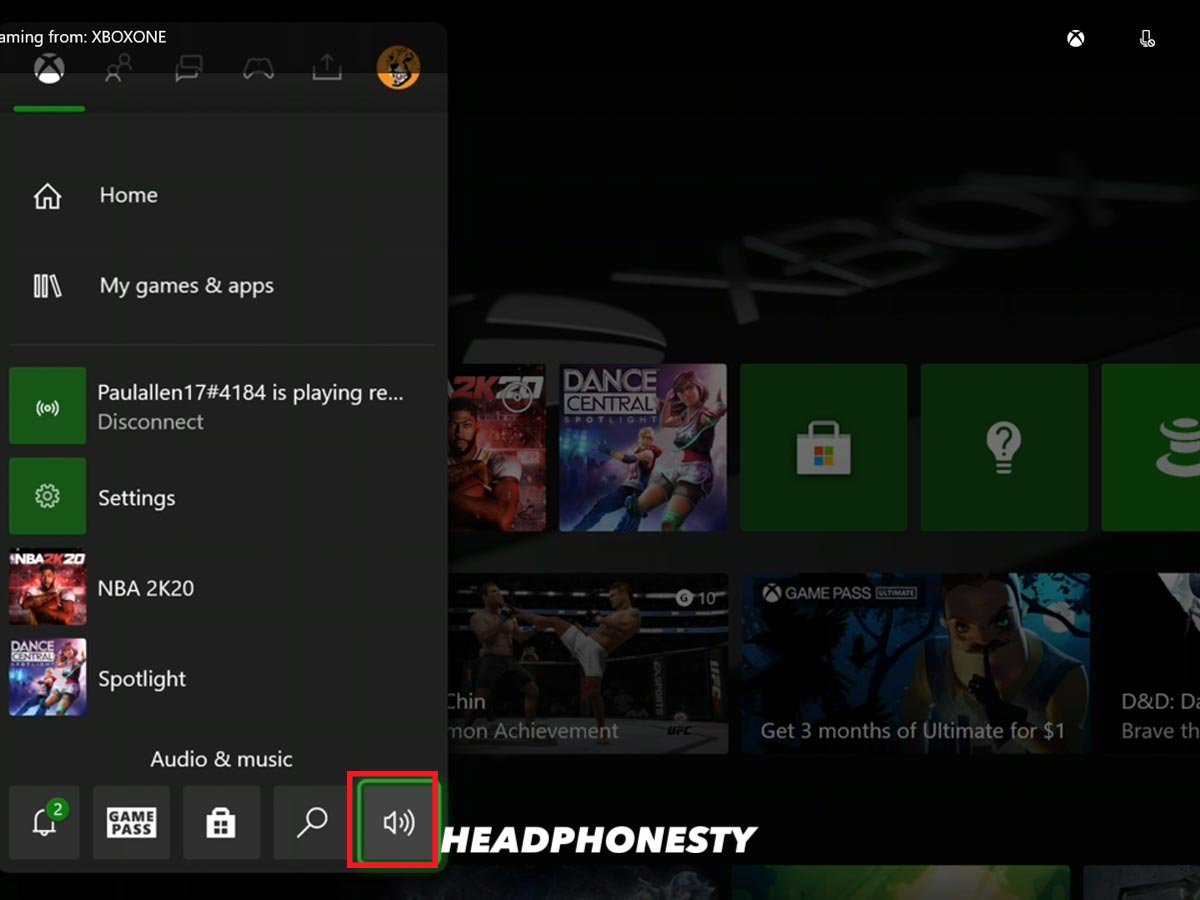
- Plug your headset into your Xbox controller. Press the glowing Xbox icon to access the menu.
Xbox Settings Menu - Click on Audio and adjust your audio settings as desired.
Adjust Audio Settings
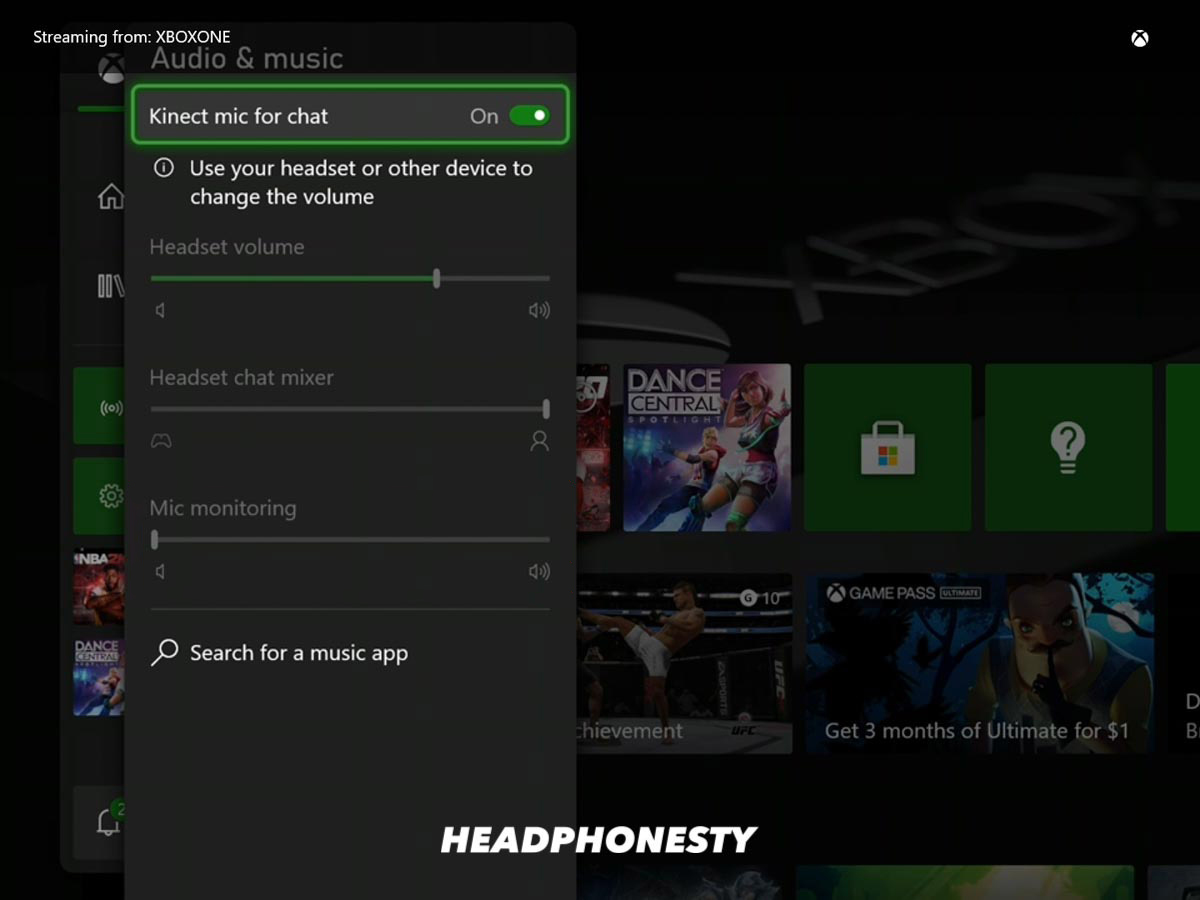
There aren’t any customizable mic sensitivity settings on Xbox. However, you can bypass this by covering your headset mic with a mic foam cover. This can help reduce background noise from getting picked up by your mic.
How to Make Mic Sound Better on Streaming Platforms
As gamers, some of us don’t really want to keep to ourselves especially when it comes to amazing gameplays. Who knows? Maybe you can be the next Ninja or Shroud.
However, no matter how many headshots you can make in one match on Valorant, no one will watch you if they can’t understand you. If you’ve already made the discussed tips above and your mic still doesn’t sound good, it could be a platform issue.
Here’s a run-down of what you can do to make your mic sound better on the top live streaming platforms: Discord, and Streamlabs.
How to make mic sound better on Discord
Discord is a live streaming platform that is often used by gamers to broadcast their gameplay in real-time. It’s a convenient platform where gamers can congregate, discuss, and communicate with fellow gamers. This is a free app but you can opt to buy in-app purchases to access more features like animated avatars and emojis.
Professional esports players also do live streams via Discord to showcase and teach gaming strategies to other gamers.
Because mic input is a huge deal for this platform, it has separate mic settings that can help make your mic sound better. To do this, follow the steps in this youtube tutorial:
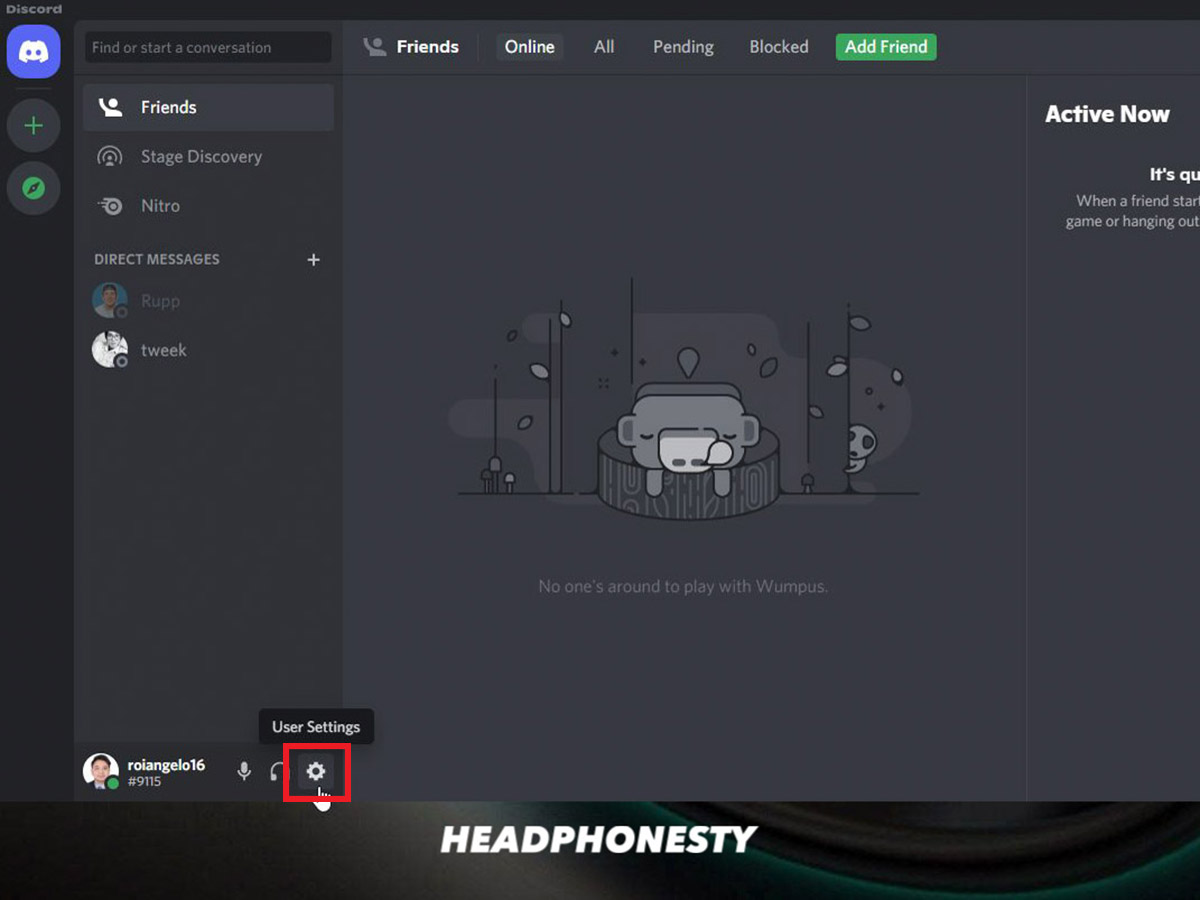
- Open User Settings by clicking on the gear icon on the bottom-left portion of your screen.
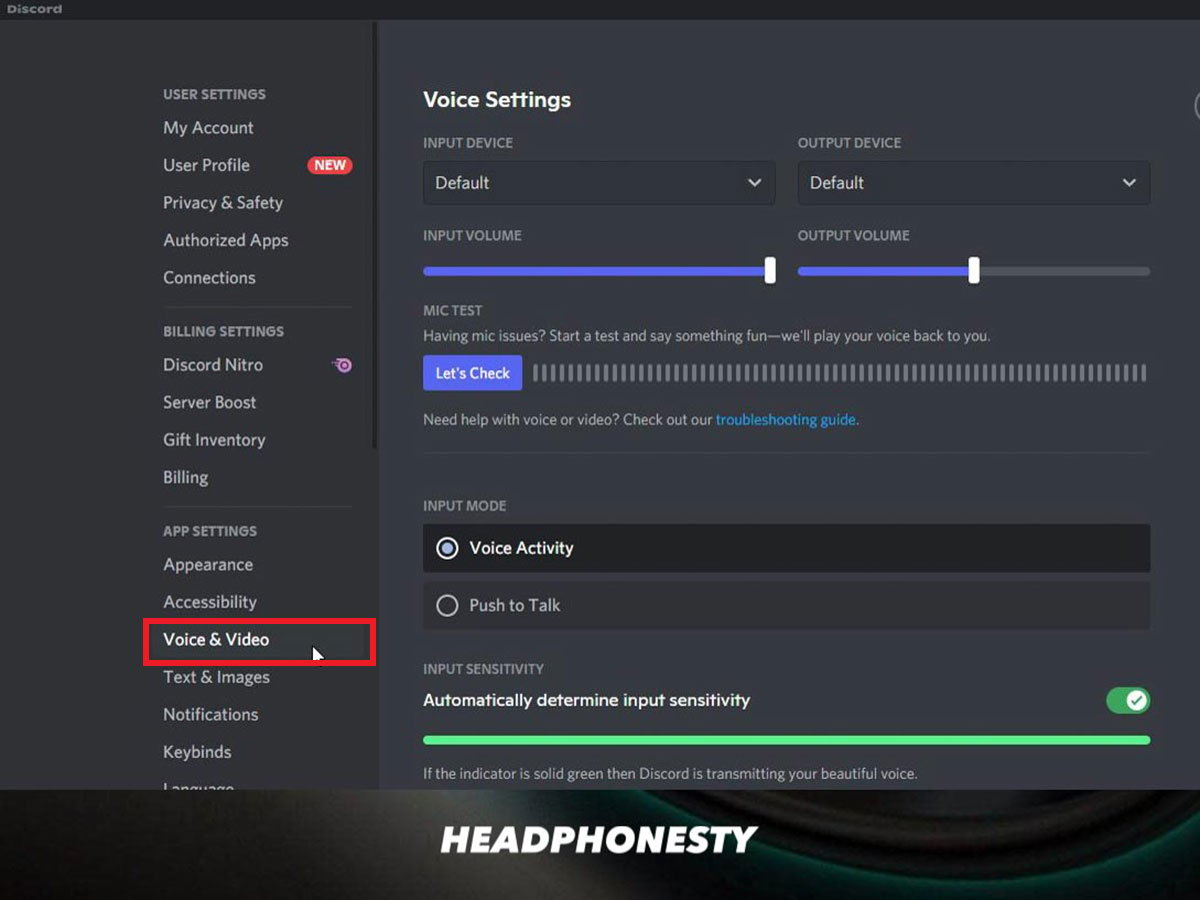
Discord User Settings - Select Voice and Video.
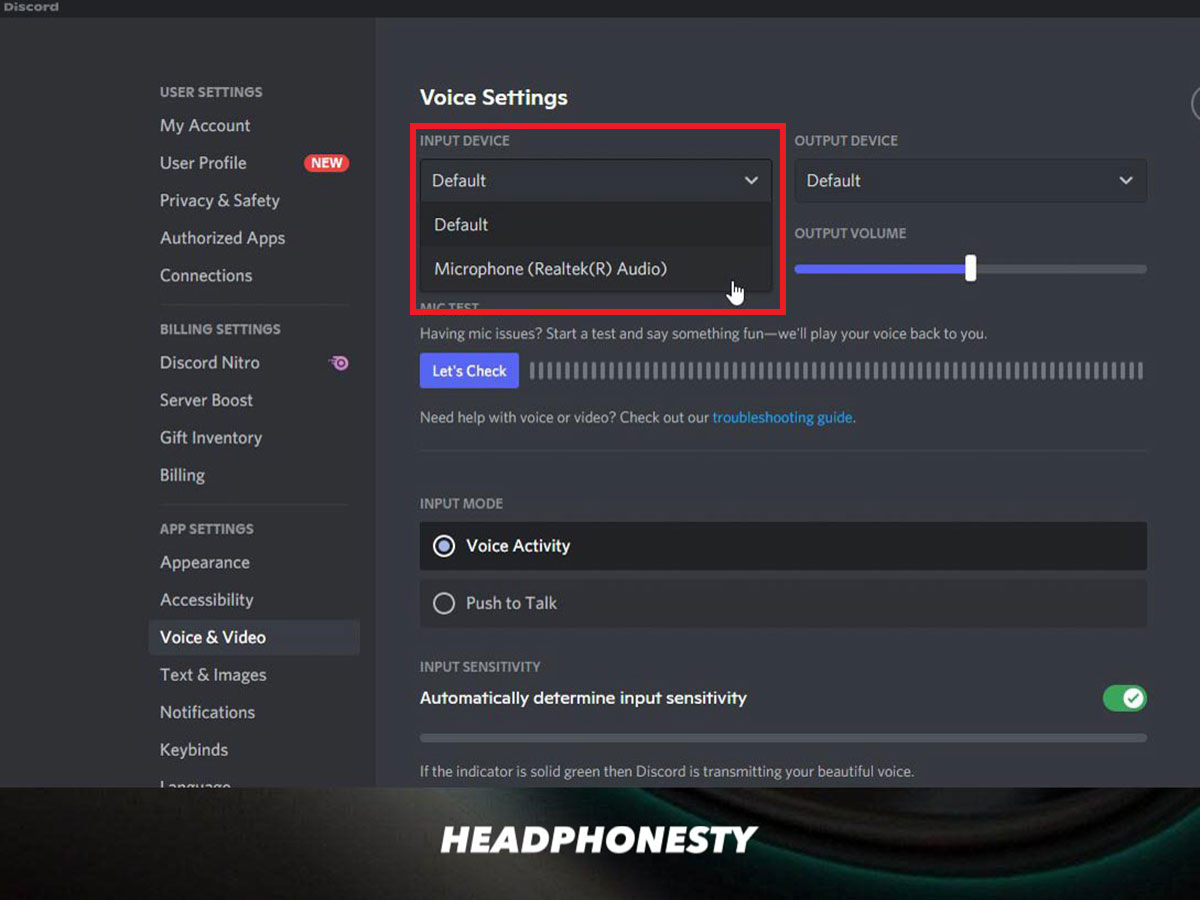
Voice and Video - In the Input Device drop-down menu, select your active headset microphone. Adjust the Input Volume as desired.
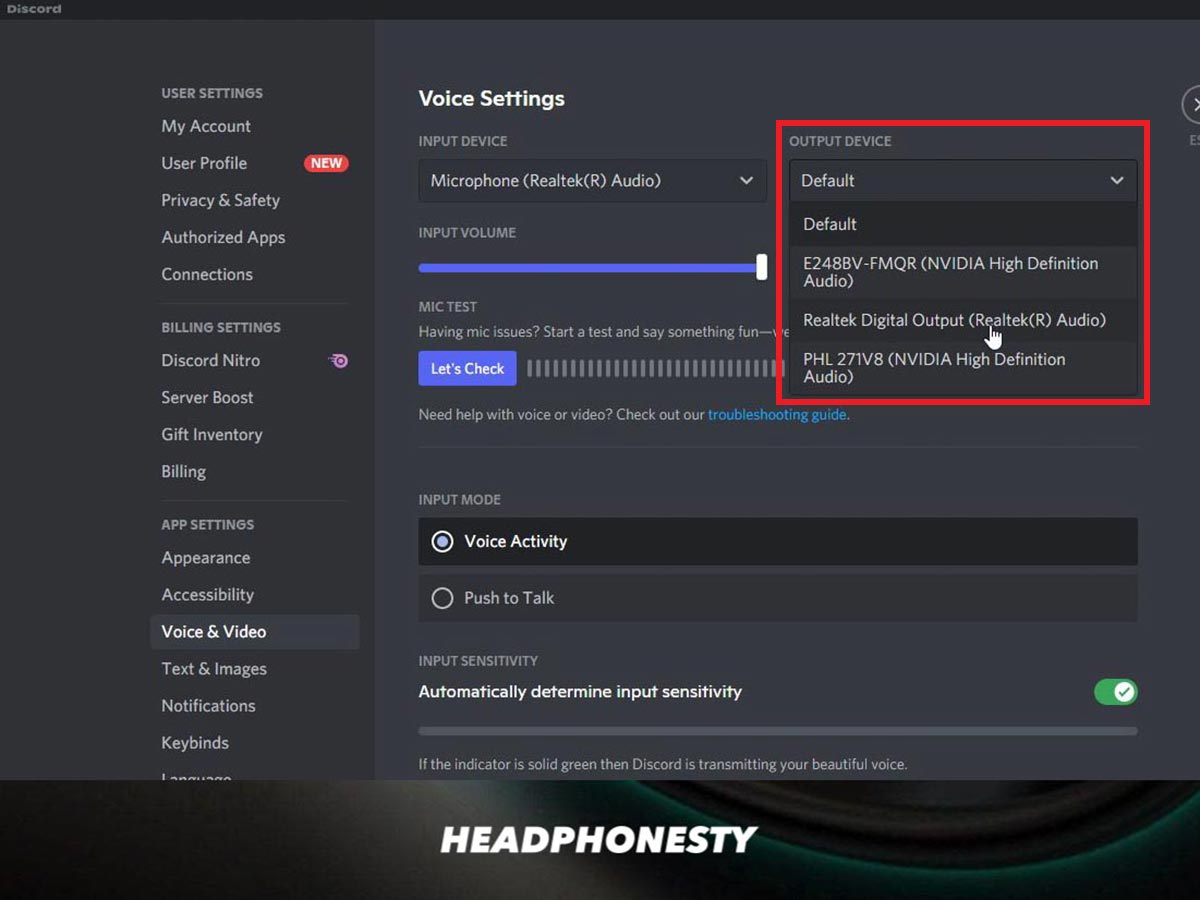
Adjust the Input Volume - In the Output Device drop-down menu, select your headset or any other speaker you want to use. Adjust your Discord Output Volume as desired.
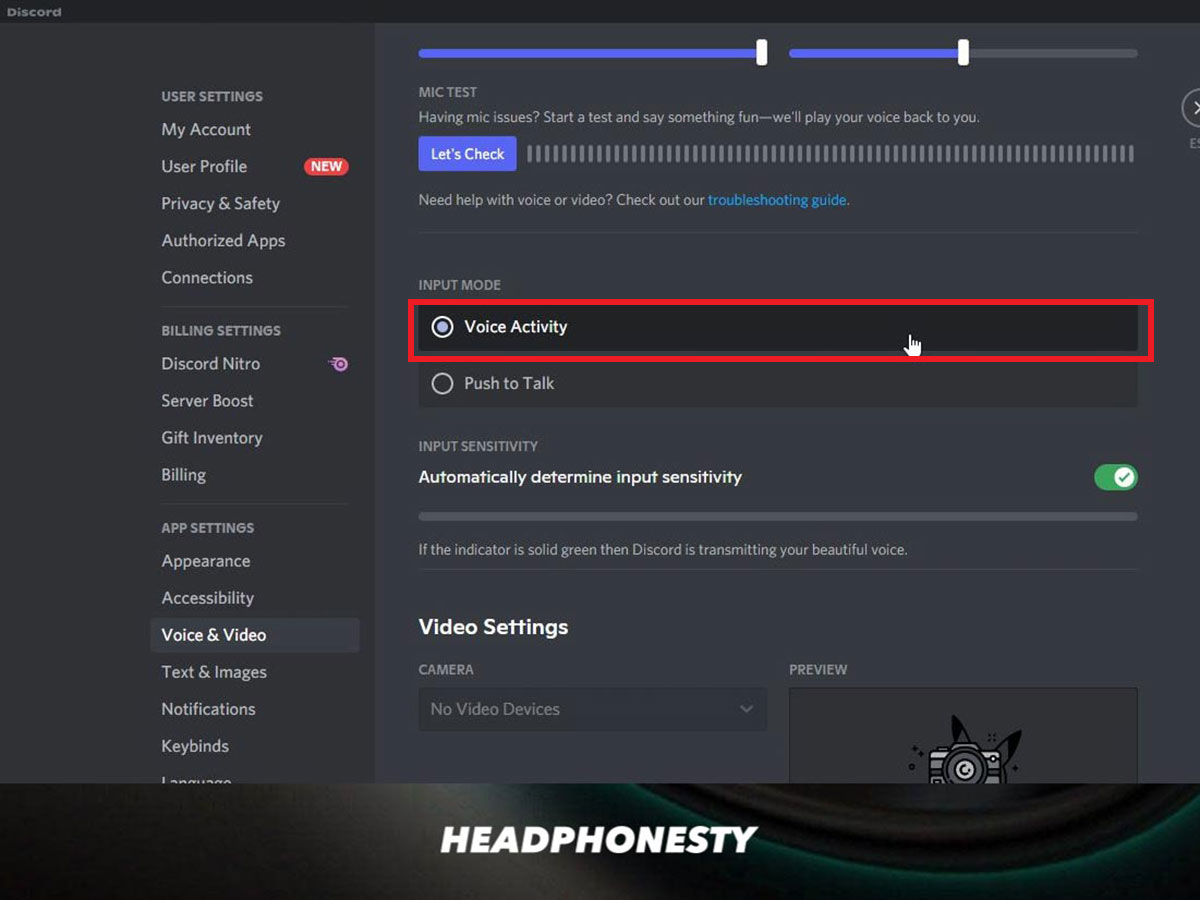
Select Output Device - Tick the box saying Voice Activity if you want Discord to broadcast your audio whenever it picks up a sound.
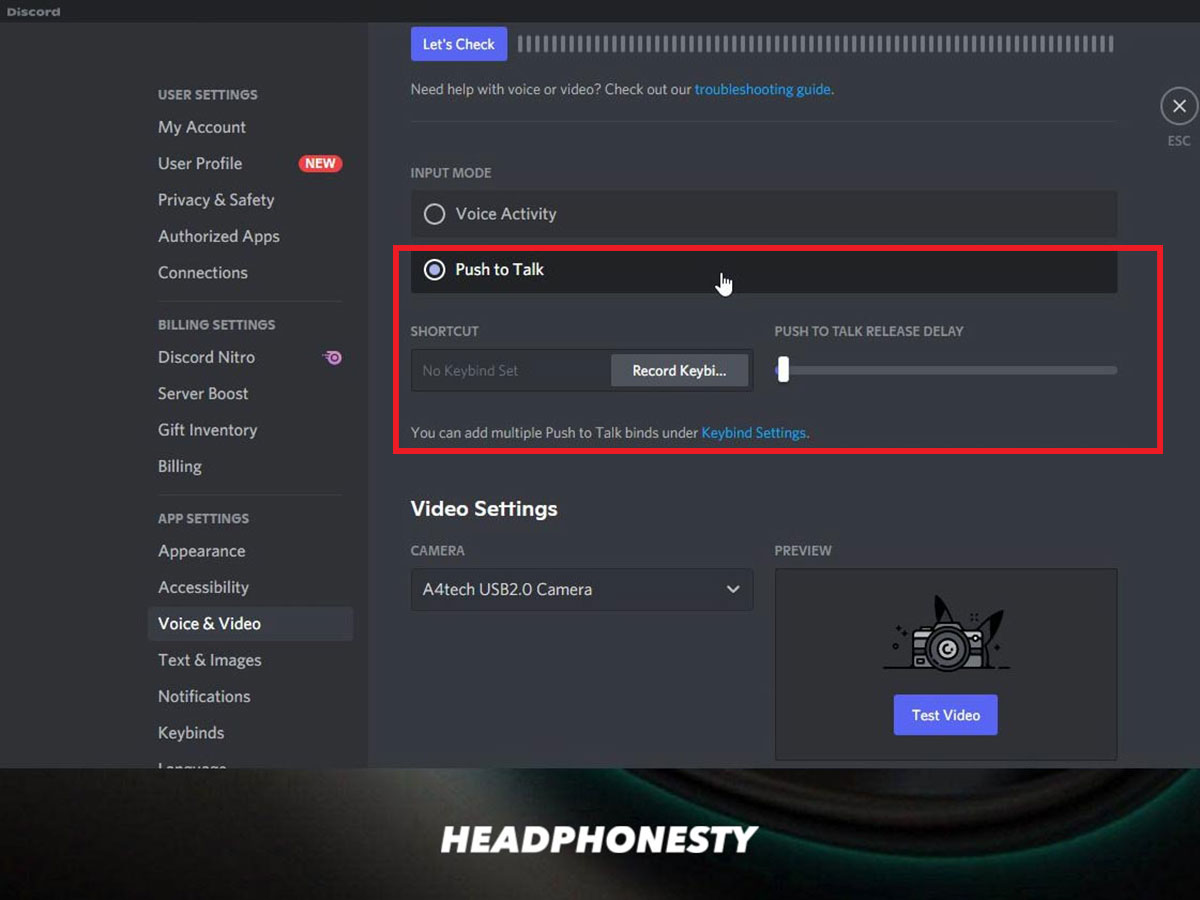
Voice Activity - Tick the box saying Push to Talk if you want Discord to broadcast your audio only when you press a specific button. You can customize it by clicking on Edit Keybind and choosing your preferred button.
Push to talk
If you’re in a noisy environment, unnecessary background noise can possibly get picked up by your headset. To counter this, you can use Krisp.ai. This is a free app that you can use that offers an advanced noise suppression setting.
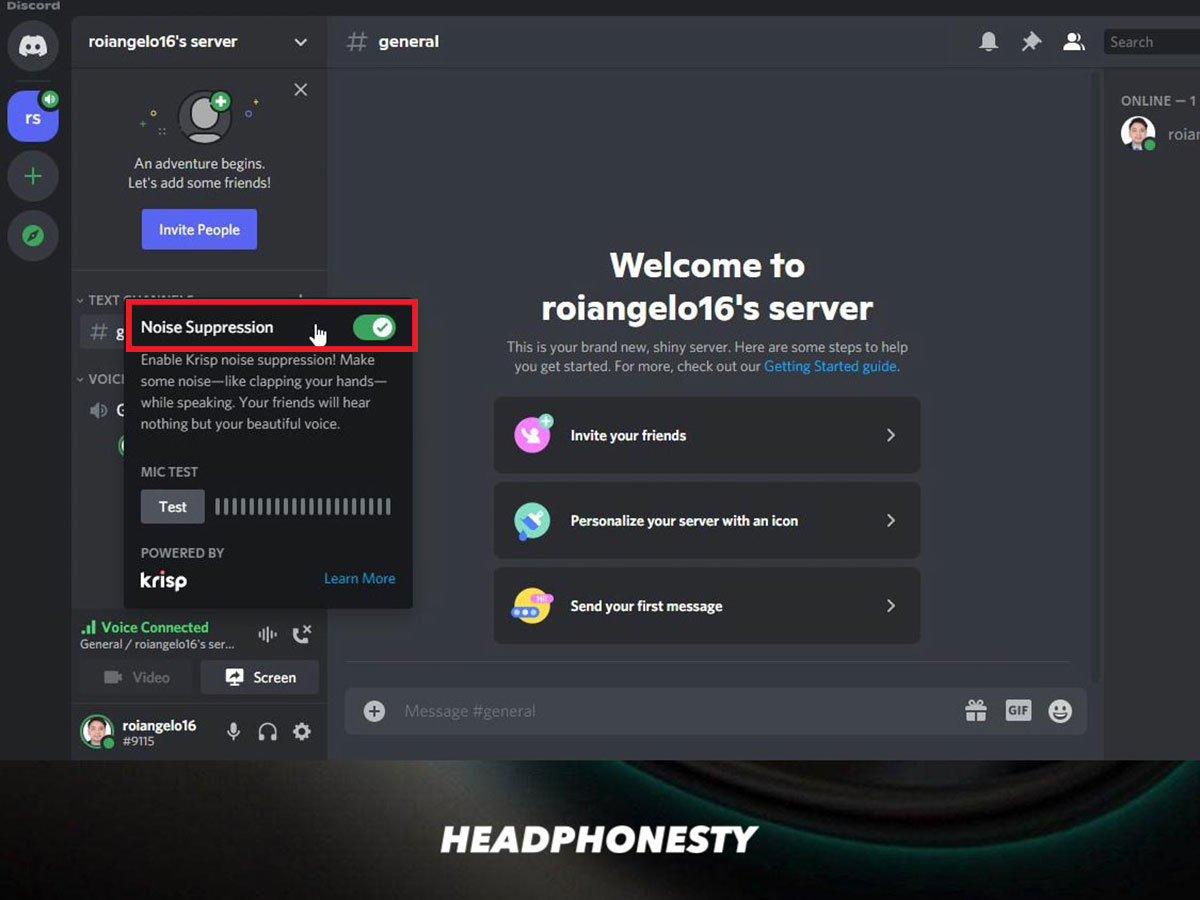
How to enable Krips.ai on Discord
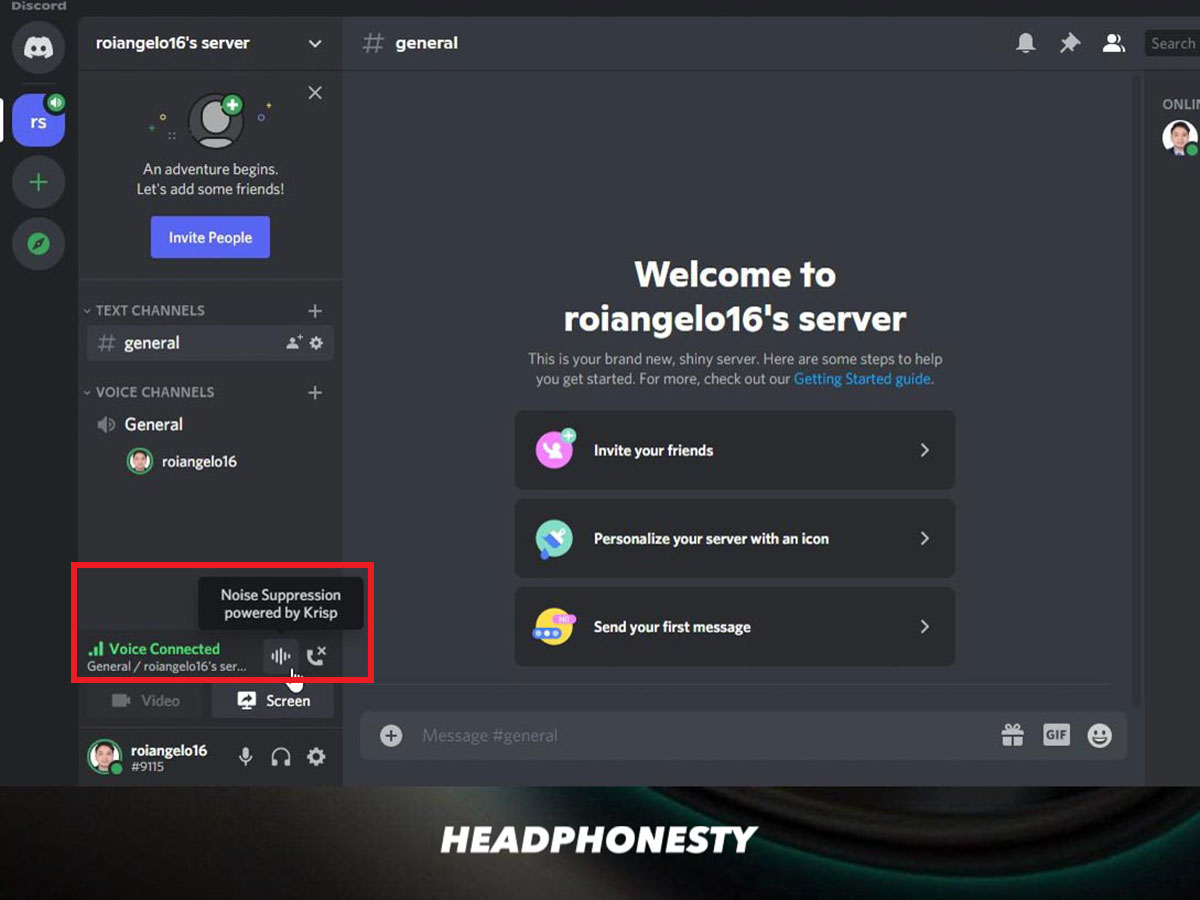
- Click on your channel and select the Noise Suppression icon.
Noise Suppression - Turn Krisp on. You can run a mic test on Discord by speaking through your microphone and clapping your hands at the same time. Notice that only your voice is being transmitted while the clapping sounds you’re making are not. You can watch this youtube tutorial to see how it’s done.
Turn Krisp Ai on
Doritos has also released an AI-noise canceling software, a.k.a. Doritos Silent, which focuses on canceling the crunch noises from snacks when you’re gaming.
How to make mic sound better on Streamlabs
Streamlabs is a live streaming software that allows people, especially gamers, to broadcast their live videos on different platforms (Twitch, YouTube, Facebook, etc.). It also features viewer engagement tools and tipping/monetizing options.
This software appeals to gamers and live streamers not just because it’s free but also because it’s very user-friendly and customizable. Aside from simple volume controls, it also features audio filters, layout editors, and stream overlays.
To adjust mic volume, follow the steps in this youtube video:
Adjust mic volume on Streamlabs
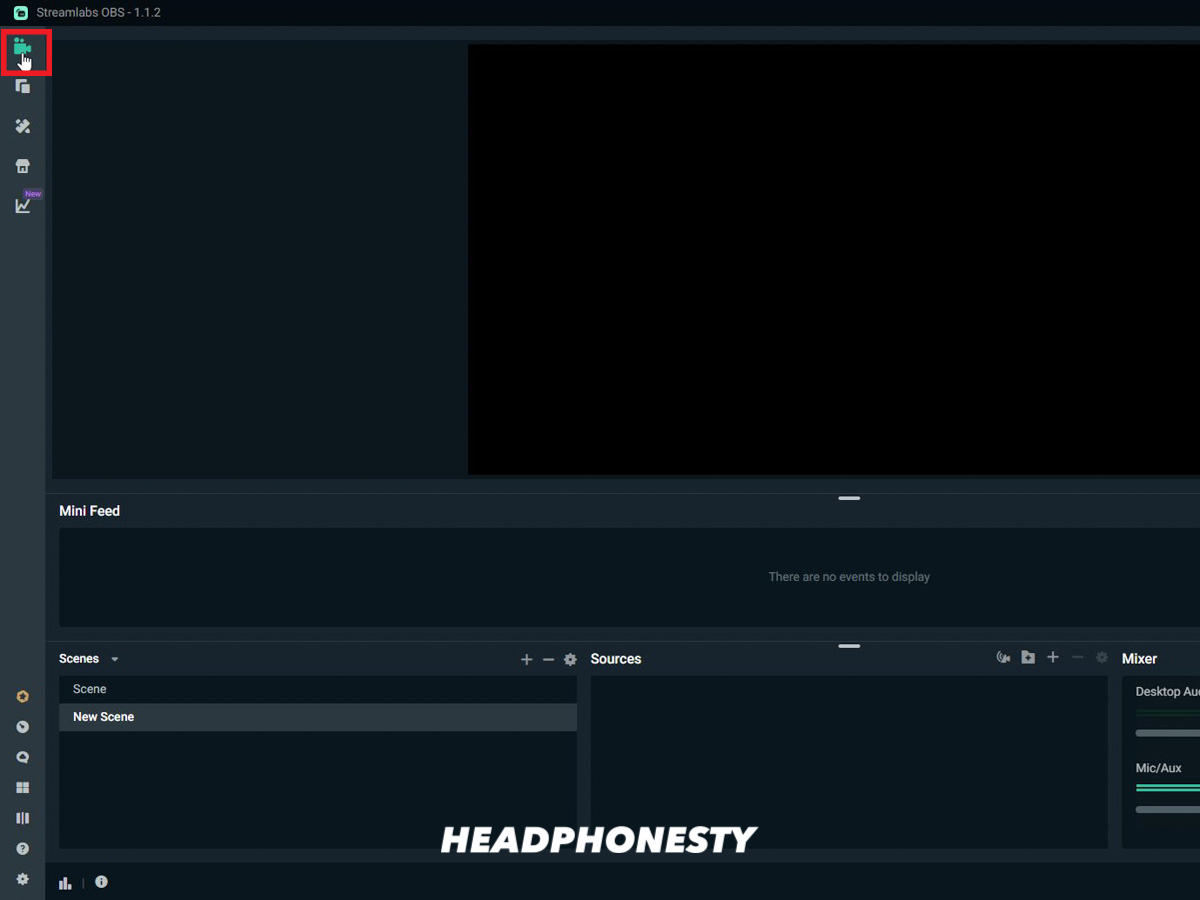
- Launch Streamlabs and choose Editor.
Steamlabs editor - On the bottom-right corner of your screen, you’ll find the Mixer. Adjust your Mic/AUX settings as desired.
Mic/AUX settings
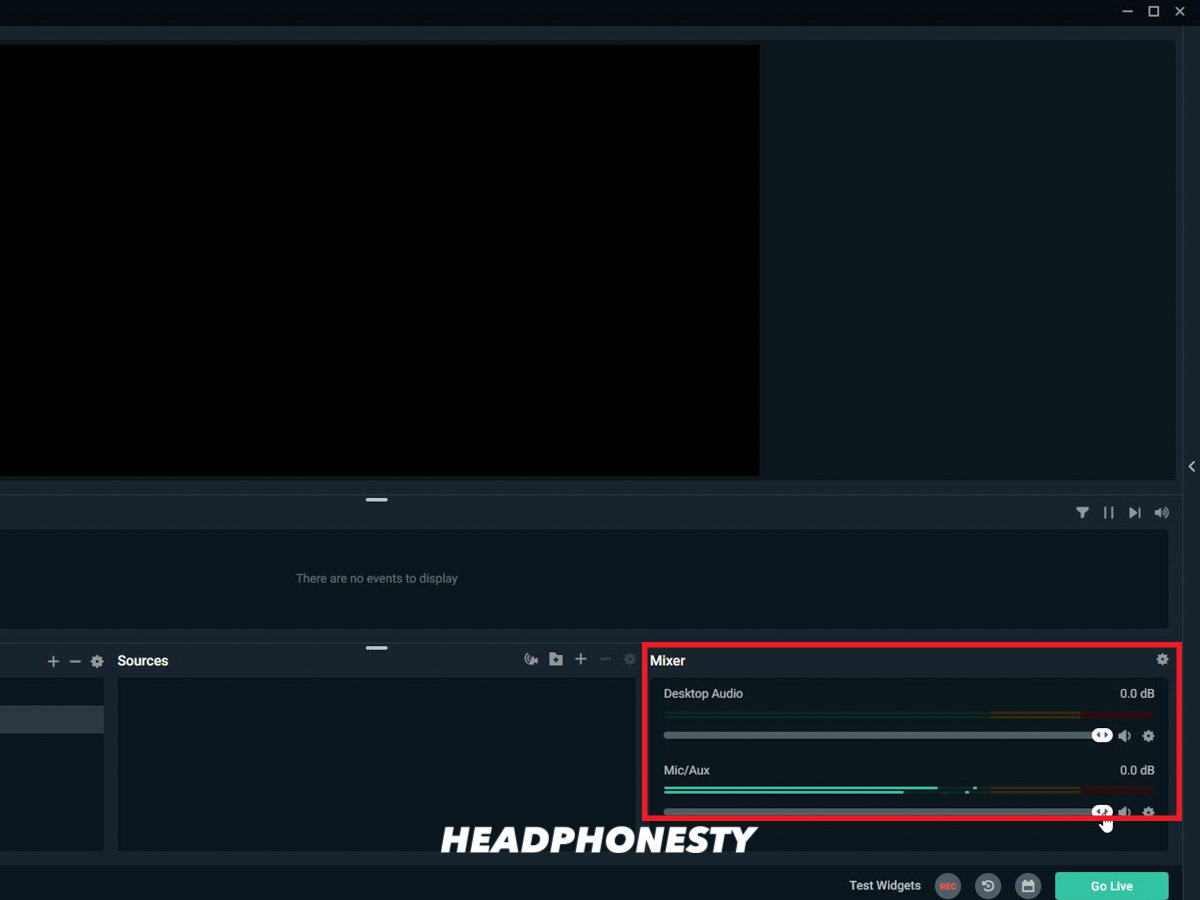
Streamlabs advises users to keep their mic volume in the yellow range for better mic audio.
Optimize Streamlabs audio filters
Aside from adjusting your mic/AUX settings, you can improve your mic quality on Streamlabs by optimizing your Streamlabs Audio Filters. Here’s a Youtube video showing how to optimize Streamlabs audio filters:
- Launch Streamlabs and open Editor.
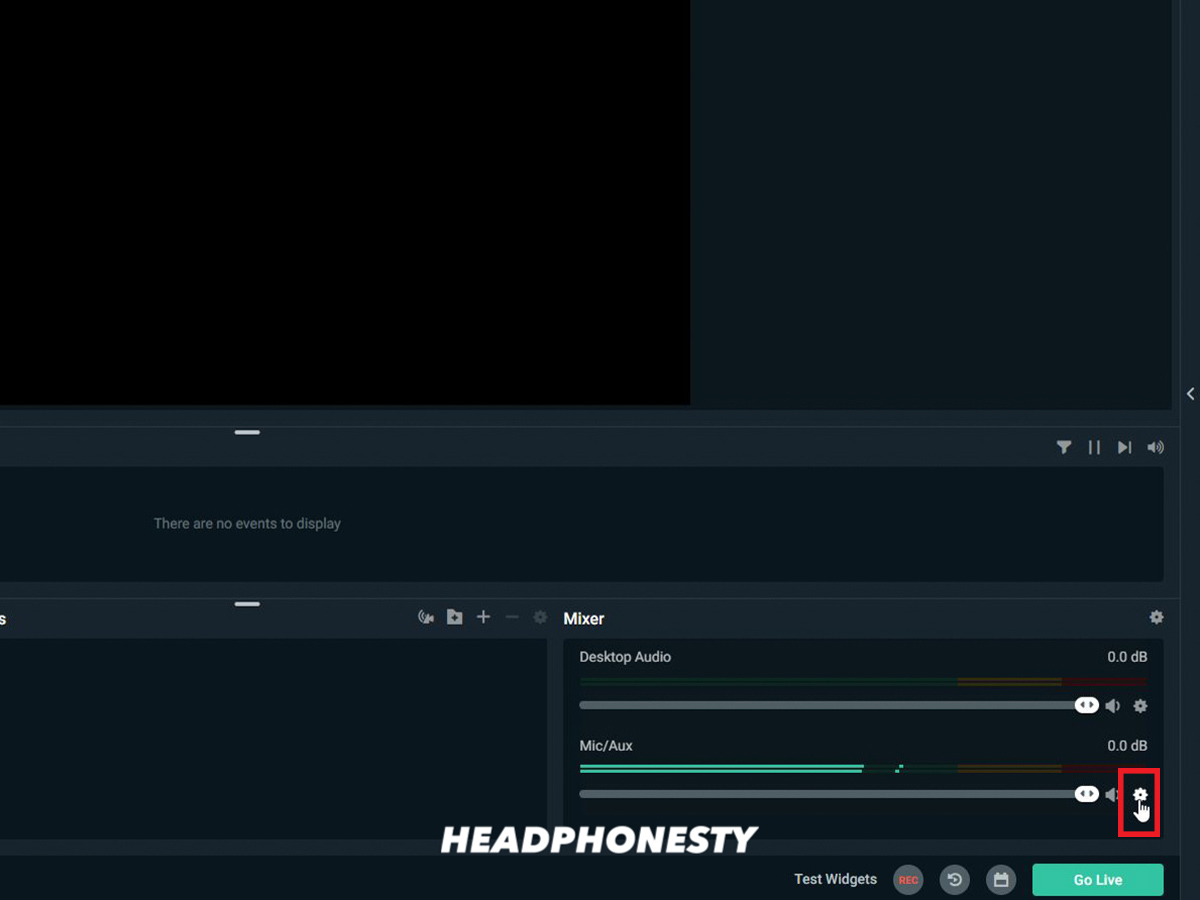
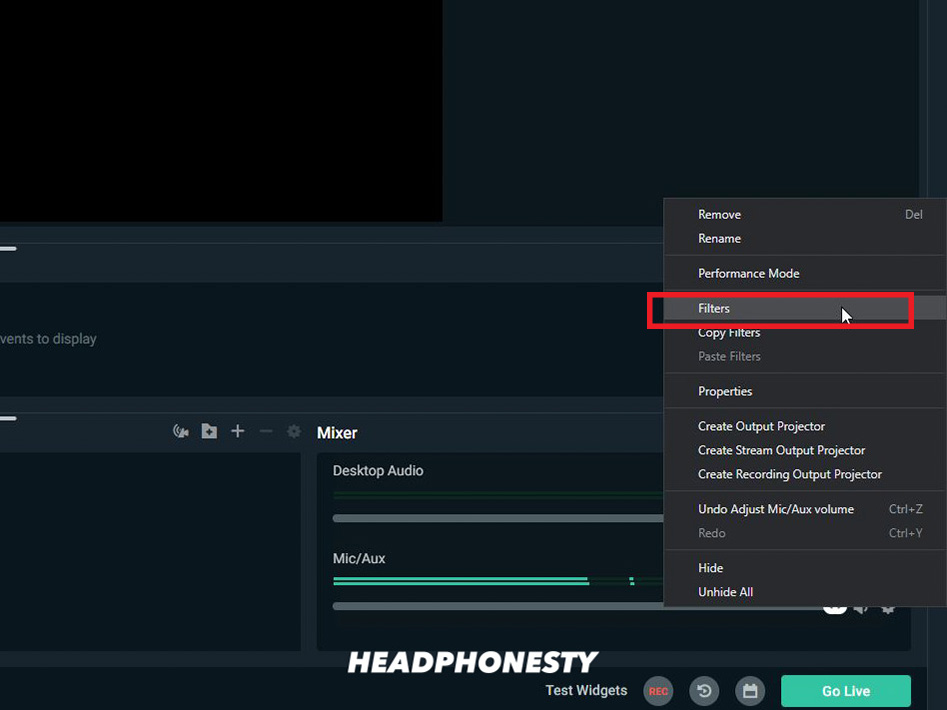
Streamlabs - Click on the wheel icon beside the speaker icon.
Select gear icon - Choose Filters.

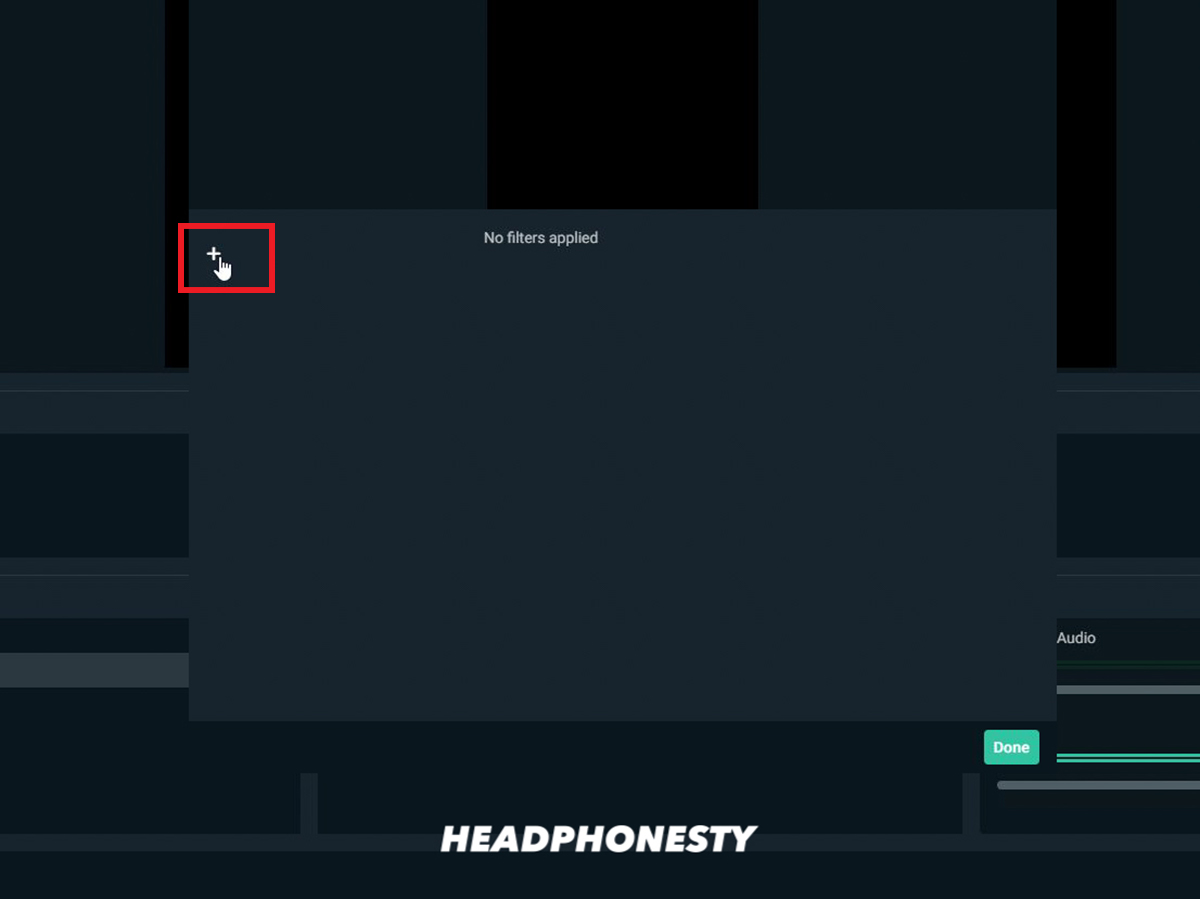
Filters - Click on the plus symbol on the right.
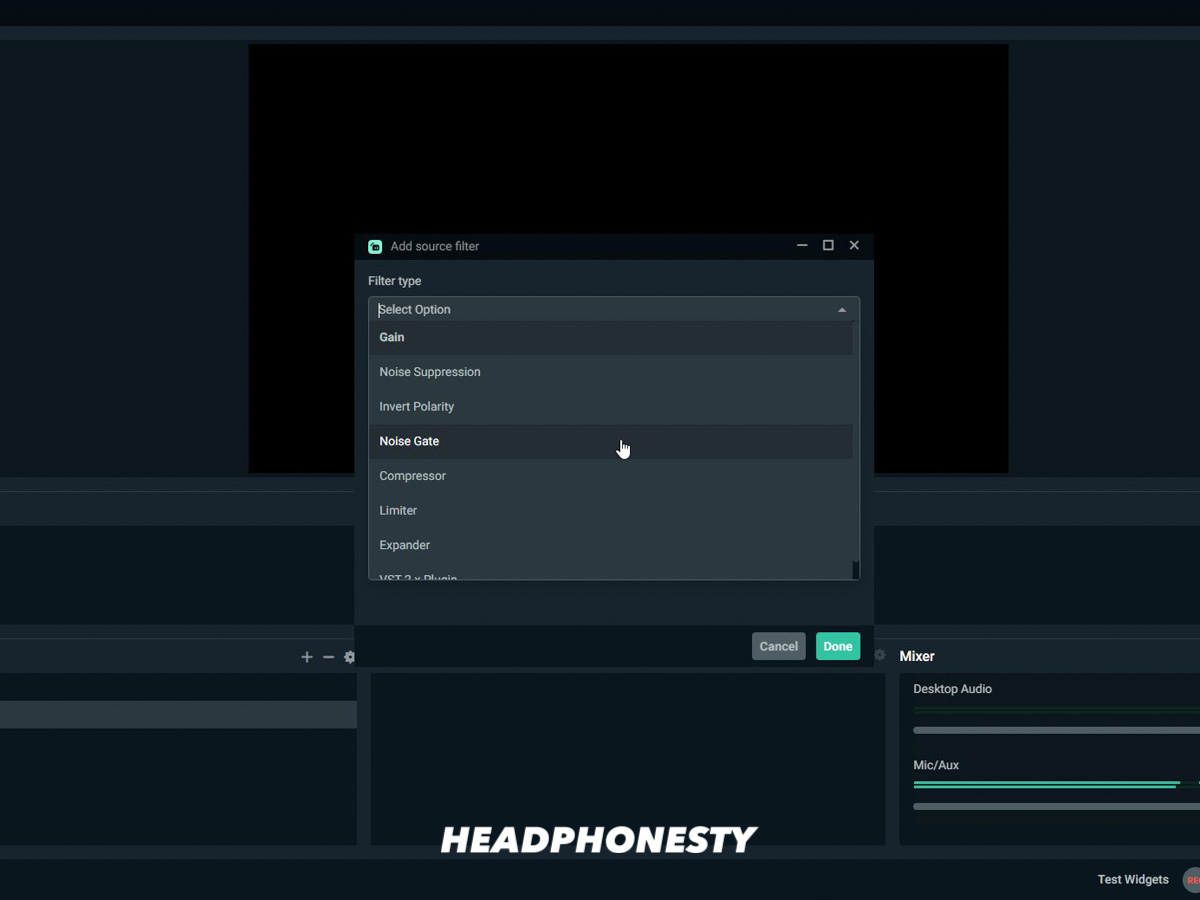
Plus symbol - Choose your Audio Filter and adjust accordingly. You can add several audio filters all at once.
List of Audio Filters

To give you a background about what the audio filters do, here is an informative rundown for each of them:
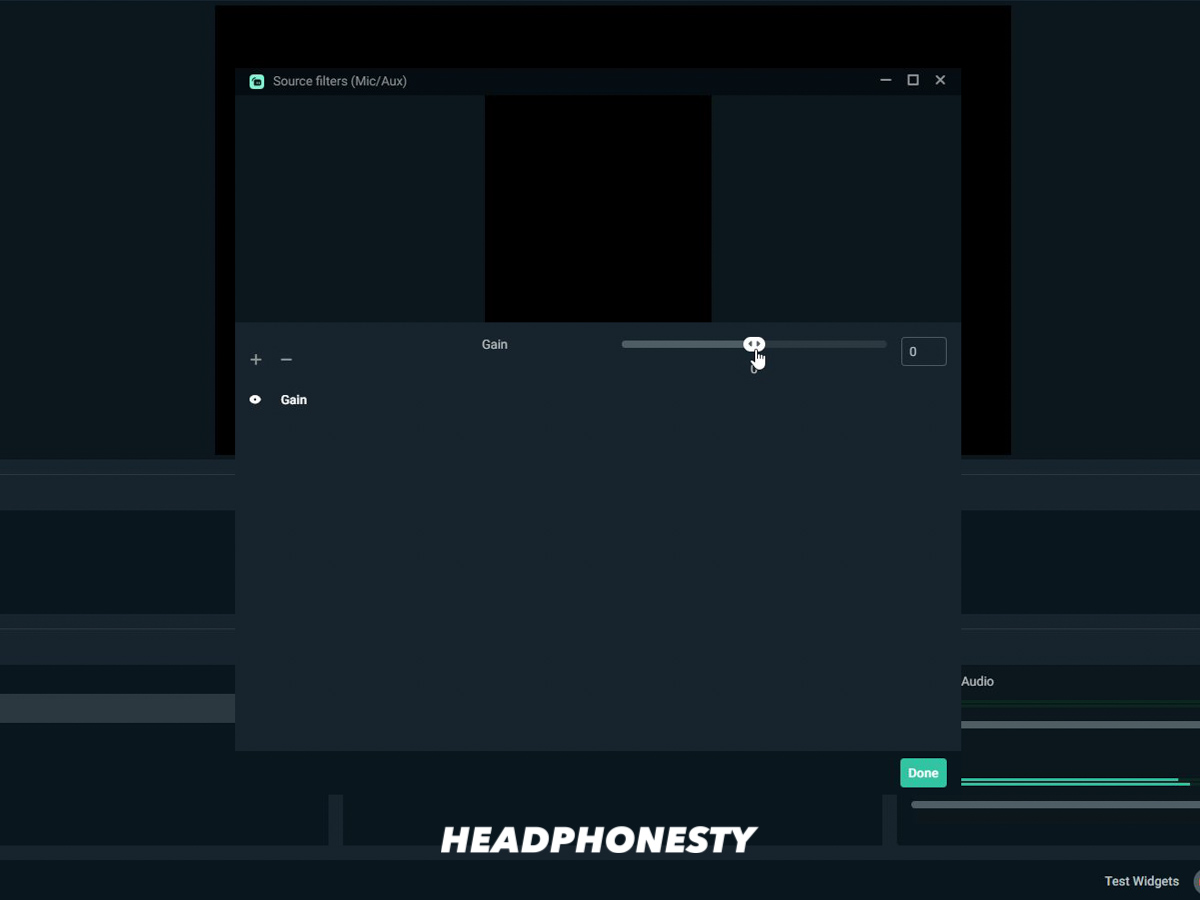
Gain
Gain refers to the volume of the audio. The higher it is, the louder your audio is. Take note, however, that the more you turn up the gain level, the more background noise will get picked up by your headset mic.
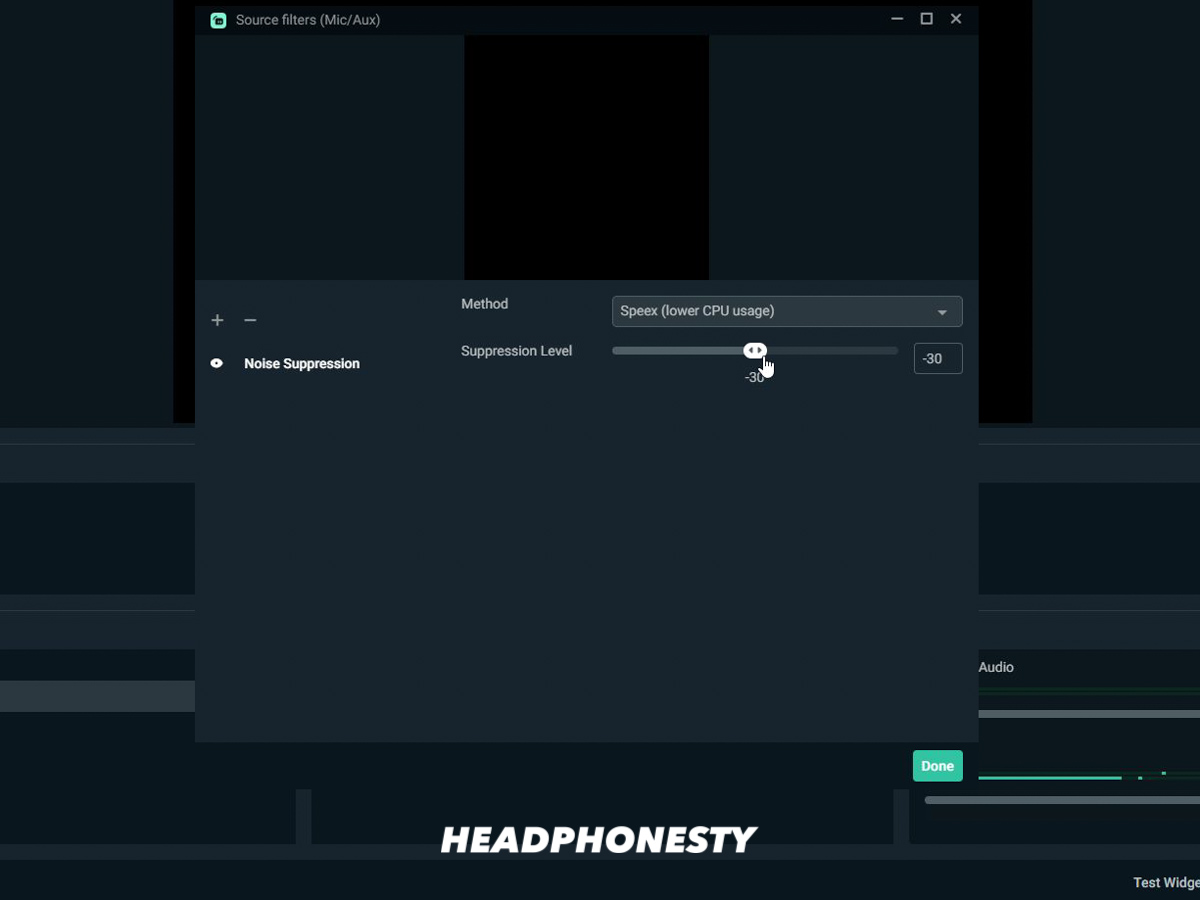
Noise Suppression
Evident from its name, the noise suppression filter cancels out ambient noise. This feature is particularly useful when you have a loud AC, a rowdy neighbor, or even a noisy sibling next door.
To use this filter without sacrificing too much of your mic quality, start the suppression level at 0. Work your way up until you can no longer hear any unnecessary background noise.
Noise Gate
Similar to Noise Suppression, the Noise Gate audio filter also blocks out background noise. Keyboard typing sounds and mouse clicking noises can get pretty loud especially when you’re under the intense heat of the gameplay. This feature can filter out these kinds of noises.
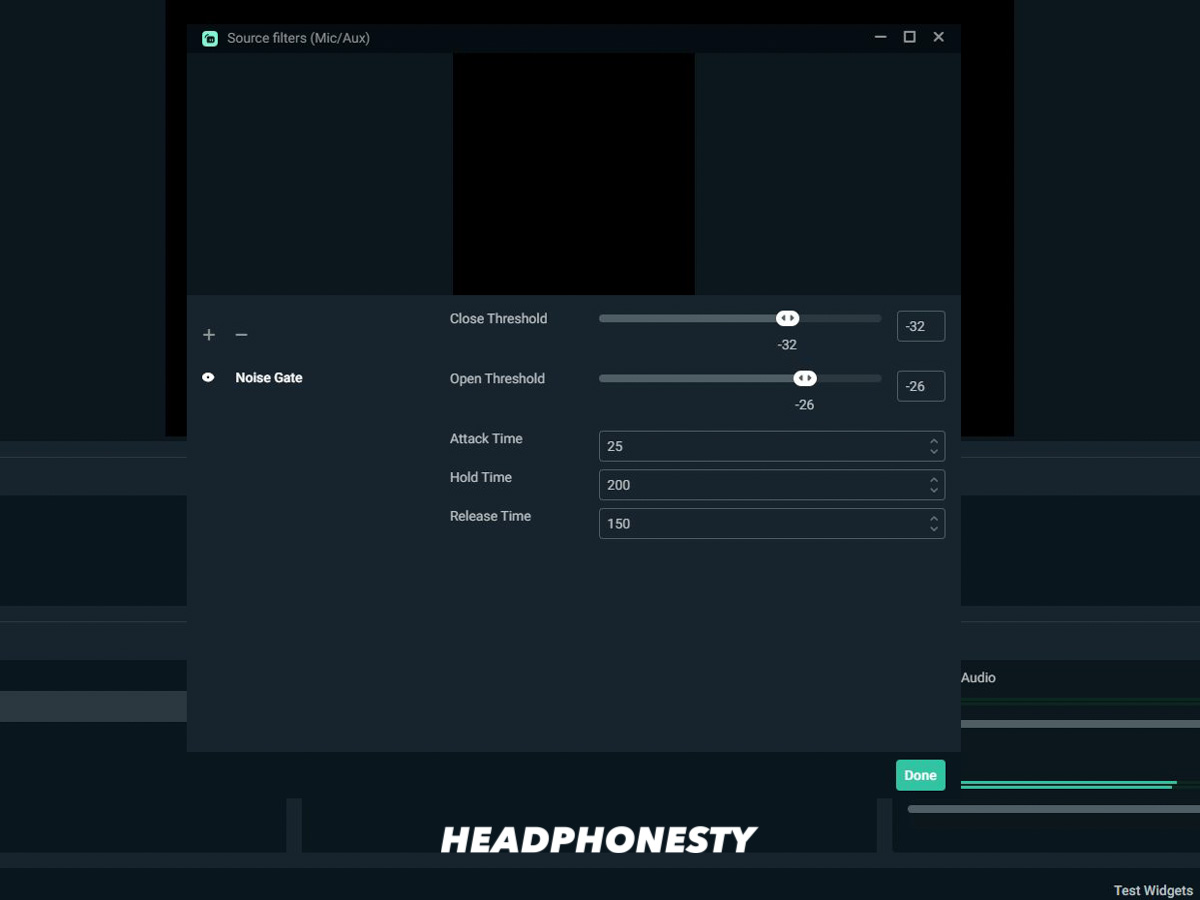
Moreover, unlike noise suppression, this filter provides more customizable settings. These are:
- Open Threshold: This feature allows you to set the minimum decibel (dB) level that needs to be met before your headset microphone picks up the sound.
For example, if you set it at -30 dB, the microphone will only pick up sounds that are -30 dB and above. So if the typing and clicking sounds are lower than -30 dB, the microphone won’t pick it up.
- Close Threshold: This feature allows you to set a specific dB level in which your microphone audio will get deactivated. For example, if you set it at -35 dB, your mic won’t pick up any sound once the audio input drops below -35 dB.
Streamlabs recommends setting your Close Threshold at least five dB below your Open Threshold.
- Attack Time: This refers to the time when the Noise Gate feature will activate when the Open Threshold is met.
- Hold Time: This refers to the time the mic stays active after the input sound drops below the Close Threshold.
- Release time: This refers to the time it takes for the mic to mute again once the input sound drops below the Close Threshold. Like the two preceding features, this is measured in milliseconds.
Compressor
This filter ensures that very loud noises will not get transmitted to your live stream at its full volume. This is especially useful when there’s a lot of yelling and shouting in the middle of gameplay. This filter automatically decreases the volume level of loud noises at a specific maximum dB.
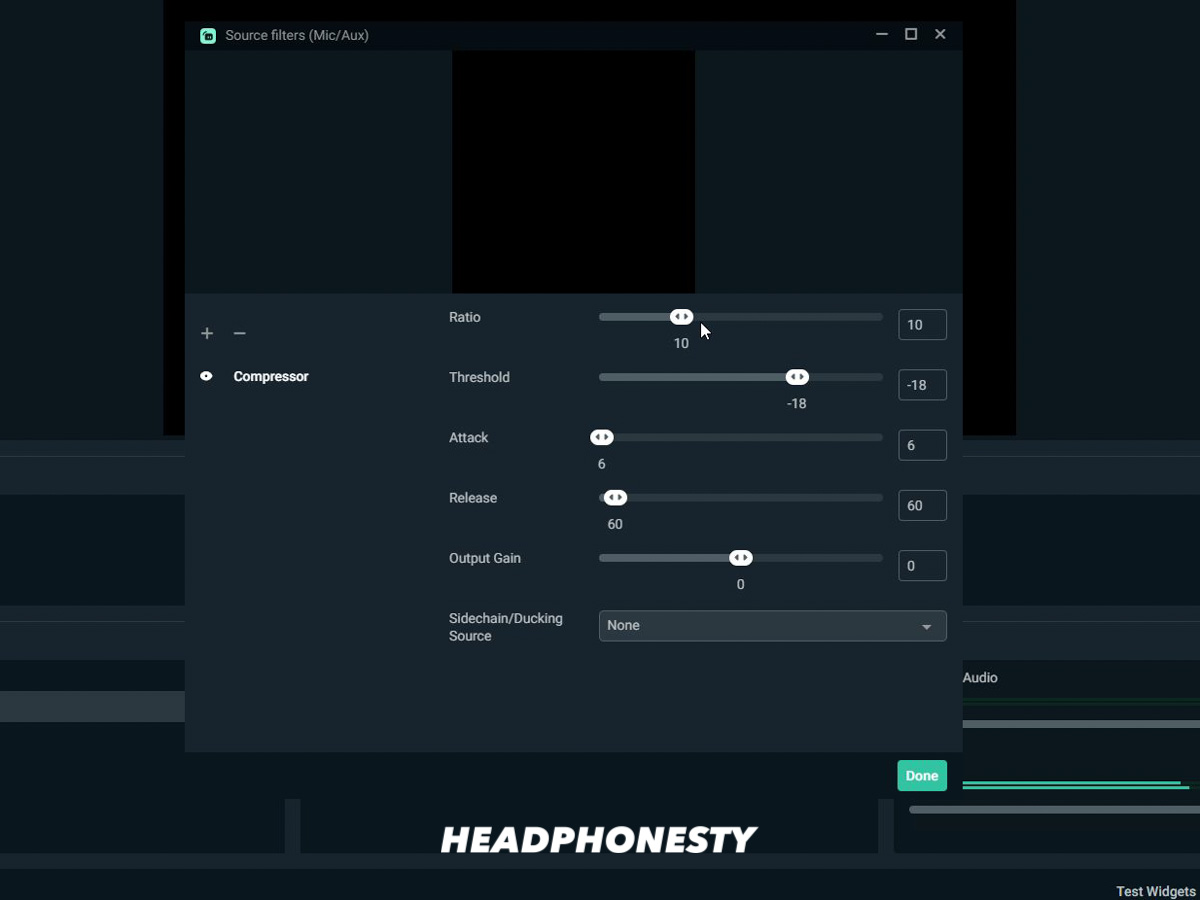
This filter can be further customized as follows:
- Ratio: This refers to the amount of compression that is applied whenever an audio input goes beyond the Compression Threshold. The lower you set it, the lower the compression gets, and vice versa.
- Threshold: This refers to the maximum audio input threshold that you want to apply. The filter will only be activated when the audio reaches beyond the set Compression Threshold.
- Attack: This refers to the time frame between the audio input exceeding the set threshold and the activation of the filter.
- Release: This refers to the time frame between the audio input level dropping below the set threshold and the deactivation of the filter.
- Output Gain: Applying this feature will bring the average range of the audio back to its normal volume level.
- Sidechain compression: This tool allows you to lower the volume of your desktop audio whenever you’re speaking. When you stop speaking, the desktop audio goes back up to its normal volume level.
Expander
Similar to the compression filter, this filter applies gain reduction to an audio input. However, the difference is that this tool applies it below the threshold and not above it. Simply put, it makes quiet sounds quieter.
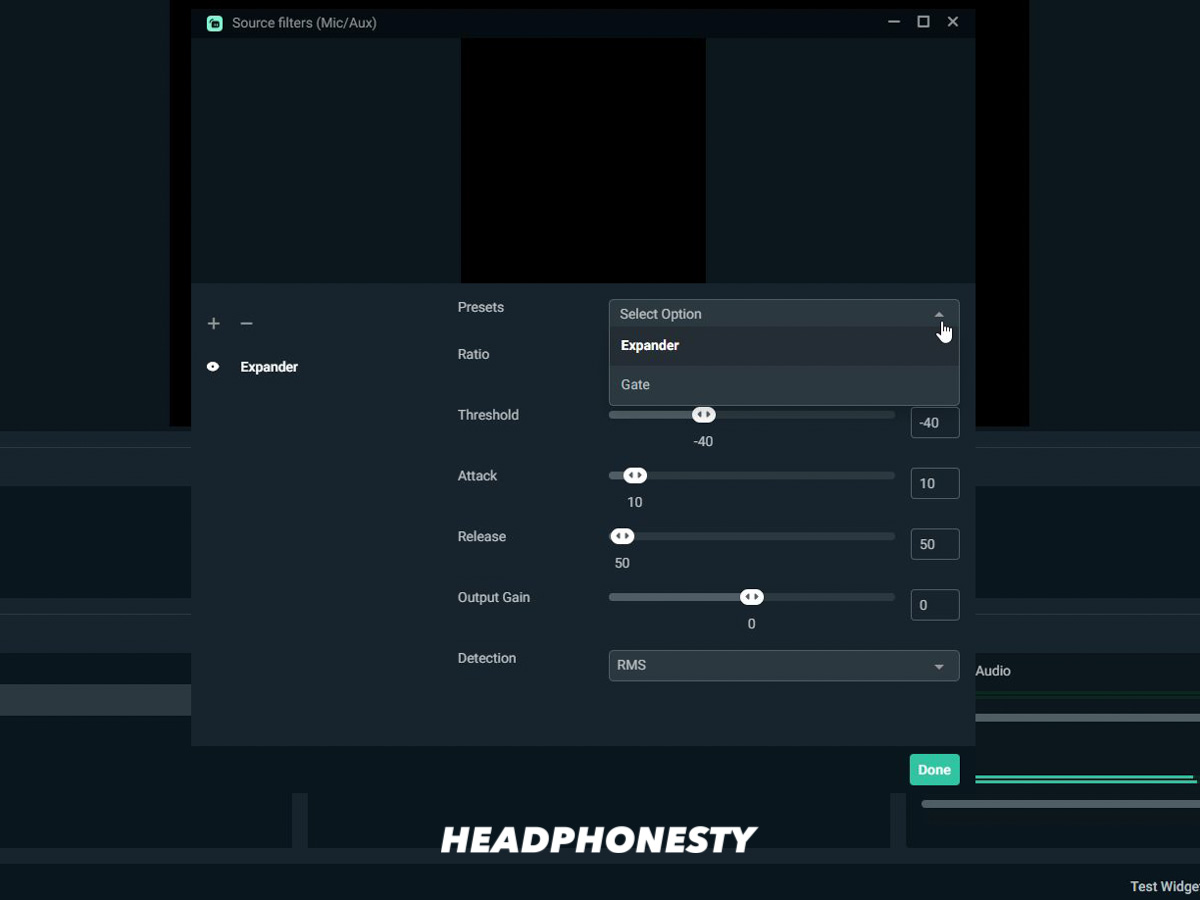
This filter has the following presets:
Expander Preset –This preset features a low ratio and low release time. It is ideal for light noise reduction.
Gate Preset –This preset features a high ratio and a high release time. It is ideal for high noise reduction.
If you want to alter the presets, you can play around with the following customizable settings:
- Ratio: Refers to the degree of expansion that would be applied once the audio signal goes below the set threshold.
Suggested ratios:
- Light Noise Reduction: 2:1
- Balanced Noise Reduction: 4:1 (highly-recommended)
- High Noise Reduction: 10:1 (This ratio will completely decrease the loudness of your audio input)
- Threshold: This refers to the level at which the expander will stop gain reducing the audio signal. For better mic quality, start from the lowest point. Go higher until you fully get rid of the noise. Be careful of setting it too high lest your voice quality might get distorted.
- Attack: This refers to the time frame between the audio signal exceeding the set threshold and the activation of the expander.
- Release: This refers to the time frame between the audio signal dropping below the set threshold and the deactivation of the expander.
- Output Gain: This is an optional feature that you can use if you want to increase the output level of your expander filter.
- Detection: This feature allows you to change how the input level is measured. It affects the sensitivity of threshold detection. It can either be detected via RMS or Peak.
- RMS: This feature averages the input level measurements over the last 10 ms. It produces a smoother audio flow by preventing the unnecessary activation of the expander due to sudden noise peaks. (recommended)
- Peak: This feature doesn’t average input level measurements, unlike RMS. It makes the filter faster to react to input level changes.
Limiter
This limiter filter is another kind of compressor that prevents audio signals from peaking beyond 0 dB. It has a very fast attack and ratio.
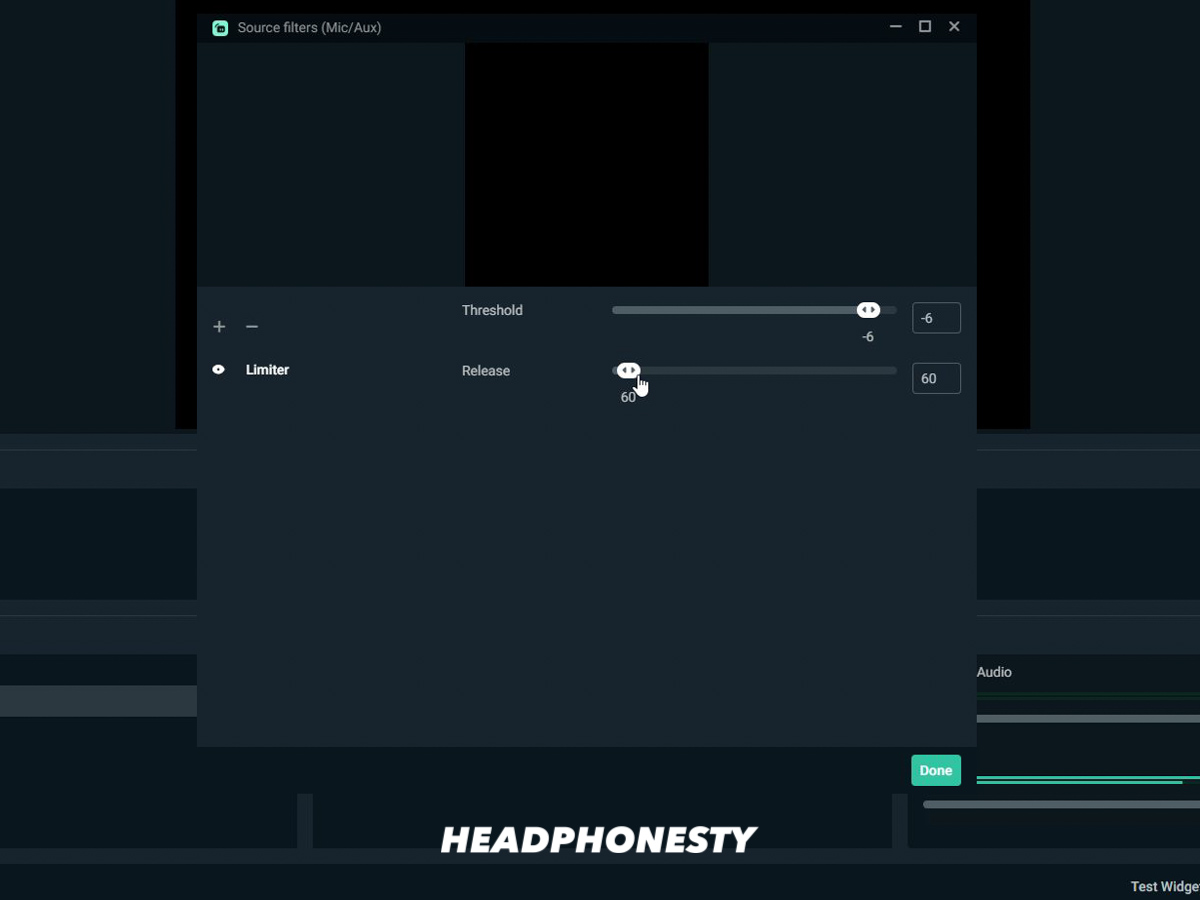
- Threshold: This sets the maximum output level that an audio signal can hit.
- Release: This refers to the time frame between the audio signal dropping below the set threshold and the deactivation of the limiter.
Conclusion
As discussed, many factors can affect your mic audio quality. Tracking the problem down to its source and addressing it from there will make all the difference.
Now, you can enjoy accurate and super-directional mic audio without having to worry about audio feedback and echoes. Moreover, you can now do high-quality live streams with top-notch audio quality. No more annoying static sounds and stuttering voices.
We hope that this article helped you make your headset mic sound better. If you have any comments or suggestions, let us know in the section below.