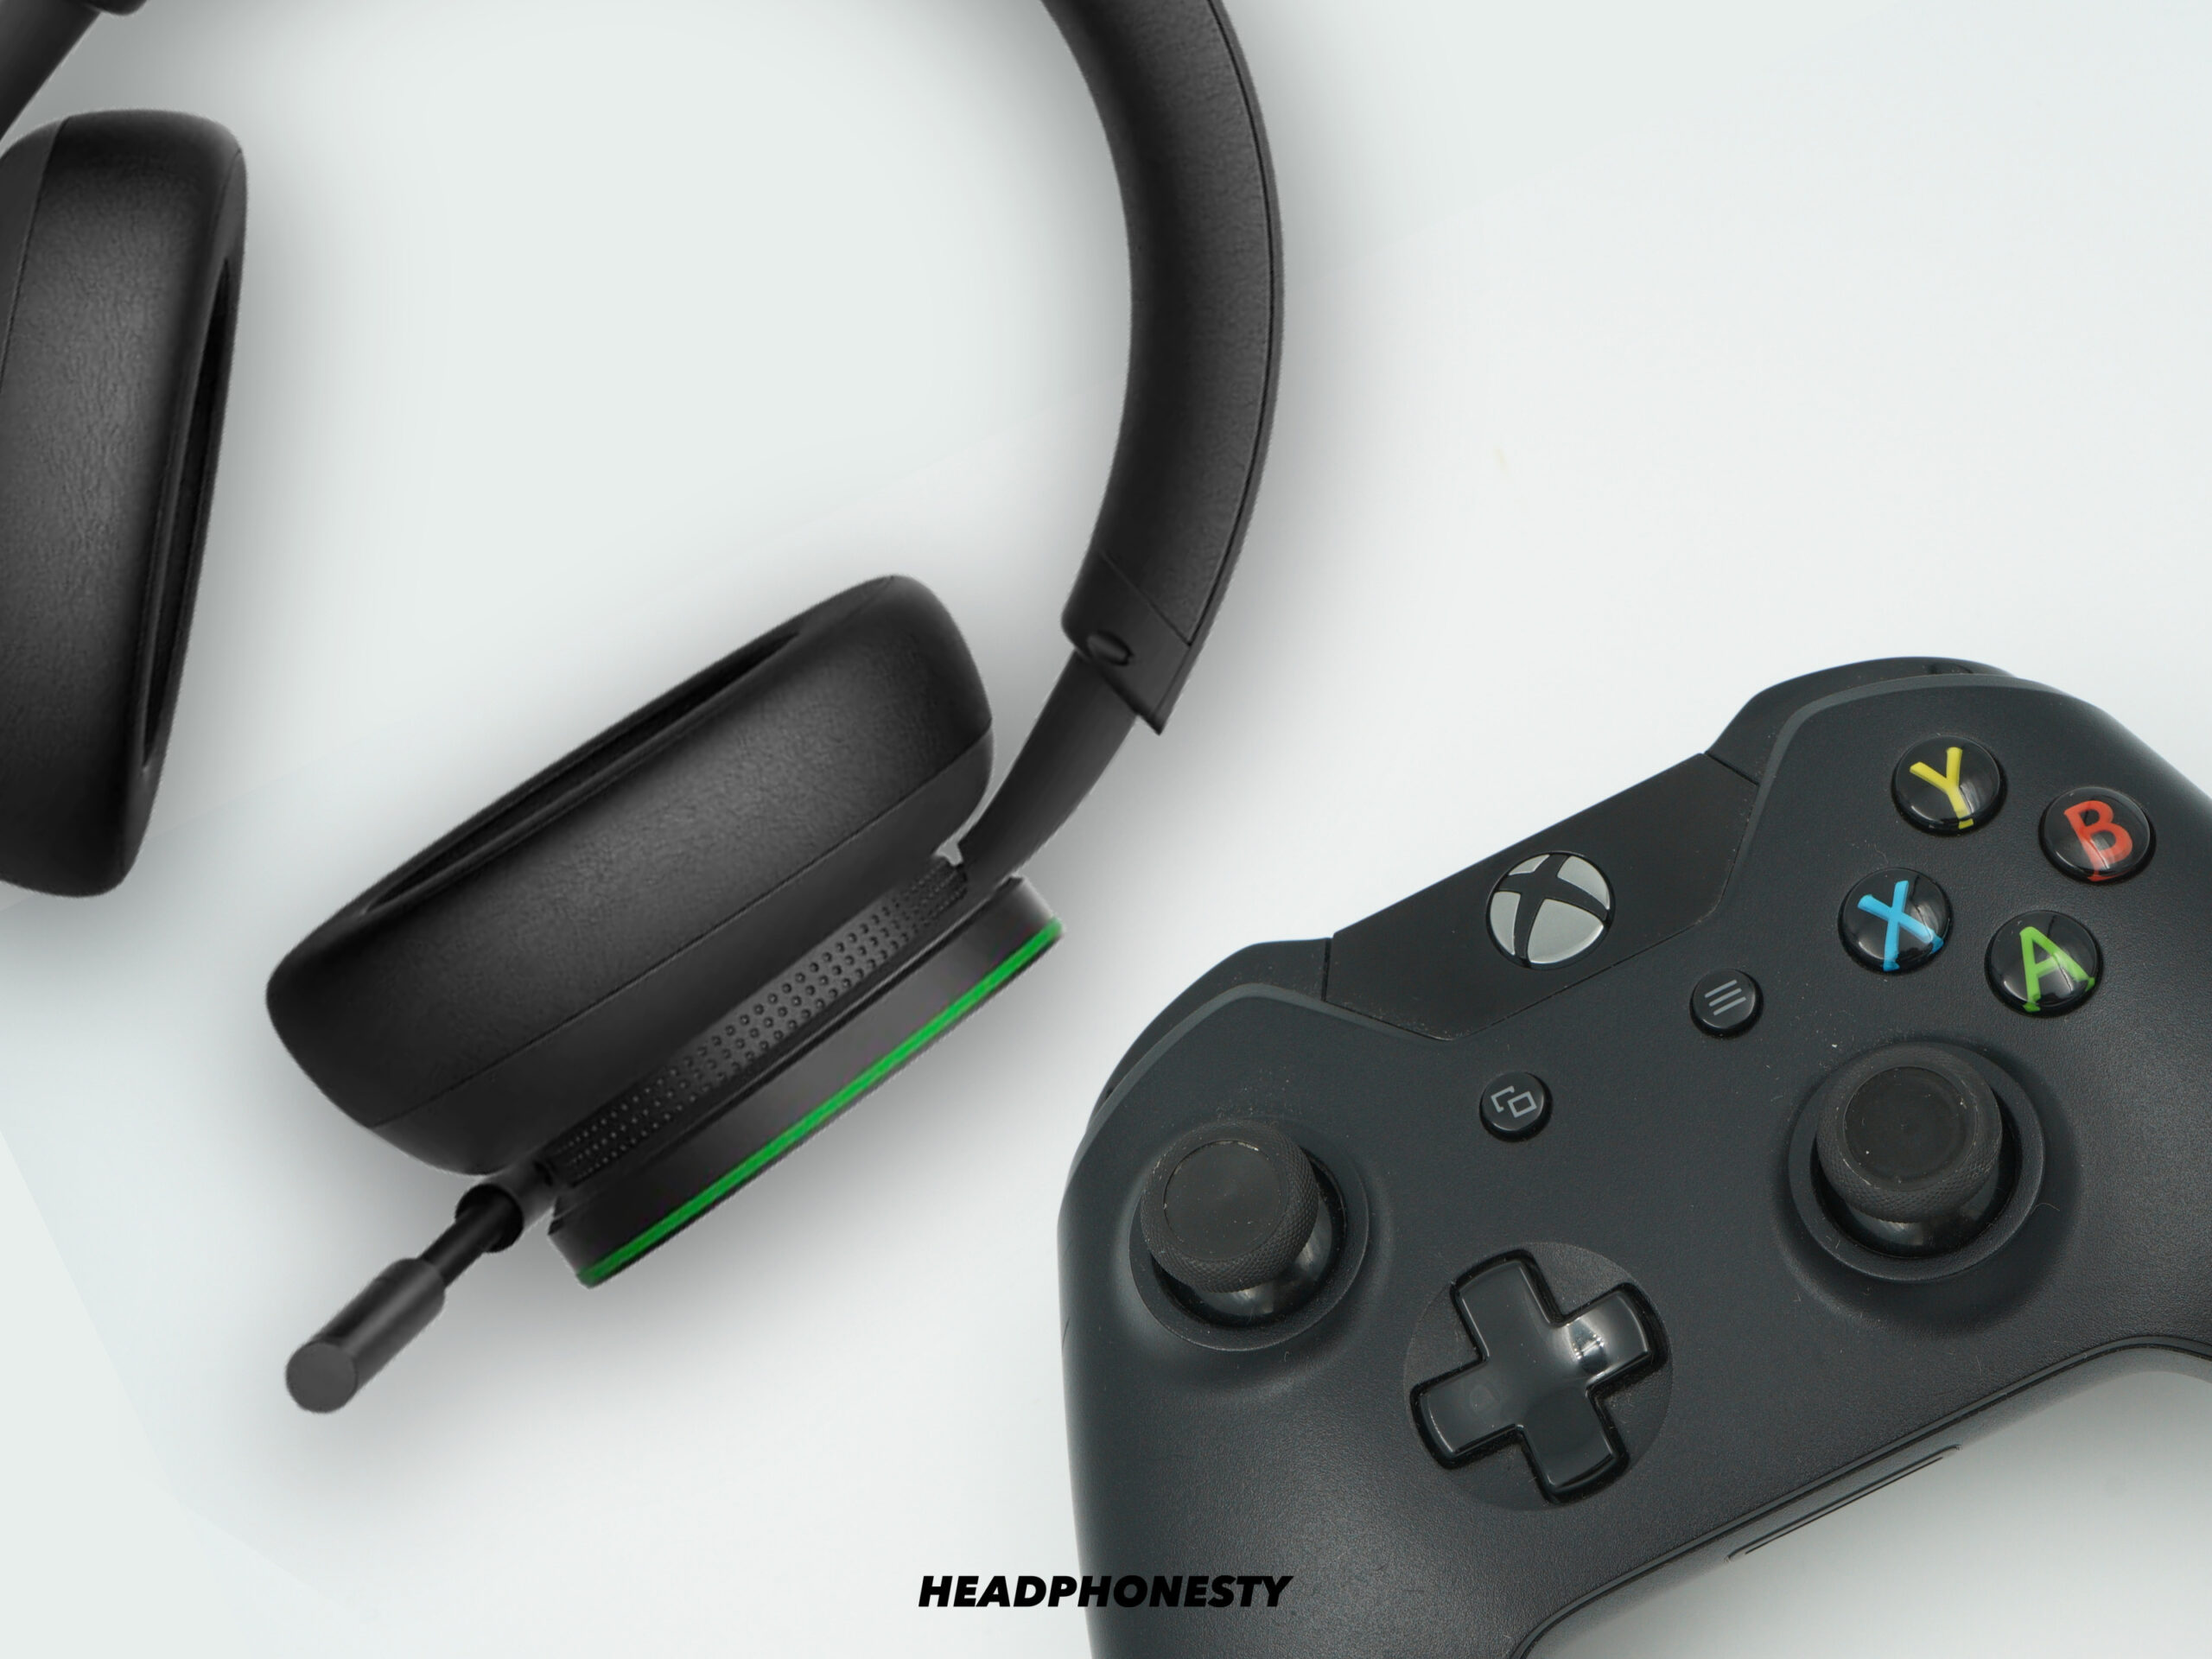
We break down the most common Xbox Series X and S audio issues and how to fix them.
Xbox Series X and S headsets provide seamless compatibility with Xbox consoles. They also deliver low-latency audio performance using Bluetooth and Xbox Wireless, Microsoft’s proprietary wireless protocol.
Despite this, some Xbox-compatible headsets can still encounter audio issues that ruin the gaming experience. These range from audio dropouts to connection and disconnection problems.
Luckily, there are ways to address these annoying inconveniences. Read on as we break down the most common audio issues in Xbox Series X and S headsets, what causes them, and how to resolve them once and for all!
- 1. How to Fix Audio Cutting Out on Xbox Series X or S
- 2. How to Fix Distorted Audio on Xbox Series X or S
- 3. How to Fix Audio Crackling on Xbox Series X or S
- 4. How to Fix Mic Not Working on Xbox Series X or S
- 5. How to Fix Headset Not Connecting on Xbox Series X or S
- 6. How to Fix Headset Disconnections on Xbox Series X or S
- Conclusion
1. How to Fix Audio Cutting Out on Xbox Series X or S
When playing on Xbox, audio dropouts will happen if you’re inactive or idle for ten seconds or longer. In such cases, your in-game audio may start stuttering or drop out altogether. Fortunately, hitting any button on your controller will resolve this issue and get your audio back.
Conversely, if your headset audio cuts in and out during gameplay, you could be dealing with a firmware issue.
Outdated firmware compromises your controller’s functionality, including how they transmit audio when connected to a headset. Since they lack the necessary updates and patches, it causes these devices to perform erratically, which in turn, leads to audio lags and dropouts.
Update your firmware
Here’s how to update your controller’s firmware:
- On the Xbox Home screen, go to Profile & system > Settings

Profile & system settings (From: YouTube/Insider Tech) - Go to Devices & connections > Accessories.
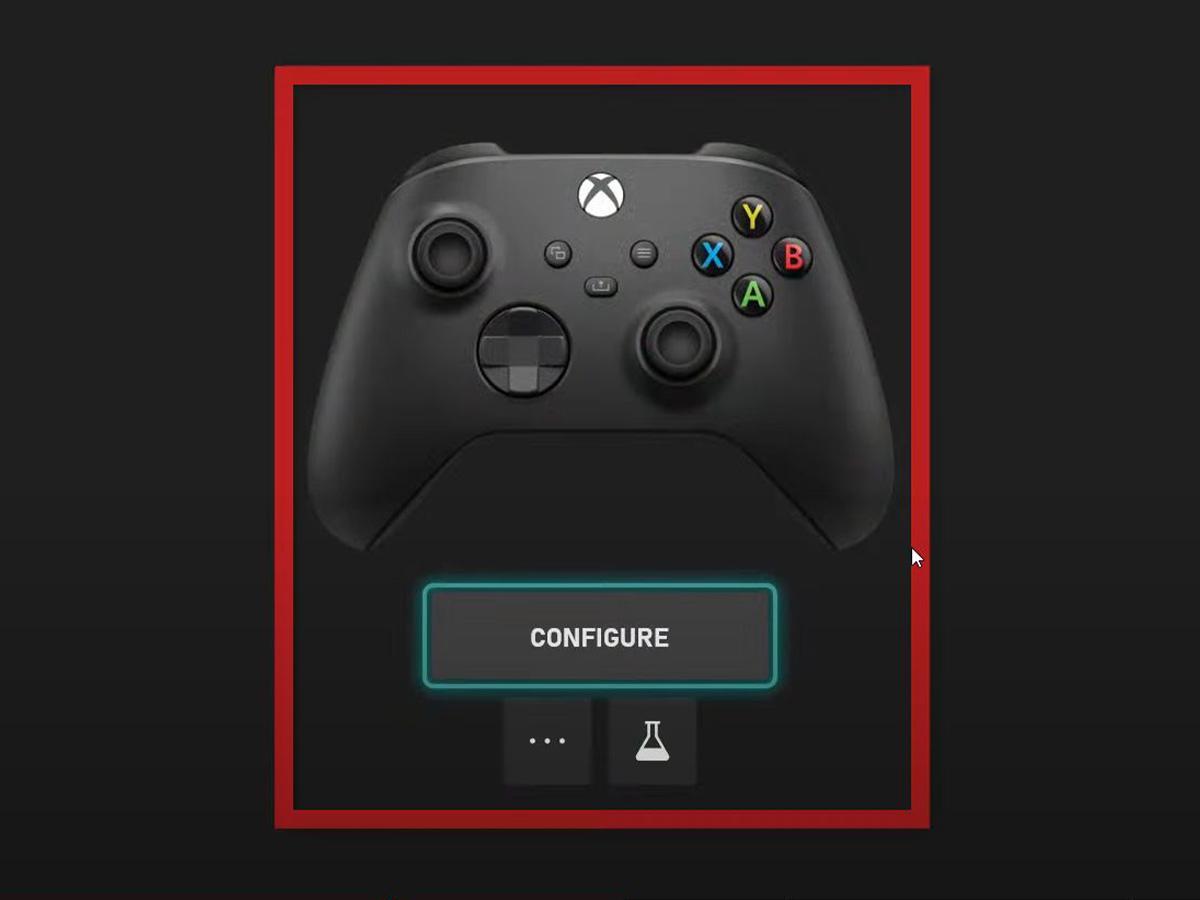
Opening Accessories option (From: YouTube/Insider Tech) - Choose your controller from the options.
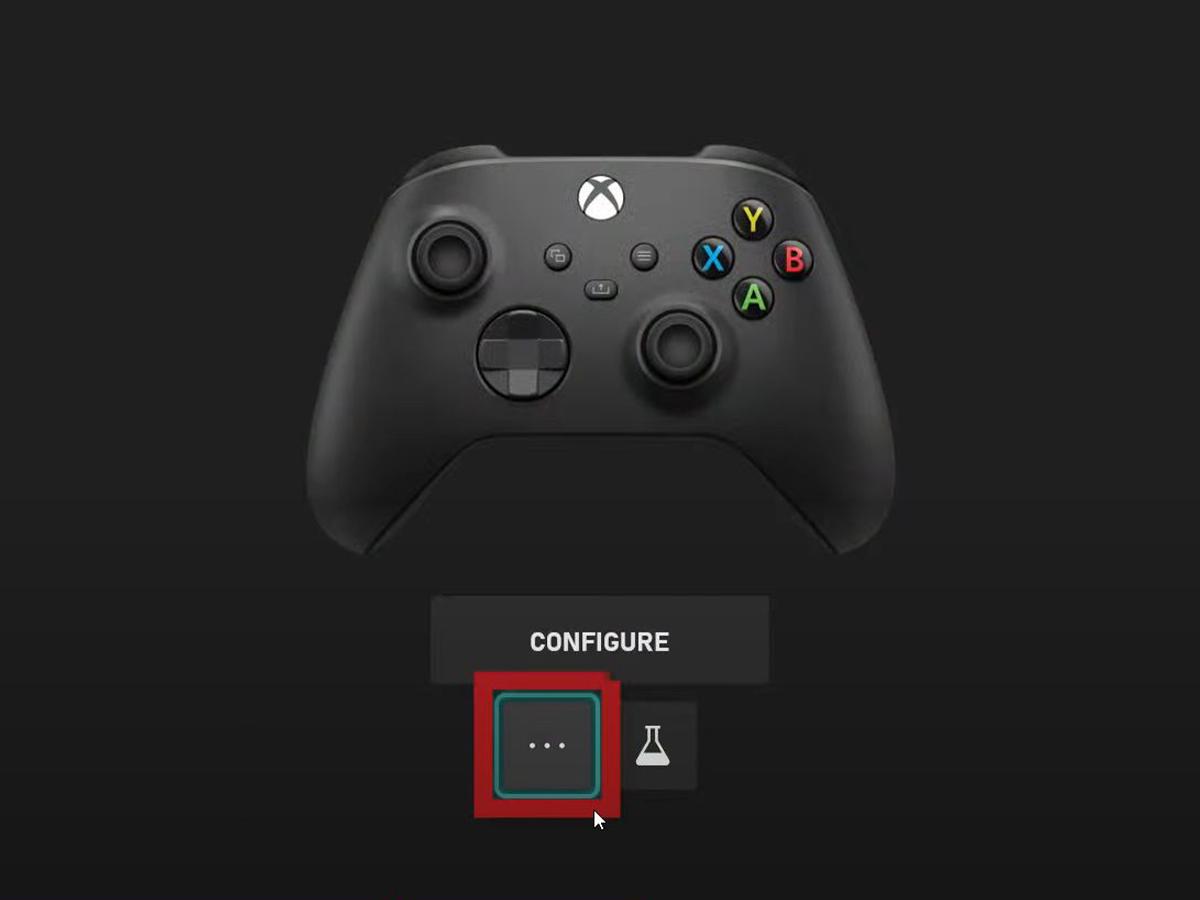
Choose your controller from the options. (From: YouTube/Insider Tech) - Choose “…” to view the firmware version.
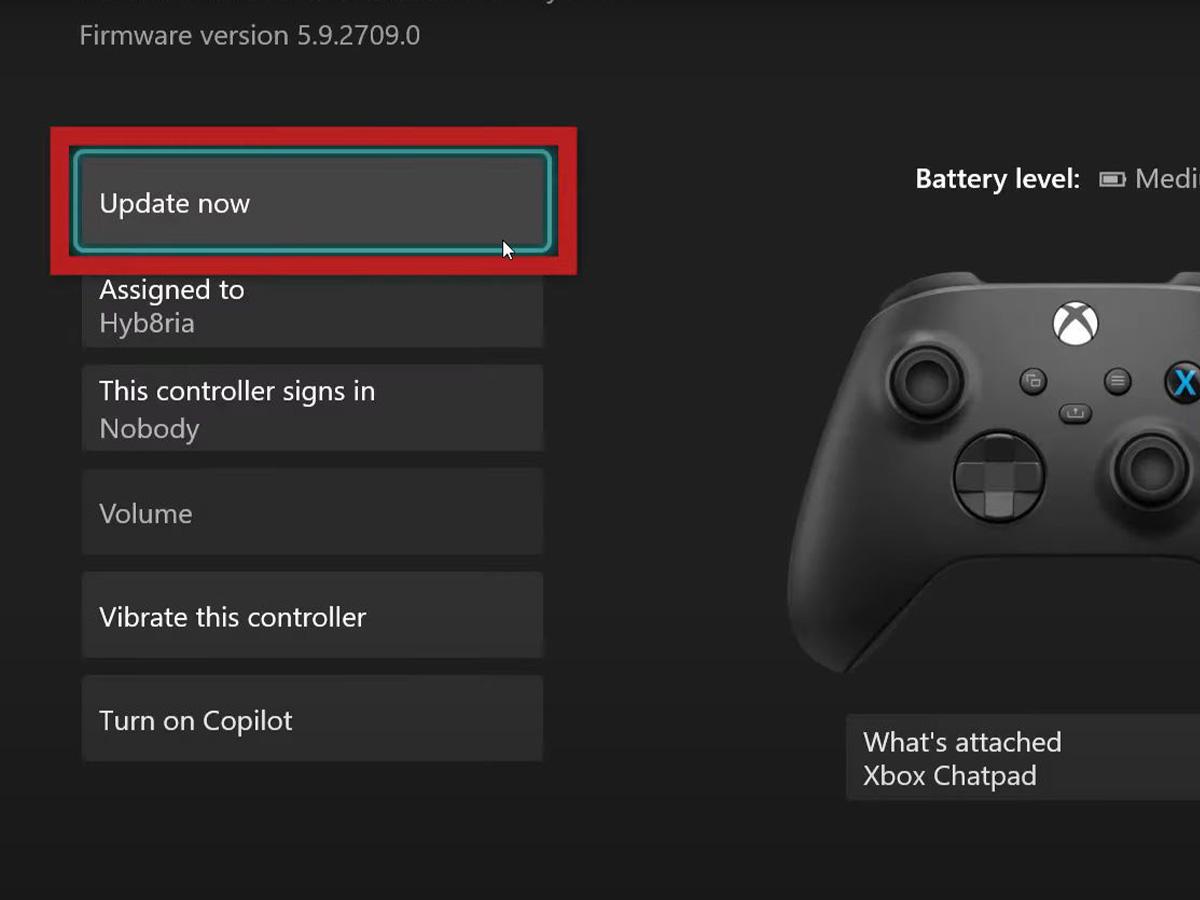
Viewing Xbox firmware version. (From: YouTube/Insider Tech) - Choose Update now to download the new firmware version.
Updating Xbox firmware. (From: YouTube/Insider Tech)


Other fixes you can try
To address the issue of audio cutting in and out, and avoid future occurrences, try the following fixes:
- Charge your headset’s battery: When your headset’s battery is running low, it doesn’t have the power to perform tasks correctly. This often affects audio transmission, which can sound choppy. Luckily, you can easily fix this issue by charging your headsets or replacing their batteries.
- Adjust your distance: Bluetooth 5.0 has a range of up to 240 meters. Despite this, you can still experience signal interference from obstructions like walls or desks between you and your console. To avoid wireless signal interference, free your console from any obstructions and ensure it’s within a reasonable distance of your headset.
- Remove any unnecessary wireless devices: The presence of other active Bluetooth devices, like smart gadgets or personal health monitors, can cause signal crosstalk that affects your audio quality. If possible, limit the number of wireless devices around your console to avoid such occurrences.
- Refresh your internet connection: A fast, reliable internet connection is essential for gaming. Without it, you can experience audio issues during gameplay. That said, try turning your modem on and off to refresh your internet connection. You can also contact your local ISP to see whether they’re experiencing network problems or downtime.
- Upgrade your Bluetooth adapter: If your Bluetooth adapter doesn’t use the same Bluetooth version or support the same Bluetooth audio codecs as your headset, you may encounter issues resulting in audio cutting in and out. In such cases, consider buying a new adapter with updated specs.
2. How to Fix Distorted Audio on Xbox Series X or S
Sometimes, your Xbox headset audio may sound randomly distorted or garbled. This is often accompanied by audio stutters or lags you can’t fix by simply turning the headset off and on. In such cases, damaged speakers or incorrect audio EQ settings are usually the cause. That said, here are some solutions you can try:
Reset your headset’s EQ levels
If your EQ levels are unbalanced such that, for instance, your bass or treble is too high, you can experience audio distortions. Here’s how to reset them:
- Press the Xbox button on your controller.

Pressing the Xbox button on a controller - Go to Profile & system > Settings
Profile & system settings (From: YouTube/Insider Tech) - Choose Devices & connections > Accessories.
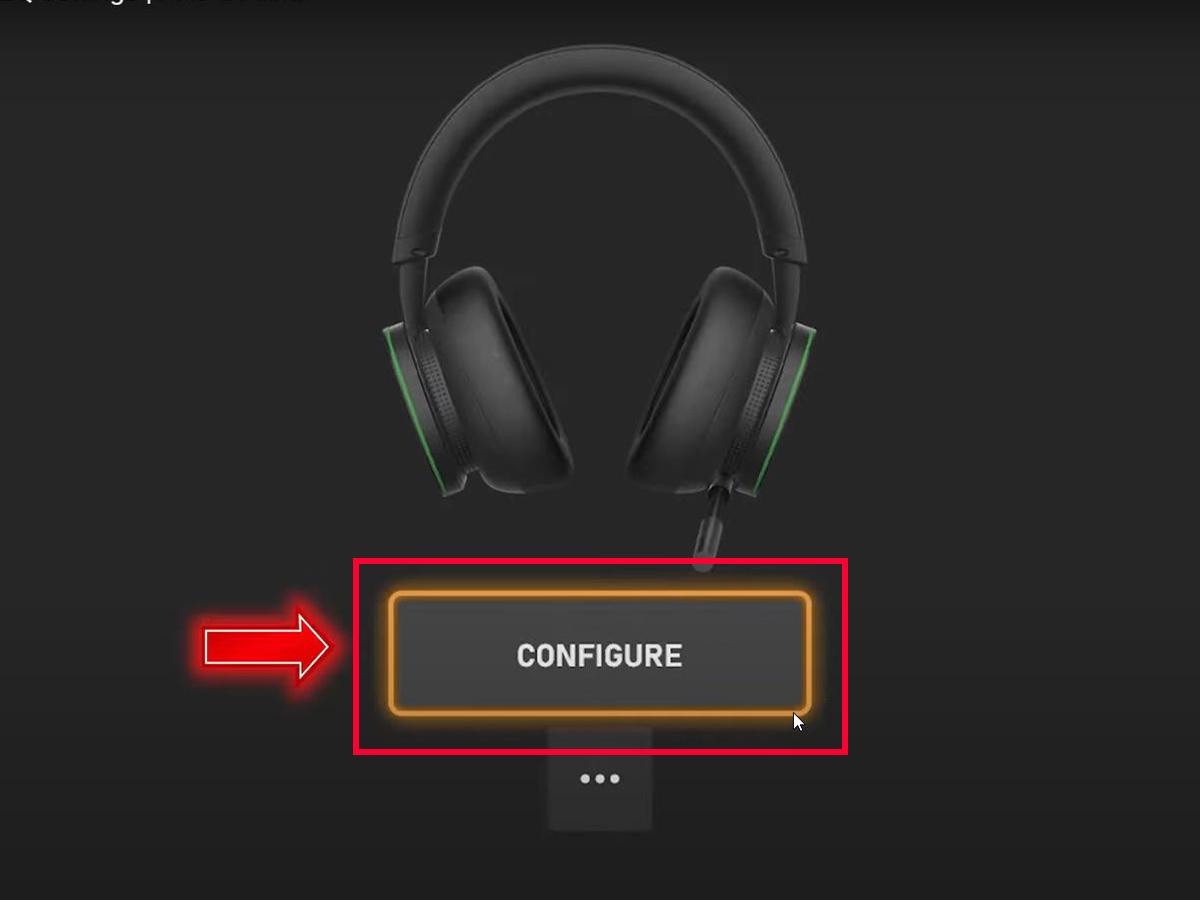
Opening Accessories option (From: YouTube/Insider Tech) - Choose your headset and select Configure.
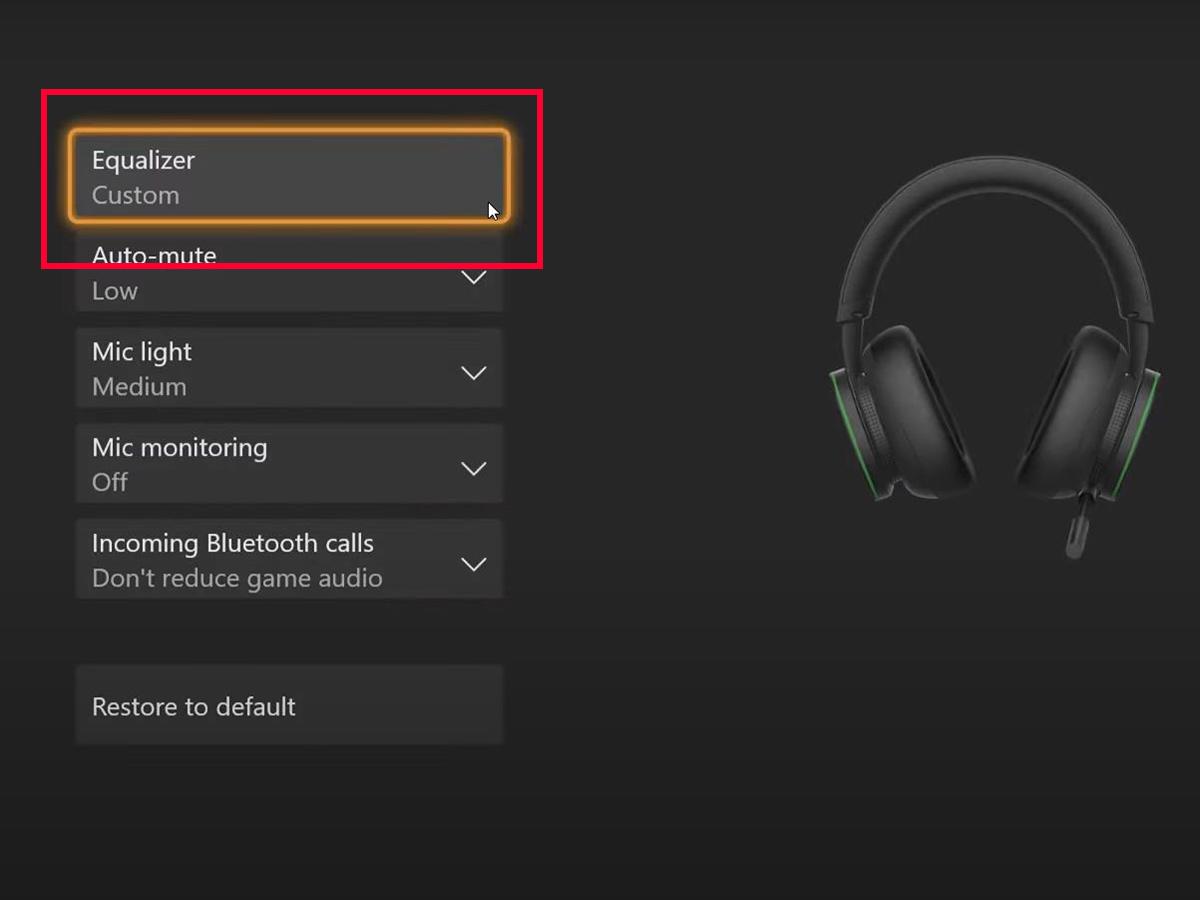
Configuring headsets on Xbox (From: YouTube/LAS Curry) - Choose Equalizer and set the levels to default.
Choose Equalizer and set the levels to default. (From: YouTube/LAS Curry)


Other fixes you can try
In addition to the solution above, you can also try the following fixes:
- Update your firmware.
- Restart your headset and Xbox console by turning them off and on again.
- Replace damaged headset speakers: If you prefer turning your headset volume high, you could blow out a driver, which can cause crackling sounds. If that happens, you can try DIY-ing your headset by opening the ear cup, removing the damaged speaker, and replacing it with a new one.
3. How to Fix Audio Crackling on Xbox Series X or S
If you’re experiencing audio that sporadically crackles or sounds staticky and robotic, you may be dealing with some system settings and hardware issues. This can arise due to system glitches or network connection instability.
Your Xbox console’s system can become bogged down with cache files over time, especially if you’ve paired it with multiple devices. This can create temporary bugs that cause glitches in your system or devices, affecting audio quality. Similarly, an unstable network connection can result in audio issues like crackles and pops.
That said, here are some solutions you can try to address glitches and network difficulties:
- Power cycle your Xbox console and modem
- Factory reset your Xbox console
- Reset your Xbox console’s network settings
- Other fixes you can try
Power cycle your Xbox console and modem
Power cycling involves turning your console off and disconnecting it from a power source. It’s a simple solution but often helps reboot your console and resolve any glitches. Here’s how to power cycle your Xbox console:
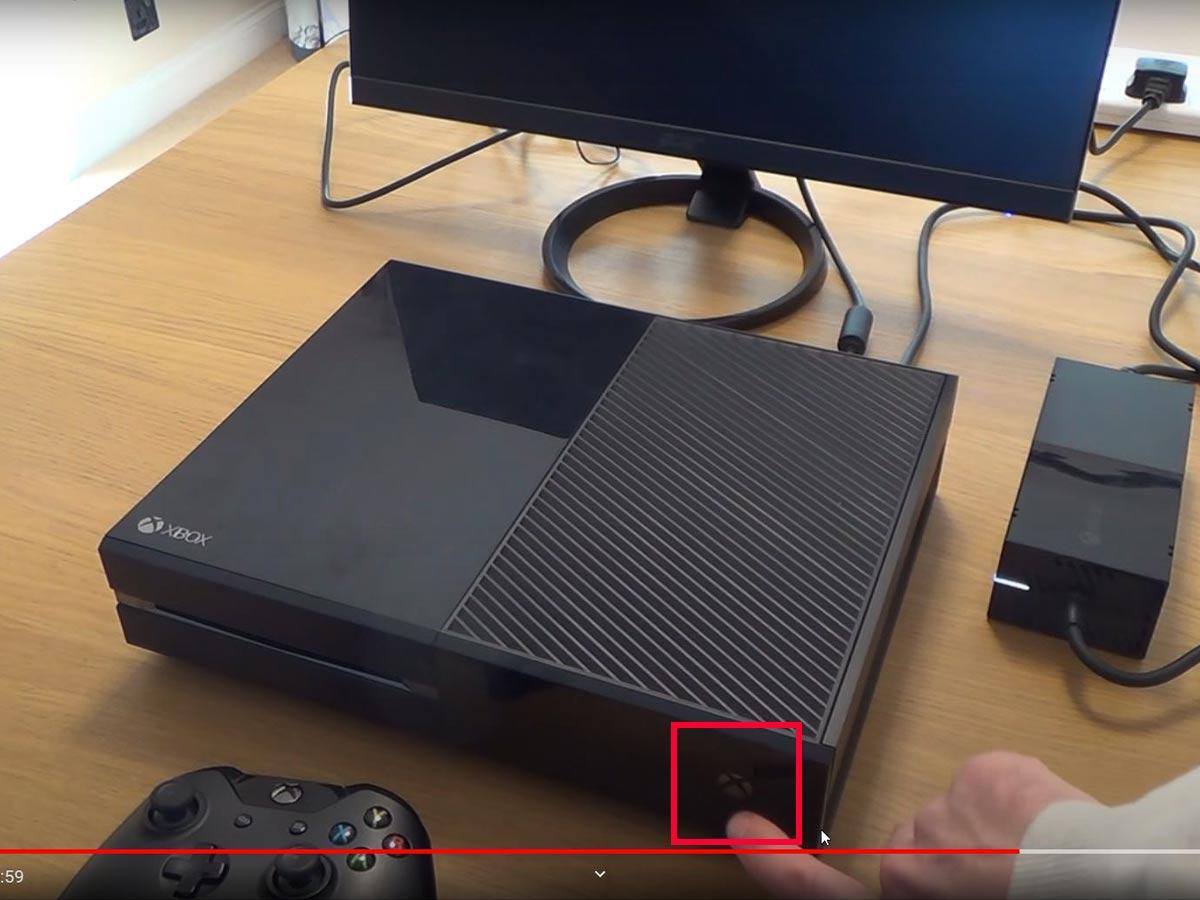
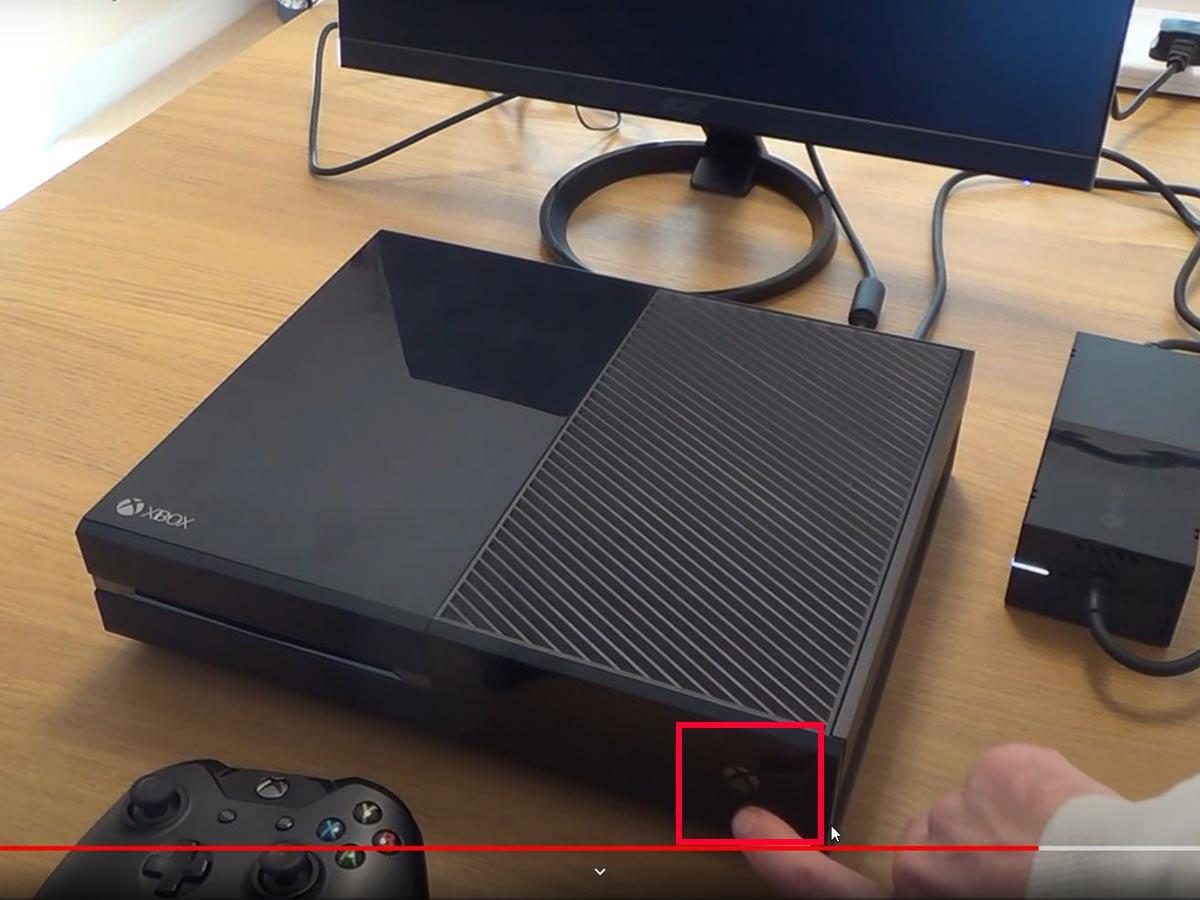
- Press your console’s Xbox button for 10 seconds to shut it off.
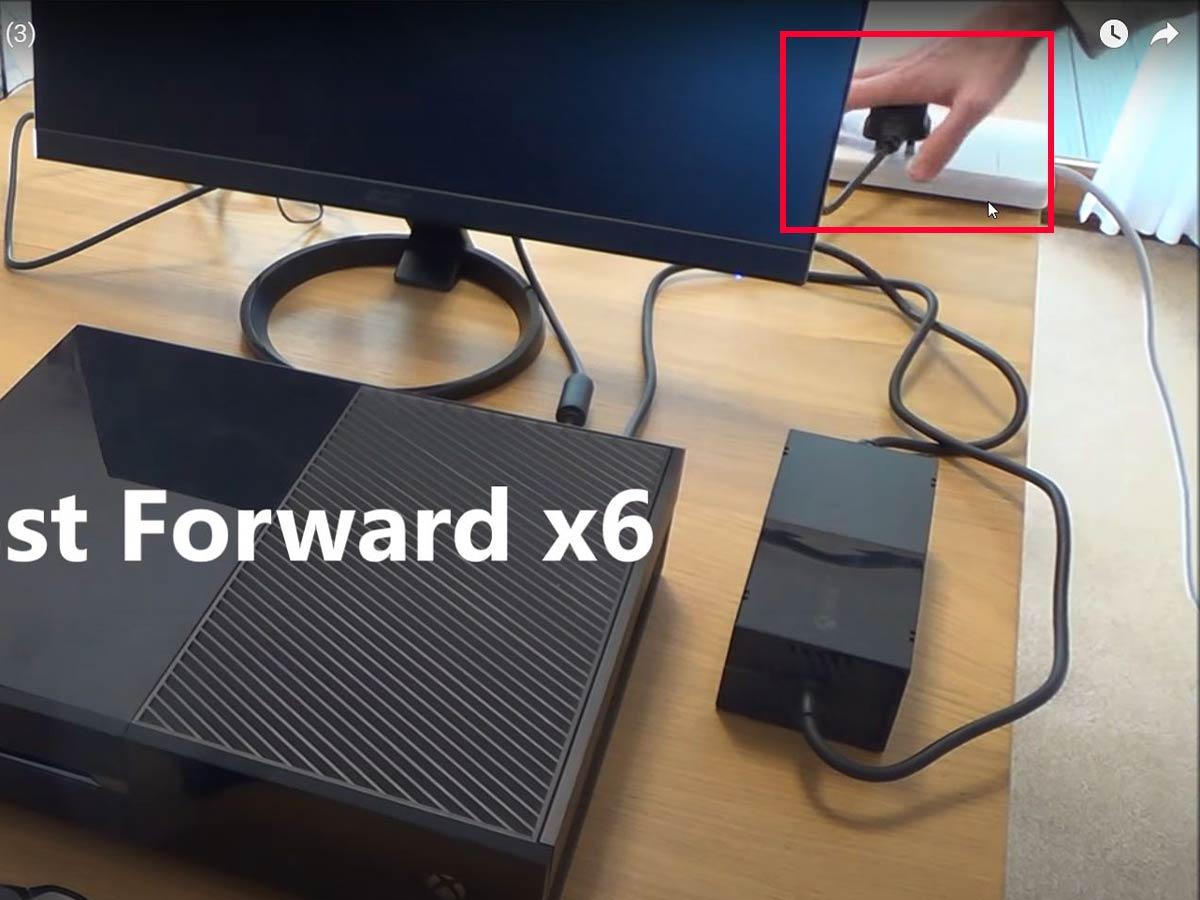
Press your console’s Xbox button for 10 seconds. (From: YouTube/My Mate VINCE) - Unplug your console’s power cable from the source.
Unplug your console’s power cable from the source. (From: YouTube/My Mate VINCE) - Turn off your internet connection.
- Wait for at least two minutes, then replug the console.
Replug the console. (From: YouTube/My Mate VINCE) - Hit the power button on the console and restore internet then wait for the console to restart.
Hit the power buttons on the console . (From: YouTube/My Mate VINCE)


Factory reset your Xbox console
A factory reset is a quick way to refresh your Xbox’s system and erase any glitch-causing bugs. Here’s how to do it:
- Press the Xbox button on the controller.
Pressing the Xbox button on a controller. - Go to Profile & system > Settings
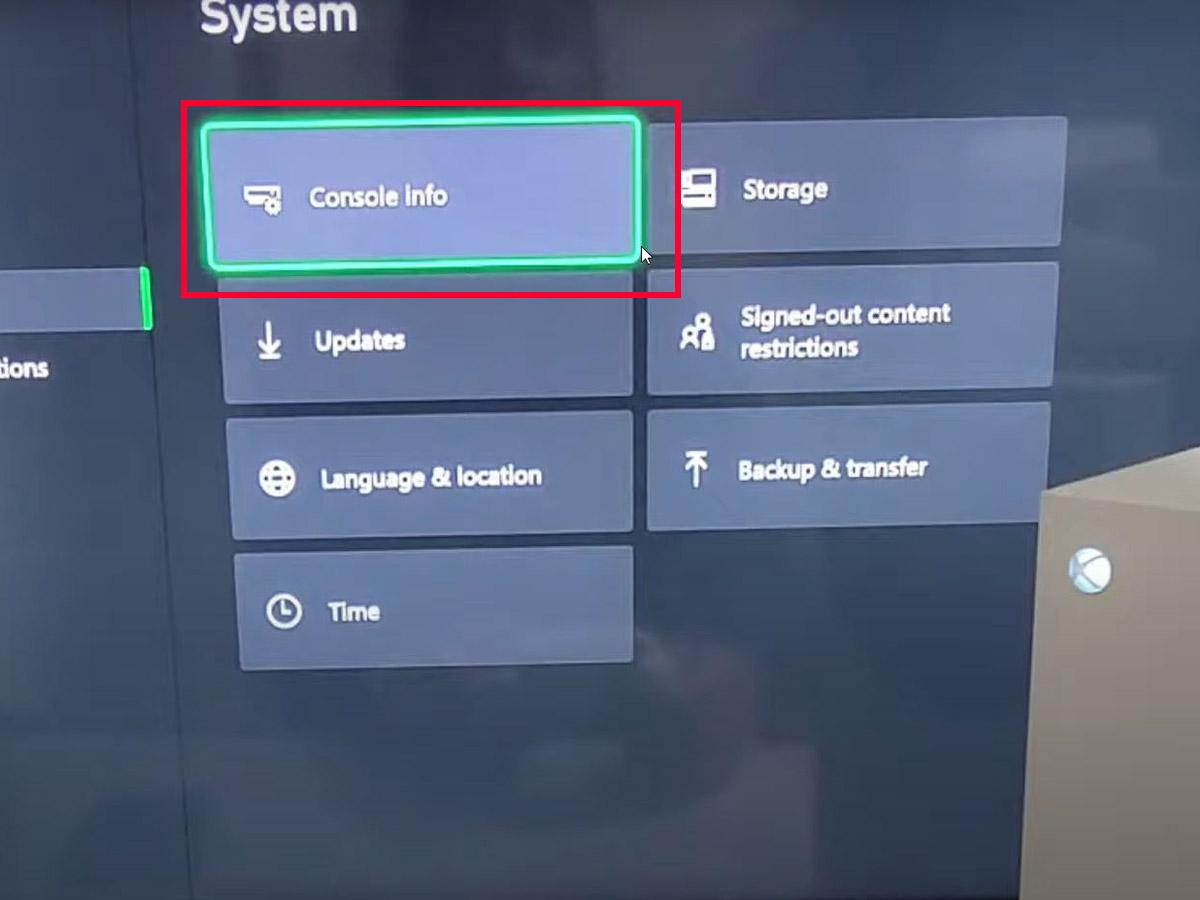
Profile & system settings (From: YouTube/ Insider Tech) - Choose System > Console info.
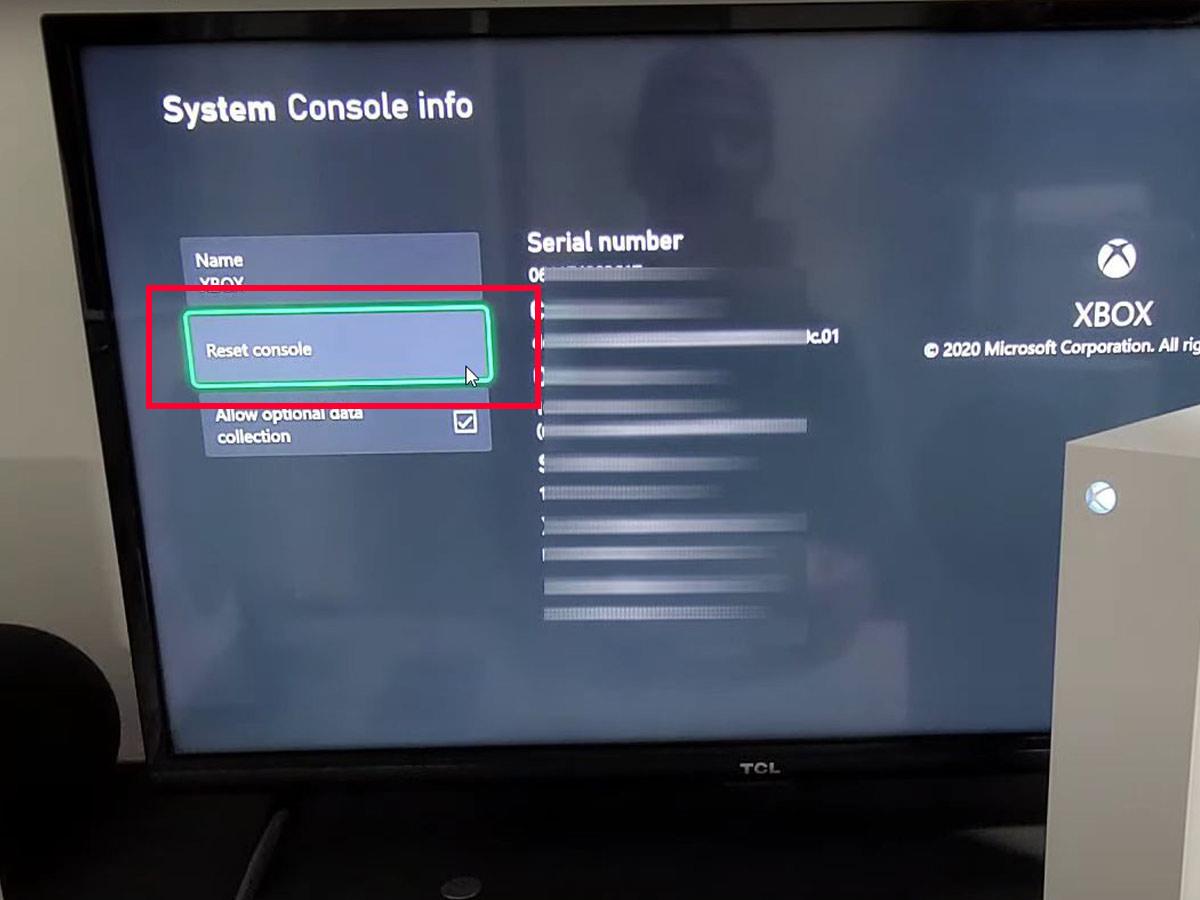
Accessing Console info. (From: YouTube/WorldofTech) - Choose Reset console.
Choose Reset console. (From: YouTube/WorldofTech) - Choose between Reset and remove everything or Reset and keep my games & apps.
Choosing resetting options (From: YouTube/WorldofTech)


Reset your Xbox console’s network settings
Resetting your network settings can refresh a faulty or unstable connection that could be causing crackling audio. Follow the steps below to reset your console’s network settings:
- Press the Xbox button on your controller.
Press the Xbox button. - Go to Profile & system > Settings.
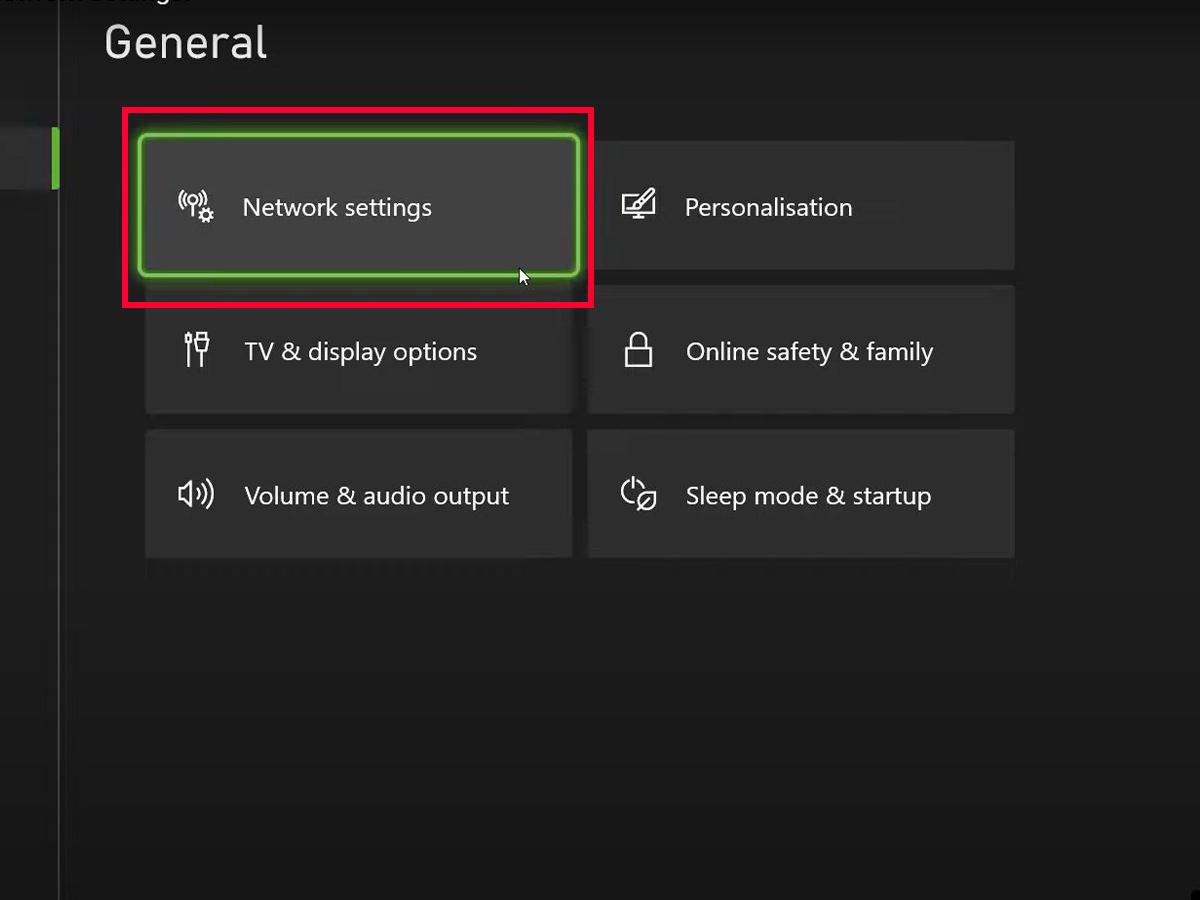
Profile & system settings (From: YouTube/Insider Tech) - Choose Network > Network Settings.
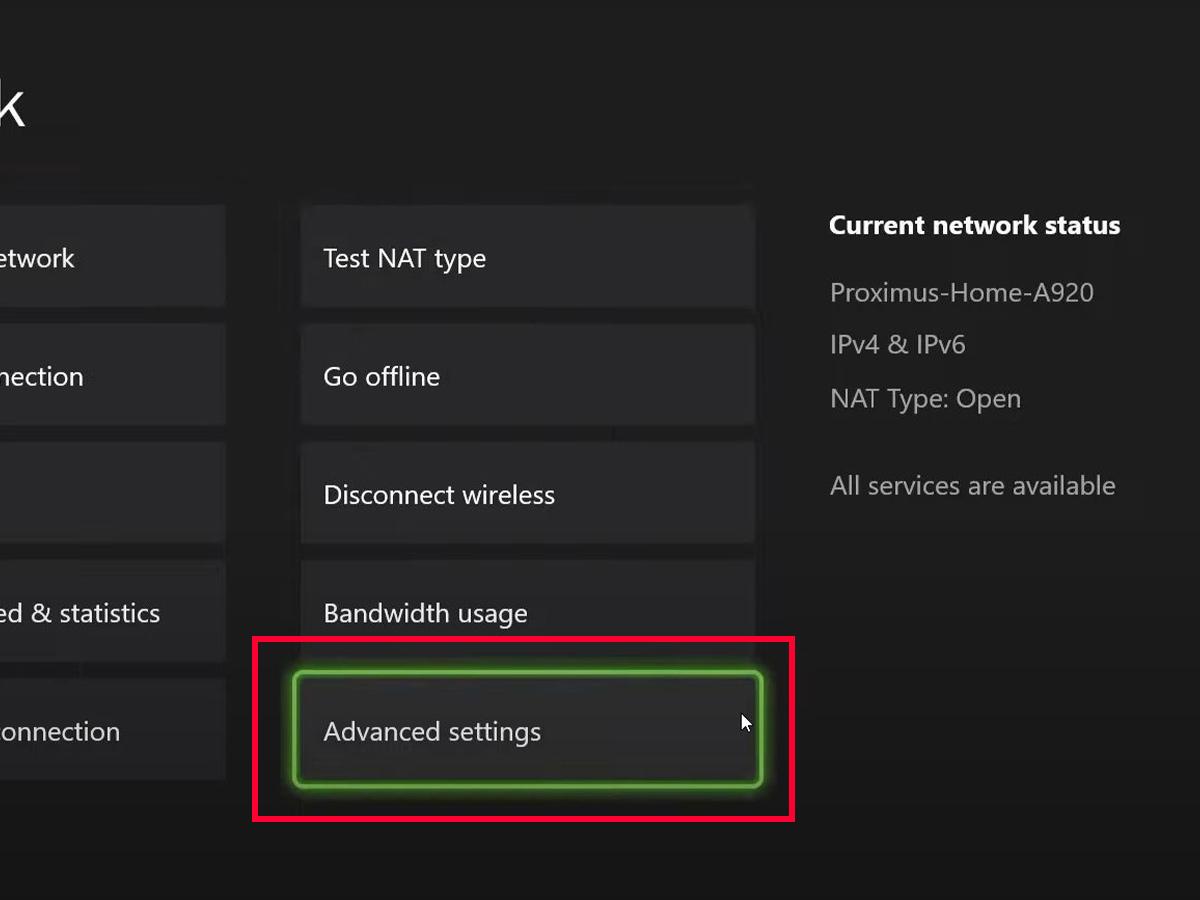
Choosing Network Settings. (From: YouTube/Veplexo) - Choose Advanced Settings.
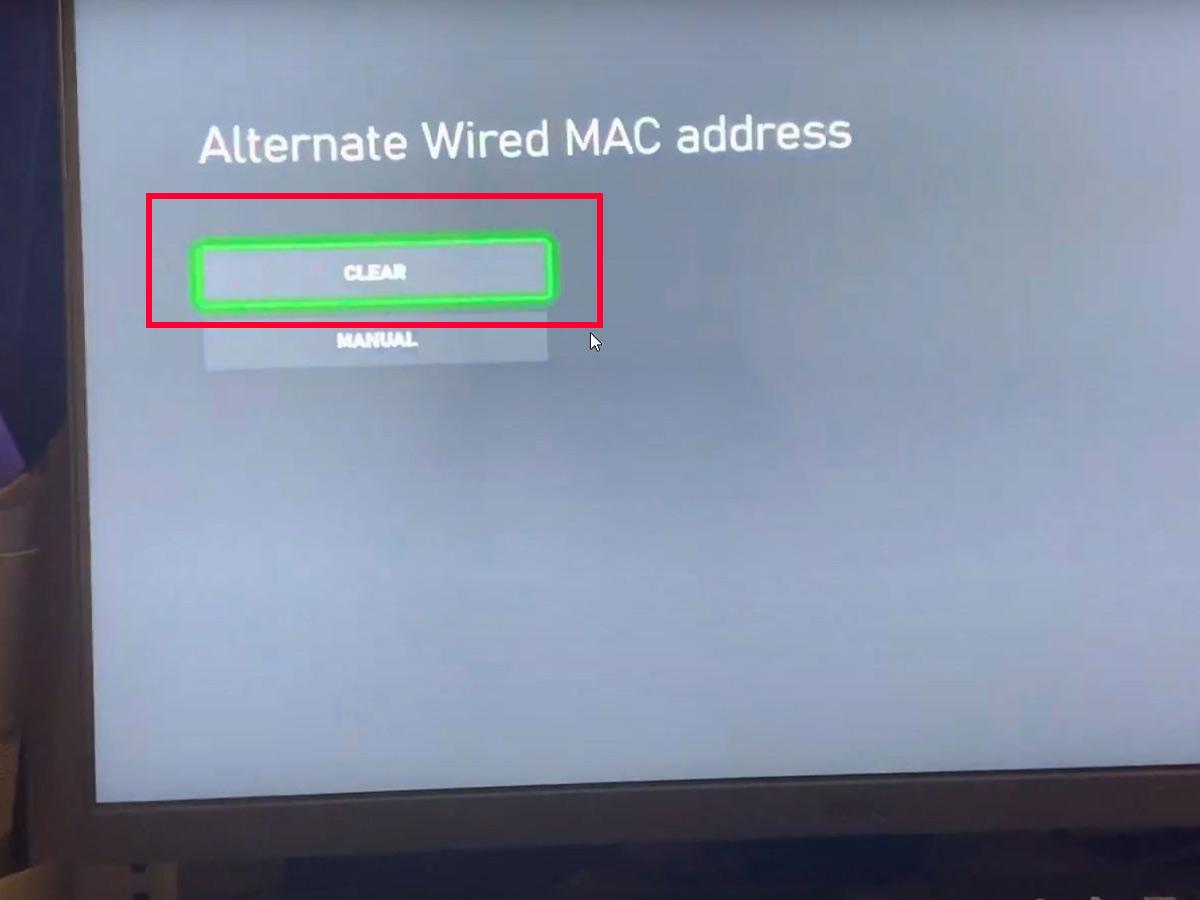
Choose Advanced Settings. (From: YouTube/Veplexo) - Choose Alternate MAC Address then Press Clear.
Choose Alternate MAC Address then Press Clear. (From: YouTube/VVaby) - Exit Settings and restart your Xbox console to apply the changes.


Other fixes you can try
Aside from the fixes mentioned above, you should also check for the following:
- Check connections for debris: Dirt accumulation can interfere with how your headset plug lines up with the conductor plates in the jack, so make sure the headset jack isn’t clogged with dust, dirt, or food debris. This simple cause is often overlooked but is sometimes at the root of crackling audio issues.
- Straighten your headset plug: If your headset’s plug isn’t clicking into place when inserted, it may be slightly bent. This affects the way audio is transmitted back to you. To fix this, just take two pliers and secure one to the plug’s base. Then attach the other to the tip and bend the pin until straight.
- Reinforce your headset cable: Frayed or exposed cable wires could cause them to short-circuit. A simple but temporary fix is to wrap the damaged part with electrical tape. This reinforces the wire and insulates the fragile parts that handle electric currents.
4. How to Fix Mic Not Working on Xbox Series X or S
Some Xbox users have reported instances wherein they can hear themselves on their headsets but cannot be heard by other players. This issue typically stems from incorrect audio settings, outdated firmware, controller setup issues, or sometimes something as simple as a muted mic.
Here are some solutions if your headset mic is not working on Xbox Series X or S:
- Change your voice chat privacy settings
- Set your primary controller
- Check your Xbox console’s NAT type
- Connect your headset via a wired controller
- Other fixes you can try
Change your voice chat privacy settings
The Xbox has specific privacy settings that let you choose who can or cannot communicate with you. You can access these settings here:
- On the Xbox Home screen, go to Profile & system> Settings.
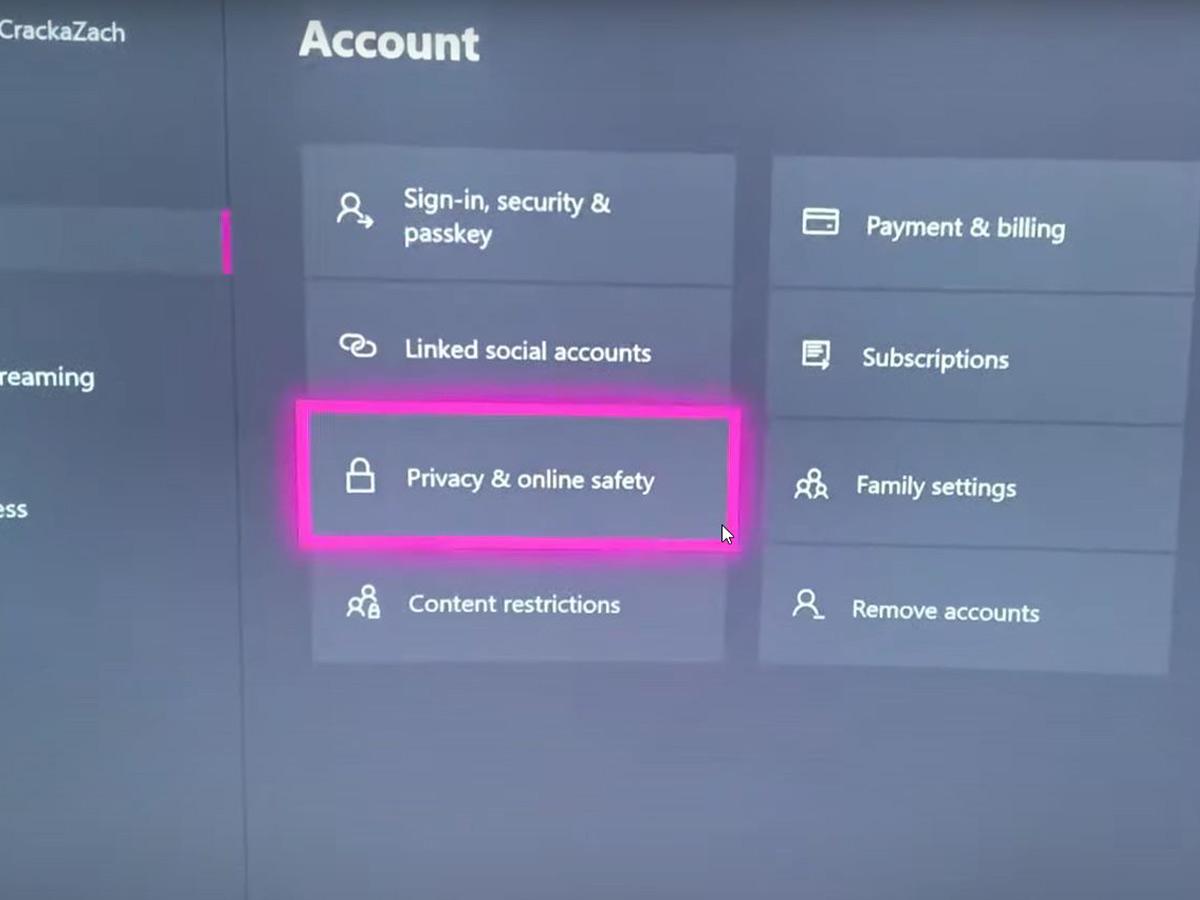
Profile & system settings (From: YouTube/Insider Tech) - Choose Account > Privacy & online safety.
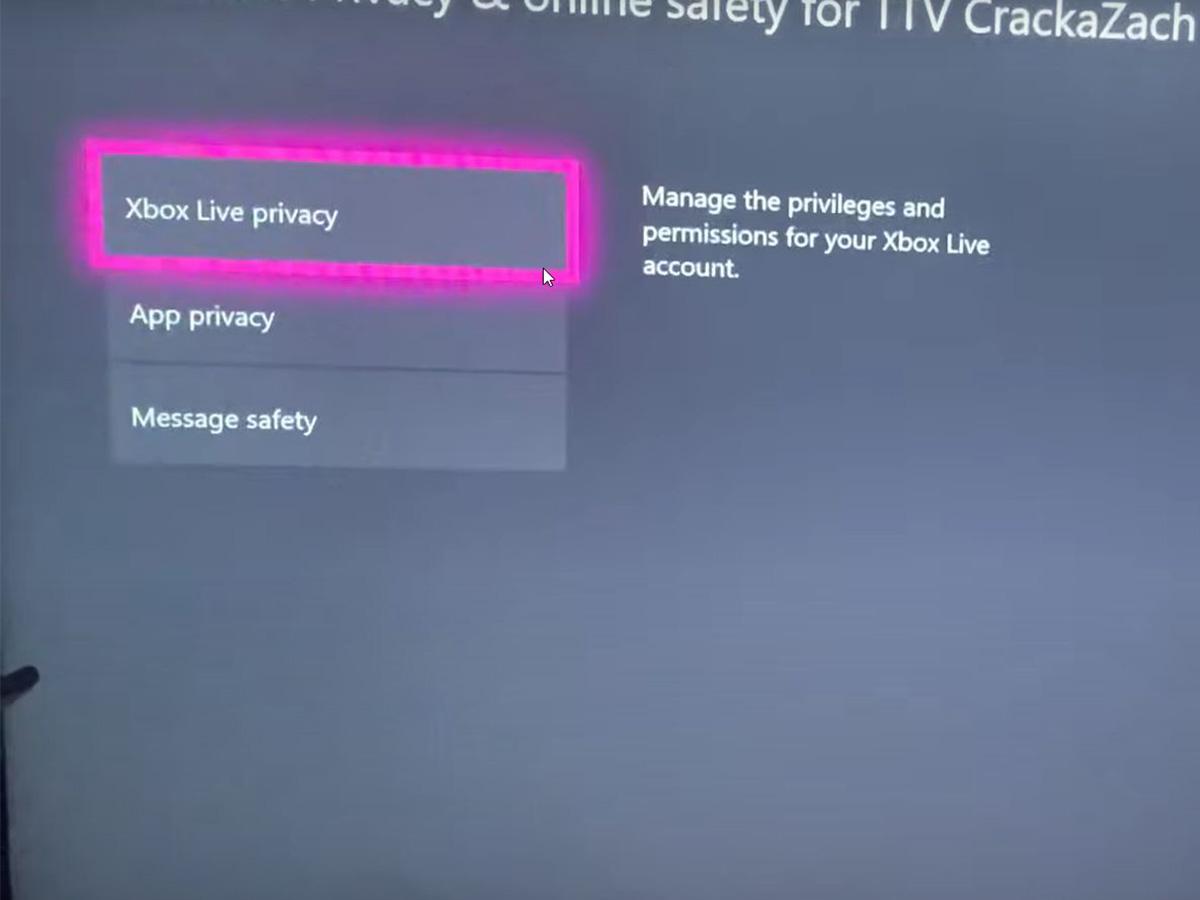
Choose Privacy & online safety. (From: YouTube/ImCraZee) - Choose Xbox Live privacy.
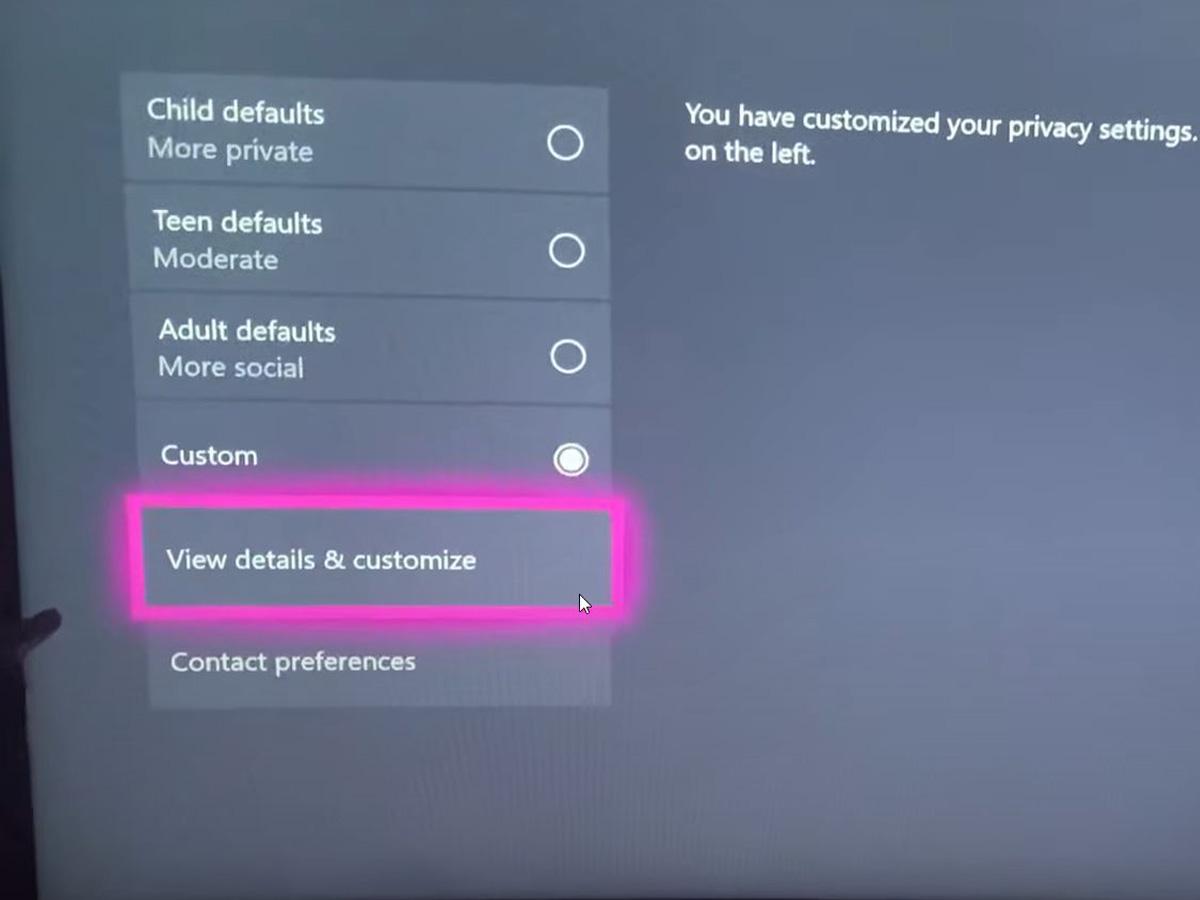
Choose Xbox Live privacy. (From: YouTube/ImCraZee) - Choose View details and customize.
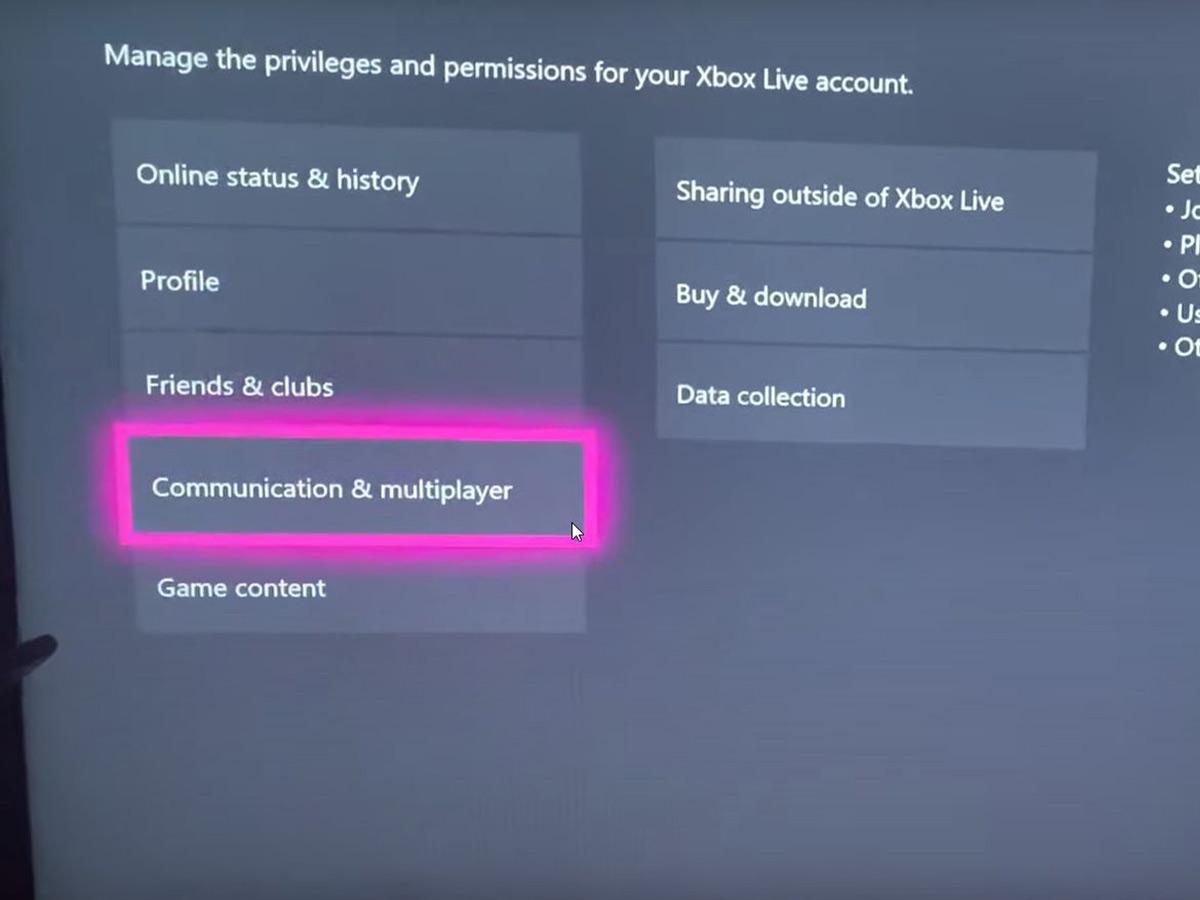
Choose View details and customize. (From: YouTube/ImCraZee) - Choose Communications & multiplayer.
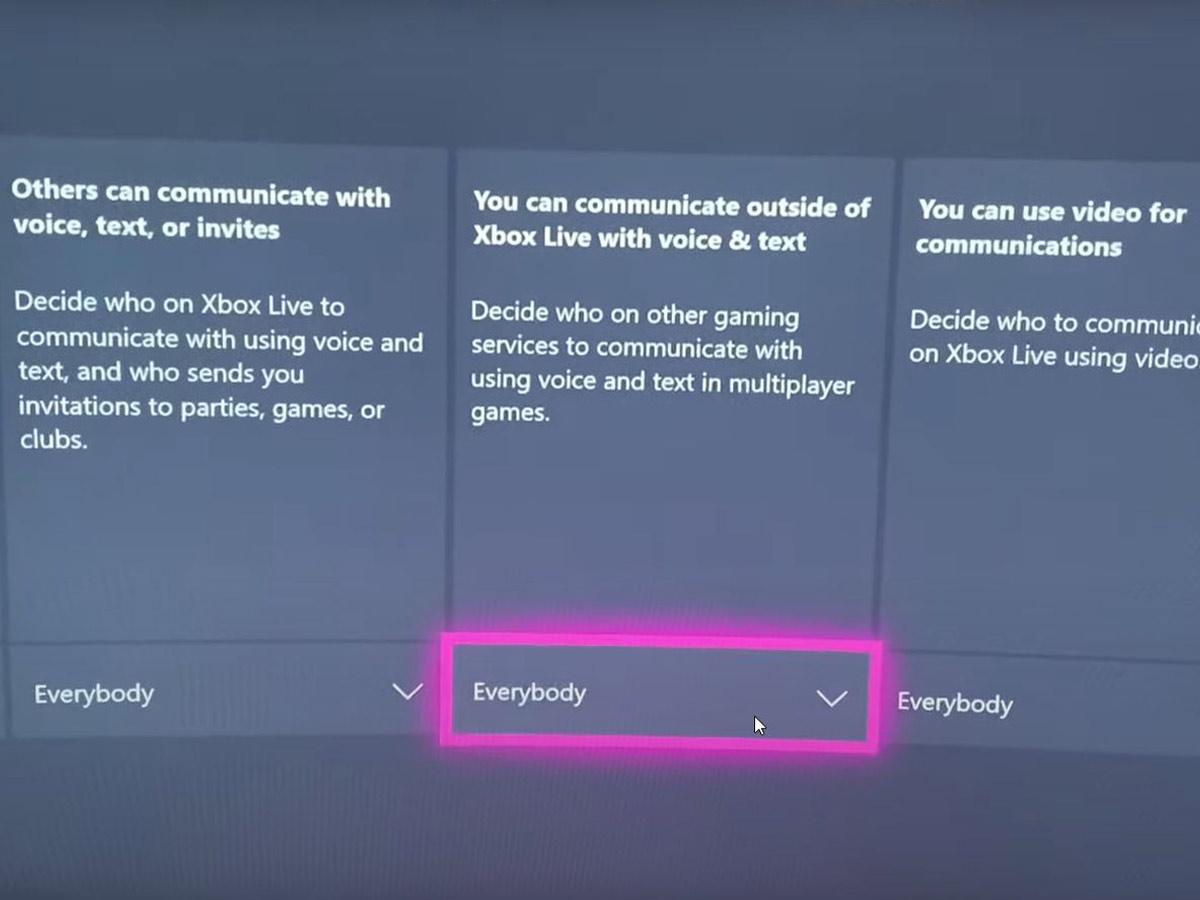
Choose Communications & multiplayer. (From: YouTube/ImCraZee) - Select Everybody, Friends, or Block to determine who you can communicate with.
Select who to communicate with. (From: YouTube/ImCraZee)

Set your primary controller
Multiple paired controllers can also cause headset mic mishaps, since your Xbox might be trying to intercept an audio signal from a different controller. To avoid this, assign your primary controller to your Xbox profile. Here’s how:
- On the Xbox Home screen, go to Profile & system > Settings.
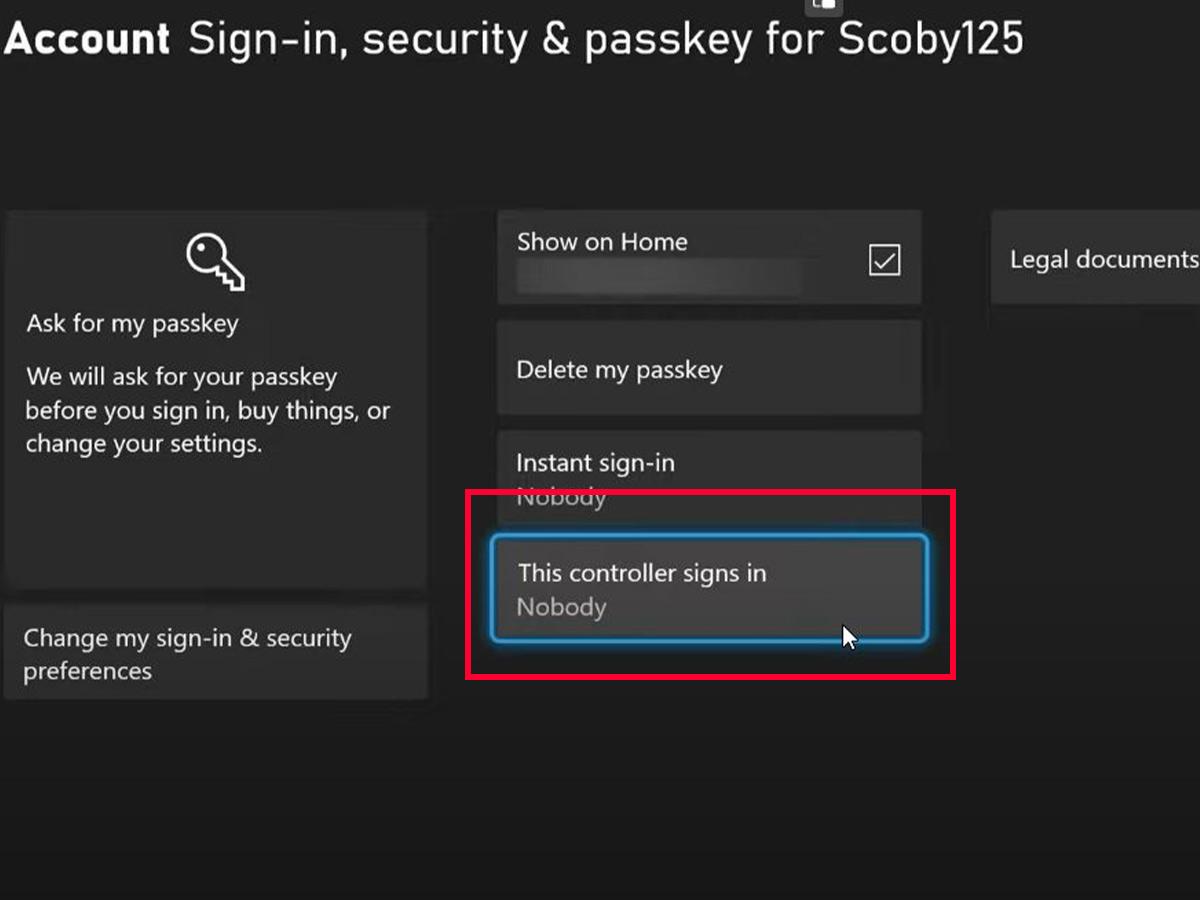
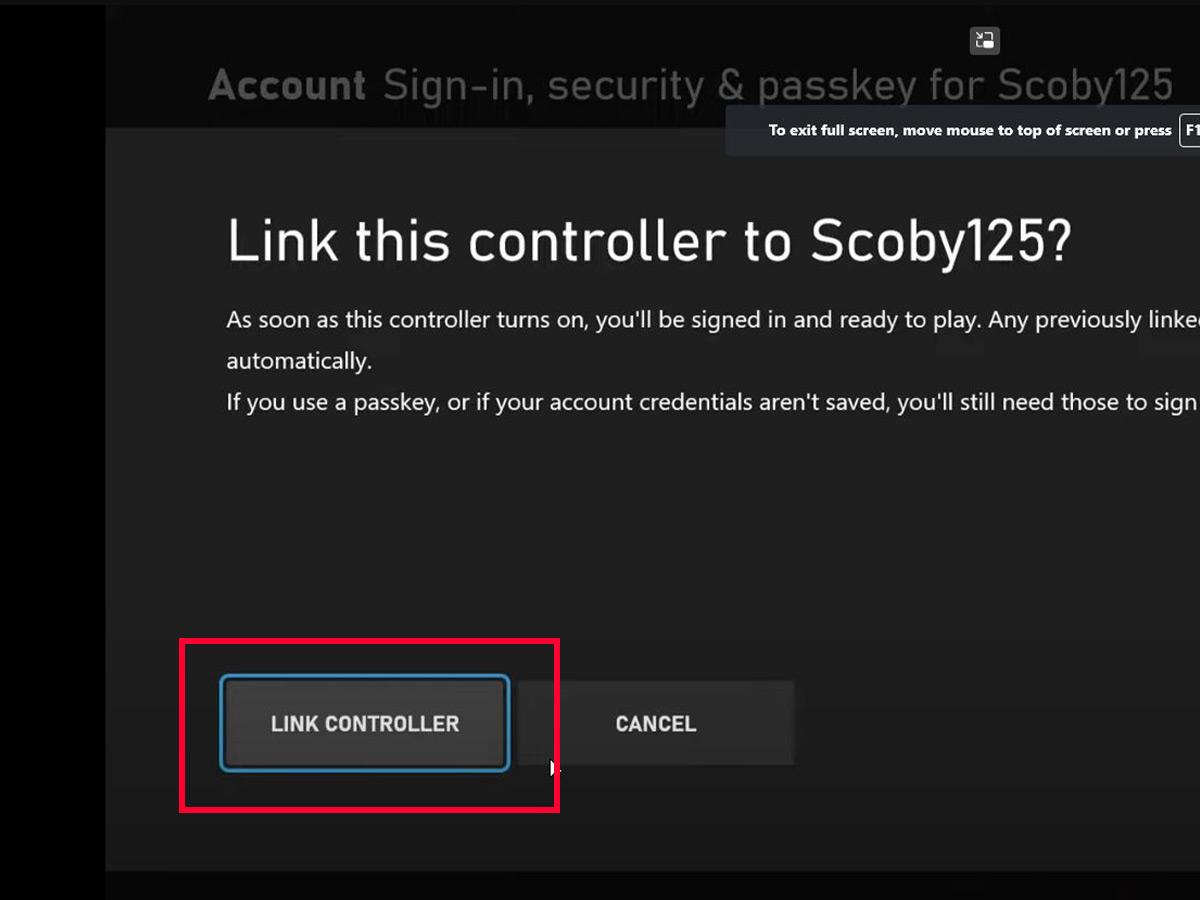
Profile & system settings (From: YouTube/Insider Tech) - Go to Account > Sign-in, security, and passkey and choose This controller signs in.
Choose This controller signs in. (From: YouTube/Scoby Tech) - Verify your account, then choose Link controller.
Verify your account, then choose Link controller. (From: YouTube/Scoby Tech)
Check your Xbox console’s NAT type
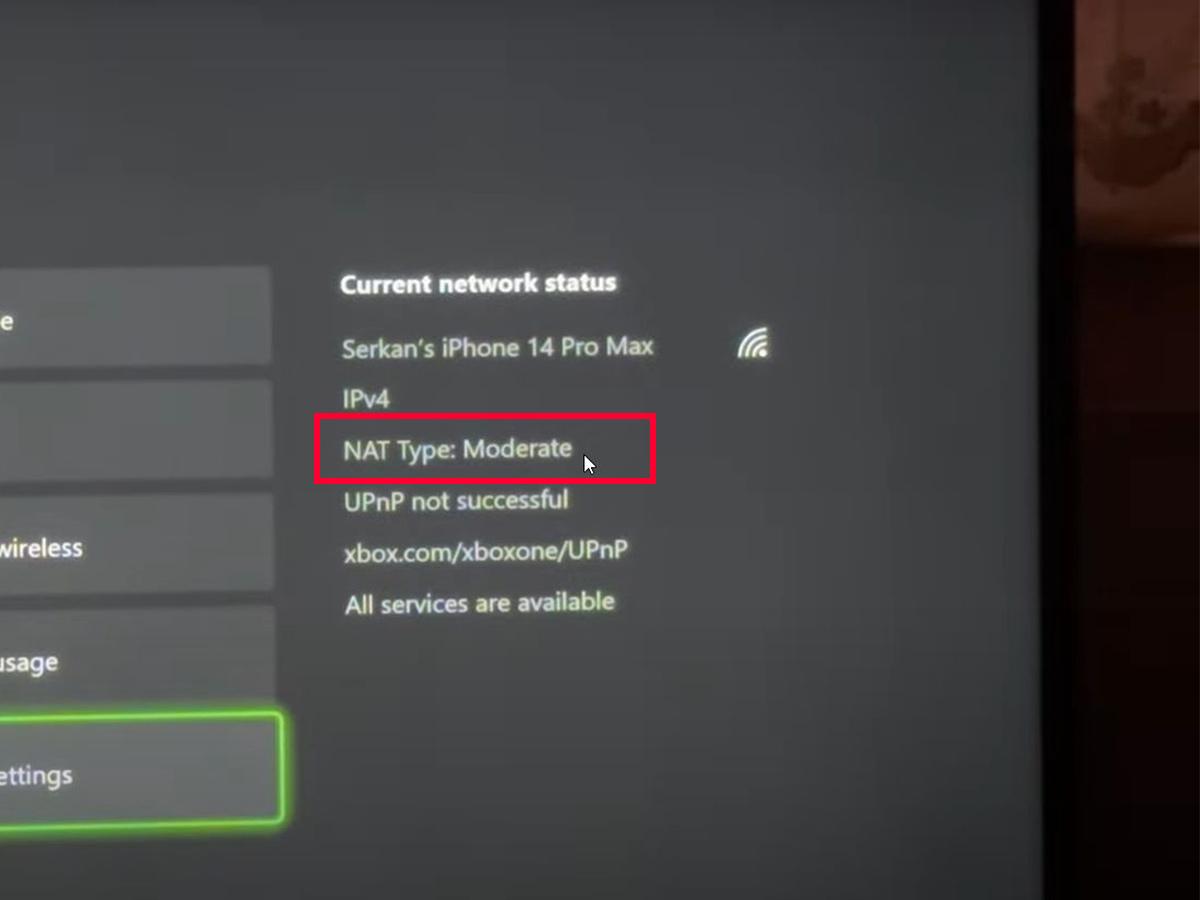
Your console’s NAT type determines whether you can communicate with other players on the Xbox Network. There are four different NAT types with varying levels of limitations:
- Open NAT: Unrestricted gaming with any NAT type.
- Moderate NAT: Restricted multiplayer options, and you may be unable to host some matches.
- Strict NAT: You can’t host matches and are limited to playing with Open NAT-type players.
- Unavailable NAT: You can’t access party chat or use the multiplayer feature for certain game titles.
You’ll want to first check if your NAT type is set to anything other than “Open,” which may be why you’re experiencing audio issues. Here’s how to do just that:
- Press the Xbox button on your controller.
Pressing the Xbox button on your controller - Go to Profile & system > Settings.
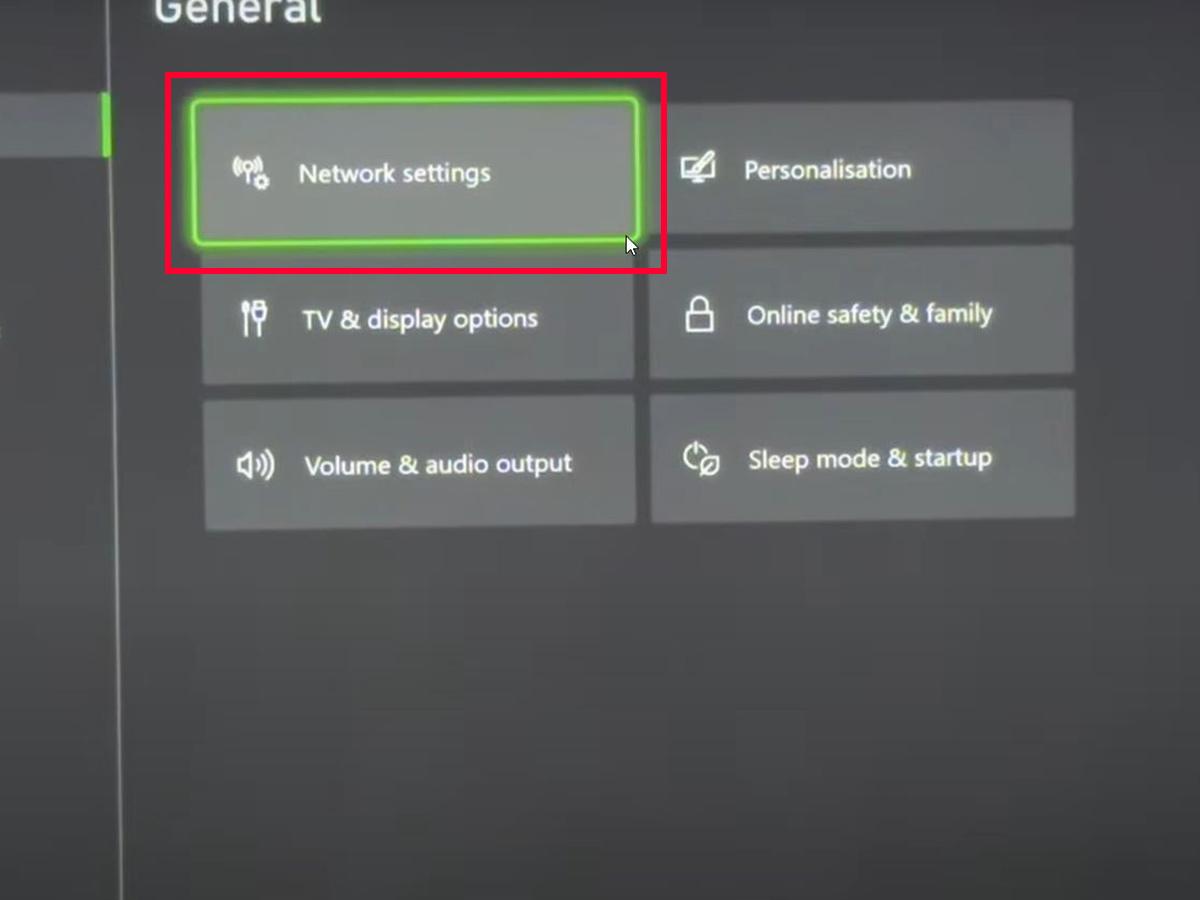
Profile & system settings (From: YouTube/Insider Tech) - Choose General > Network settings.
Choose Network settings. (From: YouTube/Traylace) - Check NAT type under Current Network Status.
Check NAT type under Current Network Status. (From: YouTube/Traylace)


Connect your headset via a wired controller
Interestingly, certain settings are only visible with a wired controller connection. So, if you’re having Party Chat problems and have a wired controller on hand, you should try this solution from u/Chlxriine on Reddit to fix your headset mic issues:
- Restart your Xbox console.
Restart your Xbox console. (From: YouTube/My Mate VINCE) - Plug in your wired controller.
Plug in your wired controller. - Create a Party and then select your Party.
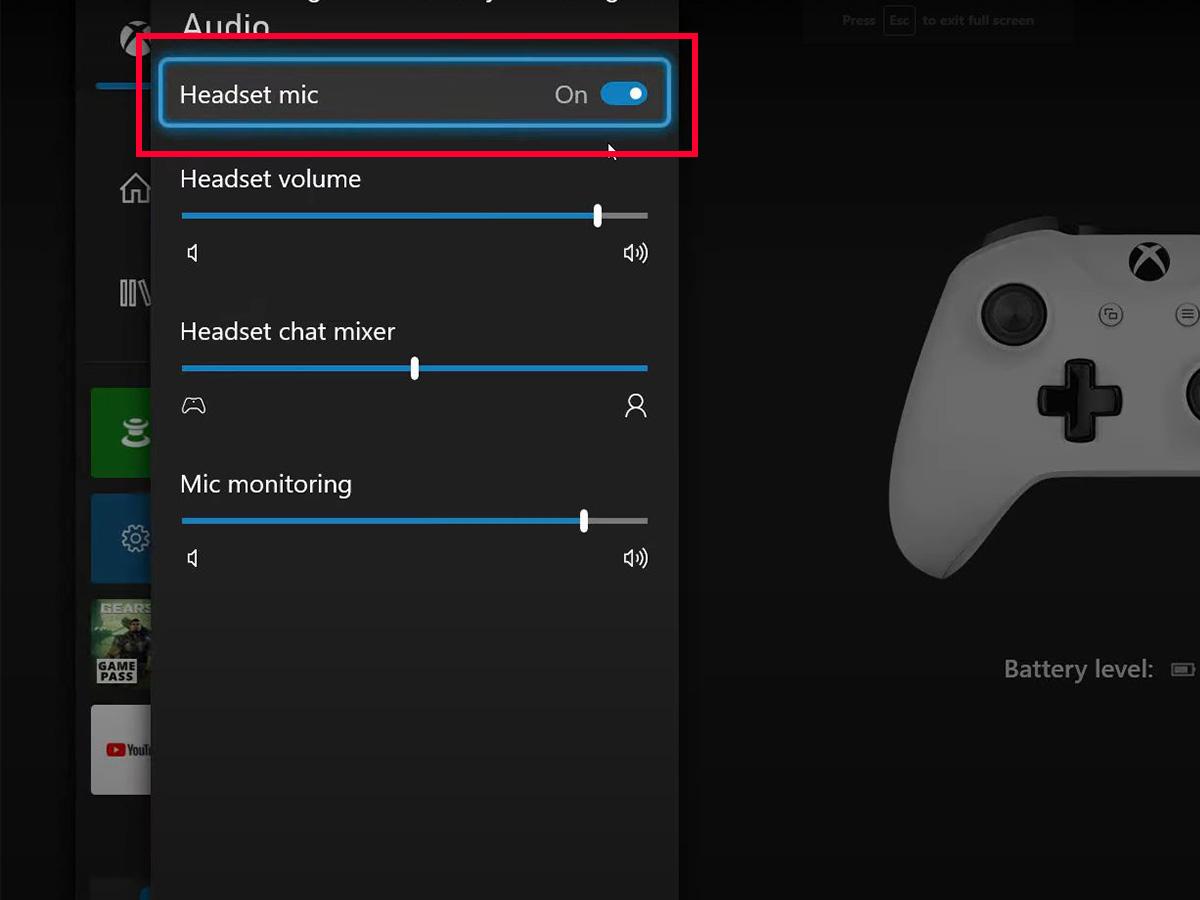
- Go to Options > Audio Settings > Headset mic.
Accesing Headset mic on Xbox. (From: YouTube/Sofa Supastar Gaming)

Other fixes you can try
If you’re still having problems after performing the previously discussed solutions, there are other fixes you can do:
- Update your firmware: Go into your controller’s settings to see if new firmware updates are available and apply them accordingly.
- Test your headset with a different device: Try testing your headset on another device to see if the problem lies in the headset or elsewhere. This will allow you to rule out the headset as the cause and look at other solutions to problems with your console settings.
- Reconnect your headset: When using a wired controller, an imperfect connection between the contact plates of the jack and plug can cause mic issues. To address this, gently twist the plug in the socket or unplug and replug it.
- Check for wire damage: Try wiggling your headphone cable while it’s in use. If your audio returns while doing this, you’ll know you’re dealing with a damaged wire that needs replacing.
- Check if you’re on mute: Sometimes, headset mic issues can boil down to someone muting you by accident. So, quickly check in with your friends or co-players to see if they’ve unintentionally left you on mute.
- Check Xbox Network Status: Xbox Live can experience outages or limited network connectivity like any other server-based system. To ensure that the problem lies in the Xbox Network and not with your headset, you can go to the Xbox Status page to see which features are experiencing any problems.
5. How to Fix Headset Not Connecting on Xbox Series X or S
Unfortunately, connection issues are not unheard of with the Xbox Series X or S. For instance, there are cases wherein an Xbox console doesn’t recognize a headset. In such situations, you may be dealing with a faulty Bluetooth adapter, Bluetooth interference issues, a damaged cable, or headset incompatibility issues.
On the other hand, if your Xbox controller doesn’t recognize your headset, you may be looking at controller hardware or firmware issues. Sometimes, faulty audio settings may also make you think that your Xbox controller isn’t detecting your headset. For example, you might’ve muted your headset or turned the volume all the way down.
If you’ve ruled out the causes mentioned above, you should try resetting your headset.
Hard reset your headset
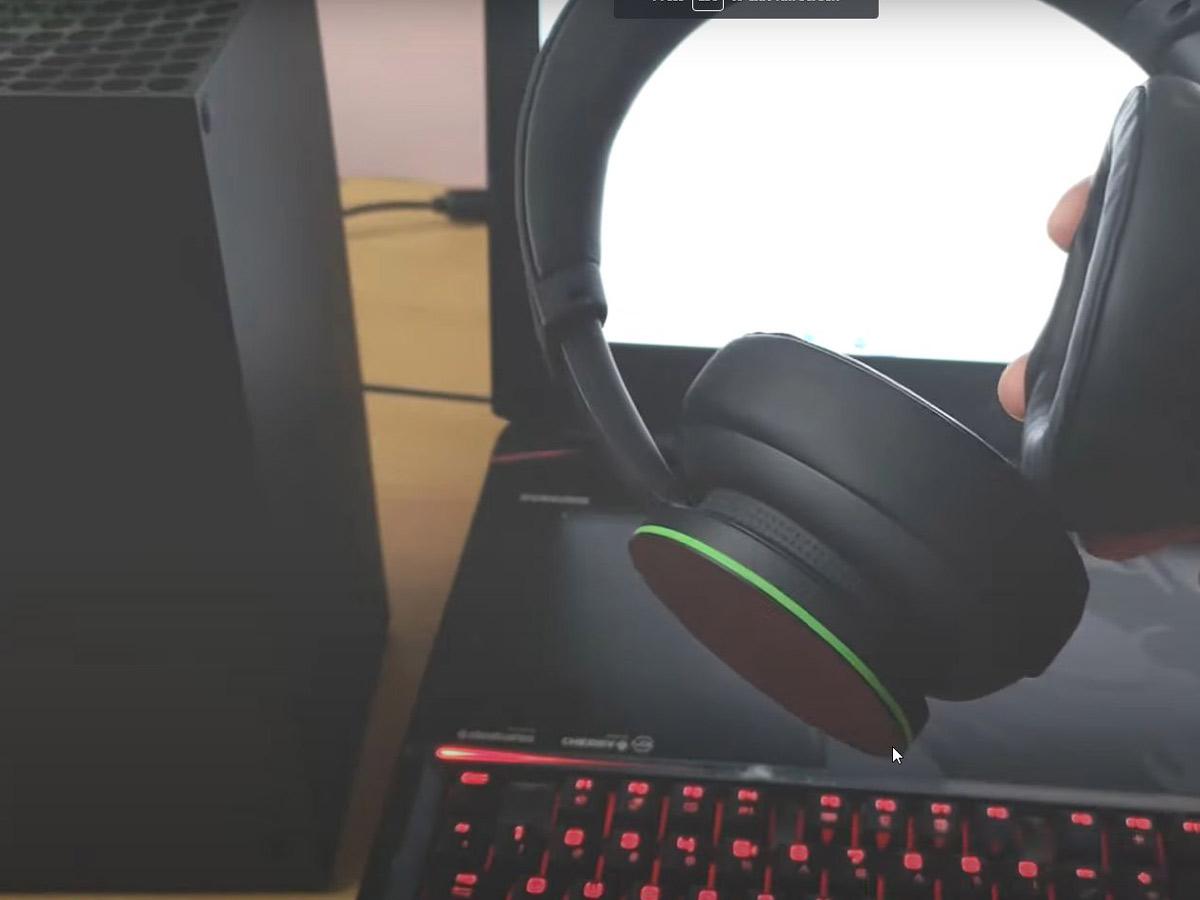
- Before starting, make sure you’re positioned near your Xbox console.
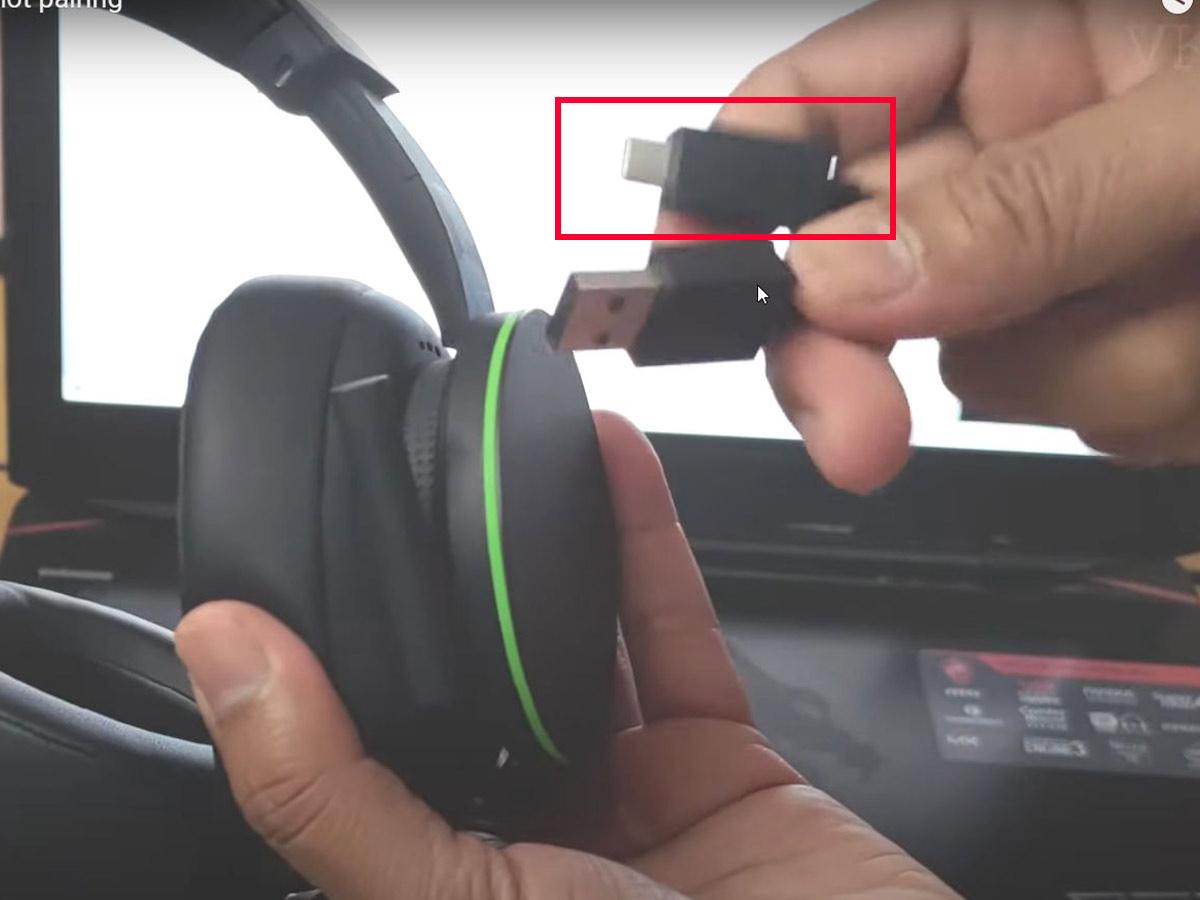
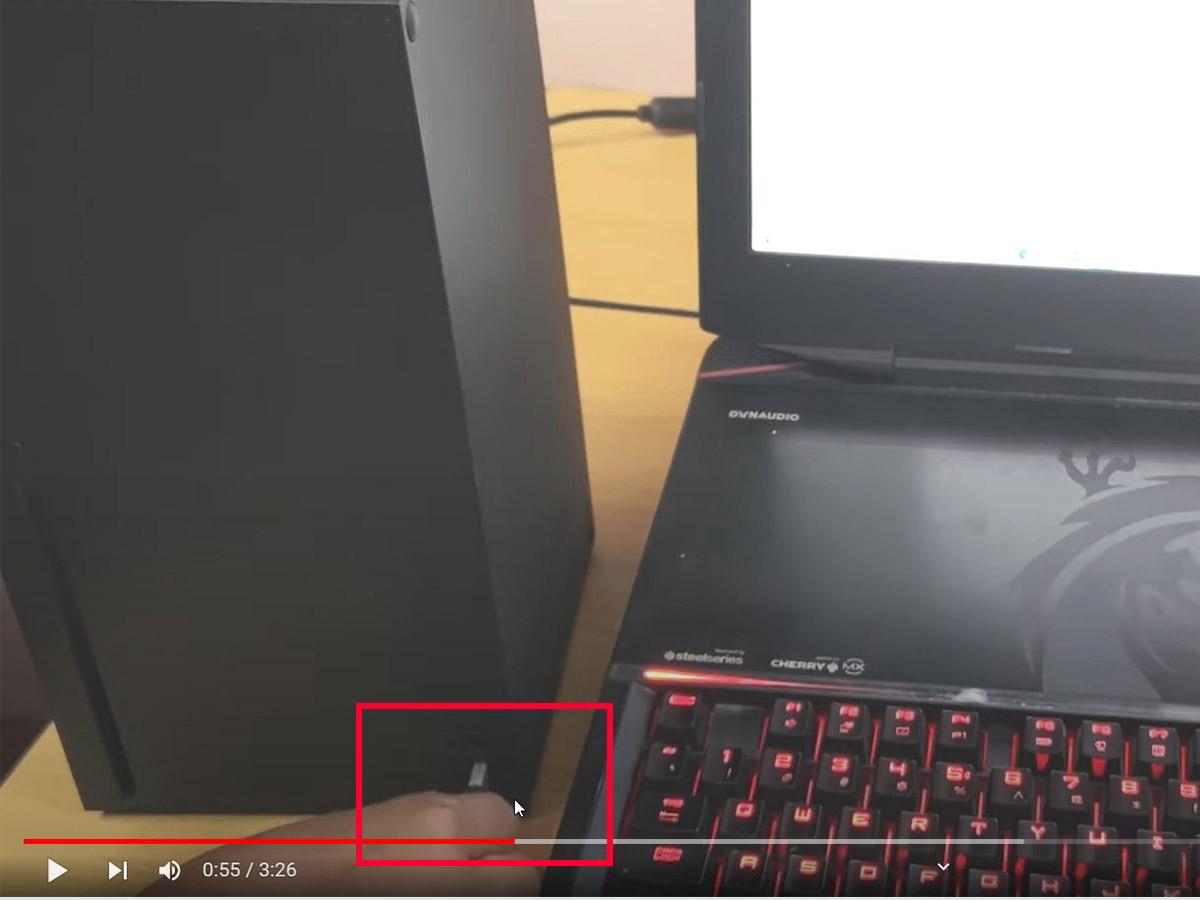
Place your headset close to your Xbox console. (From: YouTube/Vicky’s Blog) - Insert the USB-C cable into the headset while leaving the other end unplugged.
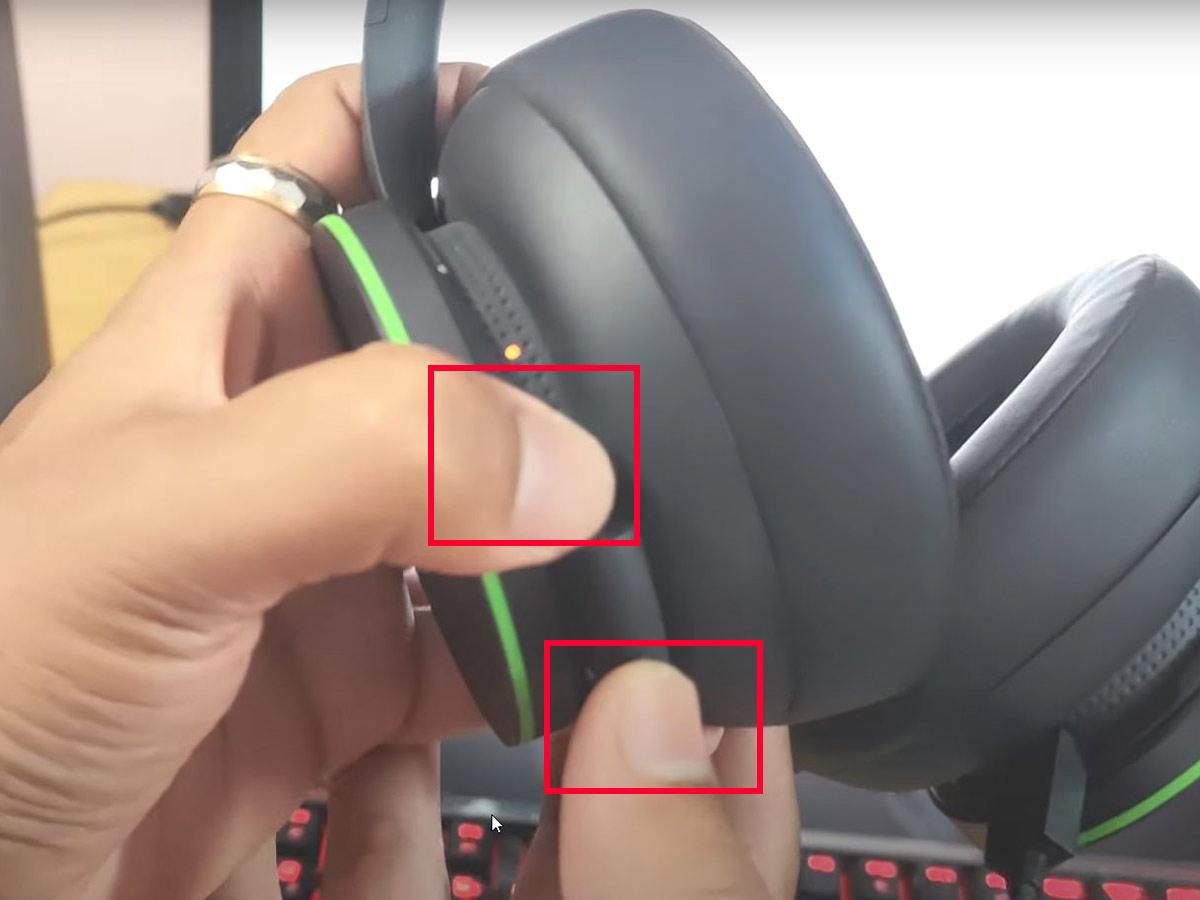
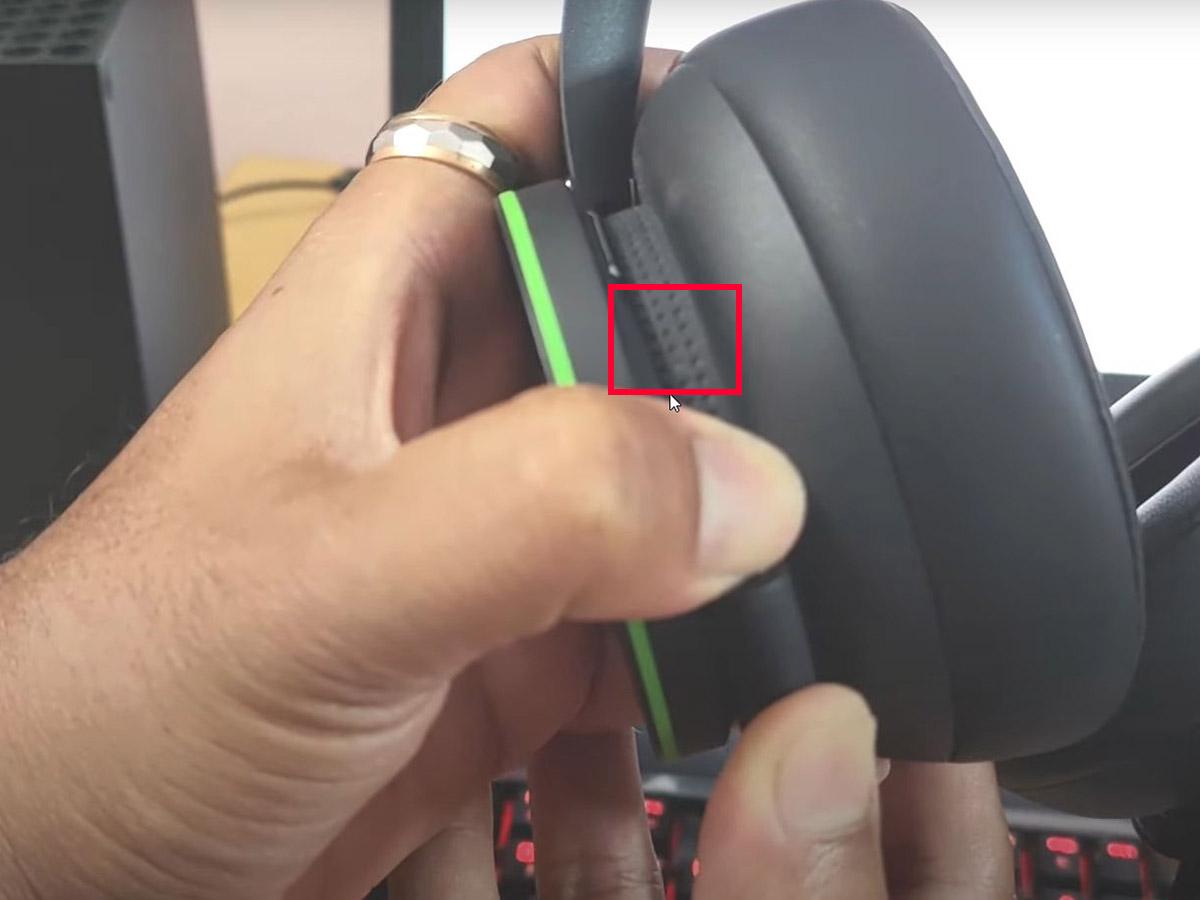
Insert the USB-C cable into the headset . (From: YouTube/Vicky’s Blog) - Hold down the power and mute buttons simultaneously on the headset’s left ear cup.
Hold down the power and mute buttons simultaneously (From: YouTube/Vicky’s Blog) - While doing this, quickly plug the other end of the USB-C cable into your console.
Plug the other end of the USB-C cable into your console. (From: YouTube/Vicky’s Blog) - If the headset powers off, the hard reset is successful.
Headset powers off. (From: YouTube/Vicky’s Blog) - Power the headset back on.If you’re using AirPods, check out our guide on how to connect AirPods to Xbox Series X or S.
Other fixes you can try
6. How to Fix Headset Disconnections on Xbox Series X or S
In contrast to the previous section, some users experience trouble with their headsets constantly disconnecting from their Xbox console. Usually, they can pair their headset successfully to the console via their Xbox controller, only to have it disconnect a few minutes later. In other cases, the headset disconnects during gameplay and is accompanied by crackling audio issues.
Like the problems we discussed earlier, this can be caused by Bluetooth signal interference, compatibility issues between your headset and console, low headset battery, or your headset being out of range of the console.
To address this, try restarting your headset and console, then re-pairing them. If this doesn’t work, you can try doing a hard reset as we discussed above.
Restart your headset and Xbox console
If the above procedure doesn’t work, try restarting both devices. Here’s how:
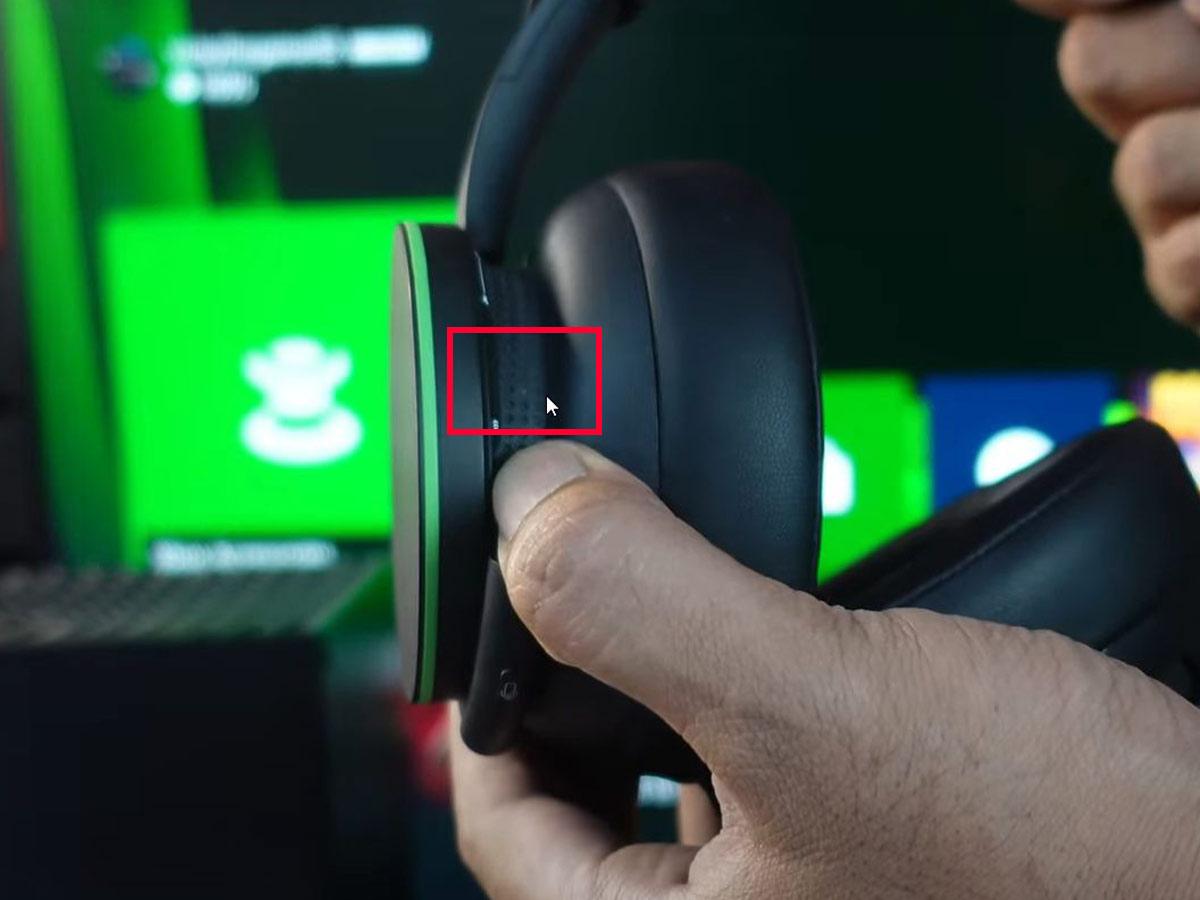
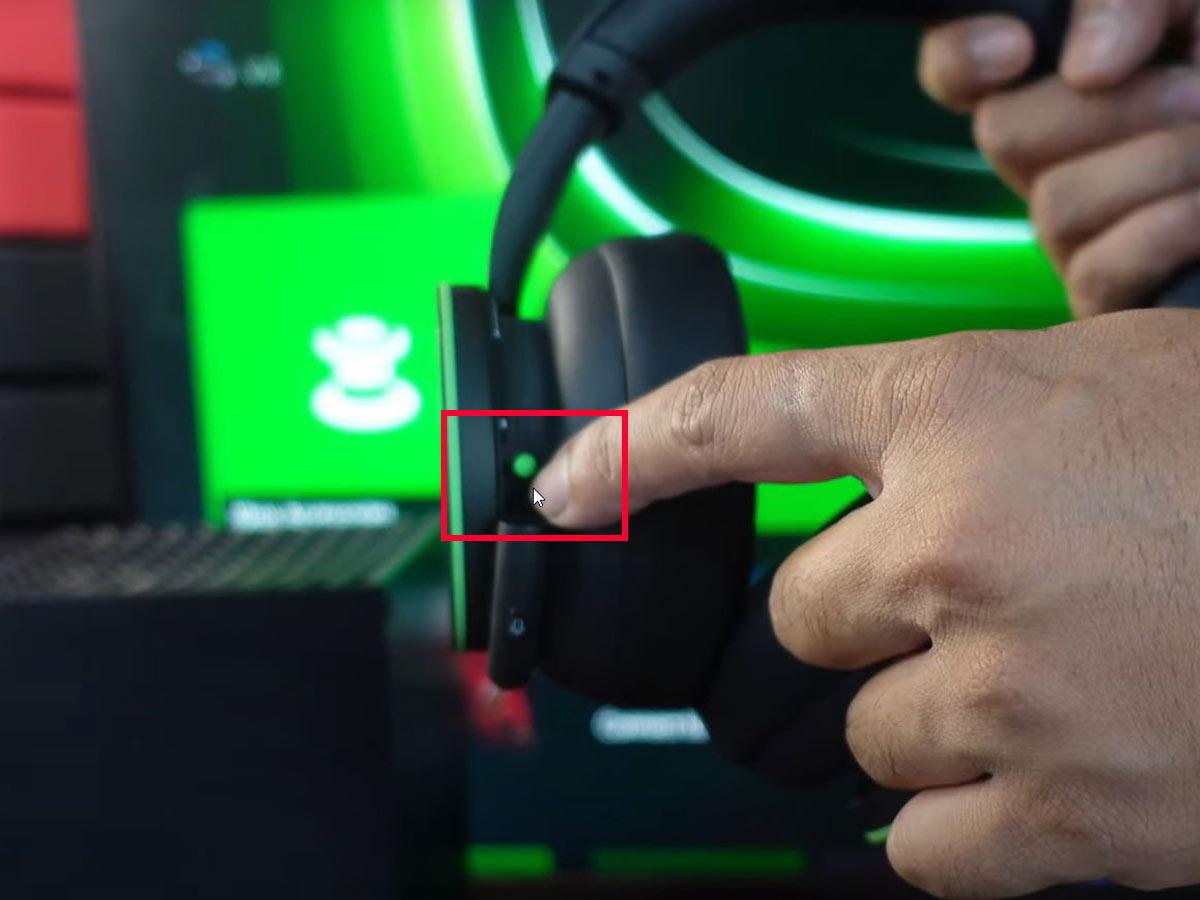
- Press the green power button on your headset’s left ear cup.
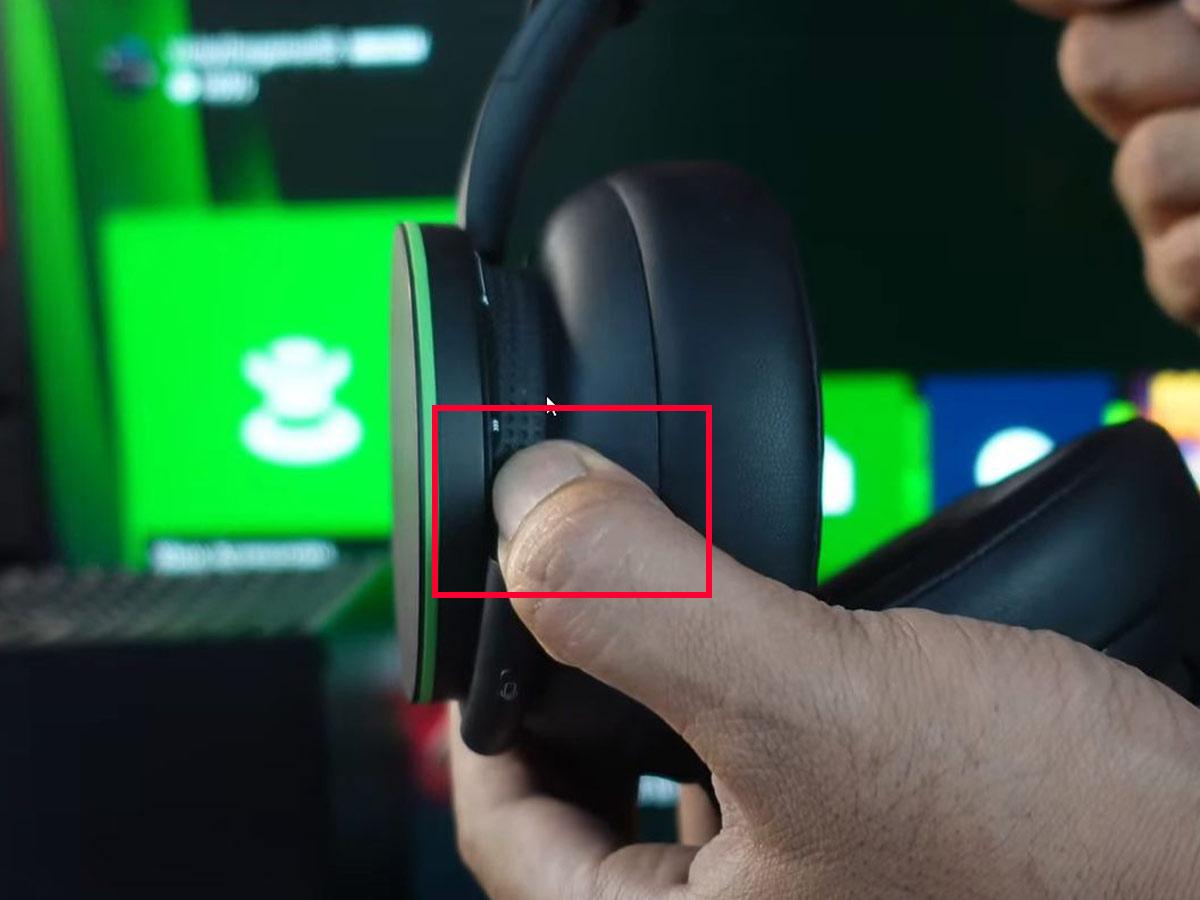
Press the green power button on your headset’s left ear cup. (From: YouTube/Vicky’s Blog) - Wait for a power-down sound and for the power light to turn off.
Wait for a power-down sound and for the power light to turn off. (From: YouTube/Vicky’s Blog) - Wait several seconds, then turn the headset on again.
Turn the headset on again.(From: YouTube/Vicky’s Blog) - On your Xbox console, hold the power button for 10 seconds.
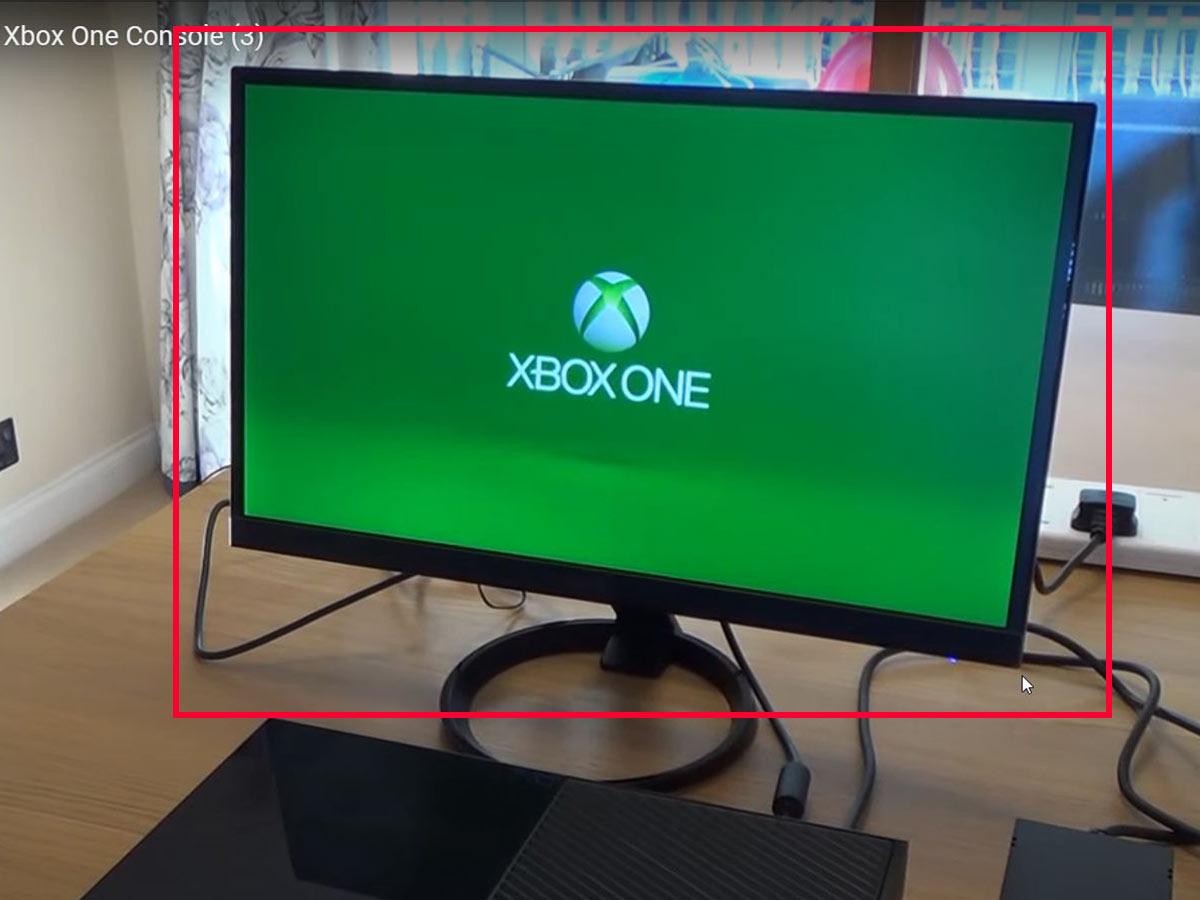
Hold the power button for 10 seconds on your Xbox console.(From: YouTube/My Mate VINCE) - Press the same button to power the console back on. You should see the green boot-up animation when it restarts.
Xbox boot up screen. (From: YouTube/My Mate VINCE)

Re-pair your headset
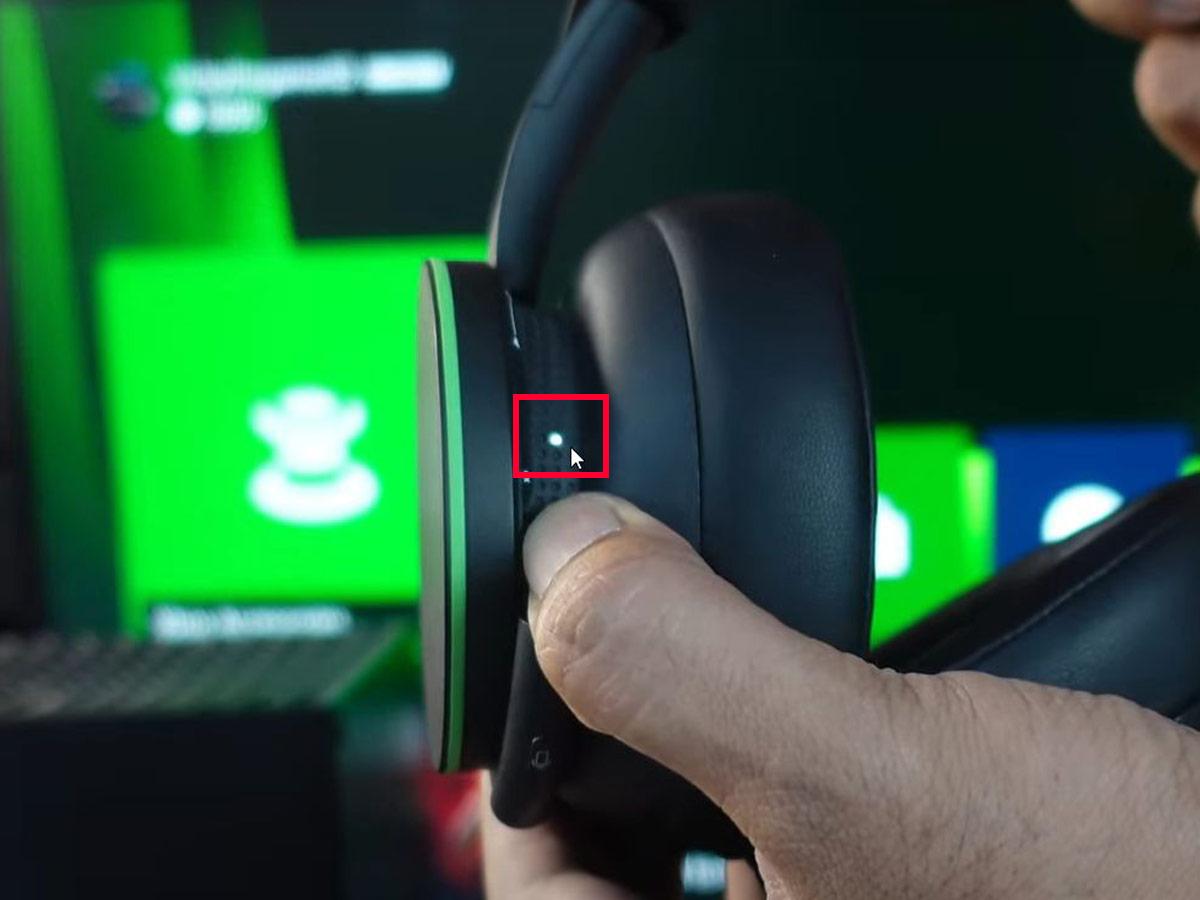
- With the headset and Xbox console powered on, hold the pairing buttons on both devices for two seconds.
Hold the pairing buttons on the headset for 2 seconds.(From: YouTube/Vicky’s Blog) - Wait for both devices’ power lights to flash, indicating they’re in pairing mode.
Wait for the power lights to flash, indicating it is in pairing mode.(From: YouTube/Vicky’s Blog)
Conclusion
Usually, you can solve Xbox headset issues using simple methods such as resetting your devices or updating firmware. If those don’t work, you can try the other more advanced solutions above. With these fixes, you should be able to address your audio issues and go back to enjoying your games without a hitch.
How did you find our solutions and suggestions? Which ones worked for you? If you have solutions that worked for you but aren’t included in our list, share them in the comments section below! We’d love to hear about them.