Our cheat sheet of the best settings, features, and hacks to help you get the most out of Apple Music.
As one of the top music streaming platforms, Apple Music has tons of neat features that elevate your listening experience, including the much-talked-about lossless and spatial audio.
However, while many of these features are easily understandable, they aren’t immediately accessible. Most are tucked away in the app’s settings or hidden behind unfamiliar icons, making it tricky for users to find and utilize them early on.
To top this issue, Apple is known to constantly roll out updates that result in plenty of features either getting tweaked or retired — such as its now-defunct ‘Automatically Follow Artists’ option. It’s hard to keep tabs on all these updates, which adds to the confusion.
Fret not. Whether you’re a new user looking to understand Apple Music settings or a loyal Apple Music enthusiast wanting to get more out of the service, we’ve got you covered with the updated tips & tricks to getting the best Apple Music experience. Let’s dive in!
- Lossless Audio in Apple Music Settings
- Sound Enhancer in Apple Music Settings
- Sound Check in Apple Music Settings
- Utilize Dolby Atmos in Apple Music
- Streaming and Download Quality Options for Both Video & Audio
- Keep Music Media Folder Organized: How to Organize Apple Music
- Reset Music Store Cache in Apple Music Settings
- Keep Apple Music on Top of Other Windows
- Apple Music’s Use Listening History Feature
- Apple Music Settings for Chromecast Streaming
- Sync Library in Apple Music Settings
- List Size - How to Change Apple Music Text Size
- Apple Music Hacks to Boost Your Listening Experience
- Conclusion
Lossless Audio in Apple Music Settings
Apple Lossless Audio delivers your music in high-resolution quality of up to 24-bit/192kHz. It also uses ALAC (Apple Lossless Audio Codec), which is optimized for iOS devices.
Given that audio accuracy is often the goal for audiophiles, Lossless Audio proves to be an excellent feature for audiophile listening because it helps maximize the capabilities of the audio gear with close-to-original sound quality.
However, you can only experience the true Lossless Audio feature using a pair of wired headphones or speakers.
This feature will not work if you stream music through wireless earbuds or headphones as Bluetooth does not have sufficient bandwidth to play lossless audio files that are typically larger in size.
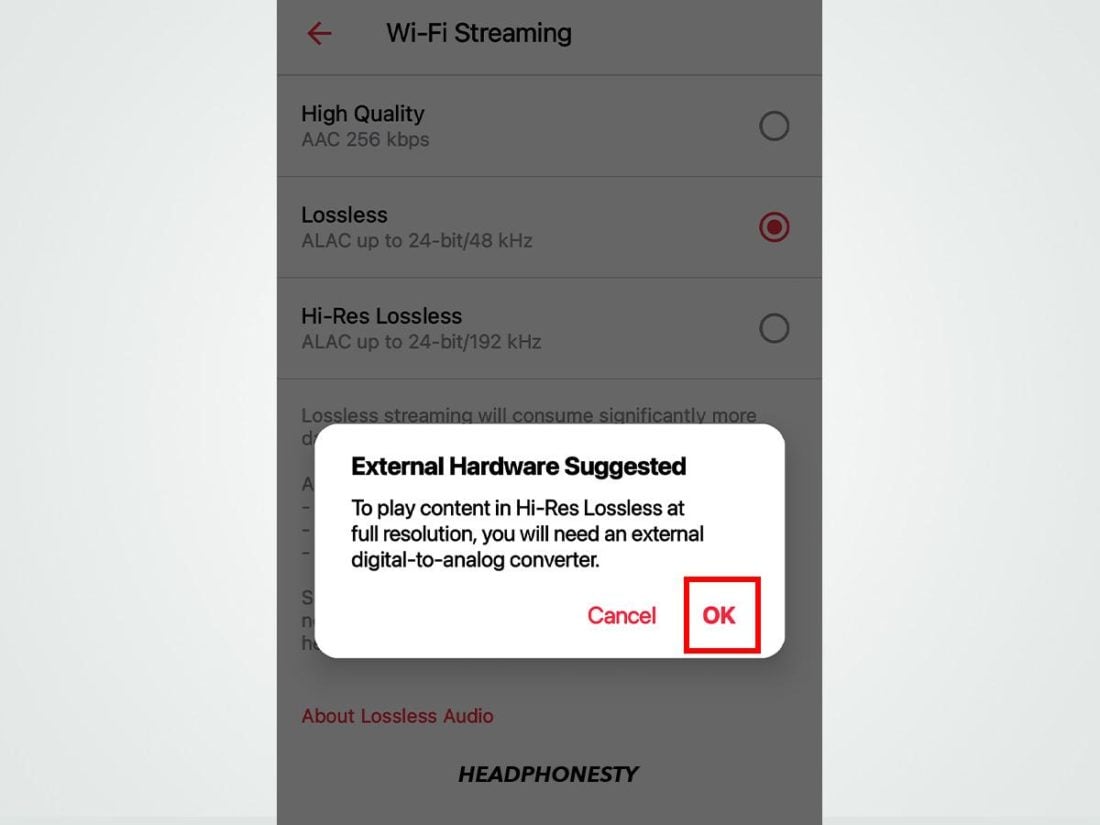
Your device must also be supplemented with an external DAC to play Hi-Res audio. And while lossless audio is supported on iPhones, you’d need to update your iPhone to iOS 14.6 or later versions to experience this Apple Music feature.
Lastly, you must also consider your internet connection. Lossless audio in Apple Music can eat up to 720-2900MB per hour, which may be too much to handle depending on your internet connection.
If you meet these criteria, here’s how you can play lossless audio in Apple Music:
Using Mac
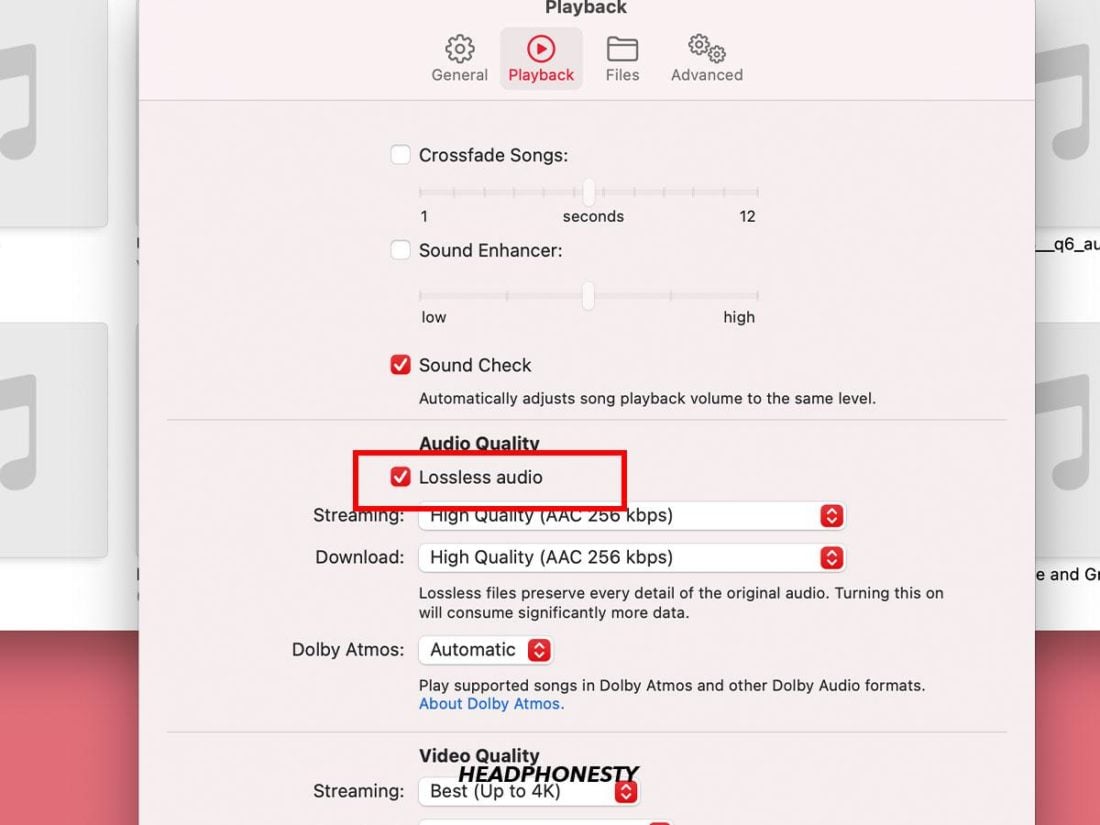
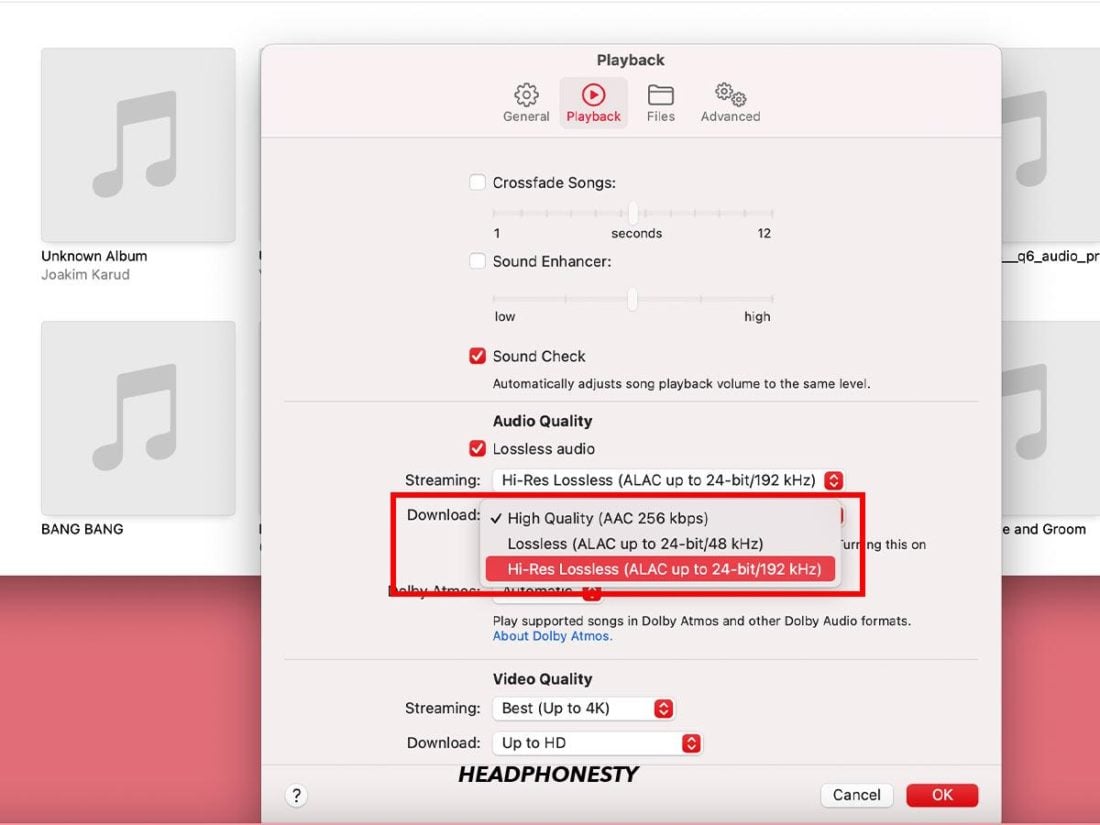
- In Apple Music, go to Playback in the general setting menu and tick the Lossless audio box in the Audio Quality section

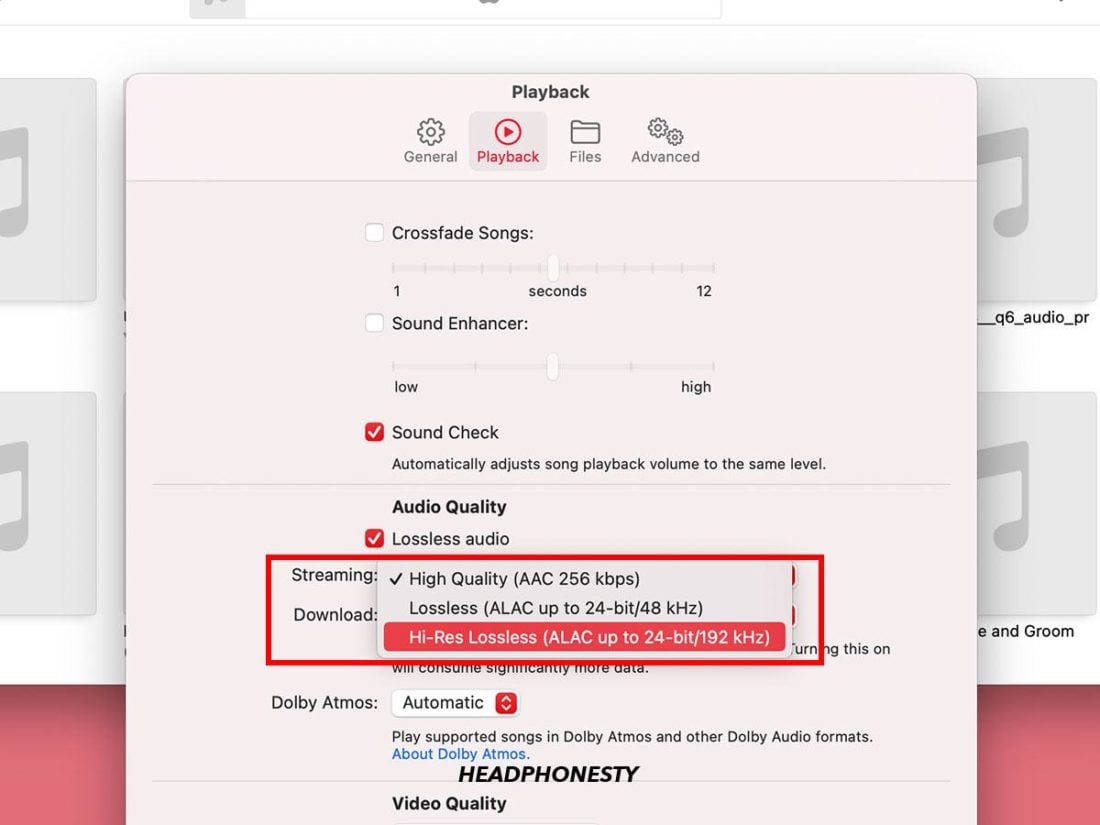
Setting Lossless Audio Quality on Mac - Select Streaming. Then, you can opt for either Lossless quality (24-bit/48kHz) or High- Resolution Lossless (24-bit/192kHz).
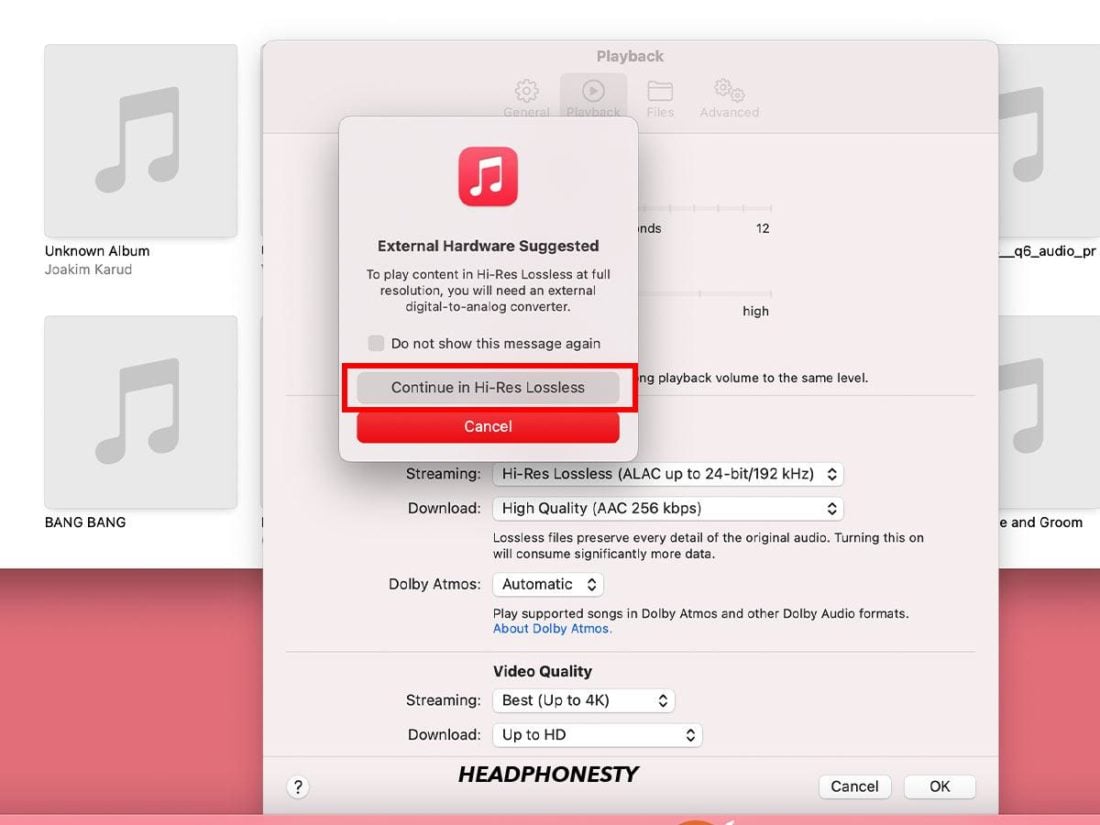
Selecting Streaming Audio Quality on Mac - Click Continue
Saving Hi-Res Lossless Setting on Apple Music - Follow steps 3 & 4 for the Download drop-down
Setting Download Audio Quality on Mac
Using iPhone
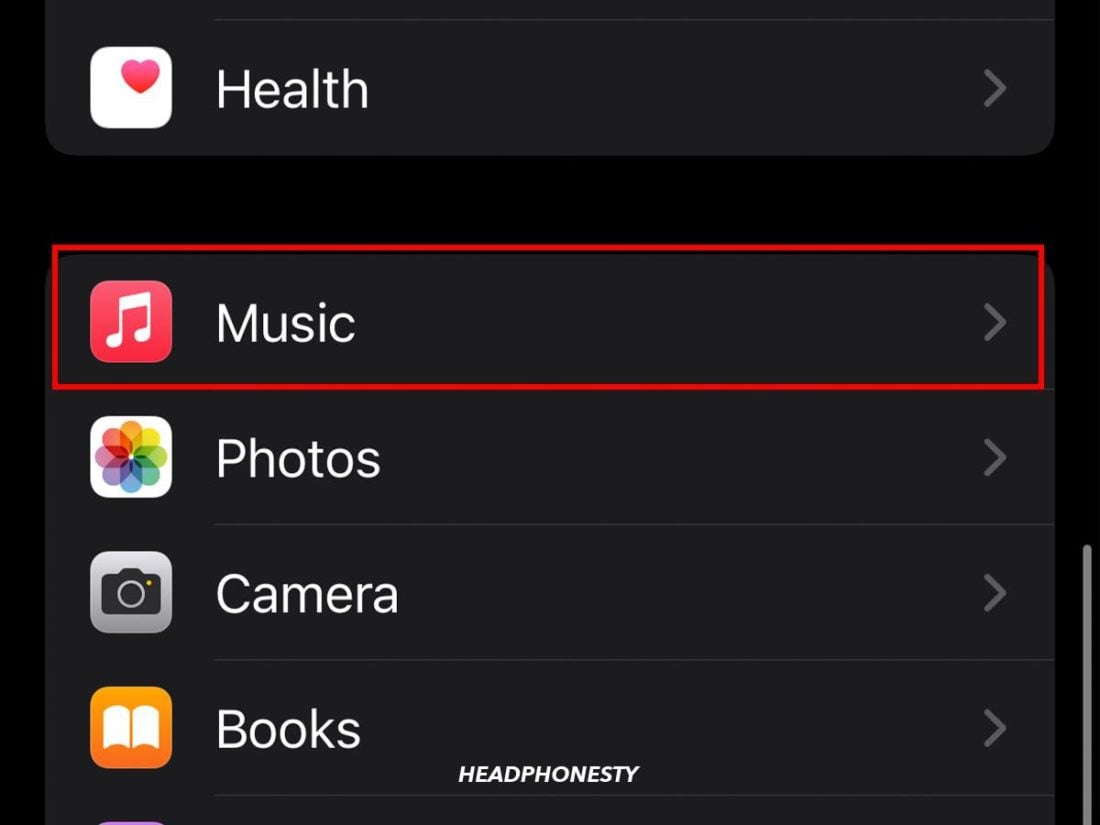
- Go to your iOS Settings, then scroll down and select Music
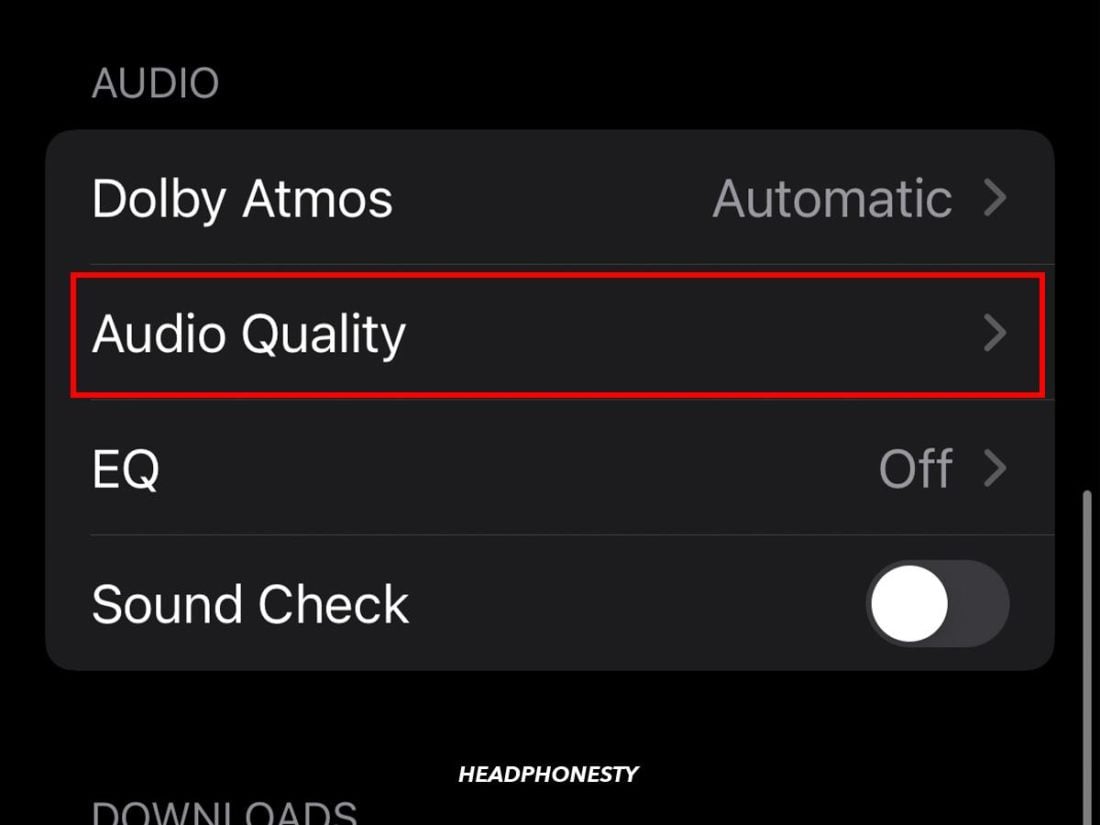
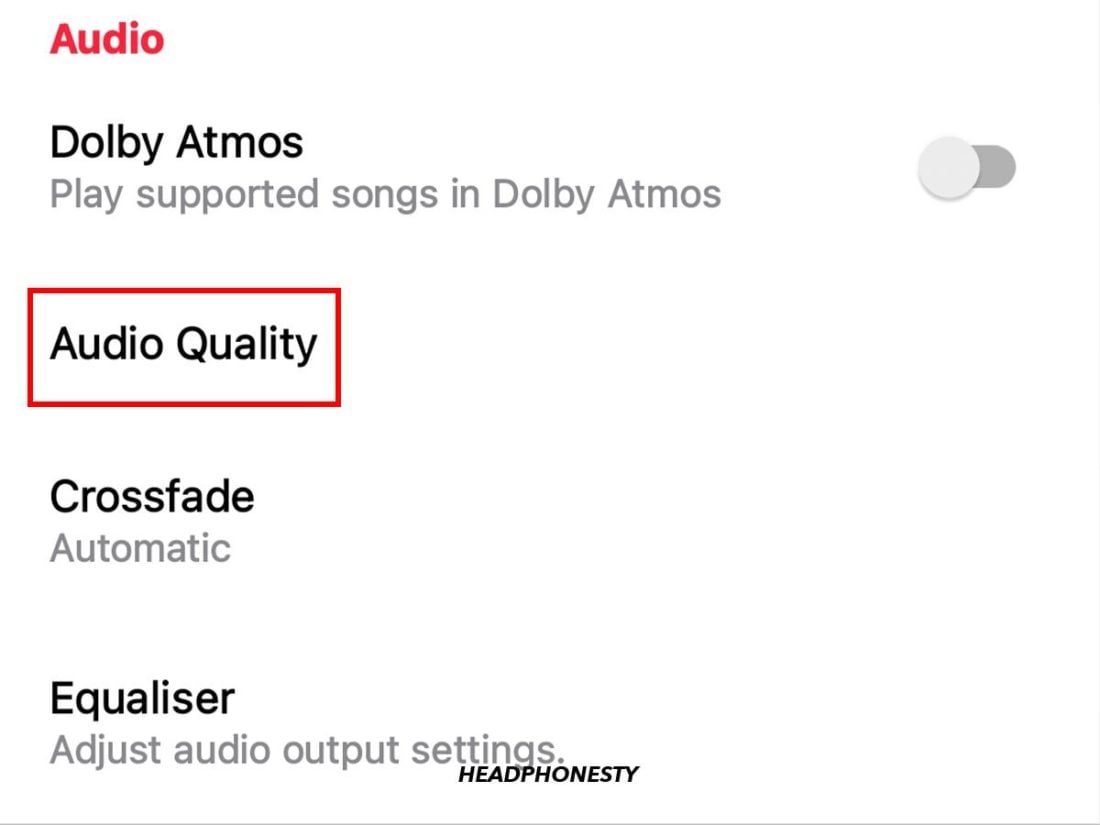
Going to Music settings on iPhone - Select Audio Quality
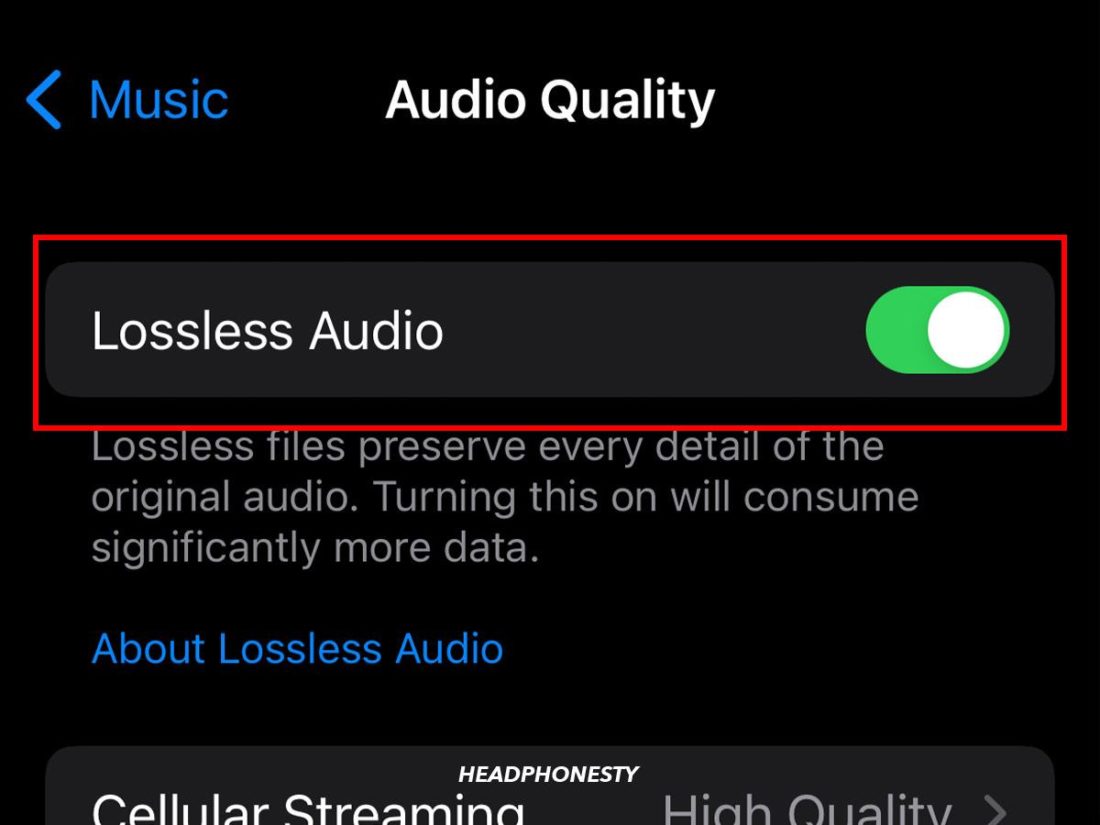
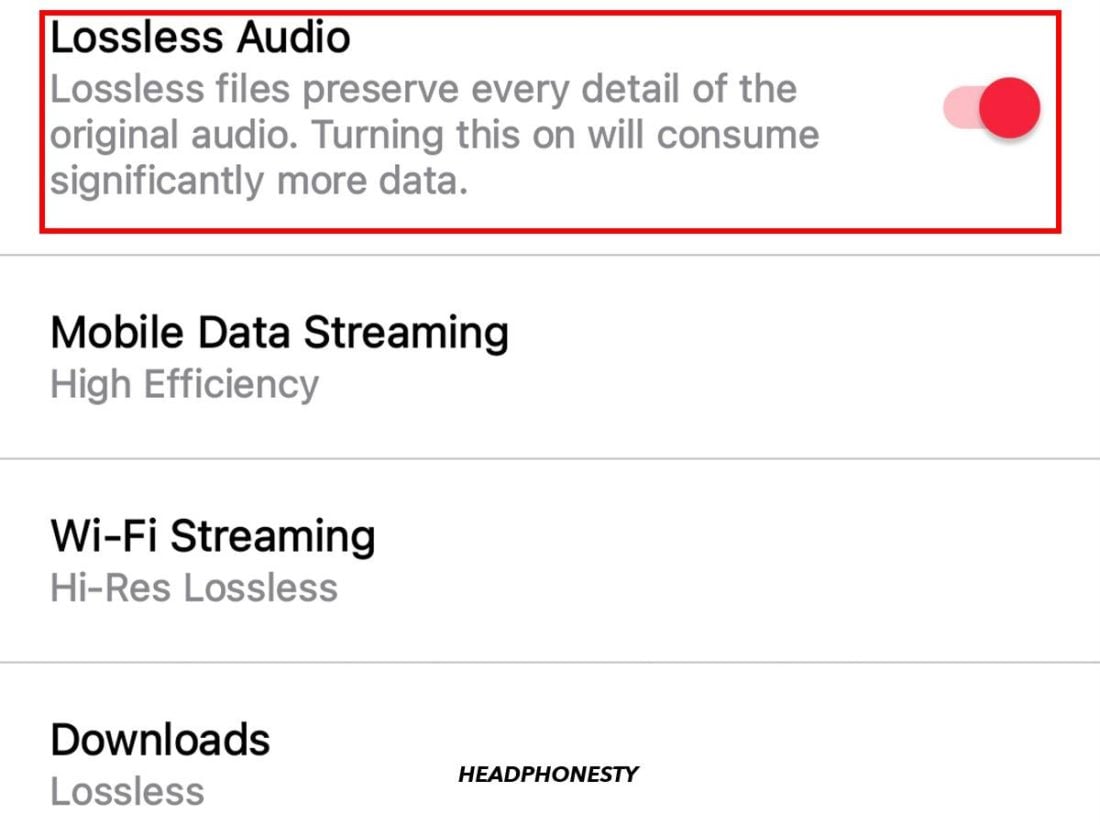
Going to Audio Quality on iPhone - Tap the Lossless audio toggle
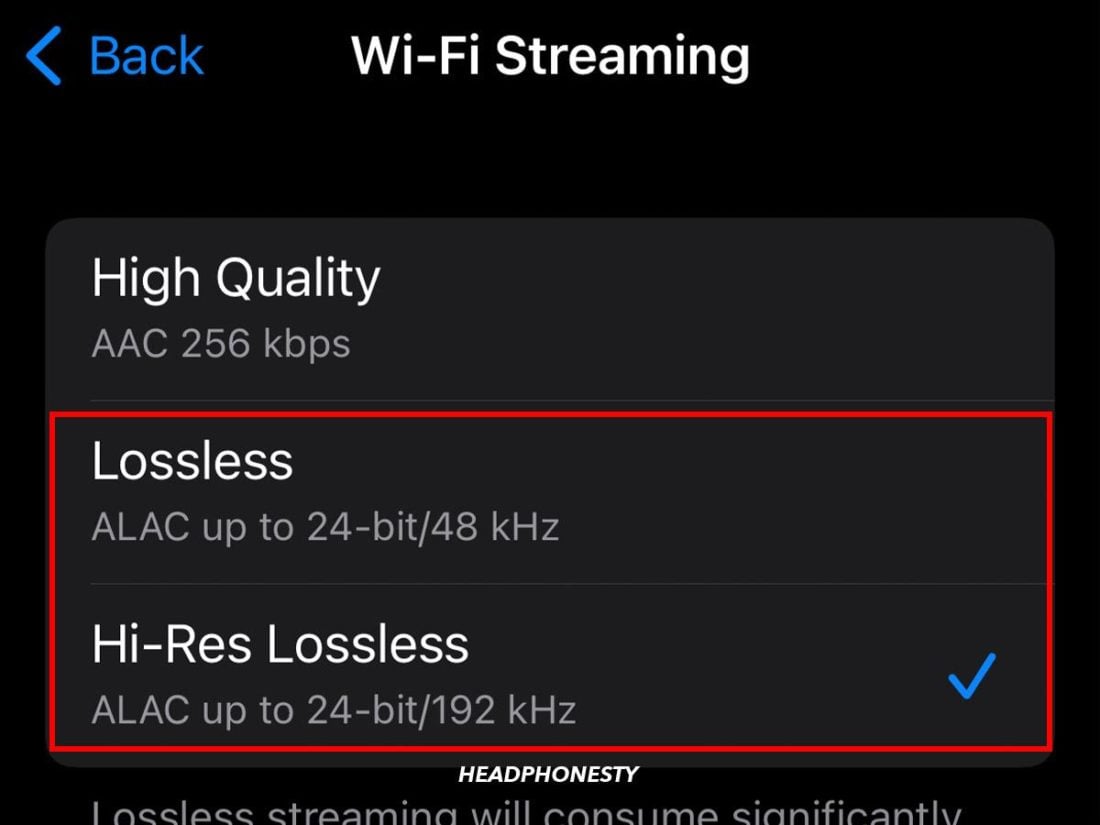
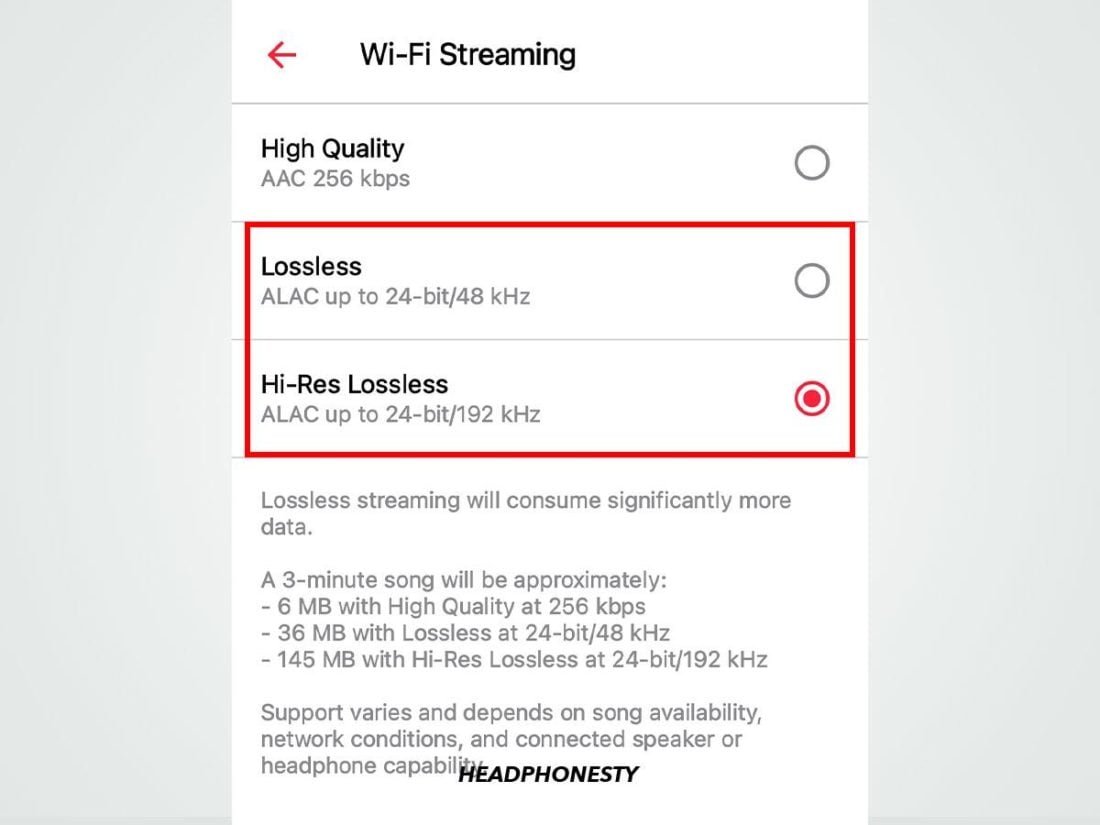
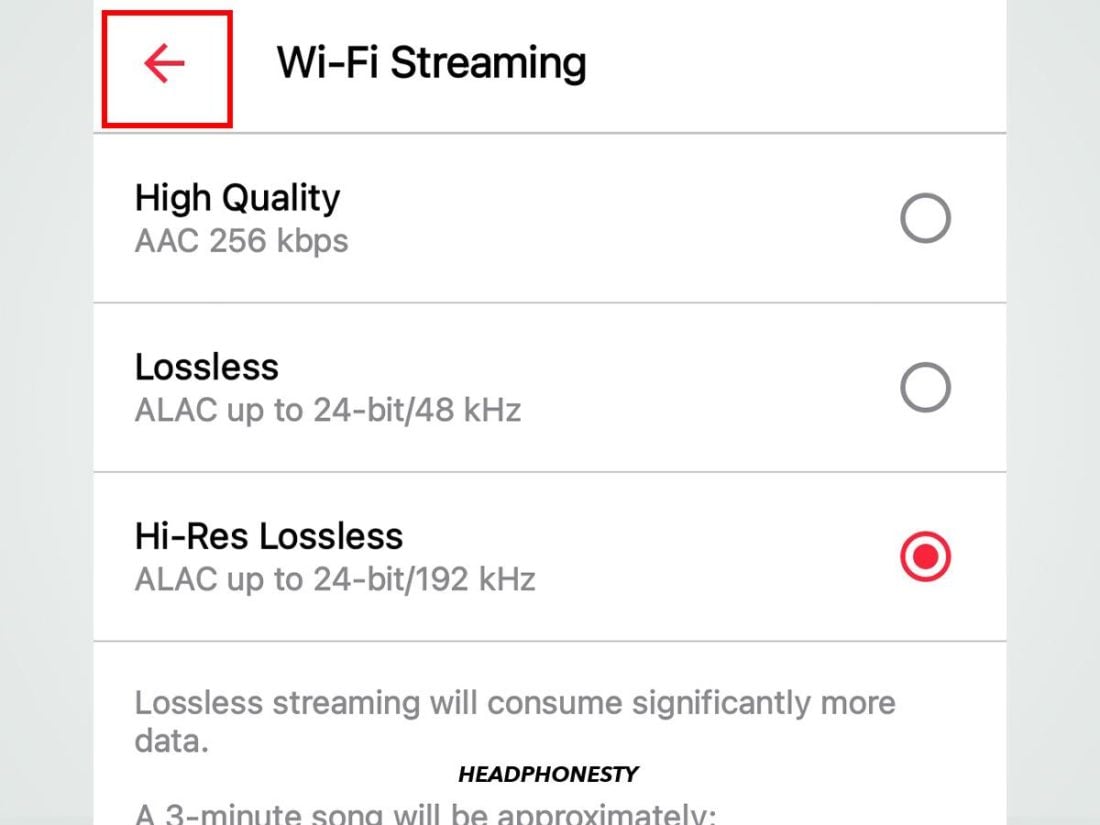
Enabling Lossless Audio on iPhone - Select Wi-Fi Streaming; you can opt for either Lossless quality (24-bit/48kHz) or Hi-Res Lossless (24-bit/192kHz).
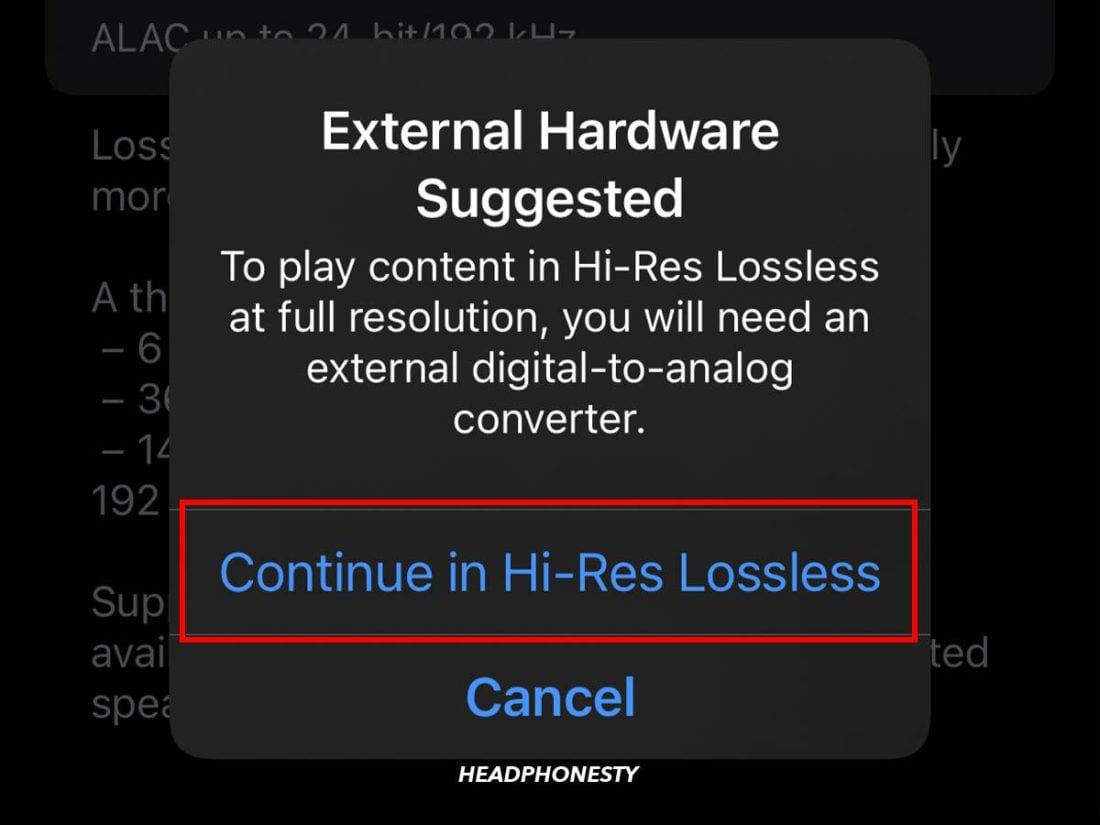
Choosing Wi-Fi Streaming quality on iPhone - Tap Continue if you chose Hi-Res Lossless.
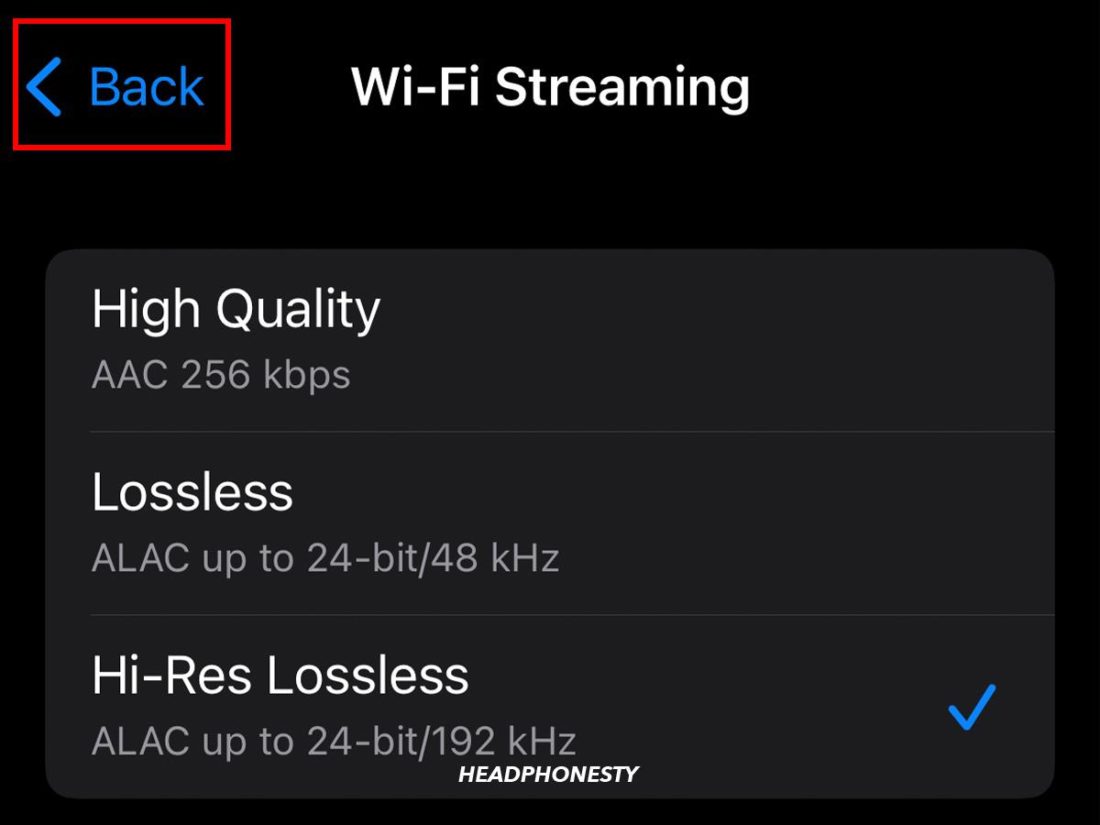
Confirming Hi-Res Lossless option - Tap the blue Audio Quality navigator in the upper-left to return to the previous screen
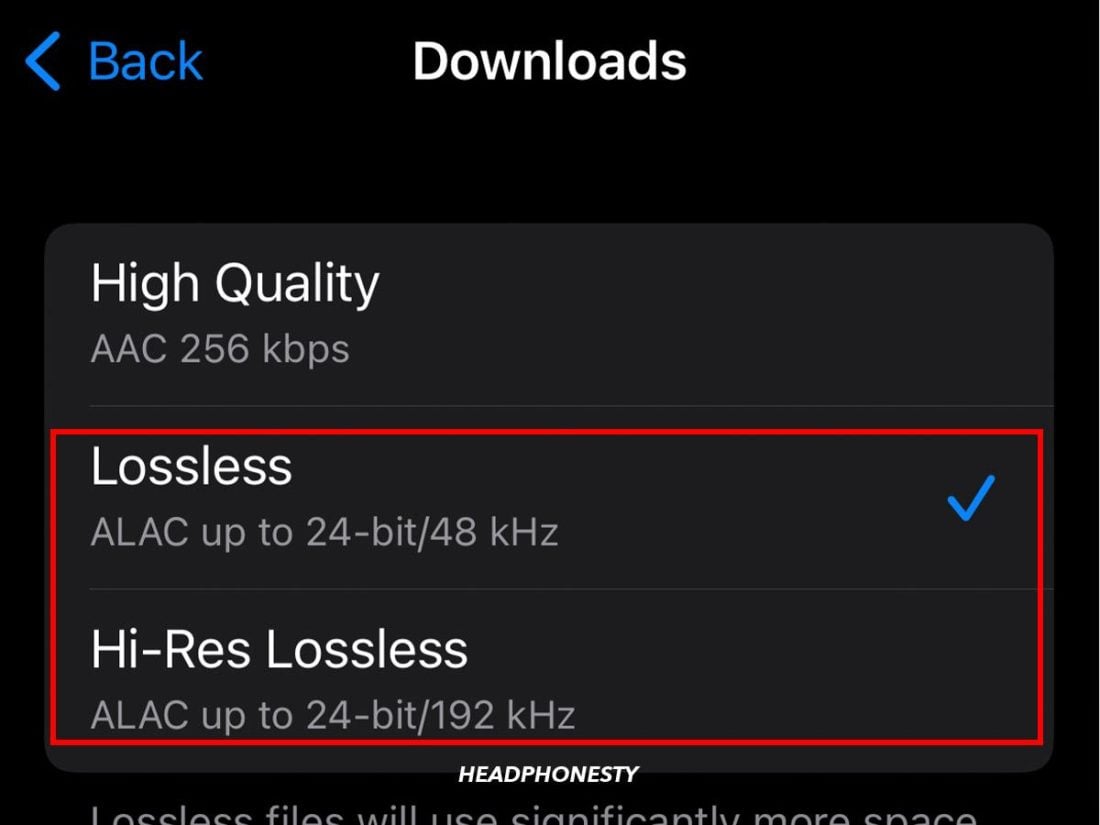
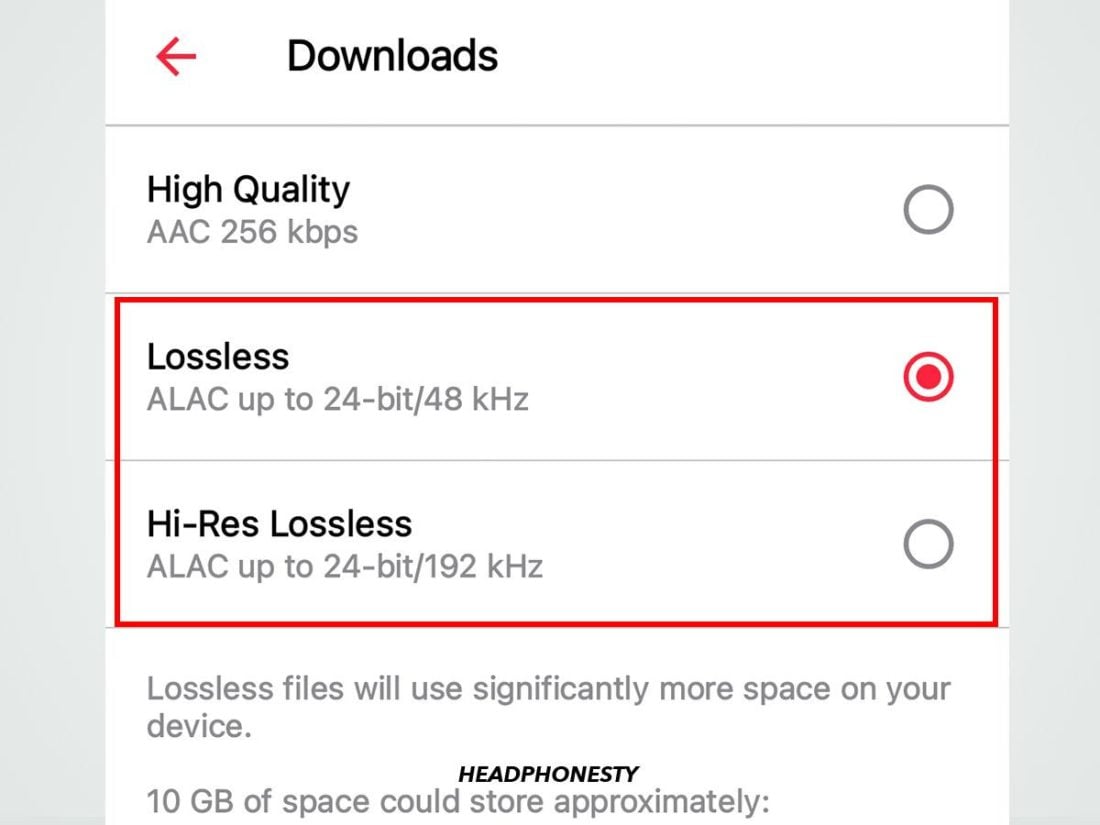
Return to the previous screen - Follow steps 4&5 for the Download drop-down.
Choose Download quality on iPhone
Using Android
- In Apple Music, go to Settings, then scroll down and select Audio Quality
Going to Audio Quality settings on Android - Toggle Lossless audio on
Enabling Lossless Audio on Android - Select Wi-Fi Streaming; you can opt for either Lossless quality (24-bit/48kHz) or Hi-Res Lossless (24-bit/192kHz).
Selecting Wi-Fi Streaming quality on Android - Tap OK if you chose Hi-Res Lossless
Confirming Hi-Res Lossless quality on Android - Tap the red back arrow in the upper-left corner of the screen to return to the previous screen.
Returning to previous tab - Follow steps 3&4 for the Download drop-down.
Choosing Download quality on Android
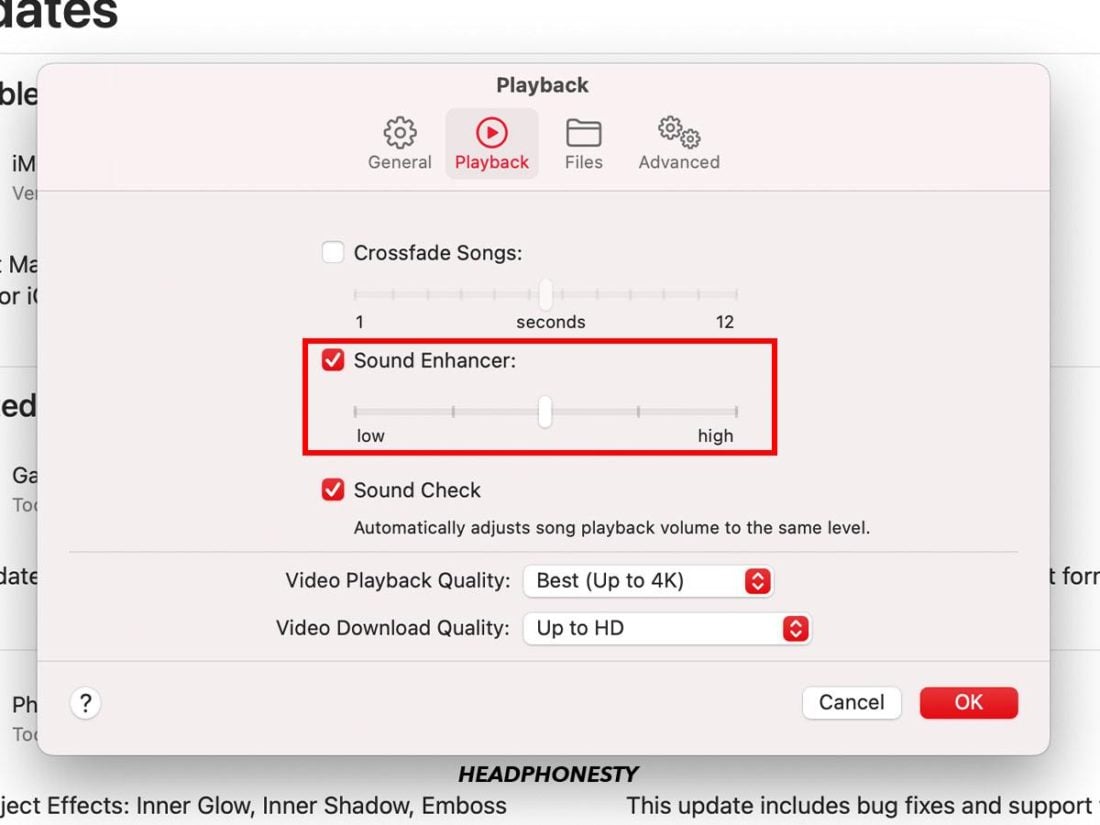
Sound Enhancer in Apple Music Settings
The Sound Enhancer feature boosts bass and treble frequencies, giving you better clarity and a wider soundstage. It’s a great way to improve your audio, especially when using earphones or your computer’s built-in speakers.
You can find this feature by going to the Playback pane under Apple Music’s Preferences.
Sound Check in Apple Music Settings
Mastering is the final step of the audio production process – after a song has been recorded and mixed.
Various tools like EQ, compression, and effects are used to enhance and optimize the soundtrack to make it more listenable and consistent, irrespective of the formats and mediums it is played on. In short, it’s the last shot to check quality control of the music.
Some songs are mastered to sound louder than others, no thanks to the loudness wars of the 90s. This inconsistency leads to jarring transitions between quieter and louder songs. And it becomes even more apparent when listening to songs from different albums.
Sound Check helps by keeping your volume levels consistent throughout your listening session. It works the same way as Audio Normalization.
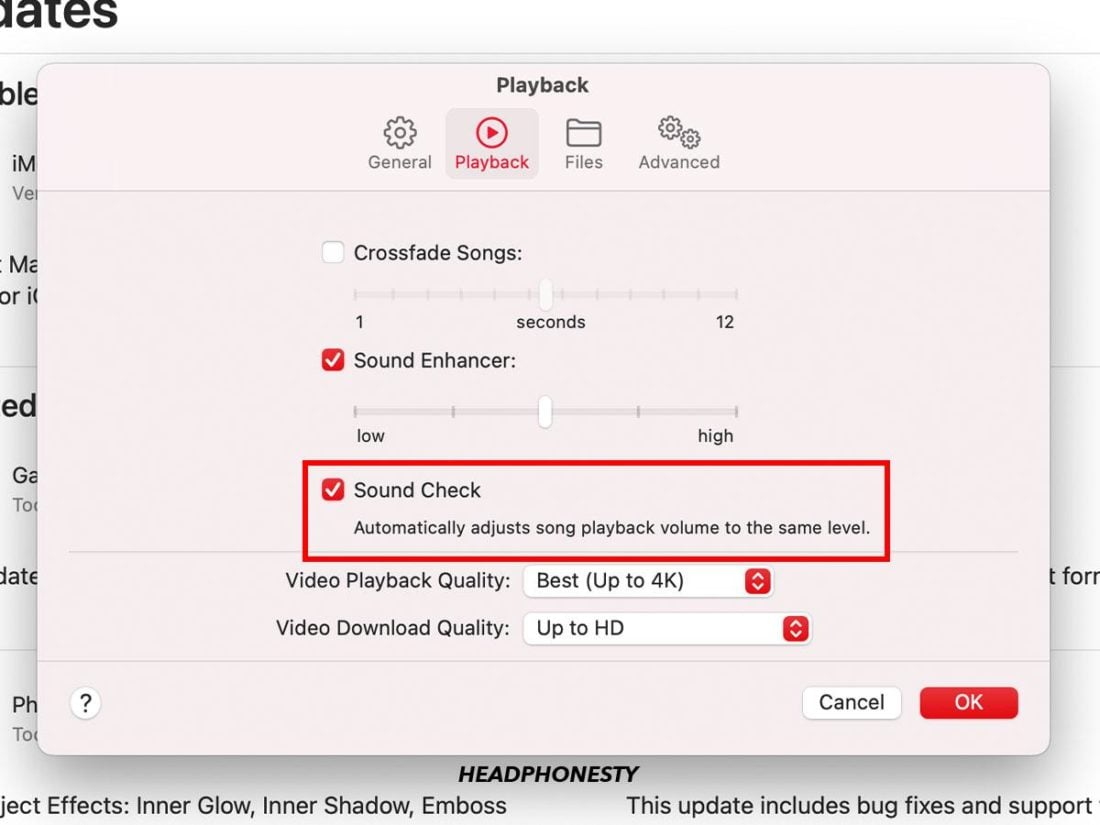
You can find this in the Playback pane under Apple Music’s Preferences, next to the Sound Enhancer feature.
Utilize Dolby Atmos in Apple Music
Apple Music offers Spatial Audio by Dolby Atmos for selected tracks. This lets you enjoy an immersive, surround sound listening experience on your headphones.
You can also download Dolby Atmos tracks or tweak your playback settings to enjoy this feature fully. Here’s how:
How to download tracks in Dolby Atmos quality
The Download Dolby Atmos feature lets Apple Music users download their favorite music tracks in Spatial Audio quality (if available). This format delivers three-dimensional sound, making it seem like your music is coming from all around you rather than just the left and right stereo channels.
Being able to download Spatial Audio tracks is great for when you want uninterrupted, high-definition audio when traveling or if you have a spotty data connection.
To download Spatial Audio tracks on Mac, iPhone, and Android, follow these steps:
Using Mac
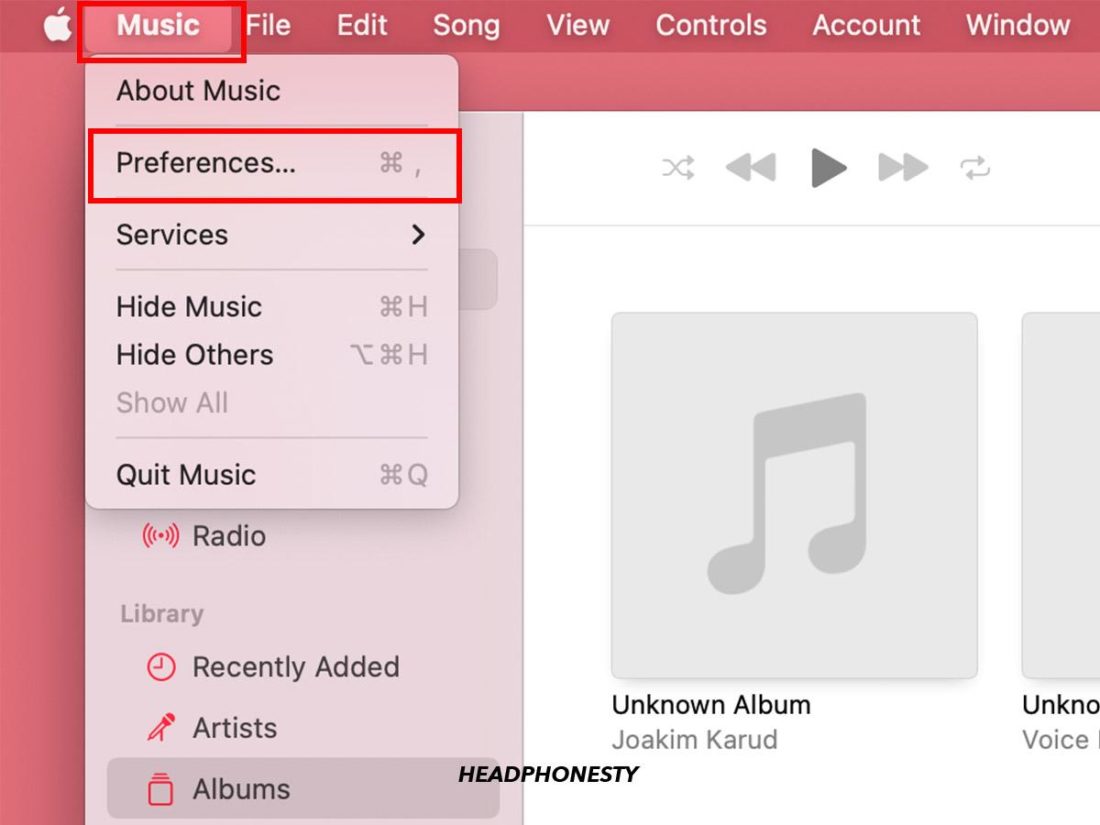
- Open the Music menu.
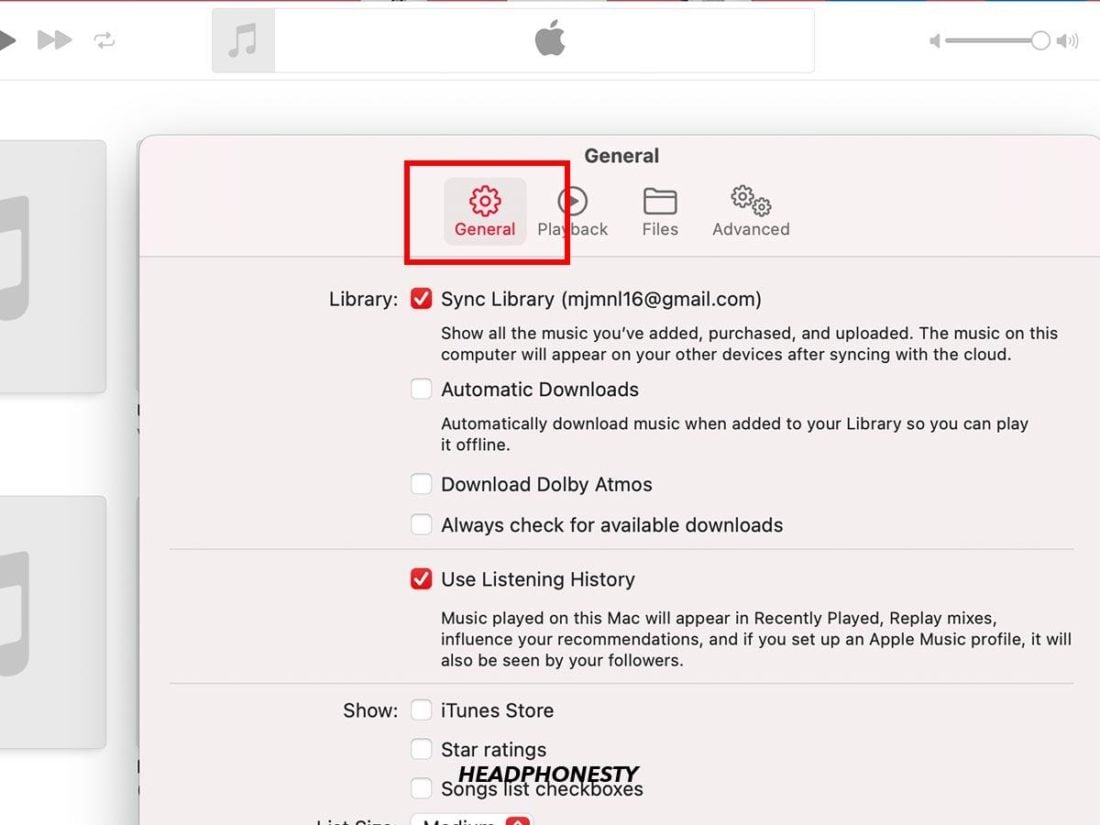
Going to Music Preferences on Mac - Go to the General pane under Preferences.
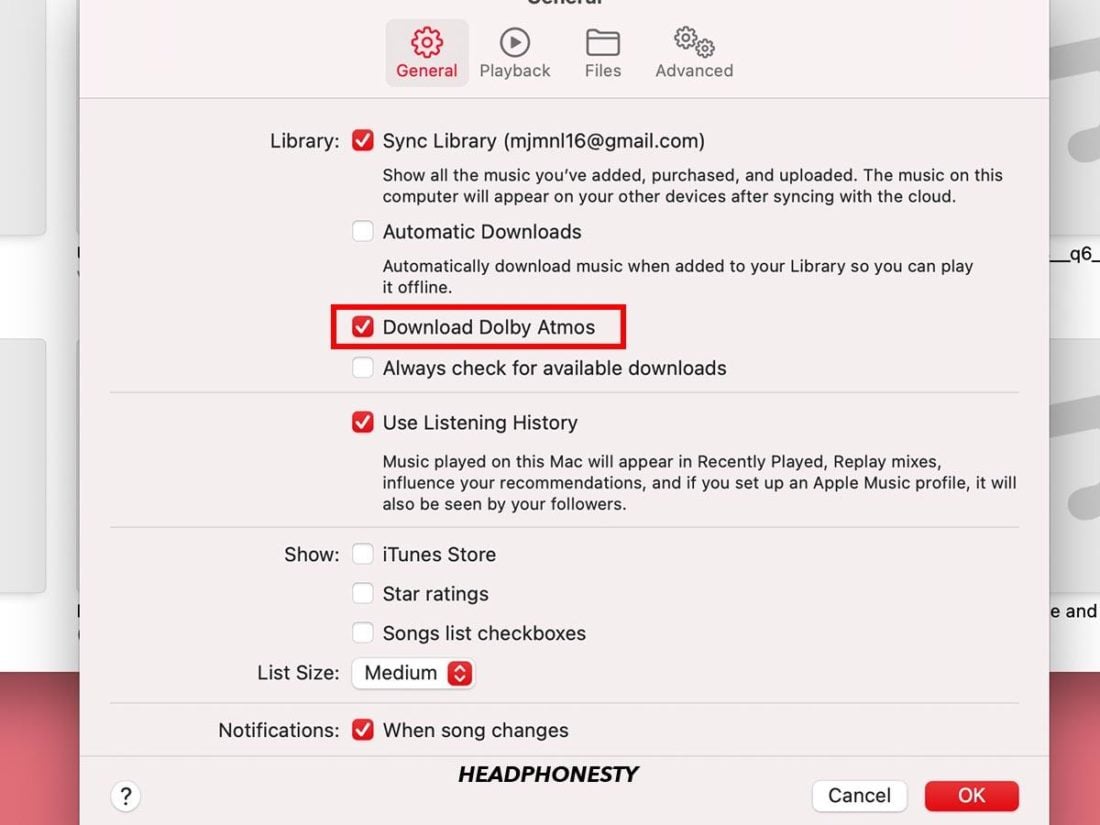
Selecting General tab - Tick the Download Dolby Atmos box to enable this feature.
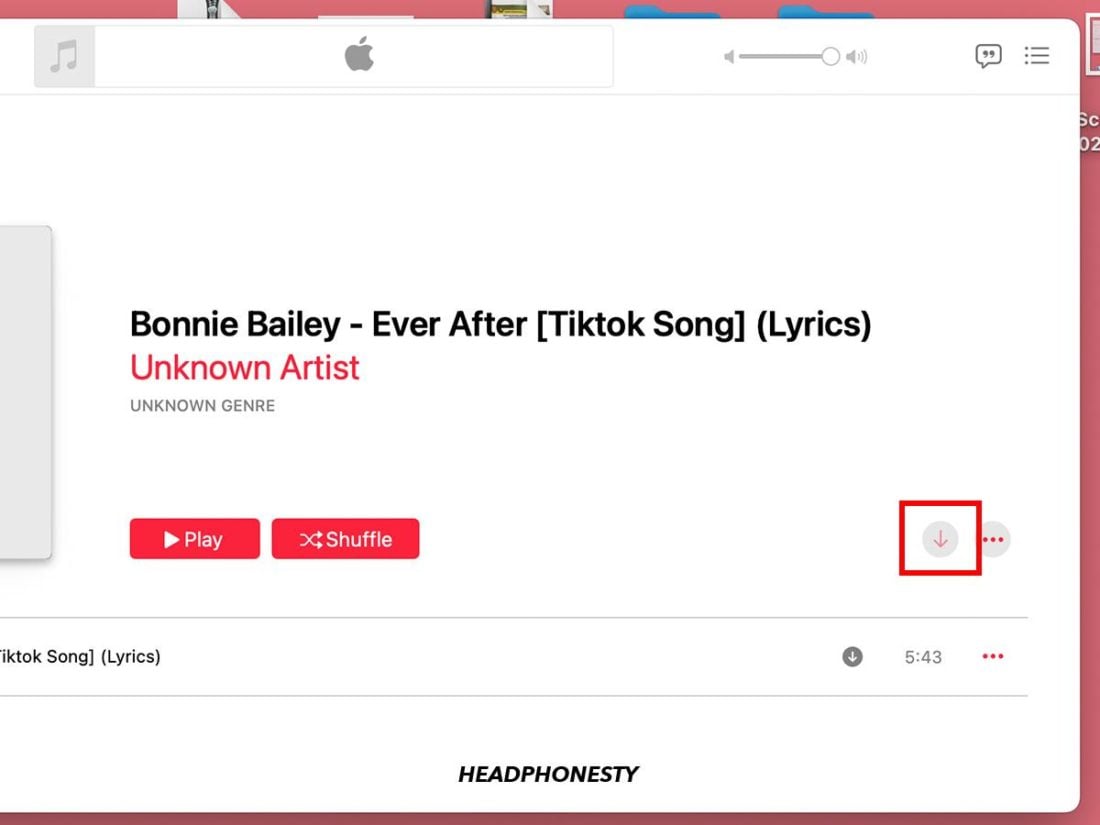
Enable ‘Download Dolby Atmos’ on Mac - A downwards arrow should appear when you hover your cursor over the song you want to download if it’s available for download in Dolby Atmos.
Downloading song in Dolby Atmos Quality on Apple Music Mac
Using iPhone
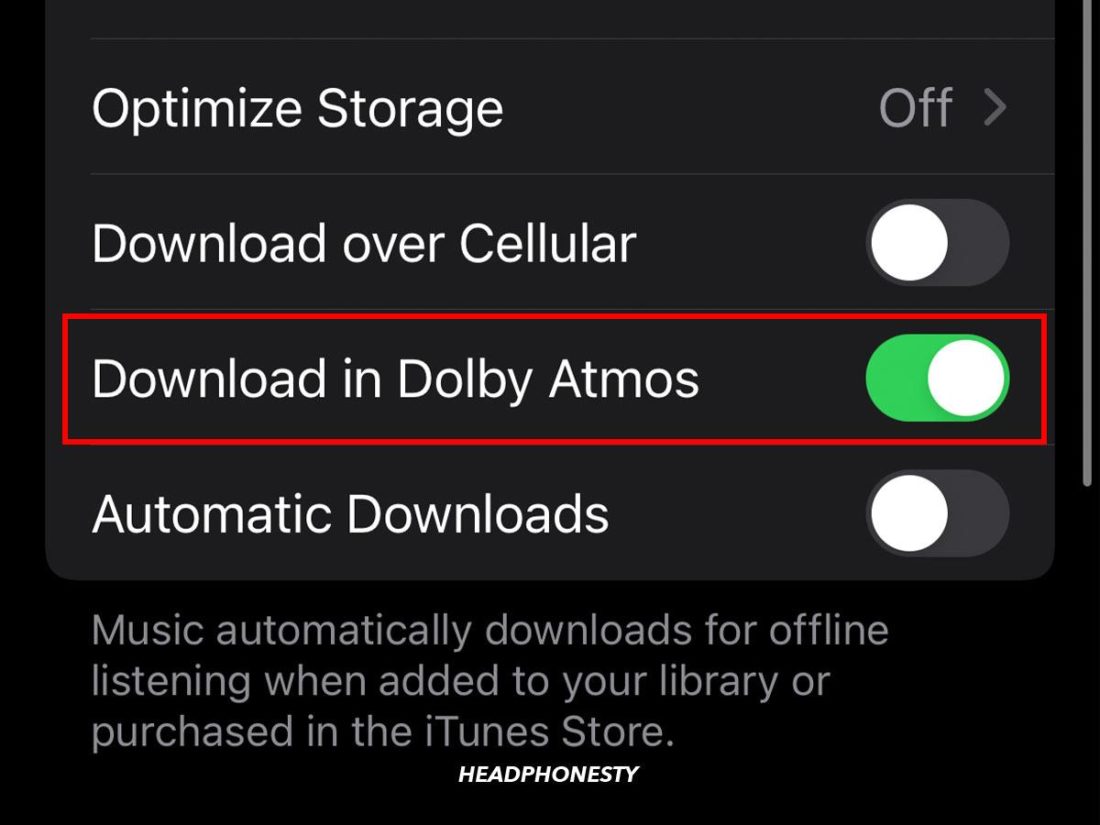
- Go to your device Settings > Music.
Going to iPhone Music Settings - Make sure the Download in Dolby Atmos option is enabled.
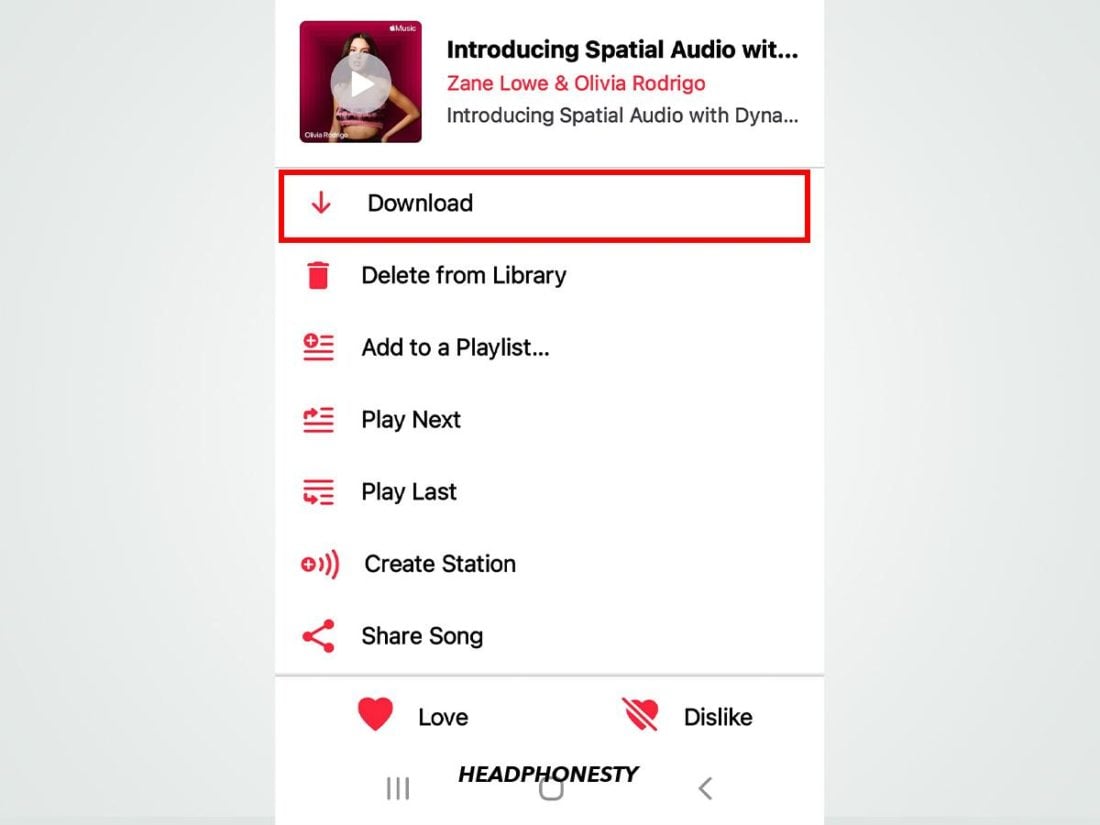
Enable ‘Download in Dolby Atmos’ on iPhone - When you go back to Apple Music, tap on the three dots to the far right of the song title, and the Download option should be available.
Downloading song in Apple Music on iPhone


Using Android
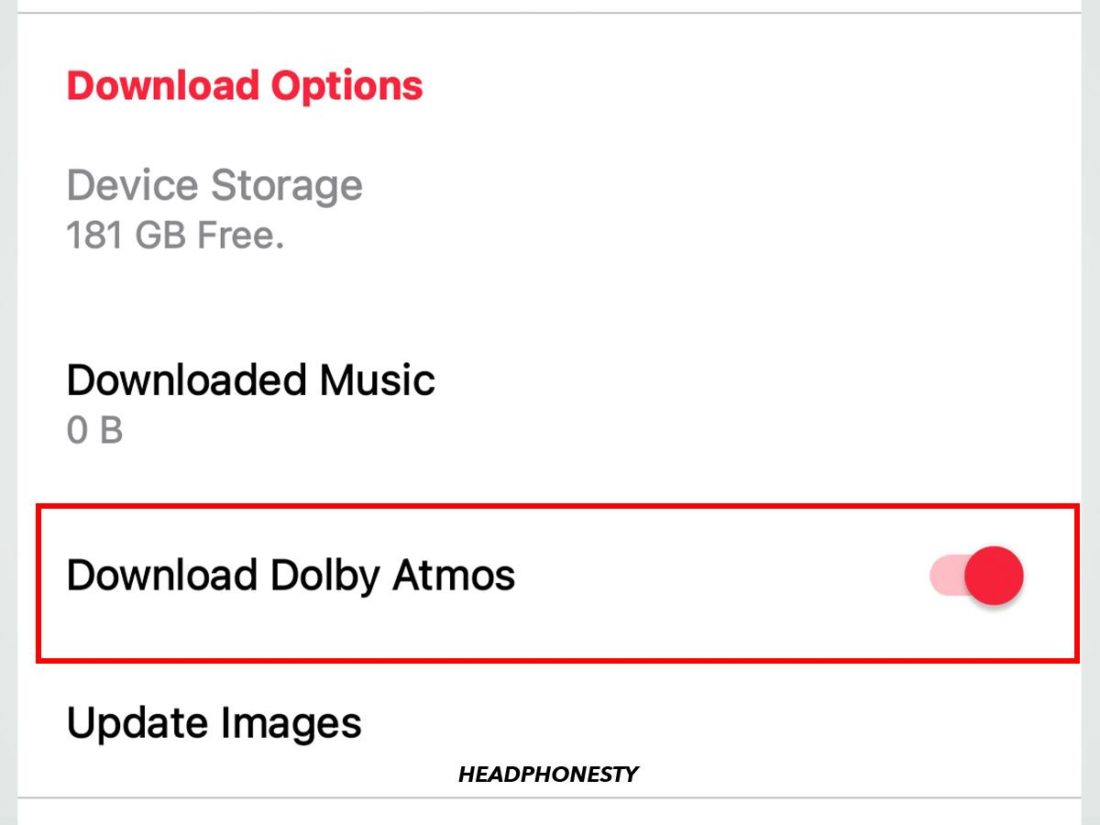
- In the Apple Music app, go to Settings.
Going to Apple Music app Settings on Android - Under ‘Download Option’, make sure the Download Dolby Atmos option is enabled.
Enable ‘Download Dolby Atmos’ on Android - When you go back to Apple Music, tap on the three dots to the far right of the song title, and the Download option should be available.
Downloading song in Apple Music on Android
How to change Dolby Atmos playback settings
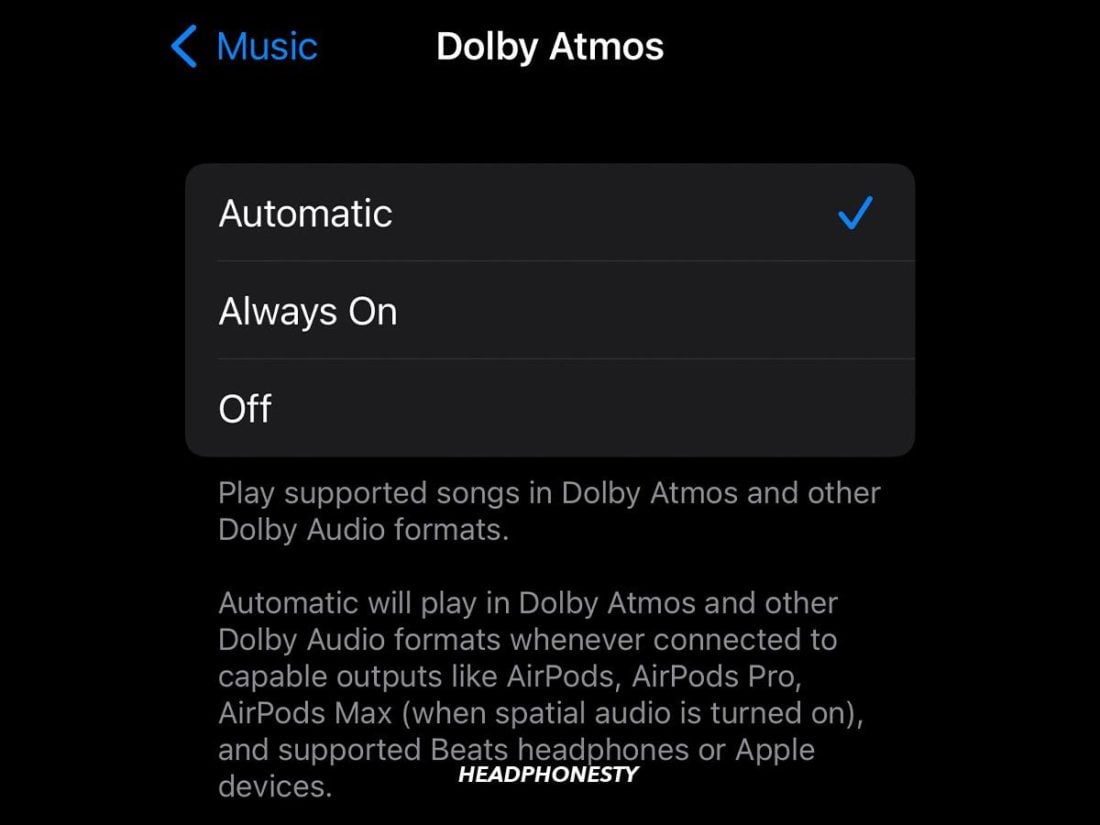
Apple Music also gives subscribers the option to customize their Dolby Atmos playback settings. You have three options to choose from:
- Automatic
- Always On
- Off
The Automatic setting plays Dolby Atmos tracks when it detects Dolby-enabled devices, such as AirPods, Beats headphones, or Macbook speakers (2018 model and up). On the other hand, the Always On setting forces Dolby Atmos quality regardless of your audio gear.
These two settings are helpful if you’re already using Atmos-enabled headphones because they’ll recognize that your headphones are compatible and automatically play Spatial Audio tracks. So, you won’t need to keep going into your settings to toggle the feature on.
Just keep in mind that the Automatic setting will only recognize Apple headphones. So, if you’re using other headphone brands, it’s best to set this to Always On.
To change the Dolby Atmos playback settings:
- On Mac, go to the Playback pane in Apple Music’s Preferences.
- On iPhone, it can be found under Music in your iOS Settings.
Selecting Dolby Atmos playback settings
Streaming and Download Quality Options for Both Video & Audio
As an Apple Music subscriber, you can choose your preferred quality settings for music and videos. For audio quality, the settings for streaming and downloads are identical. These include High Quality (256 kbps), Lossless (24-bit/48kHz), and Hi-Res Lossless (24-bit/192kHz).
As for video quality, you also have three options to choose from for streaming and downloads. Under video streaming quality, you get the following settings:
- Good
- Better (up to 1080p)
- Best (Up to 4K)
The options are slightly different for video downloads:
- Up to HD (720p to 1080p)
- Up to SD (240p to 480p)
- Most Compatible Format
These options let you customize your listening experience to suit your audio gear and connection speed. For instance, opting for the High Quality or Good setting helps to avoid audio stutters while streaming.
On a Mac, you can find these settings in the Playback pane under Preferences, next to the Dolby Atmos playback settings. On Android and iOS, these settings are found under Audio Quality in Settings.
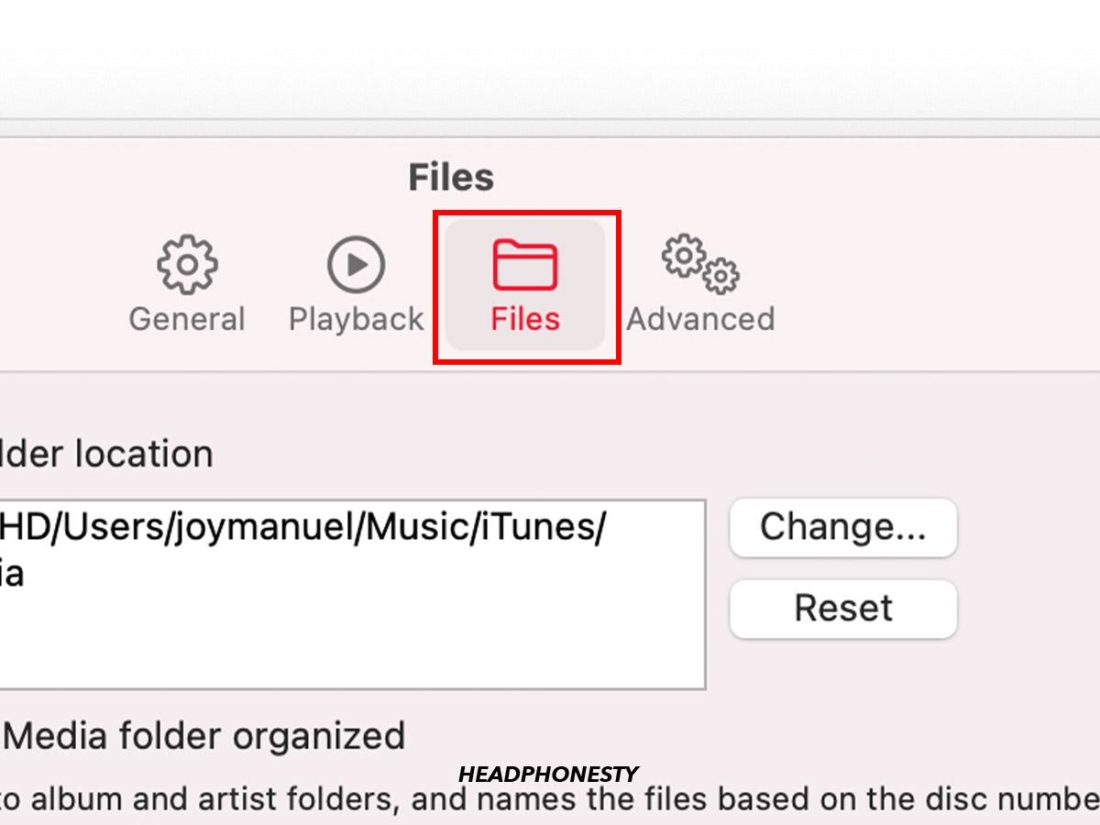
Keep Music Media Folder Organized: How to Organize Apple Music
If you’re a Mac user with an extensive music collection and tend to get a little obsessive over keeping everything organized, Apple Music has the perfect feature for you.
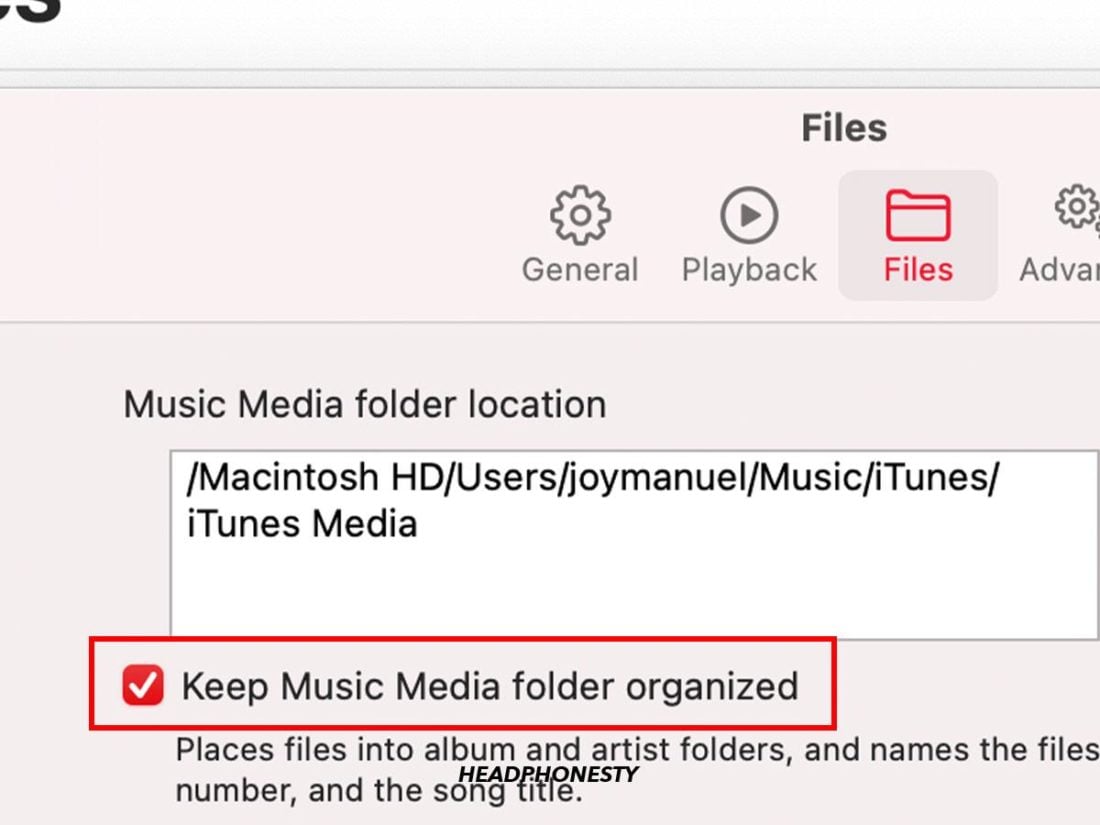
The ‘Keep Music Media folder organized’ option restructures your entire music collection and consolidates it in one location. It does this by creating folders by album and artist, then moving all of your songs into them.
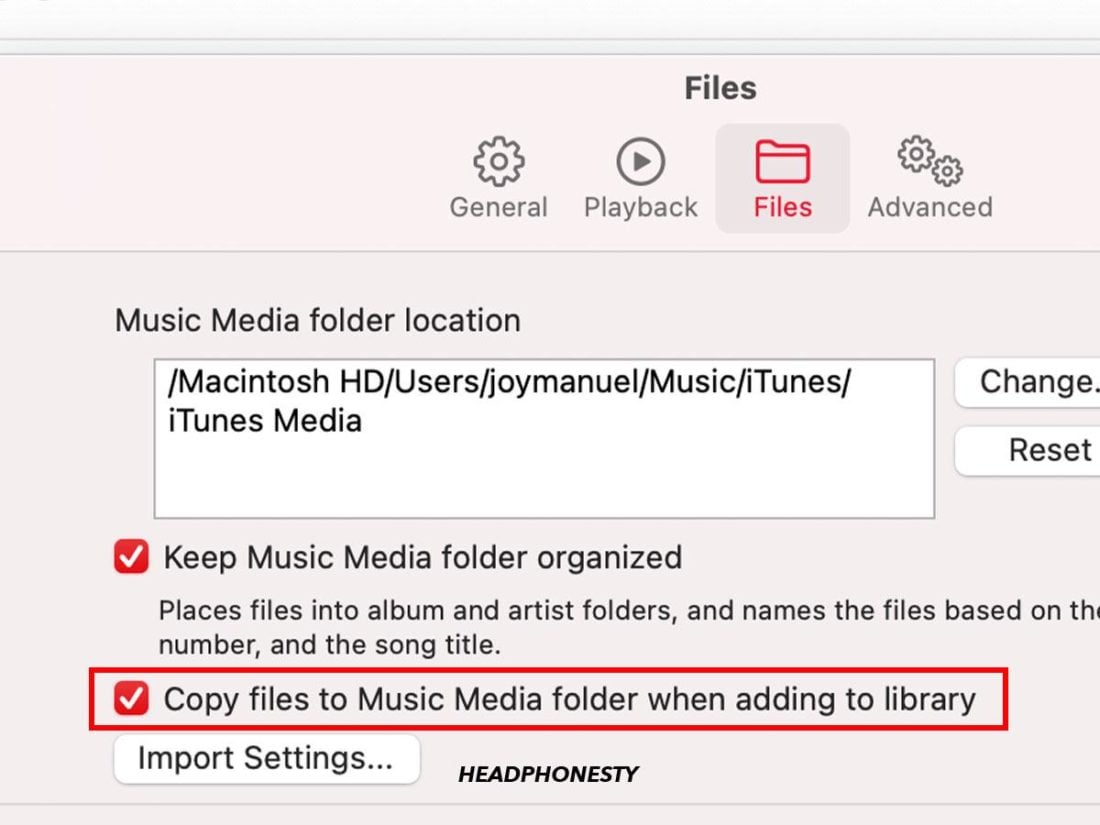
This feature works in tandem with the ‘Copy files to Music Media folder when adding to library’ option.
This ensures that all songs you import, download, buy, and add to your library are always copied to the iTunes Media folder. It’s a pretty great feature as it eliminates the hassle of manually creating folders and moving all your music.
- In Apple Music, go to Files under Preferences
Files tab in Apple Music Preferences - Tick ‘Keep Music Media folder organized’
Enable ‘Keep Music Media folder organized’ on Mac - Tick ‘Copy files to Music Media folder when adding to library’
Enable ‘Copy files to Music Media folder when adding to library’ on Mac
Reset Music Store Cache in Apple Music Settings
The iTunes Store cache stores temporary data files of pages you’ve visited on the iTunes Store. For instance, when you view the Top Albums page, a copy of that page is stored in the iTunes Store cache. This allows the app to load that page much faster the next time you visit it.
The problem is that cache files eventually become obsolete. And when they do, they can cause page errors or missing content. This can often happen on the iTunes Store since its content is continuously updated. So, if you can’t find your favorite artist’s recently released single, it’s likely due to a cache issue.
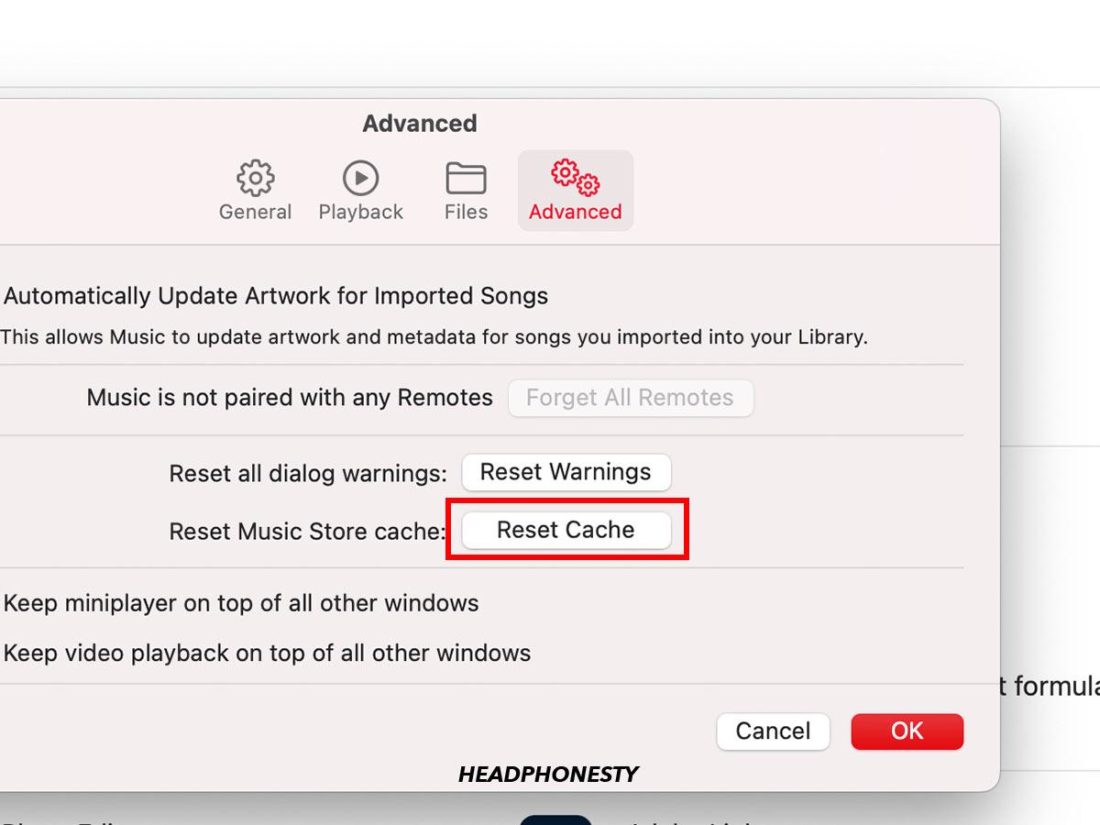
By resetting the Music Store cache, you ensure that the latest versions of those pages are saved. Resetting the cache also helps when the page isn’t opening properly. To do this on your Mac:
- In Apple Music, go to the Advanced pane under Preferences
Advanced Preferences on Apple Music - Select Reset Cache
Resetting Apple Music cache

Keep Apple Music on Top of Other Windows
If you want quick access to Apple Music on your Mac, you can opt to keep it permanently on top of other apps. But if you’re working on a smaller screen, it doesn’t make sense to have the entire app fully displayed.
You can go for two options when using this feature – the MiniPlayer and the video playback window. The MiniPlayer is a slimmed-down version of the Apple Music app and only shows the current playlist and select playback controls.
Video playback works similarly for videos, which will pop up in a separate window.
To enable this feature on your Mac:
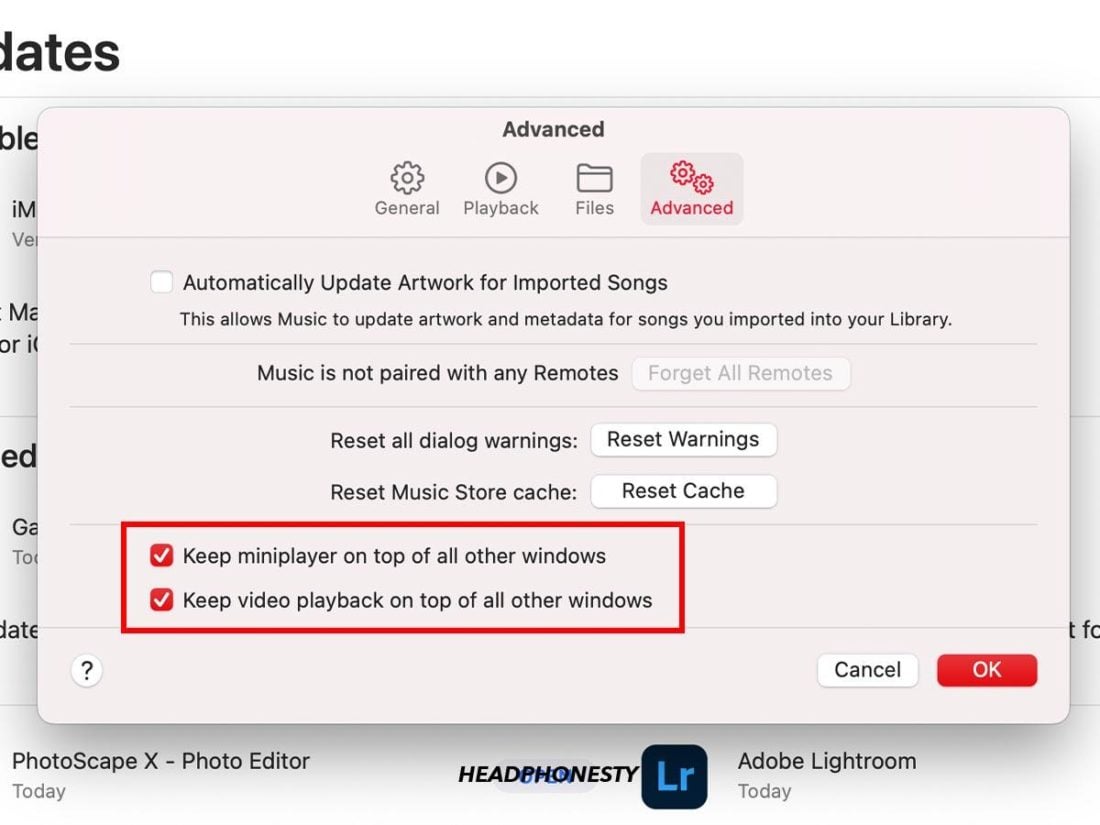
- Open up Apple Music and then go to the Advanced pane under Preferences.
Apple Music Preferences – Advanced tab - Tick the boxes for ‘Keep MiniPlayer/video playback on top of all other windows.’
Enable ‘Keep MiniPlayer/video playback on top of all other windows.’ on Mac

Apple Music’s Use Listening History Feature
In a nutshell, the Use Listening History option lets Apple Music track your listening activity. This keeps your personalized playlists, like Replay and Favorites, updated. It also helps the Apple Music algorithm give you more accurate song recommendations.
Interestingly, your listening history also shows up on your profile by default. This lets your followers see a summary of music you’ve been jamming to. But if you aren’t keen on letting everyone know about your passion for 80s synth-pop, you can make this info private.
To modify the privacy of your listening history, follow these steps:
Using Mac
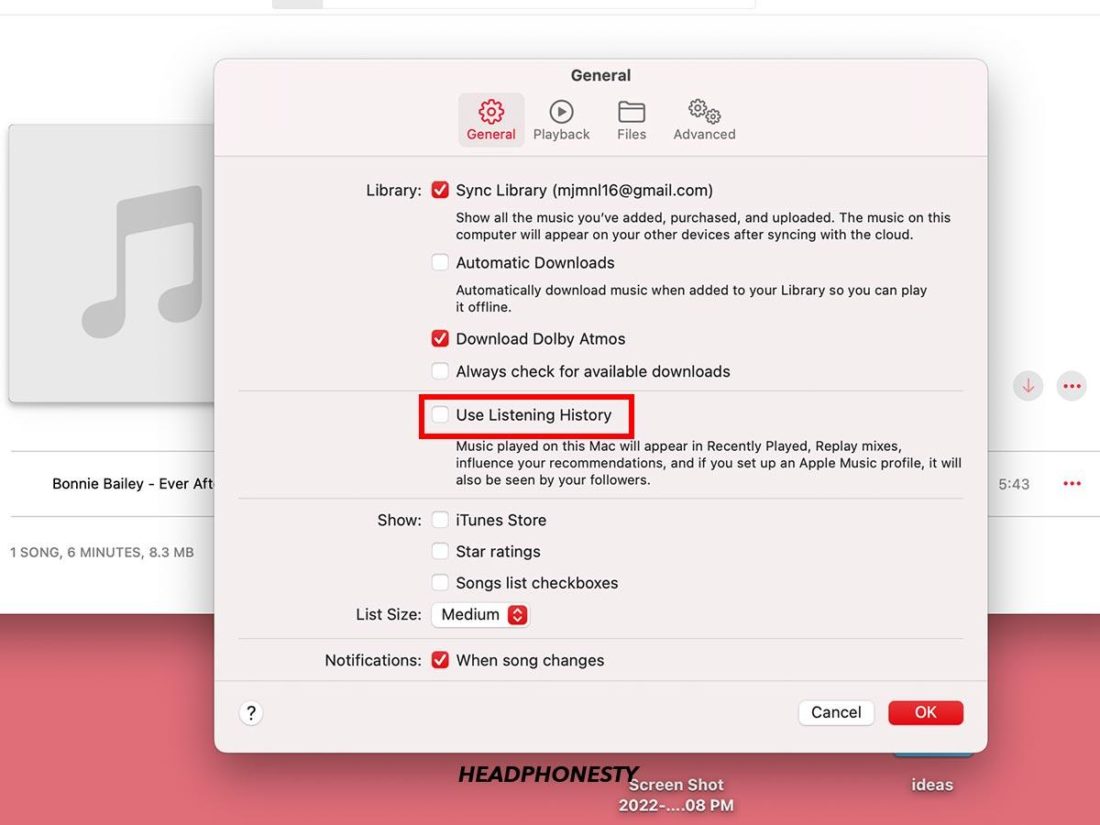
- In Apple Music, go to Preferences. Then, go to the General pane under Preferences.
‘General’ tab in Apple Music Preferences - Uncheck the Use Listening History.
Disable ‘Use Listening History’ on Mac

Using iPhone
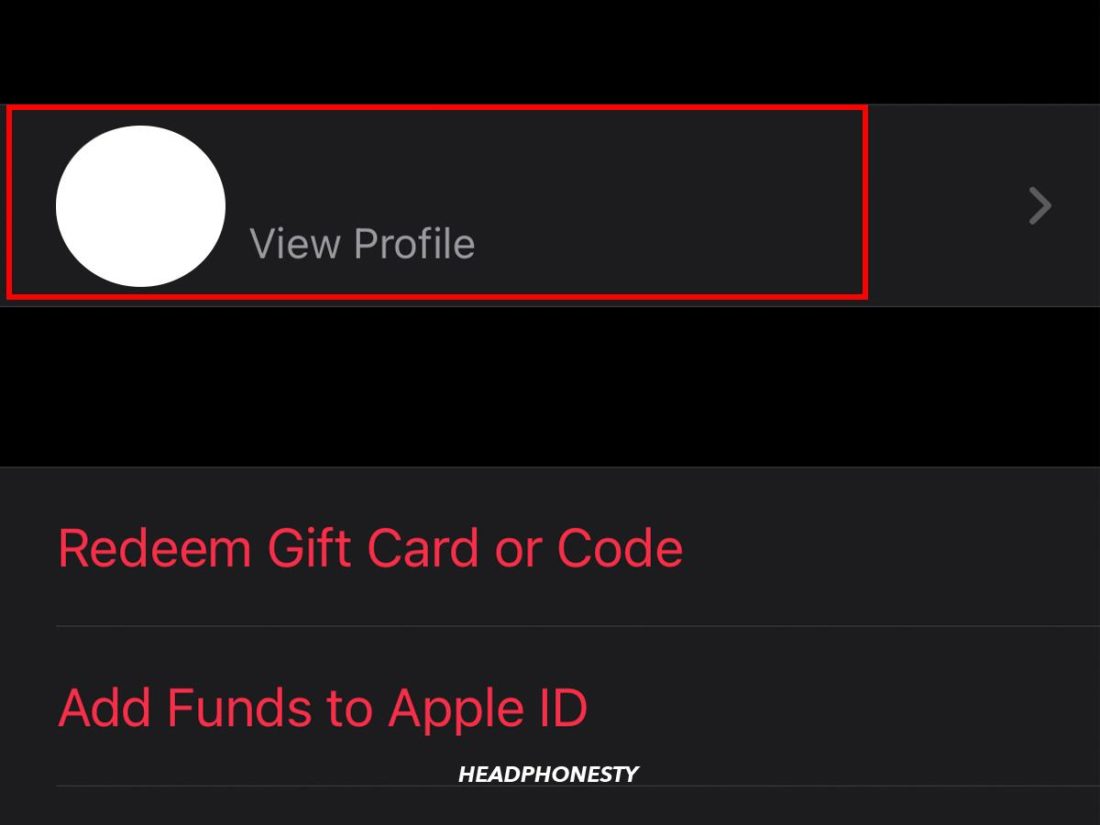
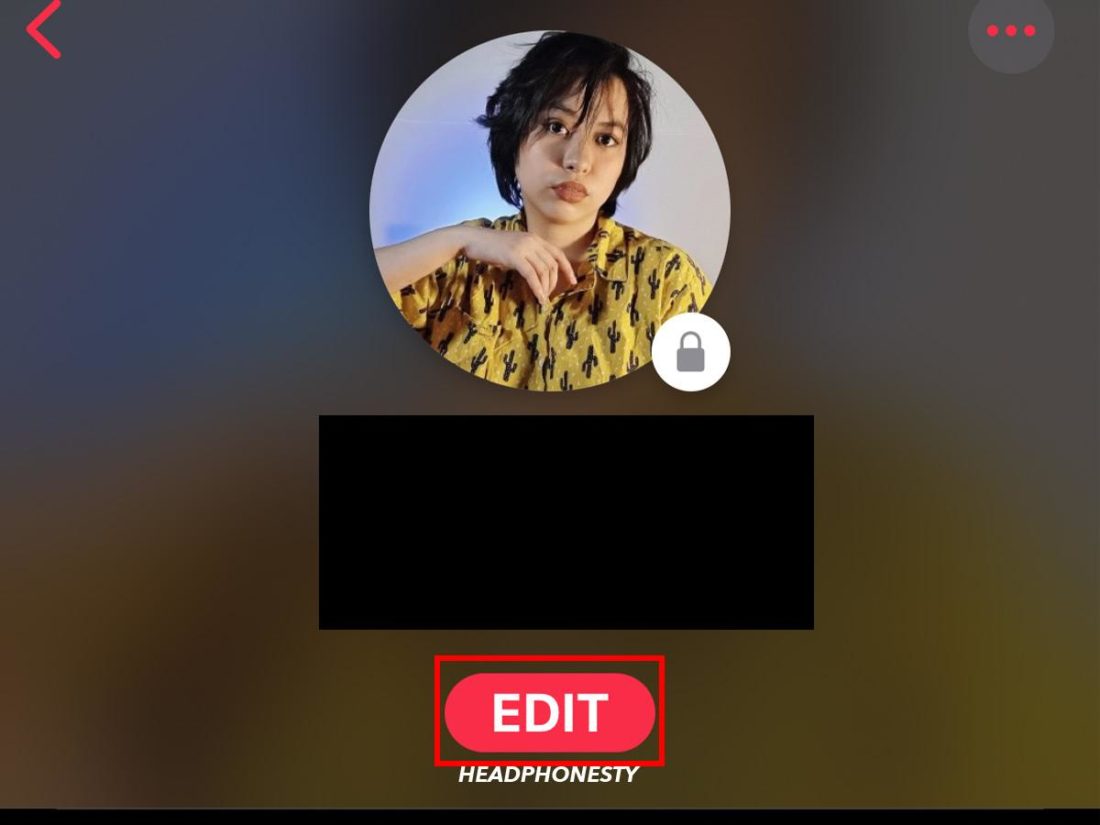
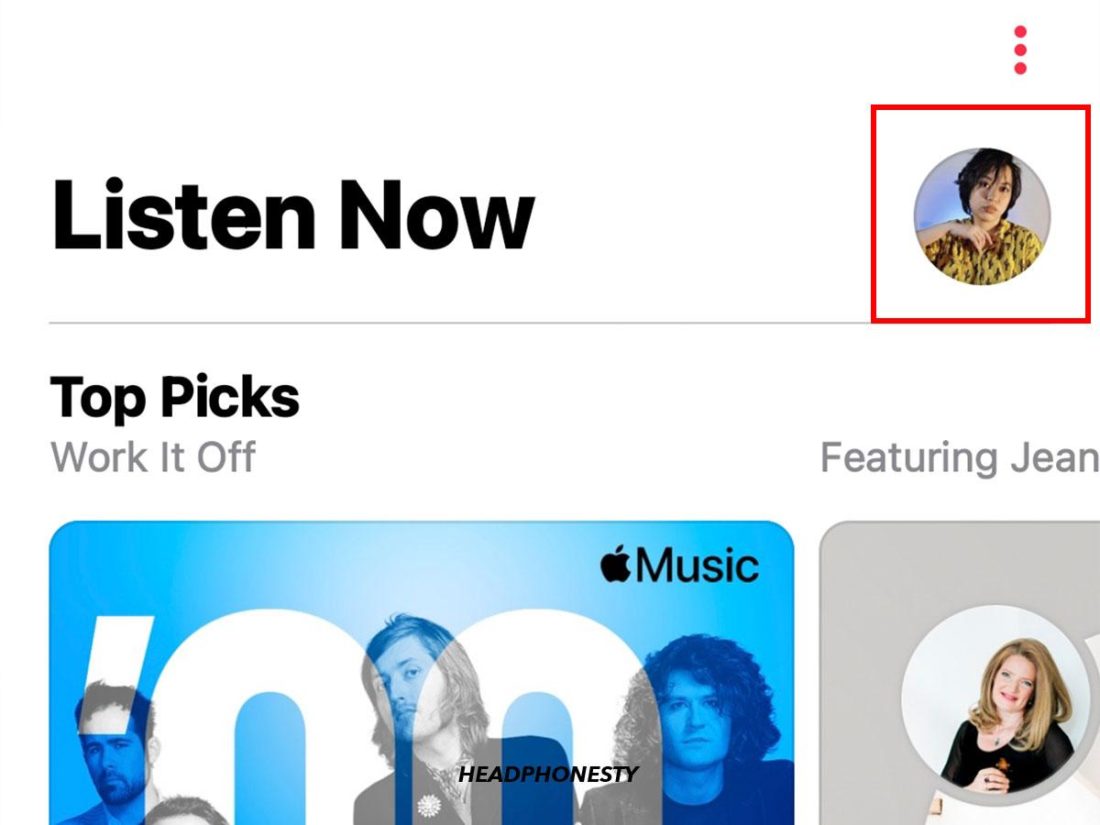
- Click on your profile picture in the Apple Music app.
Going to Apple Music Profile on iOS - Select Edit to choose who can see your activity.
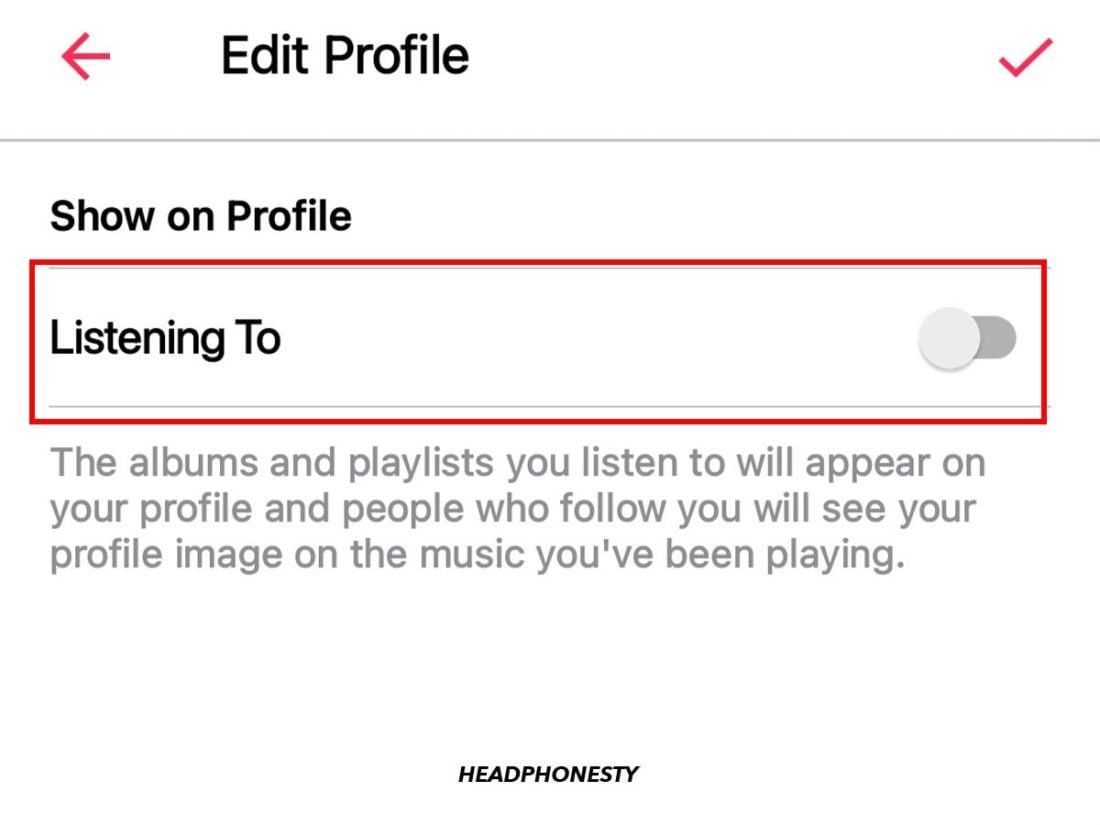
Editing Apple Music Profile - Uncheck the Listening To circle.
Using Android
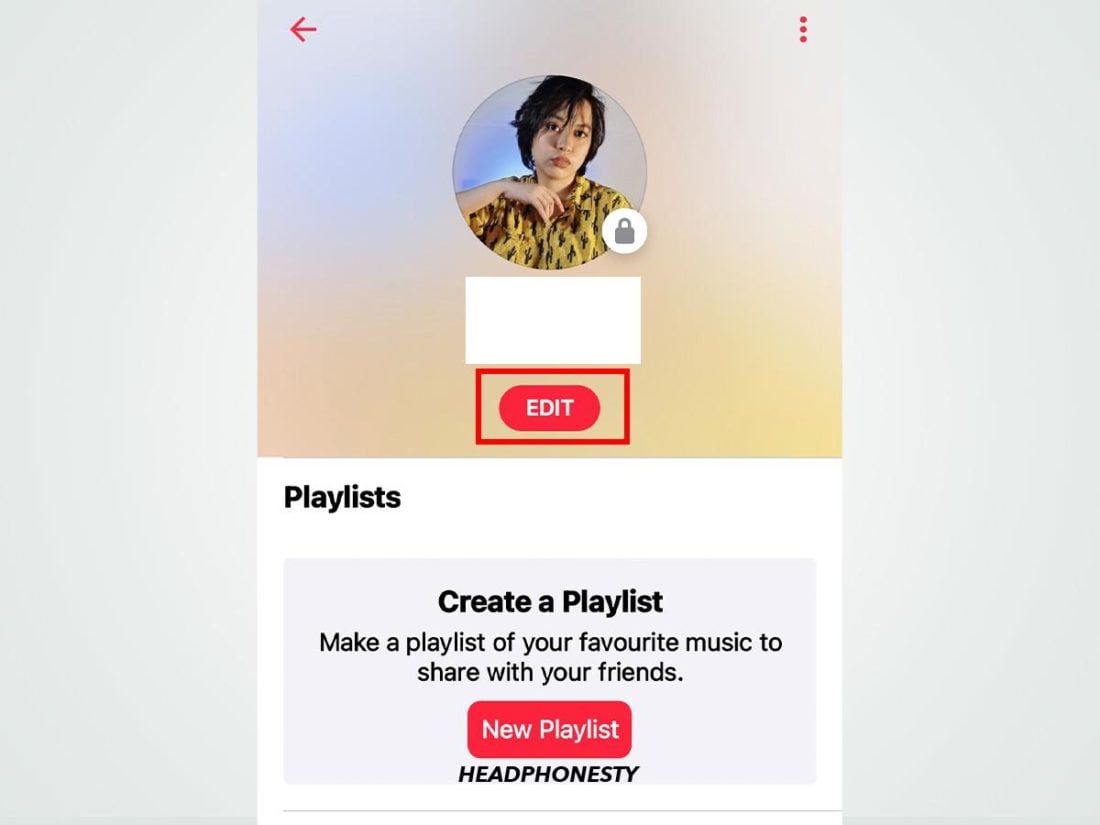
- Click on your profile picture in the Apple Music app.
Going to Apple Music Profile on Android - Select Edit to choose who can see your activity.
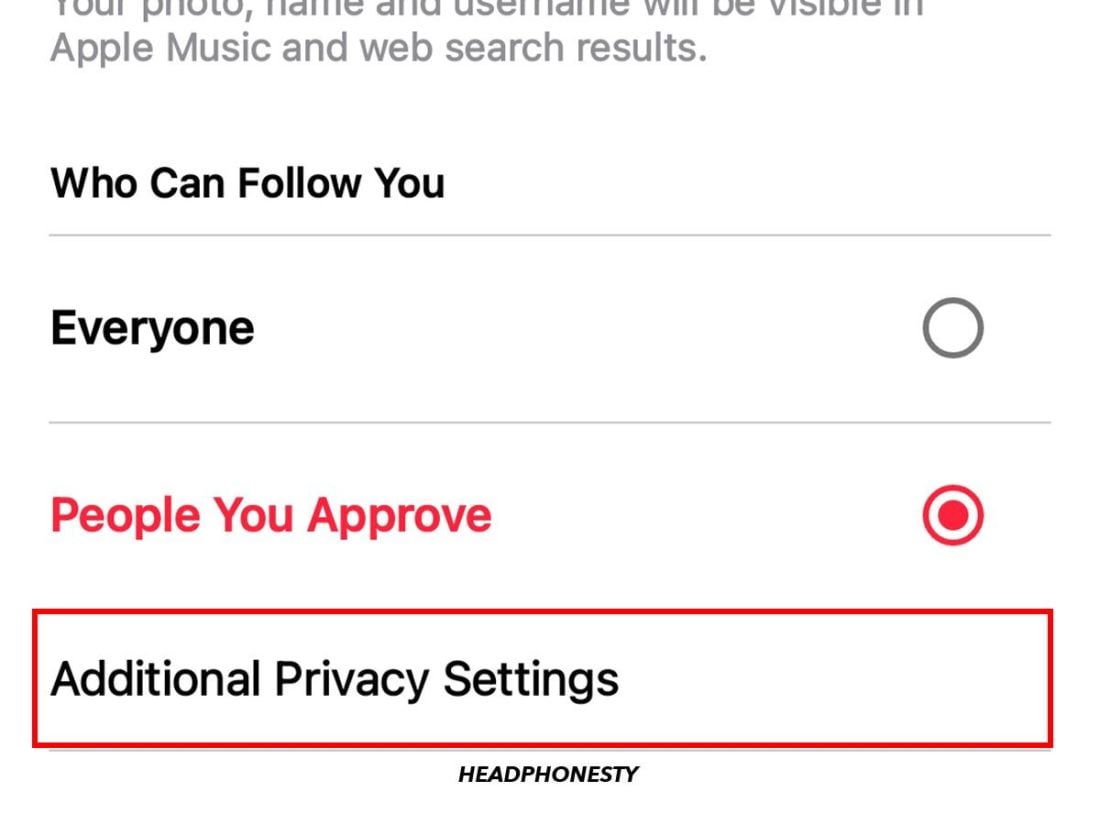
Edit Apple Music Profile on Android - Tap Additional Privacy Settings.
Accessing Additional Privacy Settings - Toggle Listening To off.
Disabling ‘Listening to’ option on Android
Apple Music Settings for Chromecast Streaming
The Apple Music mobile app for Android has a casting option for Chromecast, giving it wider compatibility. This option allows you to play music from your phone to any Chromecast-enabled device, including Google Home speakers and Android TVs.
To use this feature, open your Apple Music mobile app and tap the Cast icon in the upper right corner of the screen. Then select your Chromecast device, and you’re done.
Sync Library in Apple Music Settings
It’s frustrating when the music collection you worked so hard to curate and organize on one device can’t be accessed on another.
Luckily, Apple Music’s Sync Library function takes care of that for you. This feature syncs your entire music collection to devices where your Apple ID is logged in. This includes songs, music videos, playlists, and Smart Playlist rules.
The Sync Library feature is on by default. You can find it on your Mac in the General pane under Apple Music Preferences. On the iPhone, the option can be found under Music in your iOS Settings.
List Size – How to Change Apple Music Text Size
The text size of Apple Music’s song list has always been relatively small, even in earlier versions of iTunes. So if your Mac is hooked up to a smaller screen, you may find yourself squinting more often than not.
Fortunately, Apple Music for Mac does have an option to increase the text size of your song library.
To do this on your Mac:
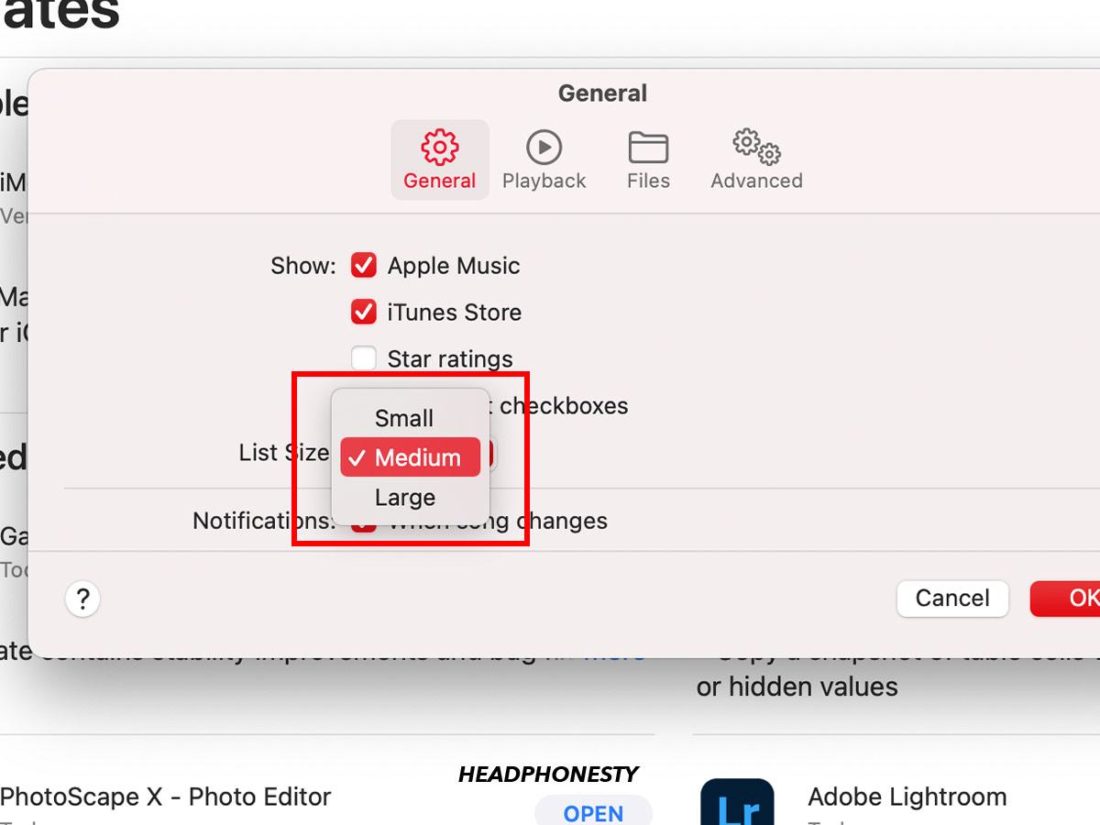
- Head on over to the General pane under Apple Music Preferences.
Apple Music General Preferences - You can then choose from Small, Medium, and Large in the List Size box.
Choosing List Size

Apple Music Hacks to Boost Your Listening Experience
As we now know, Apple Music Preferences is home to numerous functions designed to further improve your overall app experience. But it doesn’t end there. Apple Music also comes with other handy features that you won’t find in the settings pane, from volume limiters to parental controls.
Here are some of our favorites:
- Best Apple Music EQ settings
- Adjust the Apple Music volume limit on iPhone
- Get connected with AirPlay 2 speakers and Apple TV
- Wake up with Apple Music as your alarm clock
- Time yourself to the music
- Use Apple Music with Android Auto
- Keep it clean with Parental Controls
Best Apple Music EQ settings
If you’re wondering if Apple Music has an equalizer, you’re in luck. Most music streaming services have built-in equalizers, and Apple Music is no different. But what is an equalizer anyway, and why is it important?
Equalizers help tailor your sound by letting you increase or decrease the volume of specific frequencies. You can also choose custom audio presets (Acoustic, Classical, etc.) designed to bring out the best in specific music genres.
It’s an excellent feature for those with specific sound preferences or sensitivities. For instance, if you like your music with more bass, you can opt for the Increase Bass preset. And if you have difficulty listening to higher frequencies, you can lower those too.
To access the Equalizer:
- On Mac: Launch the Apple Music desktop app, click the Window menu, and select Equalizer from the list.
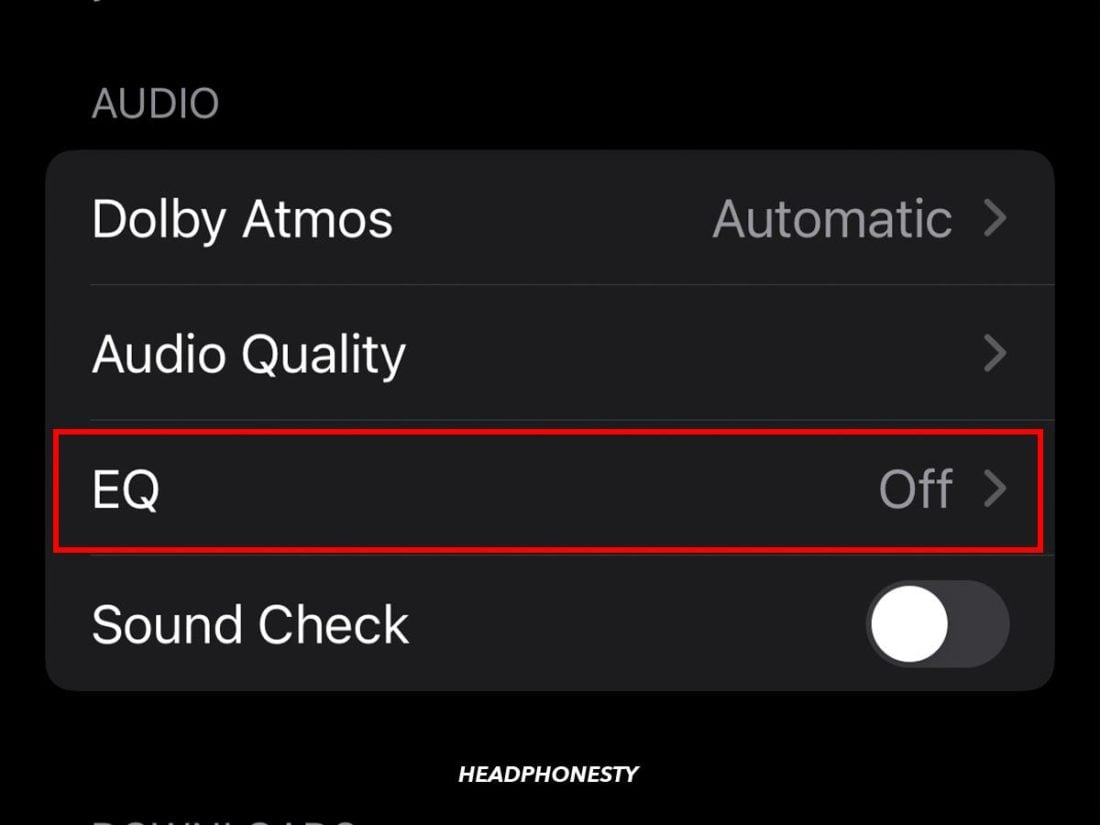
- On iPhone: Select EQ from your iOS Music settings.
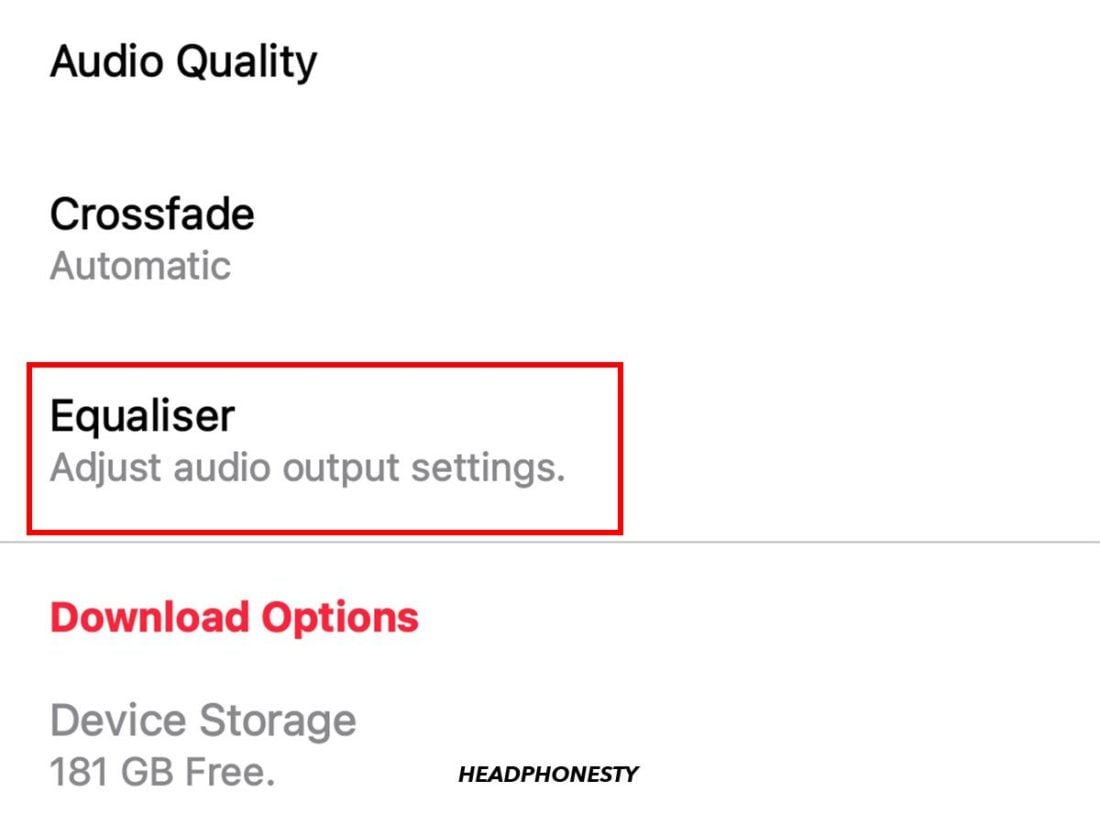
Accessing Apple Music Equalizer on iOS - On Android: Choose Equalizer in the Apple Music settings menu.
Accessing Apple Music Equalizer on Android
Save your ears: Adjust the Apple Music volume limit on iPhone
Turning up the volume is always our first instinct when our favorite song comes on. And when you’re having fun, it’s easy to forget what the excessive volume levels are doing to your ears. Thankfully, Apple has kept this in mind and included a built-in volume limiter on its Music app.
To adjust the volume limiter on your iPhone, follow these steps:
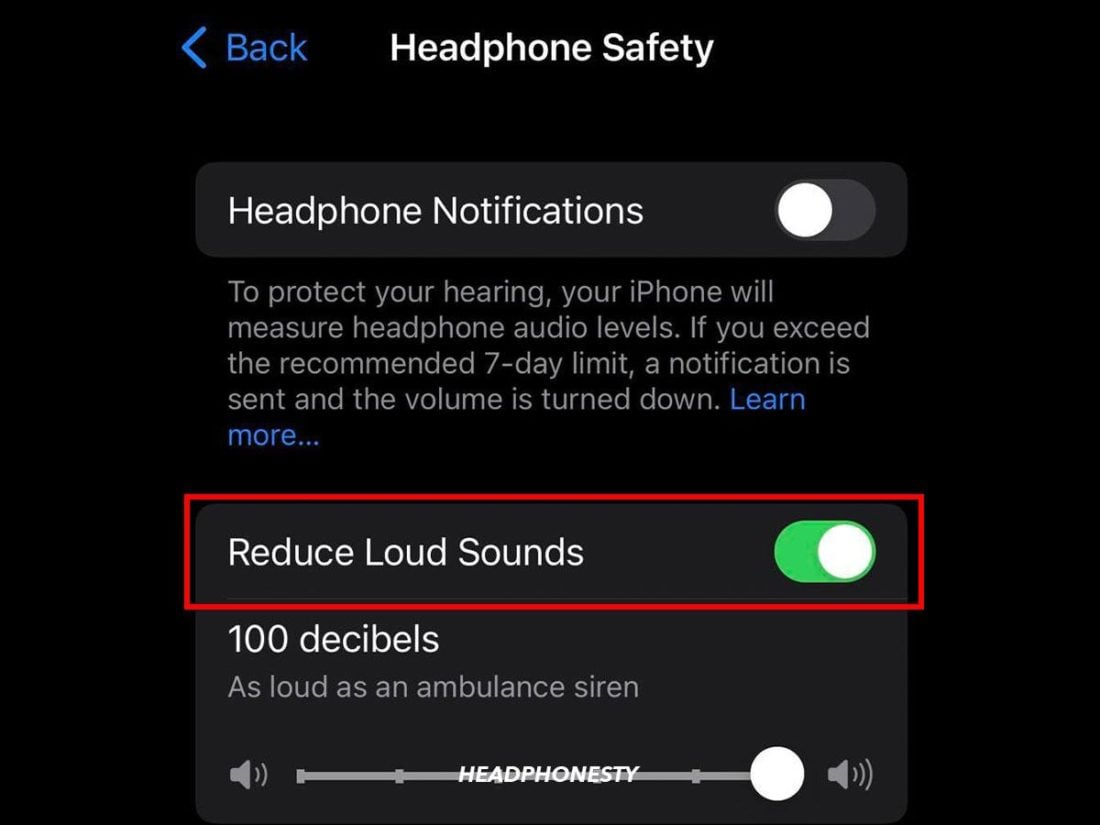
- Go to Settings > Sound & Haptics, and select Headphone Safety.
Going to iPhone Headphone Safety - Toggle on Reduce Loud Sounds, then set your desired volume limits in the slider that appears.
Adjust volume limit on iPhone

Get connected with AirPlay 2 speakers and Apple TV
Known initially as AirTunes, AirPlay 2 helps connect your Apple device to a wide range of compatible speakers, receivers, and smart TVs. This lets you share photos, movies, podcasts, and music with any AirPlay-enabled device – and all of it is wireless streaming!
Since AirPlay 2 typically works over Wi-Fi, all AirPlay-enabled devices need to be on the same wireless network, connected to the same Wi-Fi router.
And while it offers far greater coverage than Bluetooth ever will (which is approximately 10 meters), the downside is that it will not work over long distances unless you’re carrying a portable travel router with you to establish a temporary Wi-Fi network.
To connect with AirPlay 2 speakers and Apple TV, follow these steps:
For Mac
- Click on the AirPlay icon in the upper right corner of the Music app.
- Then, choose a device to connect to from the list.
- Look for the AirPlay icon in the music widget and tap it.
- Finally, select one or more devices to connect to from the list.
For iPhone and Android
- Connect your AirPlay 2 speakers to your phone.
- Begin to play music.
- Press the new AirPlay or Cast button on iPhone and Android below the Play button.
- Choose the AirPlay 2 speakers from the pop-up window.
Wake up with Apple Music as your alarm clock
There are days when we need that extra kick of inspiration to get us out of bed and ready for the day. And sometimes, our phones’ dull default alarm tones just aren’t enough. Fortunately, you can customize your alarm tone to play any song in your Apple Music library.
Here’s how you can use Apple Music as an alarm:
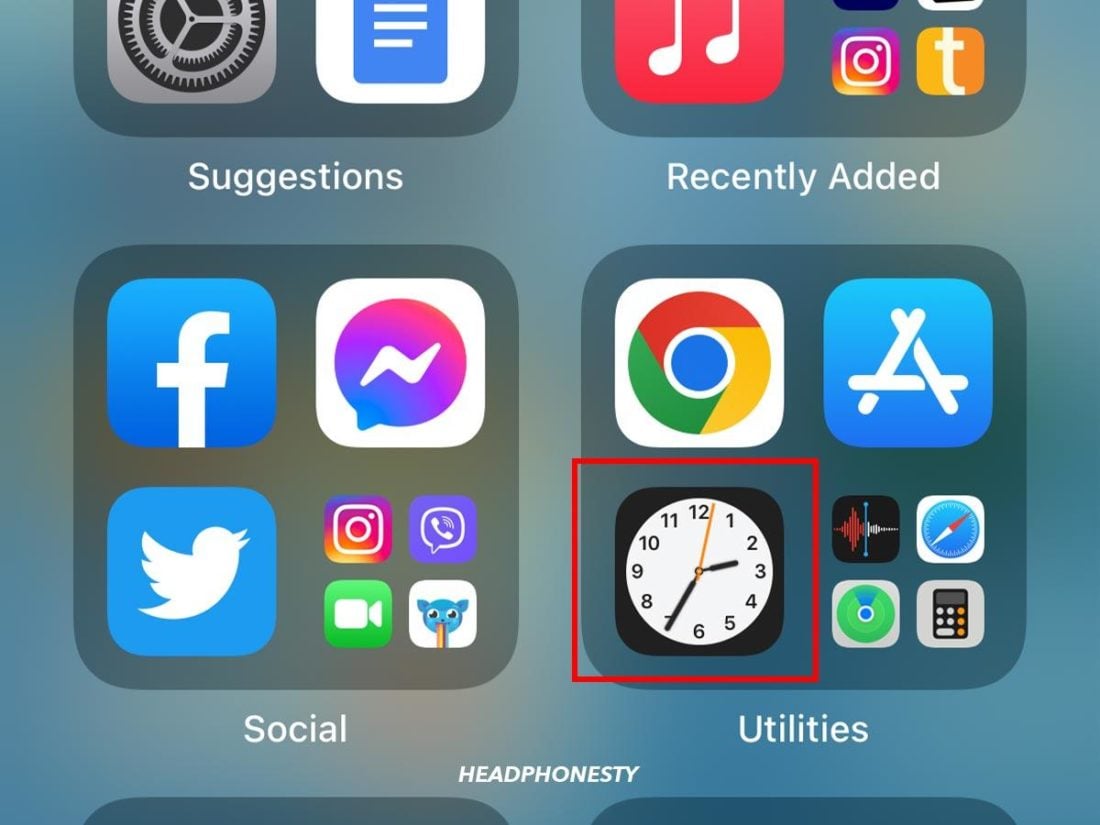
- Open the Clock app on your iPhone.
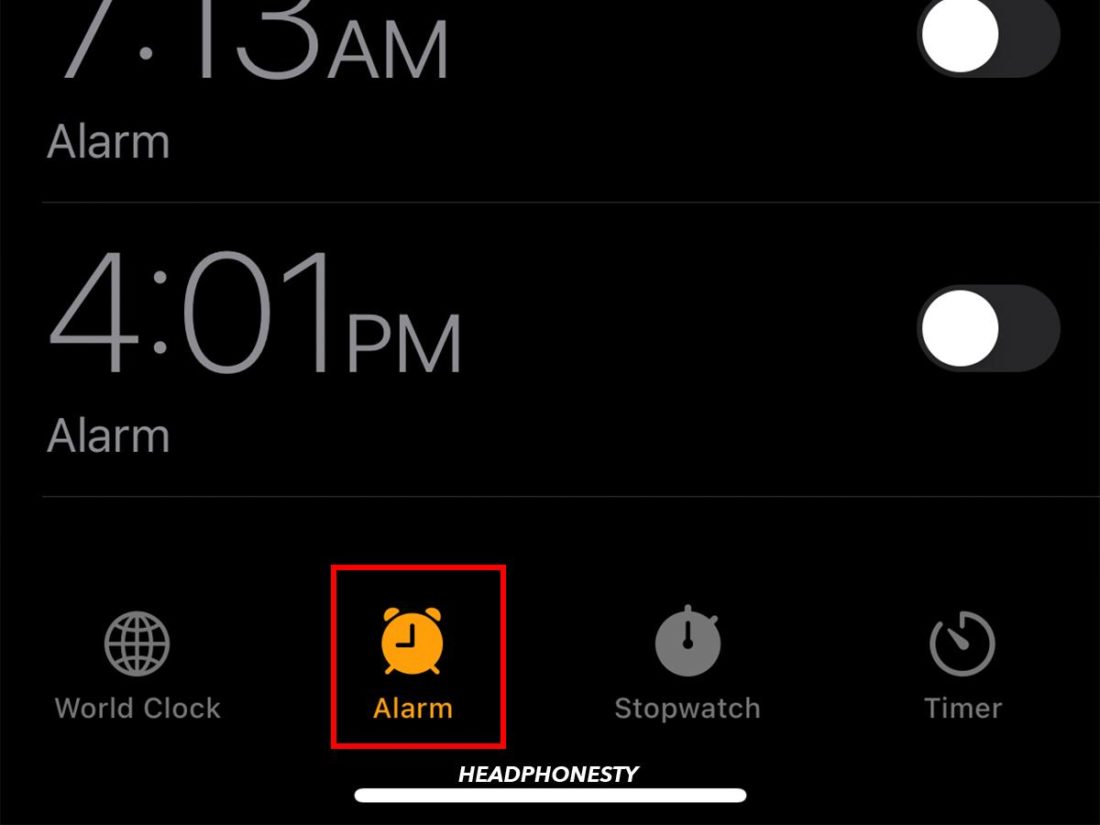
iOS Clock app - Tap the Alarm option.
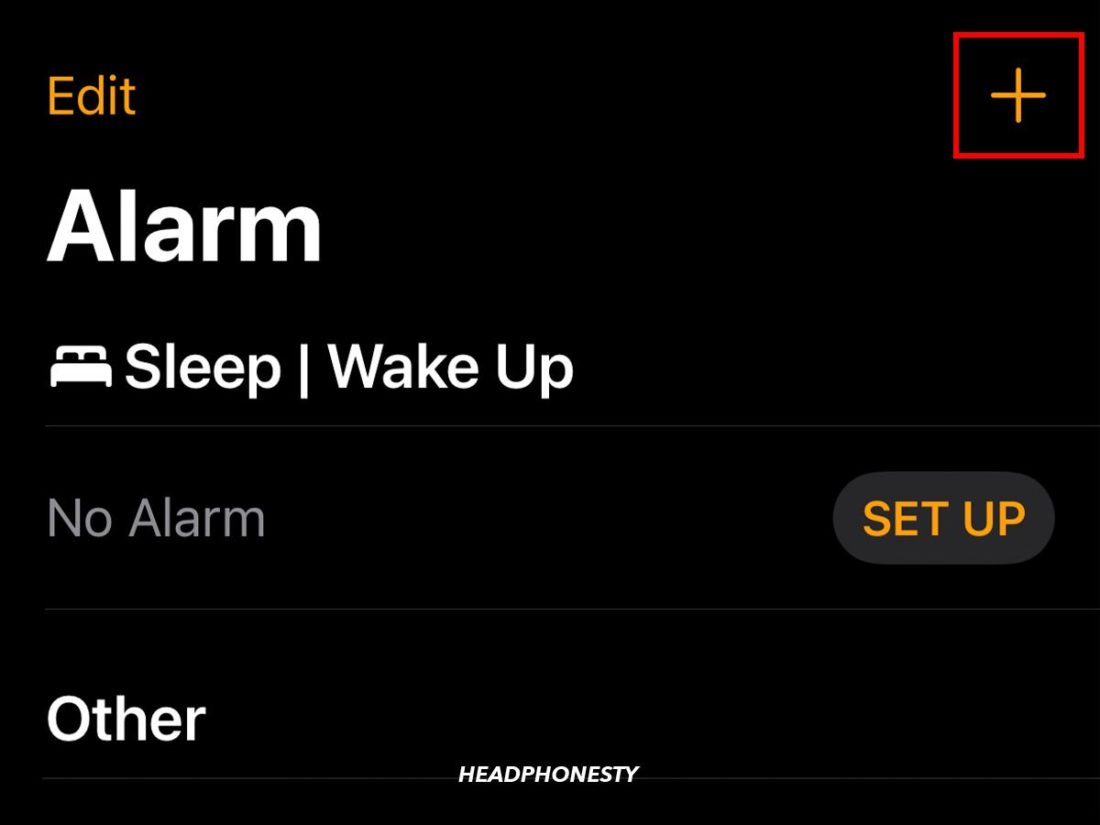
Going to iOS Alarm - Select the “+” sign to create a new alarm or tap Edit to customize an existing alarm.
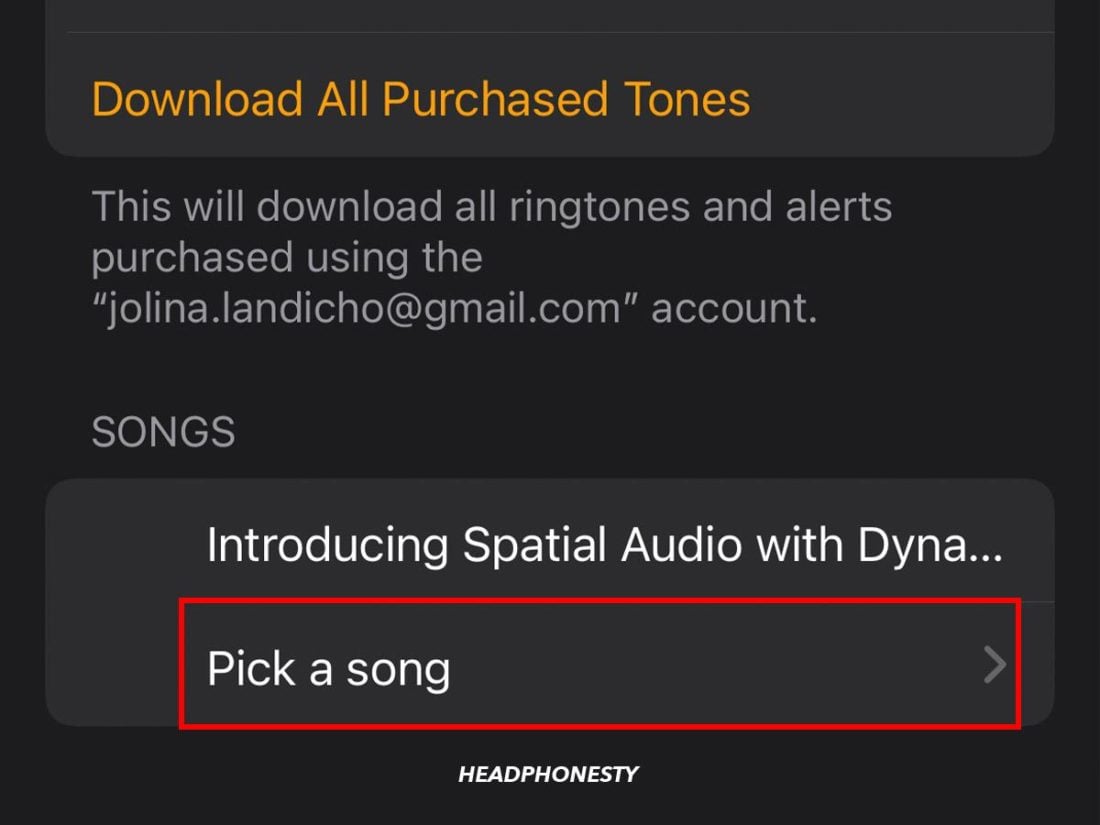
Customize existing alarm - After that, tap Sound > Pick A Song and choose something from your library.
Selecting song from Apple Music
Time yourself to the music
Phone timers are helpful for all sorts of activities, from cooking to coloring hair. You only need to set the timer to a specific number of minutes and wait for a shrill alert tone to interrupt whatever you’re doing to while away your time.
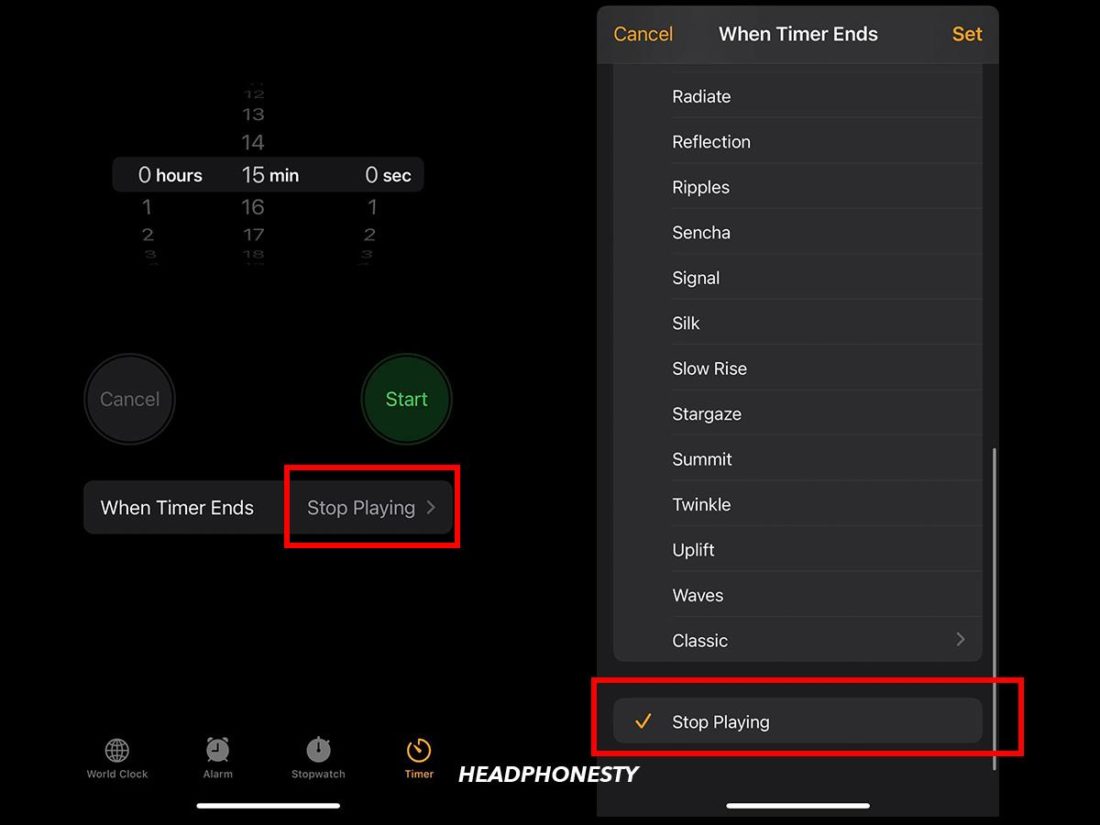
If you prefer not having your zen disrupted by an annoying alarm, you can change how your timer alerts you. Instead of playing a tone, you can set up the timer so that it stops music playback when your countdown is up.
So, for instance, if you’re enjoying some music while timing a pot roast, your music will simply stop when it’s time to take the dish out of the oven.
To enable this feature, go to your Clock app on your iPhone and select Timer. Then, in the box labeled When Timer Ends, select Stop Playing.
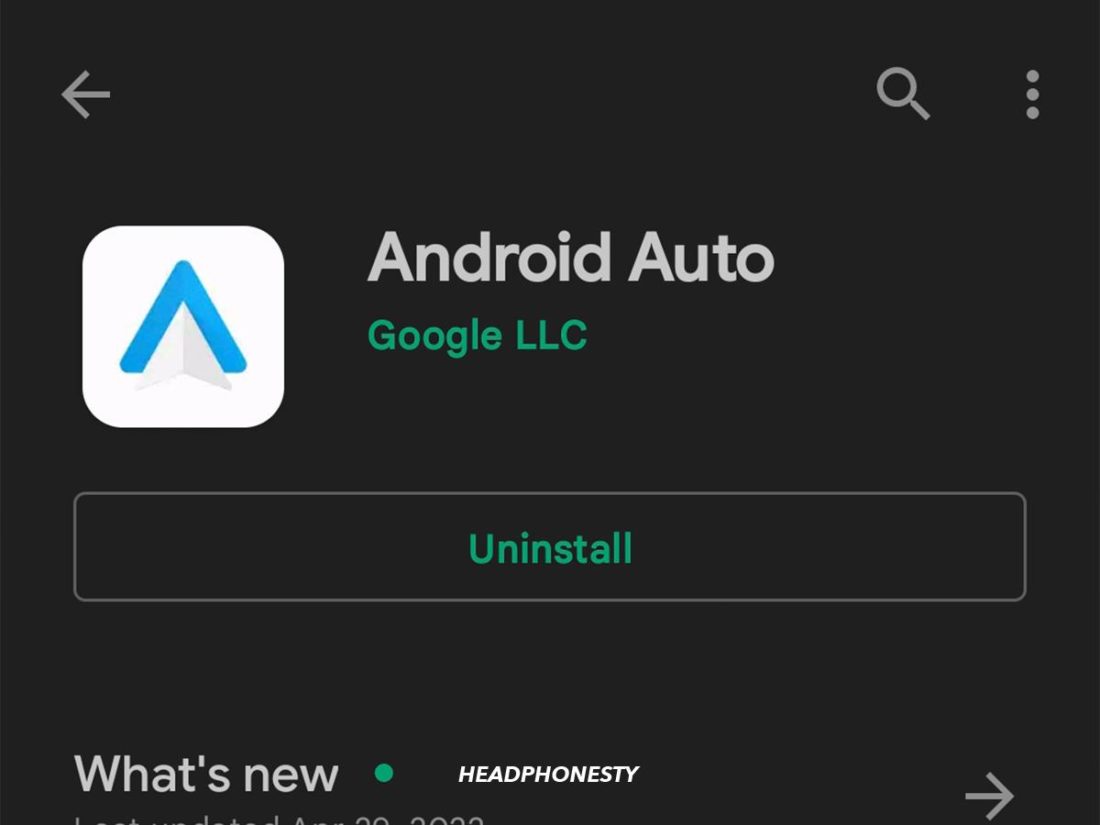
Use Apple Music with Android Auto
Not all Apple apps are compatible with Android, but you’ll be glad to know that Android Auto is an exception.
To achieve this set-up in your car, follow these steps:
- Download the Android Auto app from Google Play.
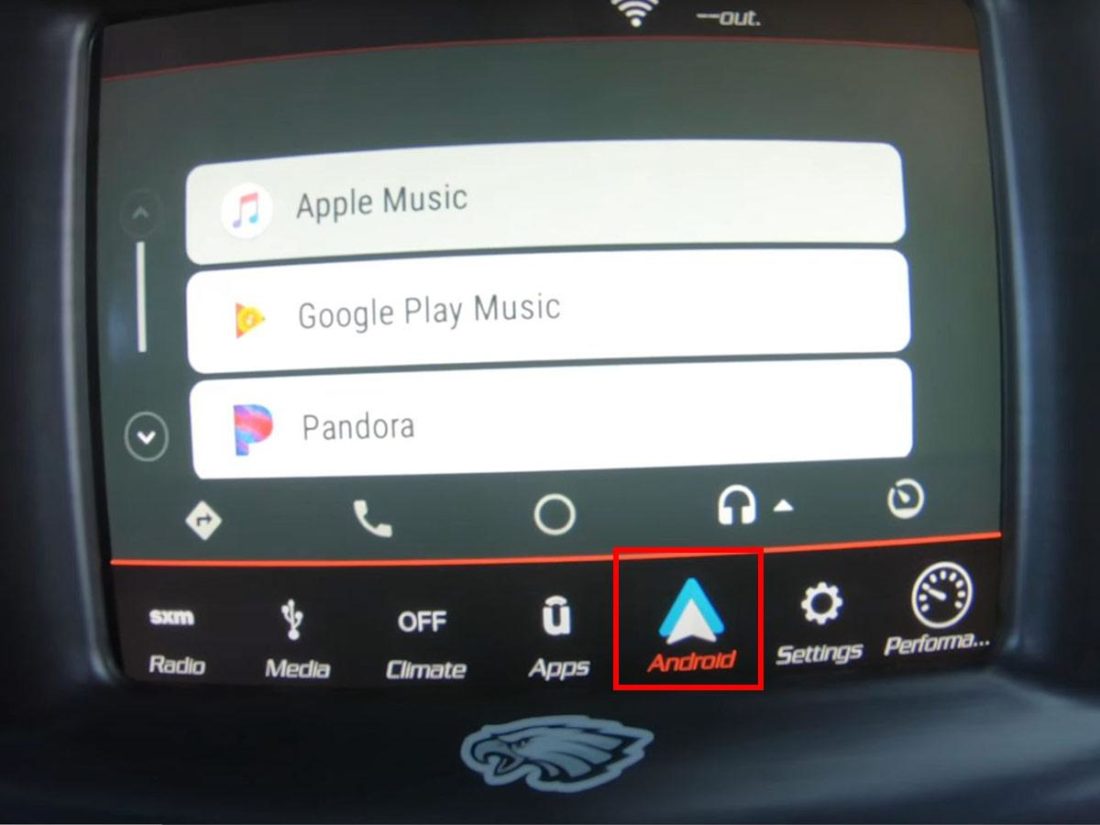
Installing Android Auto - Connect your smartphone to your car.
Connecting Car Bluetooth with Android - Open the Android Auto app from the dashboard display. And launch Apple Music.
Opening Apple Music on Android Auto (From: Youtube/J. Williams) https://www.youtube.com/watch?v=m2v6AQ_qNL0&t=57s

Keep it clean with Parental Controls
No parent wants their child to see or hear inappropriate content that may scar them for life. But if you’re sharing your personal iPhone or iPad with your child, who’s to say it can’t happen? Luckily, that’s precisely what Apple Music’s Parental Controls are for.
To activate Parental Controls on Apple Music:
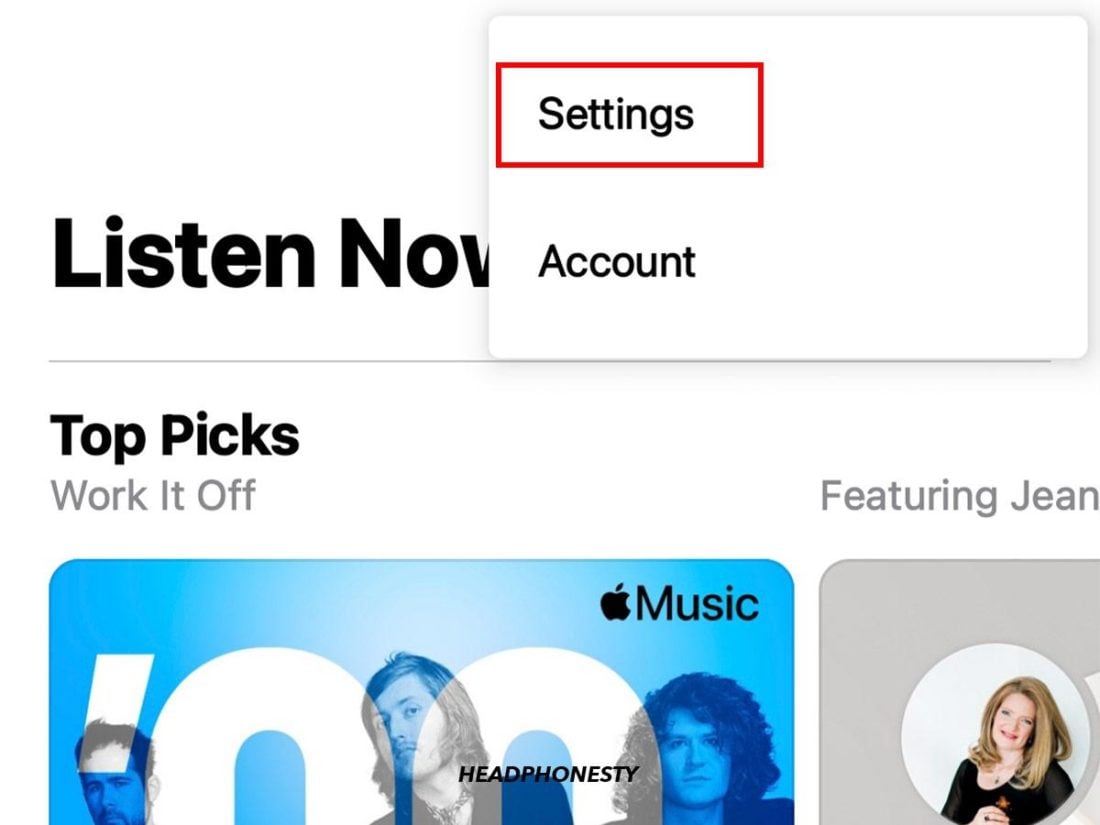
- Go to music.apple.com
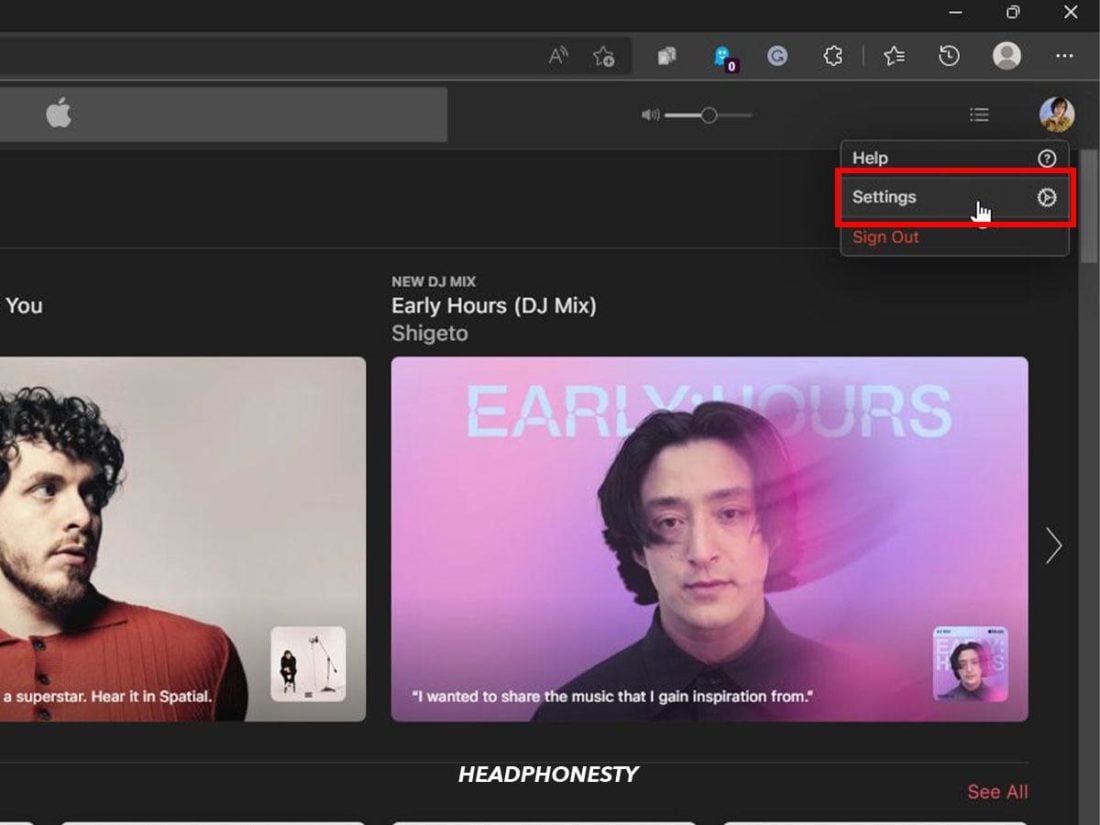
Apple Music website - Choose My Account -> Settings
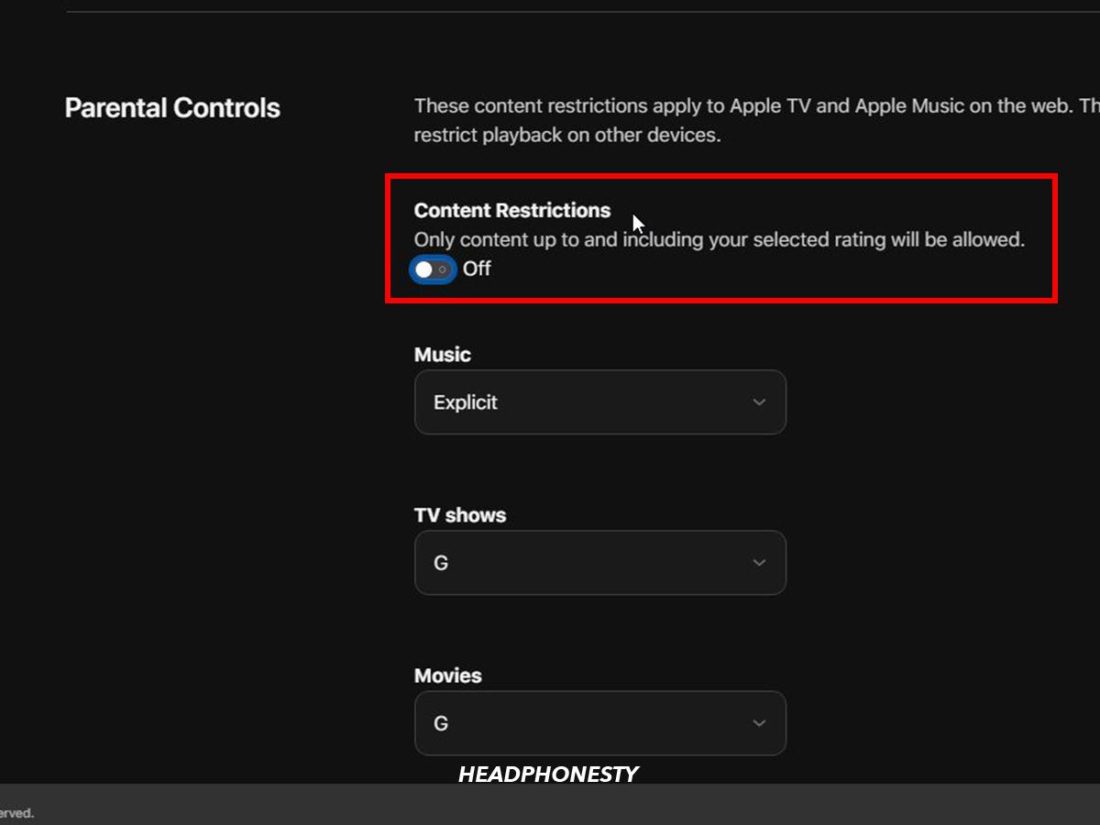
Going to Account Settings on Apple Music browser - Switch Content Restrictions on.
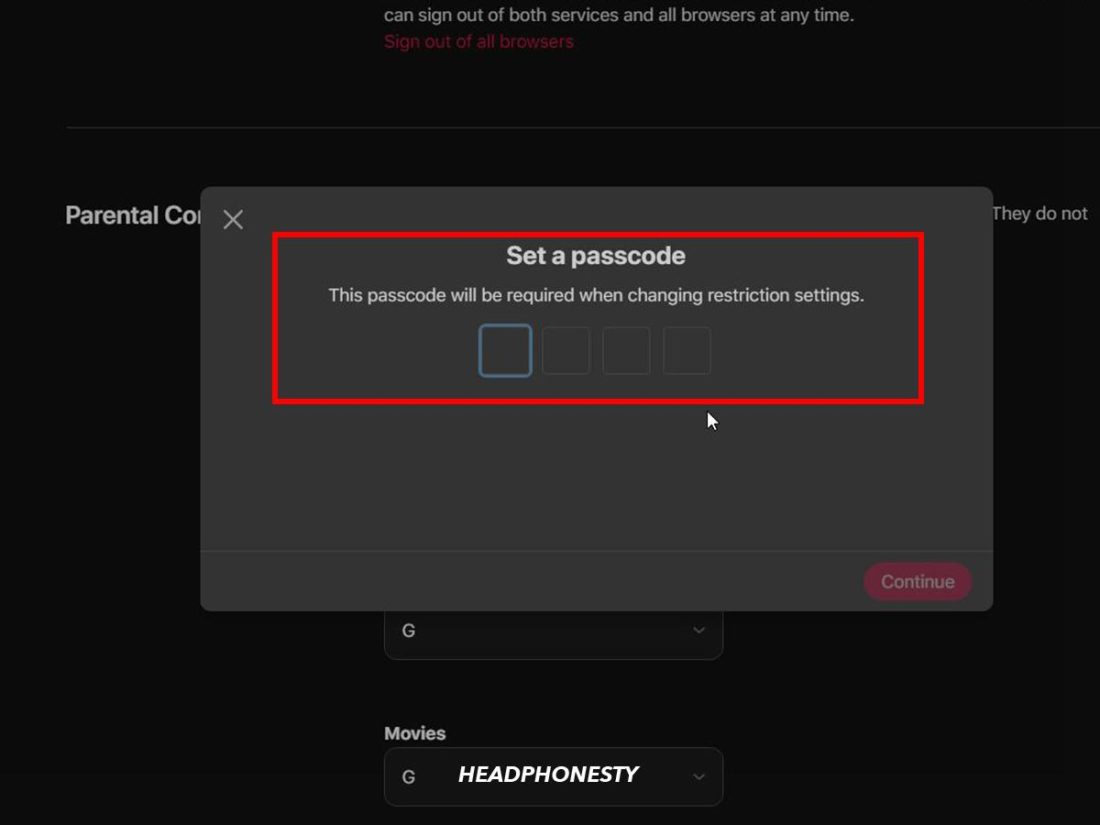
Enabling Content Restrictions on Apple Music - Enter and verify a new 4-digit password and recovery email.
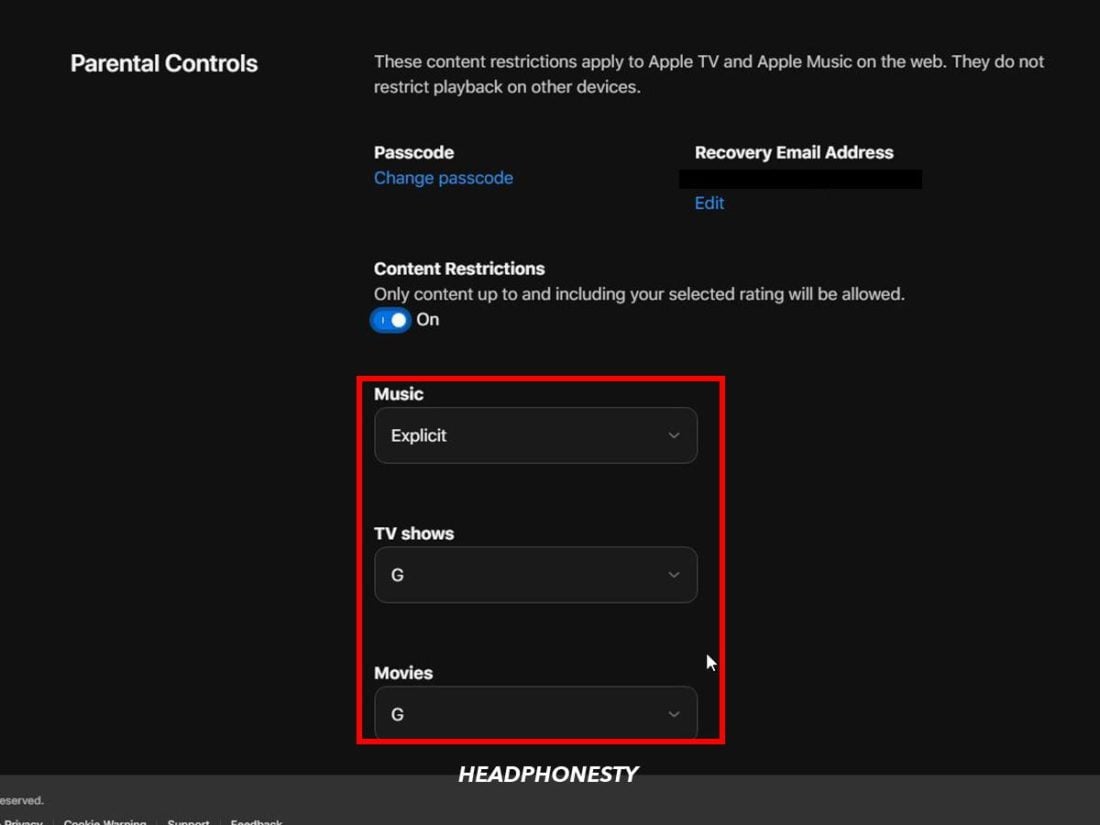
Setting password - Select which parental controls you’d like to enable from the on-screen menus.
Setting parental controls on Apple Music
Conclusion
Hopefully, with help from the tips we shared in this article, you’ve discovered new ways to improve your listening experience on Apple Music. And with any luck, you’ve also learned about new features that have made your overall experience more enjoyable.
How did you find our article? If you have tips and tricks of your own, we’d love to hear about them in the comments section below, so please drop us a line!
Hi there, thanks for so many useful features! I have a question about Lossless and AirPlay, is it possible to play lossless (24-bit/48kHz or 96kHz) through AirPlay to a Wi-Fi speaker that supports AirPlay?