Here are the tested and proven solutions for when your AirPods won’t connect to your iPhone, iPad, or Mac.
AirPods provide users with the convenience of private listening and flexibility, thanks to their wireless design.
However, encountering occasional connectivity issues can disrupt this smooth experience, leaving you agitated.
Fortunately, resetting your AirPods and performing some basic software troubleshooting can easily address this problem. Keep reading as we explain these solutions in detail.
- 1. Make Sure Your AirPods Have Enough Charge
- 2. Turn Your Bluetooth Off and On Again
- 3. Reset Your AirPods
- 4. Check Your iOS/iPadOS Version
- 5. Turn Off Other Bluetooth Devices
- 6. Clean the AirPods
- 7. Reset Network Settings
- 8. Contact Apple Support
- AirPods Not Connecting to Mac: What to Do
- Frequently Asked Questions
1. Make Sure Your AirPods Have Enough Charge
Low battery levels on your AirPods disables key functionalities, including your Bluetooth connection. That’s why you should always ensure your AirPods have ample charge by checking their battery status regularly.
To do this, open the charging case with both AirPods inside. The status light on the case will illuminate, revealing the battery level.
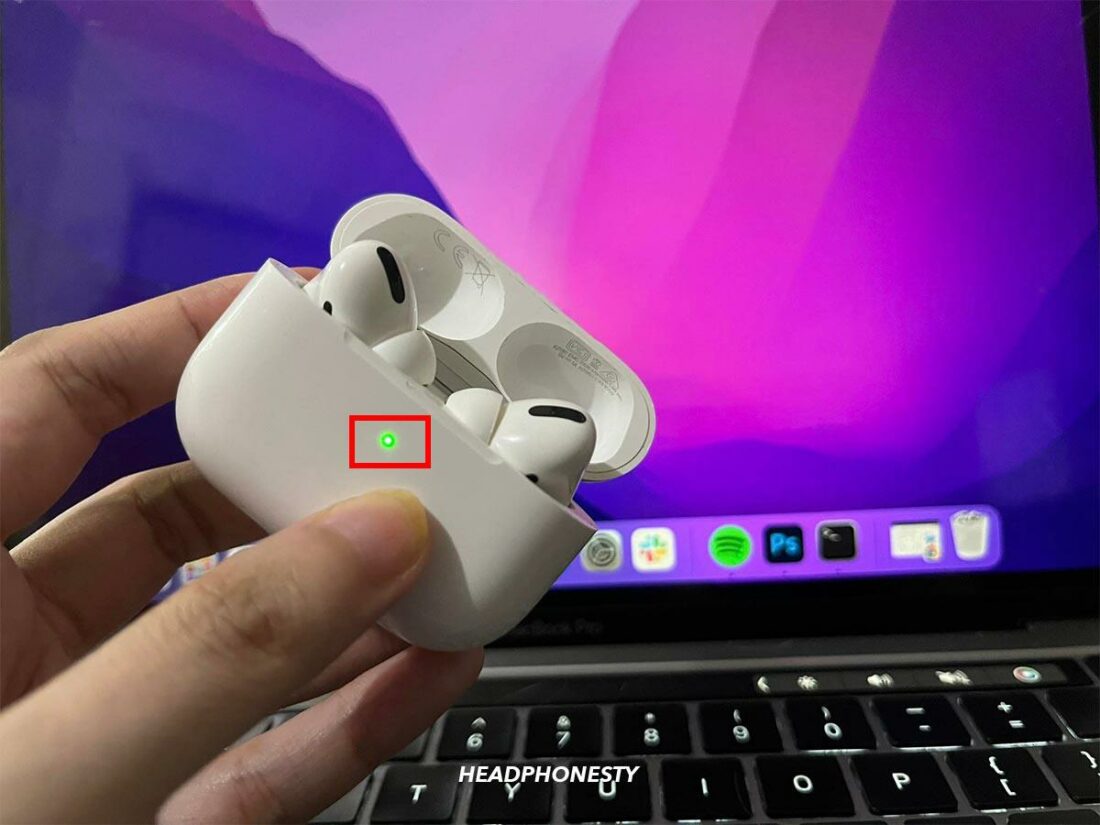
Wherever the status light is located, a green light signals a full charge, amber indicates less than full, and no light means the batteries are dead. If your AirPods have amber or no light, try charging them for at least 15 minutes before trying to reconnect.
2. Turn Your Bluetooth Off and On Again
Turning your Bluetooth on and off refreshes the connection and gets rid of potential temporary bugs that prevent your AirPods from connecting.
To do this, open the Settings app on your iPhone, navigate to Bluetooth, and slide the switch off.
Alternatively, you can use the button in the iPhone’s Control Center to turn off Bluetooth. After around 30 seconds, toggle it back on and recheck if your AirPods can now connect to your device.
3. Reset Your AirPods
If your AirPods still won’t connect, it’s time to do a full reset.
Here’s how to reset your AirPods:
- Put your AirPods in their case and close the lid. Wait for 30 seconds.
- On your iOS device, go to Settings > Bluetooth.
- Tap the (i) icon beside your AirPods. Select Forget This Device and confirm.
- Open the charging case and hold the setup button until the status light flashes amber, then white.
- Place your AirPods near your device and try to reconnect them.
4. Check Your iOS/iPadOS Version
Keeping your iOS device up to date is crucial, as Apple regularly releases bug fixes alongside new firmware for AirPods that addresses connection issues. So, to ensure seamless connectivity, make sure your iOS devices or other non-Apple devices meet the recommended firmware requirements.
Refer to the table below for the latest software requirements for each AirPods model and Apple device.
| AirPod variant | iPhone or iPod touch | iPad | Apple Watch | Apple TV | Mac |
|---|---|---|---|---|---|
| AirPods (1st Gen) | iOS 10 or later | iOS 10 or later | watchOS 3 or later | tvOS 11 or later | macOS Sierra or later |
| AirPods (2nd Gen) | iOS 12.2 or later | iOS 12.2 or later | watchOS 5.2 or later | tvOS 12.2 or later | macOS 10.14.4 or later |
| AirPods (3rd Gen) | iOS 15.1 or later | iPadOS 15.1 or later | watchOS 8.1 or later | tvOS 15.1 or later | macOS 12 or later |
| AirPods Pro (1st Gen) | iOS 13.2 or later | iPadOS 13.2 or later | watchOS 6.1 or later | tvOS 13.2 or later | macOS 10.15.1 or later |
| AirPods Pro (2nd Gen) | iOS 16 or later | iPadOS 16.1 or later | watchOS 9 or later | tvOS 16 or later | macOS Ventura |
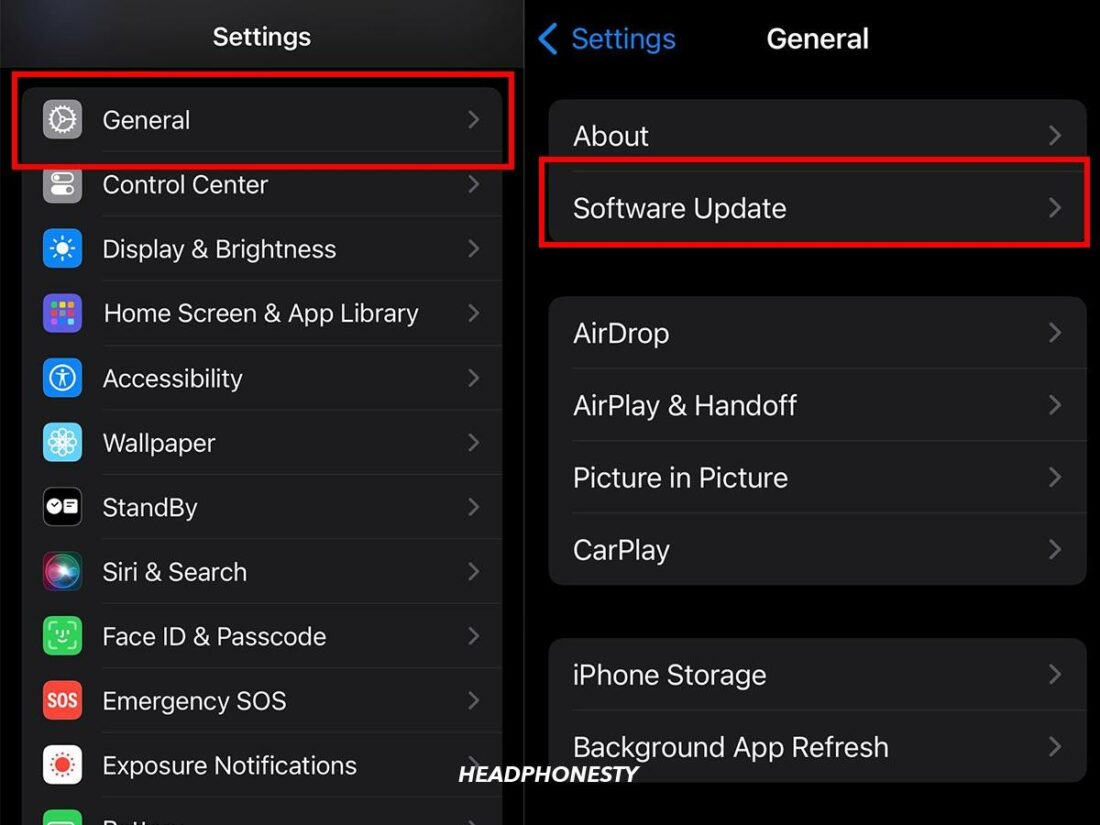
While your device may satisfy the minimum requirements, it’s still best to use the latest OS version as much as possible. To check for and install the latest iOS/iPadOS software update, follow these steps:
- Head to Settings > General.
- Choose Software Update to check if there is an update available.

Updating the software of an iOS device.
5. Turn Off Other Bluetooth Devices
It is possible that your AirPods are connecting to a different device than the one you intend to use. To address this, check whether Bluetooth is enabled on other devices in close proximity, as they might be competing for the AirPods’ signal.
Turning off Bluetooth on these additional devices can help ensure that your AirPods connect to the intended device without any interference or signal conflicts.
6. Clean the AirPods
Wearing your AirPods over time can result in the accumulation of earwax and dirt, which may obstruct the proximity sensors and cause connectivity issues.
Here’s a step-by-step guide on how to clean your AirPods:
- Dampen the cotton swab with isopropyl alcohol and clean the exterior of the AirPods.
- Carefully brush the crevices on the AirPods and charging case with a toothpick.
- Use a toothbrush to gently scrub off the remaining debris.
- Wipe with a lint-free cloth and let it dry for at least 30 min before using.
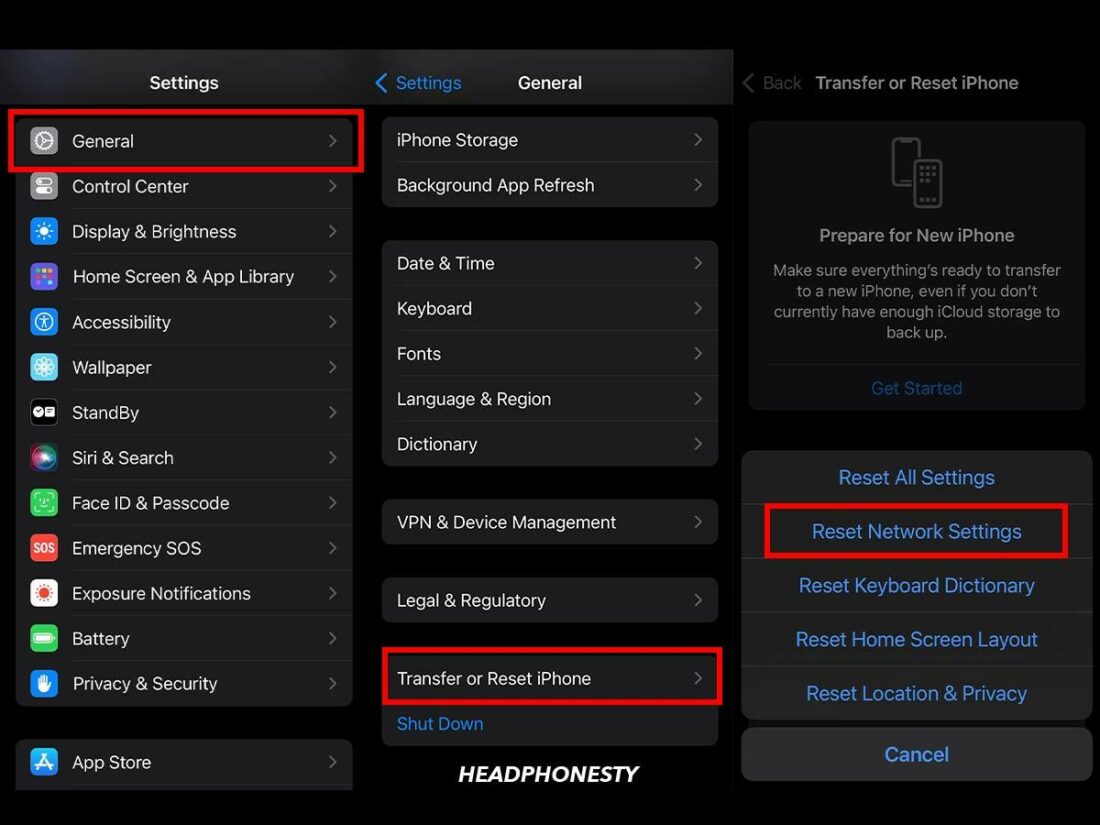
7. Reset Network Settings
Resetting your device’s network settings clears wireless connection data, which resolves bugs that cause AirPods pairing issues and allows fresh connections.
- Go over to Settings > General.
- Click Transfer or Reset iPhone.
- Then Reset > Reset Network Settings.
Reset Network Settings.
8. Contact Apple Support
As always, the experts will know best! If your AirPods still won’t connect after a reset, or if they say they’re connected but aren’t working, then it’s worth reaching out to Apple Support with your problem.
To contact Apple Support directly, you can call the number listed for your country or contact them online via chat or email.
AirPods Not Connecting to Mac: What to Do
If you’re experiencing connectivity issues specifically with your AirPods on your Mac, don’t worry, there are solutions to address this. Explore the following steps below to troubleshoot and resolve AirPods connection problems on your Mac.
- Check for MacOS updates: Ensure your Mac is up to date by checking for MacOS updates. These updates can introduce support for newer Apple devices like AirPods, potentially resolving connectivity issues.
- Restart Bluetooth: Restarting your Mac’s Bluetooth can facilitate AirPods connection by refreshing the Bluetooth connection. This process can clear any temporary glitches, ensuring a smoother pairing experience.
- Disconnect other Bluetooth devices: This helps make sure your Mac has enough storage space to connect with your AirPods. To disconnect other Bluetooth devices from your Mac, click on the Apple logo at the top left corner of your screen. Select System Preferences > Bluetooth. Hover your mouse over the device you want to forget and click on “Remove.”
- Set your AirPods as the default output device: This is useful when your AirPods are connected but have no sound. To do this, click on the Apple logo at the top-left corner of your screen and select System Settings. Click Sound > Output > select your AirPods from the list of sound output devices.
For more solutions, check out our comprehensive article on how to connect your AirPods to your Mac.
Frequently Asked Questions
- Why are AirPods suddenly not connecting?
- Can I connect AirPods without the charger?
- Do I need an Apple ID to use AirPods?
Why are AirPods suddenly not connecting?
Several factors can lead to sudden AirPods connection issues. These can include, low battery charge, outdated iOS versions, dirty AirPods, and network setting problems.
Can I connect AirPods without the charger?
Yes, you can connect AirPods to a device without the charger. AirPods connect wirelessly via Bluetooth. As long as they have sufficient battery charge, you can pair them with compatible devices without using the charging case. However, this only works with devices you have previously paired with your AirPods.
Do I need an Apple ID to use AirPods?
No, you don’t need an Apple ID to use AirPods, but having one offers benefits. With an Apple ID, you can enjoy features like automatic connection across devices with the same ID and integration with Find My AirPods, enhancing the overall user experience.
wow what a amazing article.it’s very help to me.thanks.
Thanks – a helpful article. Making bluetooth forget my airpods and then reconnecting worked for me!
Very helpful! Thank you!
Having trouble connect apple AirPods generation 2 to iPhone 13 Pro wit the latest update 16.5.1
Great article, explanations and visuals are excellent. Tried everything, I think, and still cannot connect my Ugreen 5.0 bluetooth receiver to my AirPods Pro 2nd ben. The AirPods pairing lights indicate they are paired but no sound is transmitted via the Ugreen from Sony Walkman to AirPods. Stumped!? The receiver does connect and transmit on my Bose speaker and on iPhone, iMac, etc. Basically, I can listen to the content of my Sony on everything except the AirPods. Thoughts?
Dude !! For AirPods Pro 2 the status light is also located on the front of the case not inside.