Revive your Beats! Discover effective solutions to resolve charging issues with your Beats headphones.
The Fast Fuel function is one of the many reasons why Beats headphones are practical and convenient. You only need to charge them for ten minutes and you get three hours of playback.
Unfortunately, the Beats’ charging function doesn’t always work flawlessly. Some users report problems such as not being able to charge their headphones or not seeing the charging lights turn on.
Luckily, there are several solutions you can try, ranging from temperature regulation to DIY repairs. Keep reading as we discuss all the possible fixes to get your Beats headphones back to full power in no time.
- 1. Get Your Beats Headphones Back to Normal Operating Temperature
- 2. Charge Your Beats Headphones via a Wall Outlet
- 3. Use a Different Charging Cable
- 4. Make Sure the Charging Cable Is Inserted Properly
- 5. Clean Your Beats Headphones
- 6. Update Your Headphones’ Firmware
- 7. Reset Your Headphones
- 8. Consult Apple Support
- 9. DIY Repair: Change Your Beats Batteries
- FAQs on Beats Headphones Not Charging
- Conclusion
1. Get Your Beats Headphones Back to Normal Operating Temperature
Extreme temperatures can affect the battery life and charging ability of your headphones. Too much heat speeds up the chemical reactions within a battery, shortening its life, while too much cold can permanently reduce the battery’s capacity.
Like iOS devices, your Beats headphones have a built-in function that turns them off when exposed to extreme temperatures. But while this is a protective measure to safeguard their internal components, it can also prevent your headphones from charging.
The ideal operating temperature range for Beats headphones is between 0°C and 35°C.
Because these headphones use lithium-ion batteries, they may not charge or work properly when used outside of this temperature range.
To get your Beats headphones charging again, try bringing them back to their normal operating temperature with these tips:
- If your headphones are too hot, disconnect them from any device, charger, or accessories and turn them off. Then, place them in front of a fan to cool them down.
- If your headphones are too cold, leave them at room temperature or wrap them with a thick, dry cloth.
- Take your time regulating the temperature of the headphones. Don’t use a heating device like a hairdryer or microwave to warm them up, or place them inside a freezer to cool them down.
2. Charge Your Beats Headphones via a Wall Outlet
Charging your Beats headphones via a wall outlet can be more efficient than using bus-powered USB hubs or ports. The latter receives power from a self-powered hub like a PC or laptop, which means they can only supply limited power. This results in slower charging times that may give you the impression that your Beats headphones aren’t charging.
On the other hand, wall outlets provide more current, making charging faster and more efficient.
3. Use a Different Charging Cable
Physical damage to the charging cable may prevent Beats headphones from charging correctly.
Over time, various factors like repeated bending, pulling, or exposure to heat and moisture can degrade the internal wiring of your charging cable, leading to inconsistent or complete loss of charging capability.
You can identify a damaged cable by looking for the following signs:
- Physical distortions like tears, noticeable bends, or warped wire sheathing.
- The cable feels hot or emits a burning smell when plugged in.
- Rusted or loose connectors.
To determine if the charging cable is the issue, try using a different cable to charge your Beats headphones. If the headphones charge successfully with the new cable, it’s evident that the original cable was the problem and should be replaced.
4. Make Sure the Charging Cable Is Inserted Properly
Improper charging can often result from damage to your headphones’ charging port, such as from forcing the cable in or dropping the headphones. This causes the charging port to become loose, preventing the charging cable from fitting properly. As such, your charging problems will persist, regardless of whether an old or new cable is used.
Ideally, a good connection between the charging cable and your headphones’ charging port should feel stable and firm, with no room for wobbling.
To see if there are issues with your Beats’ charging port, you can do the following:
- Do a physical check: Using a flashlight, look closely at the charging port for any visible signs of damage or dirt stuck inside the charging port.
- Do a wiggle test: This means gently moving the charging cable back and forth while it’s plugged into your headphones. If the headphones start to charge when you do this, it’s a sign that the charging port is loose and needs replacing.
- Inspect the cable’s connectors: Check the charging cable’s plug to ensure it is not bent or corroded.
Depending on the identified issue, you can do DIY repairs to replace the damaged charging port by following YouTube tutorials.
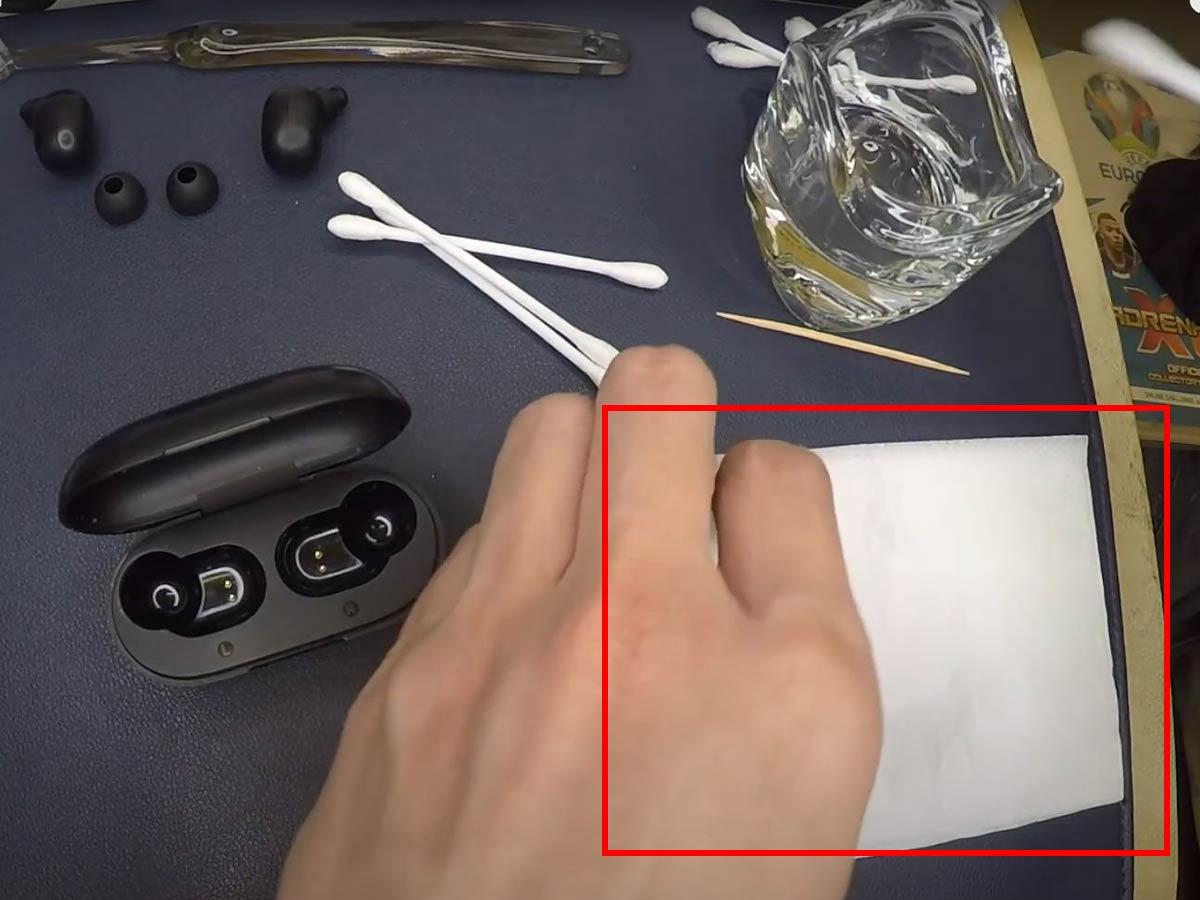
5. Clean Your Beats Headphones
The buildup of grit or debris in the charging port and contacts is a typical problem that can make it impossible for your Beats headphones to charge.
Over time, dust, lint, and other particles can get lodged in these areas, obstructing the connection between your headphones and the charging cable. This can lead to inefficient charging or even prevent your headphones from charging altogether. For this reason, proper headphone maintenance is crucial.
Fortunately, you can clean the charging port and contacts with items you likely already have at home. These include:
- A can of compressed air
- Cotton swabs
- A soft-bristled brush or toothbrush
- Cleaning putty for electronics
- A clean, lint-free or microfiber cloth
- 99% isopropyl alcohol or a cleaning solution made specifically for electronics
That said, here’s how to go about cleaning your device’s charging port and contacts:
Cleaning your headphones’ charging port
- Unplug your headphones and turn them off to prevent any potential damage.
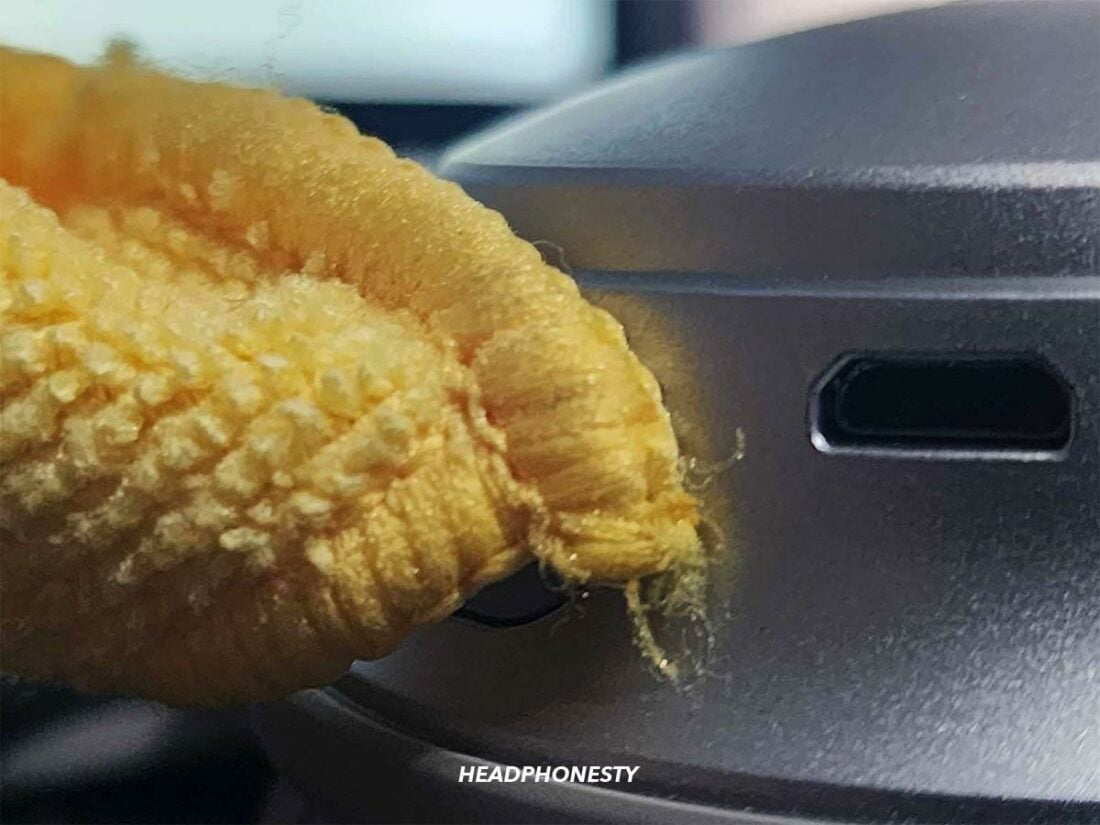
- Use a dry cloth to gently wipe the exterior of the charging port to loosen any surface debris.

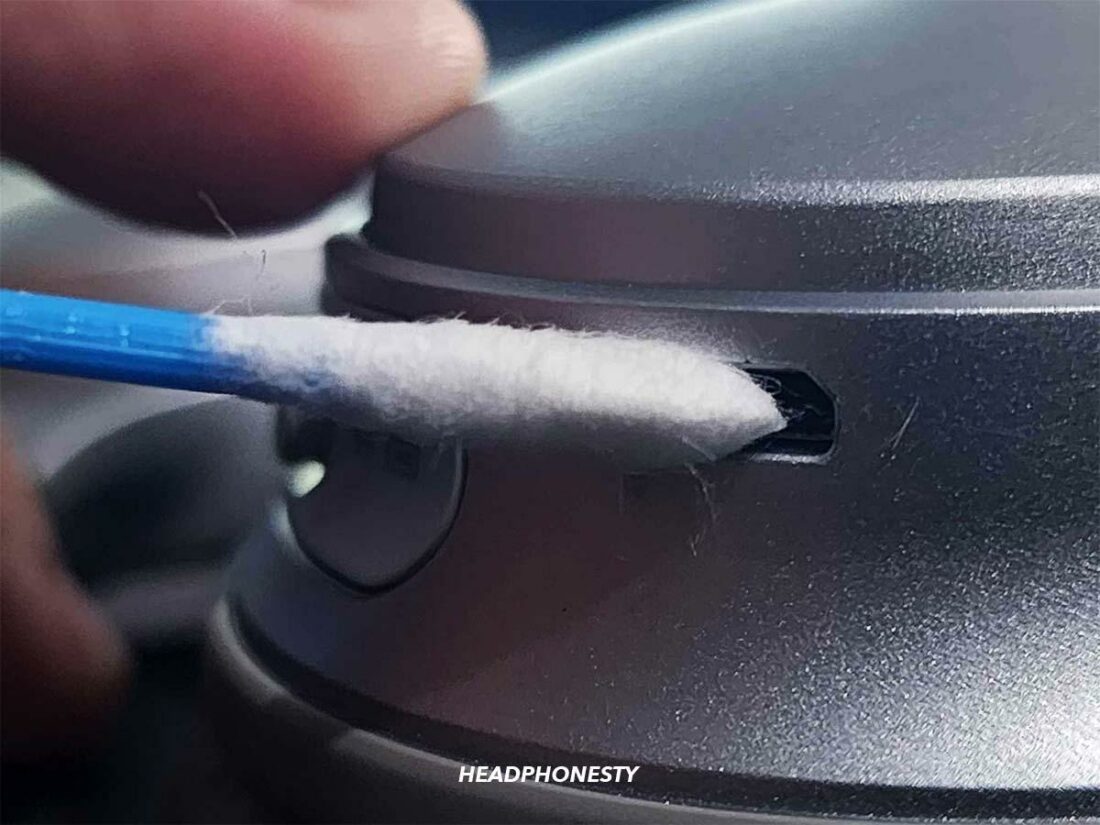
Wipe the exterior of the charging port with a dry cloth. - Lightly dampen a cotton swab with alcohol and carefully swab the inside of the charging port. Avoid soaking any electronic components.
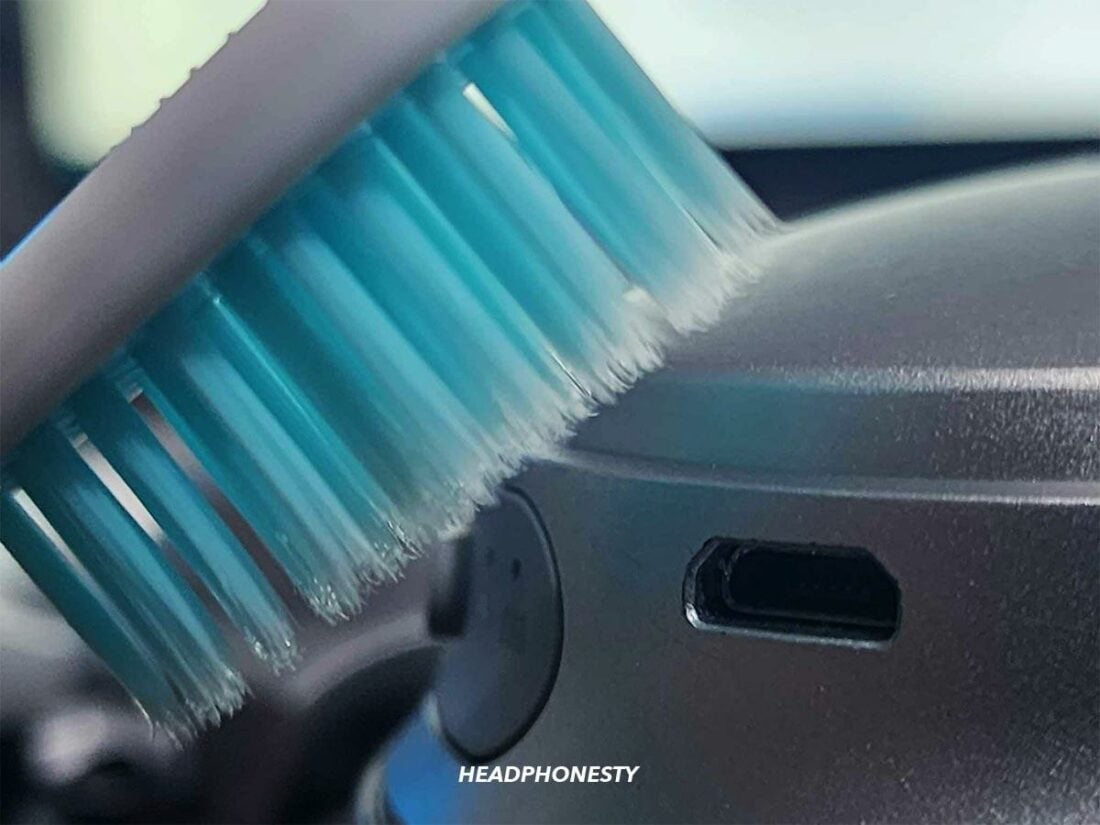
Clean the inside of the charging port with a cotton swab. - For stubborn dirt, use a soft-bristled brush or toothbrush to gently dislodge the dirt. Make sure to hold the Beats headphones so that the charging port is facing down to prevent the dirt from going deeper into the device.
Use a soft-bristled toothbrush to gently remove the dirt. - Do a final wipe and let the port dry completely before charging your headphones again.
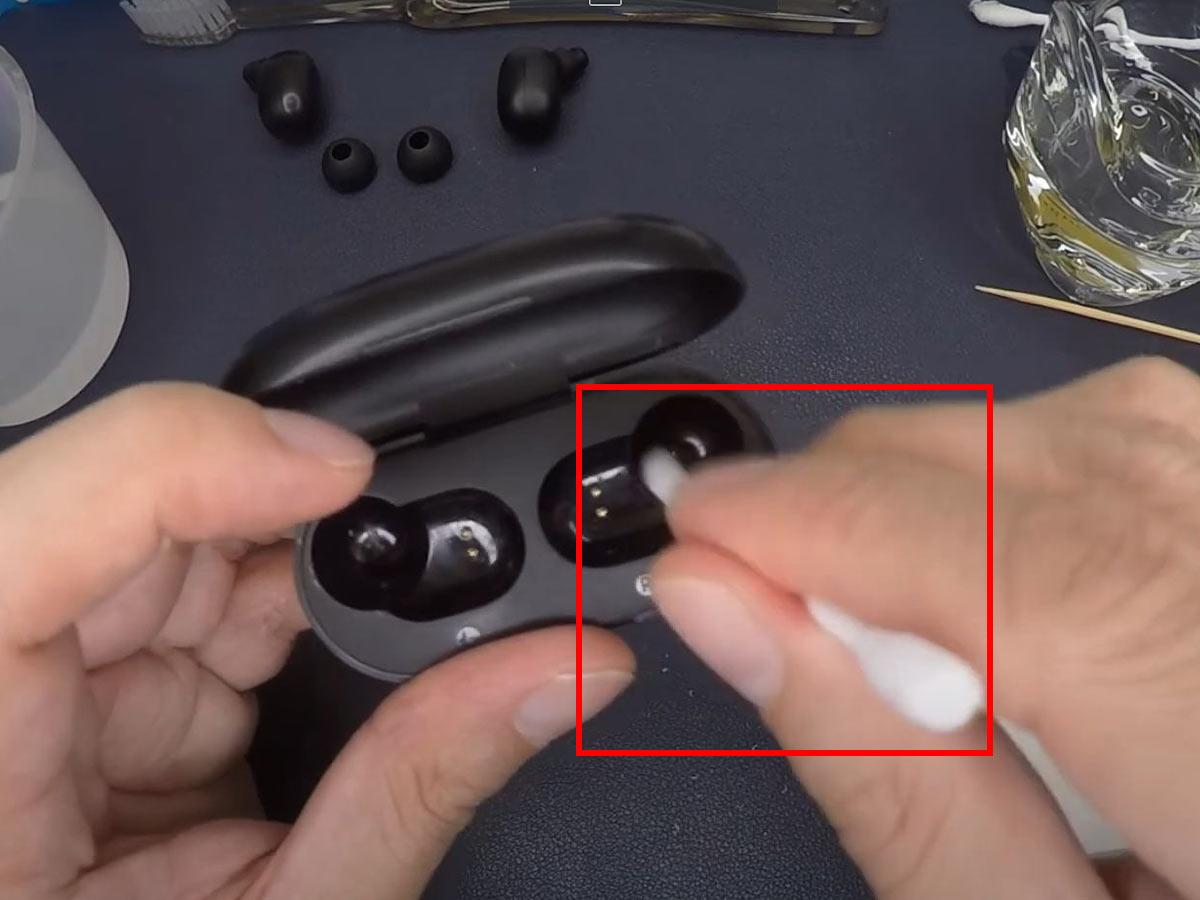
Cleaning your earbuds’ charging case contacts
- Disconnect the charging case from any power source and remove the earbuds.
- Use a dry, lint-free cloth to gently wipe the charging contacts.

Use a clean, dry cloth to wipe down the earbuds. (From: Youtube/ying Newton) - Use a cotton swab dampened with alcohol to clean stubborn dirt on contacts, being cautious not to get liquid on electronic components. Consider using canned air or cleaning putty on extra tough dirt, but use them sparingly to avoid damaging fragile charging components.
Use a cotton swab to wipe down the pins on your earbuds and charging case. (From: Youtube/ying Newton) - Allow the charging case to dry completely before placing your earbuds back.
6. Update Your Headphones’ Firmware
Firmware is the software programmed into a device that provides instructions for how the device operates. It’s updated periodically to improve performance and fix known issues. As such, if your headphones’ software is outdated, it can cause problems in how they function.
By updating your Beats headphones’ firmware, you ensure your device is equipped with the most recent software to help address such vulnerabilities, including charging issues.
Here’s how to update your Beats headphones’ firmware:
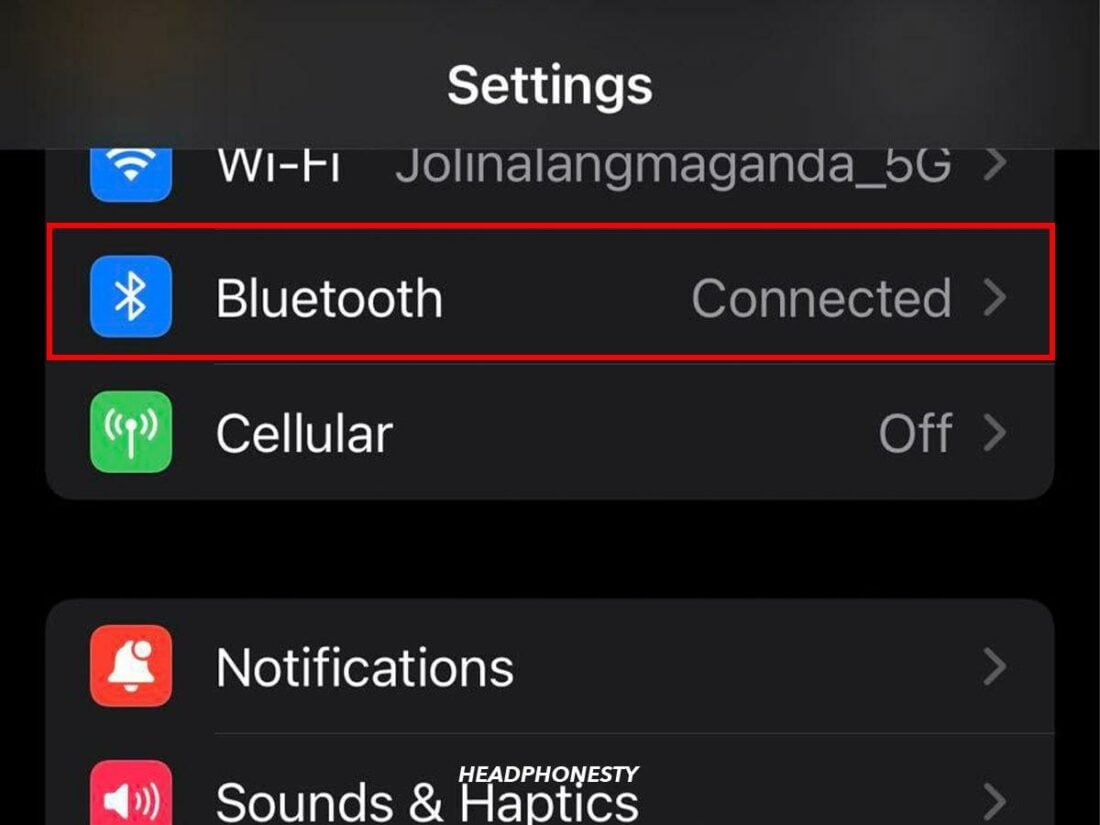
On iPhone
Your Beats headphones should update automatically when paired with an iOS device that’s connected to the internet. To check if your Beats headphones are up-to-date via your iPhone, follow the steps below:
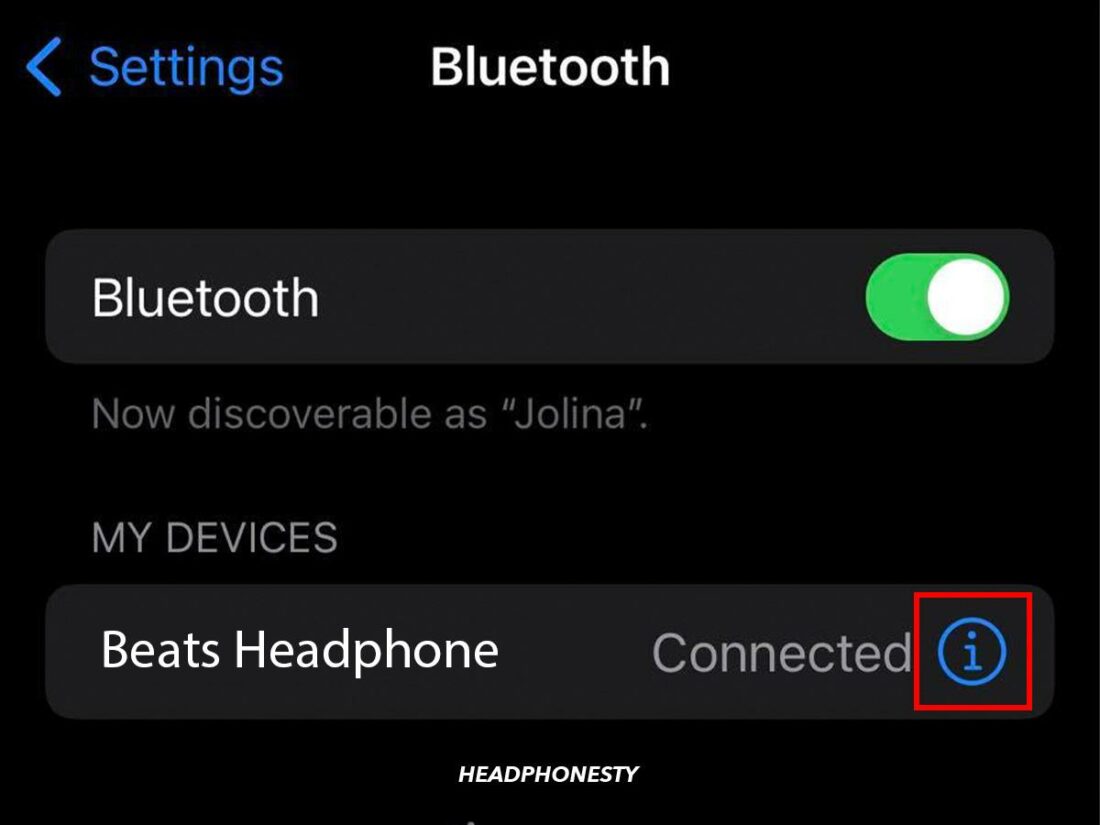
- Go to Settings > Bluetooth.
Go to Bluetooth. - Tap the Info (i) button next to your Beats.
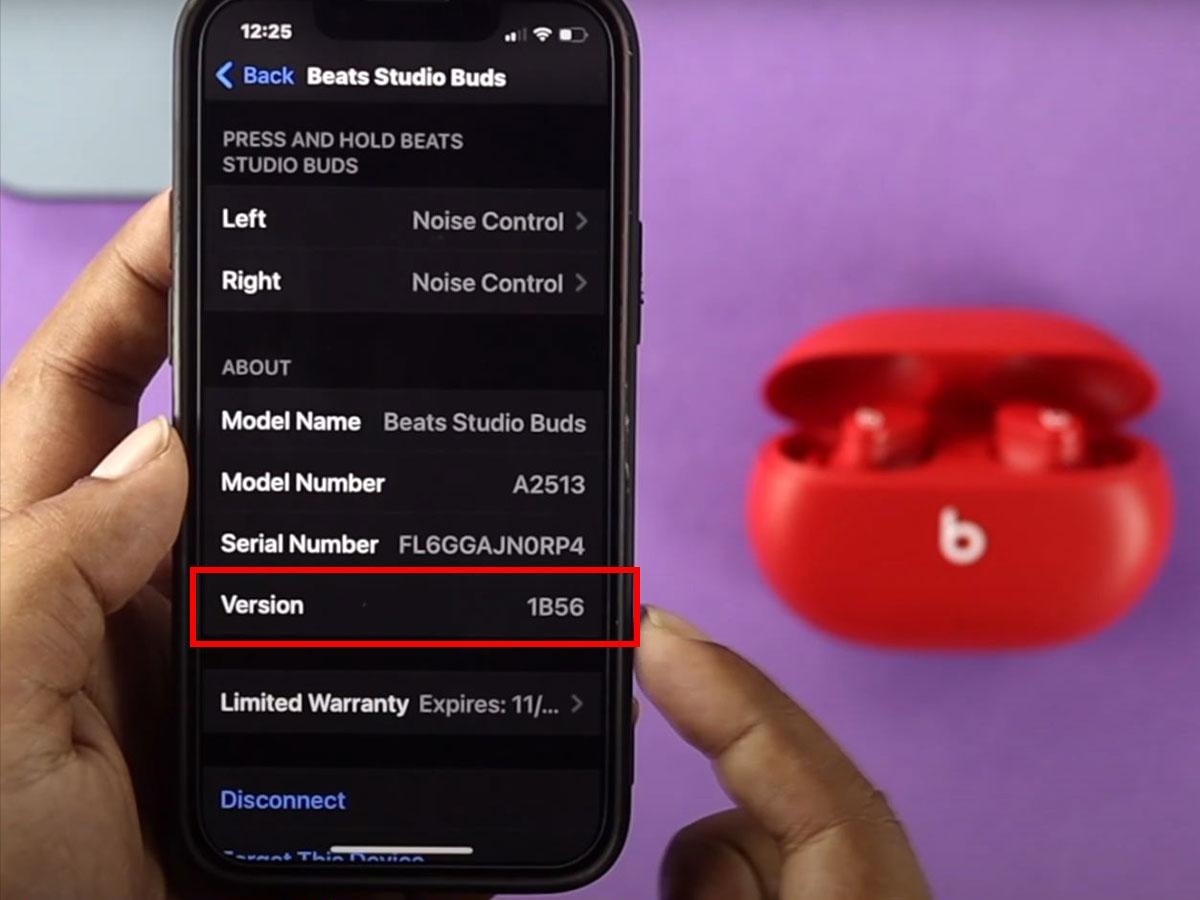
Tap the Info button. - Scroll down to the About section to find the firmware version.
Beats headphone firmware version. (From: Youtube/Fix369) - If your Beats headphones’ firmware isn’t up-to-date, leave the headphones connected to your device for at least 15 minutes, then check again.
On Android
- Connect your Beats headphones to your Android device.
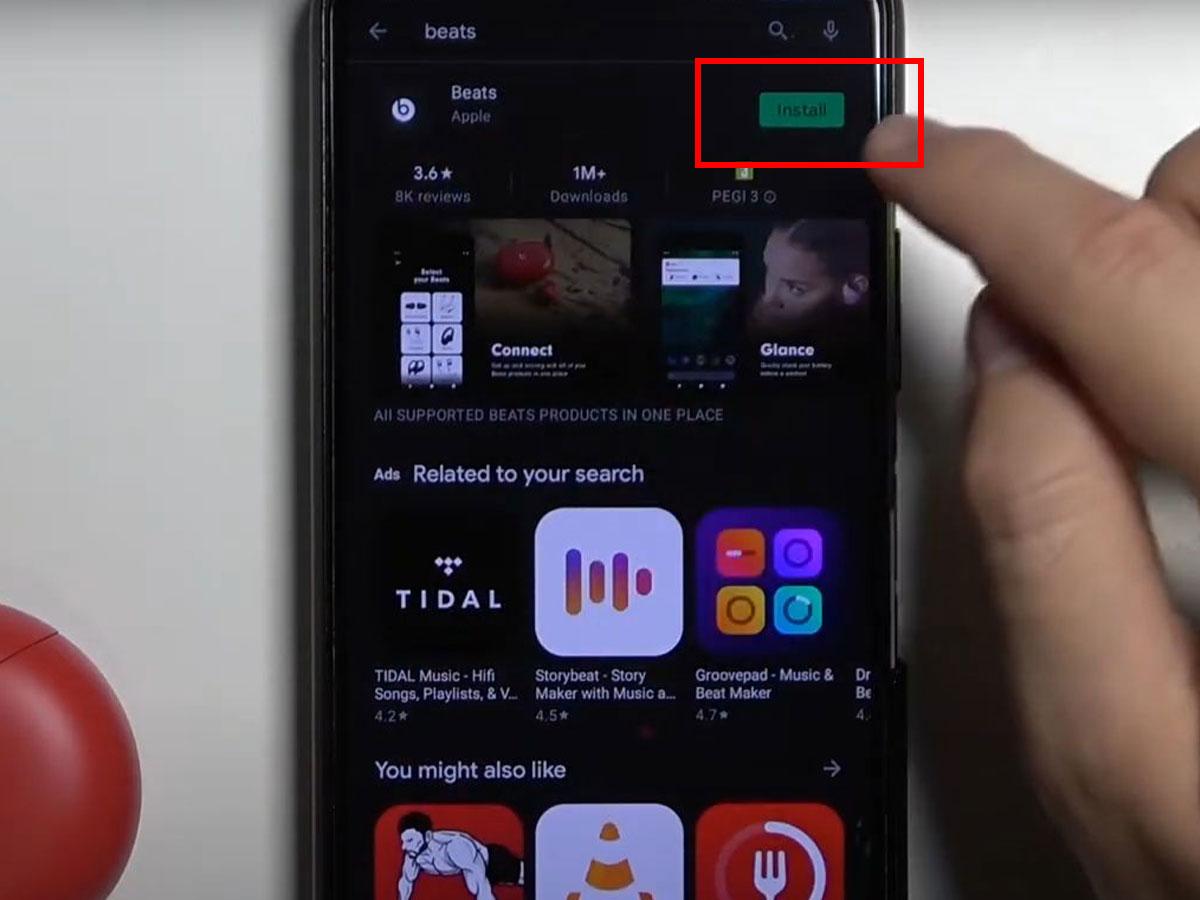
Connect your Beats headphones to your Android device. - Download the Beats app for Android.
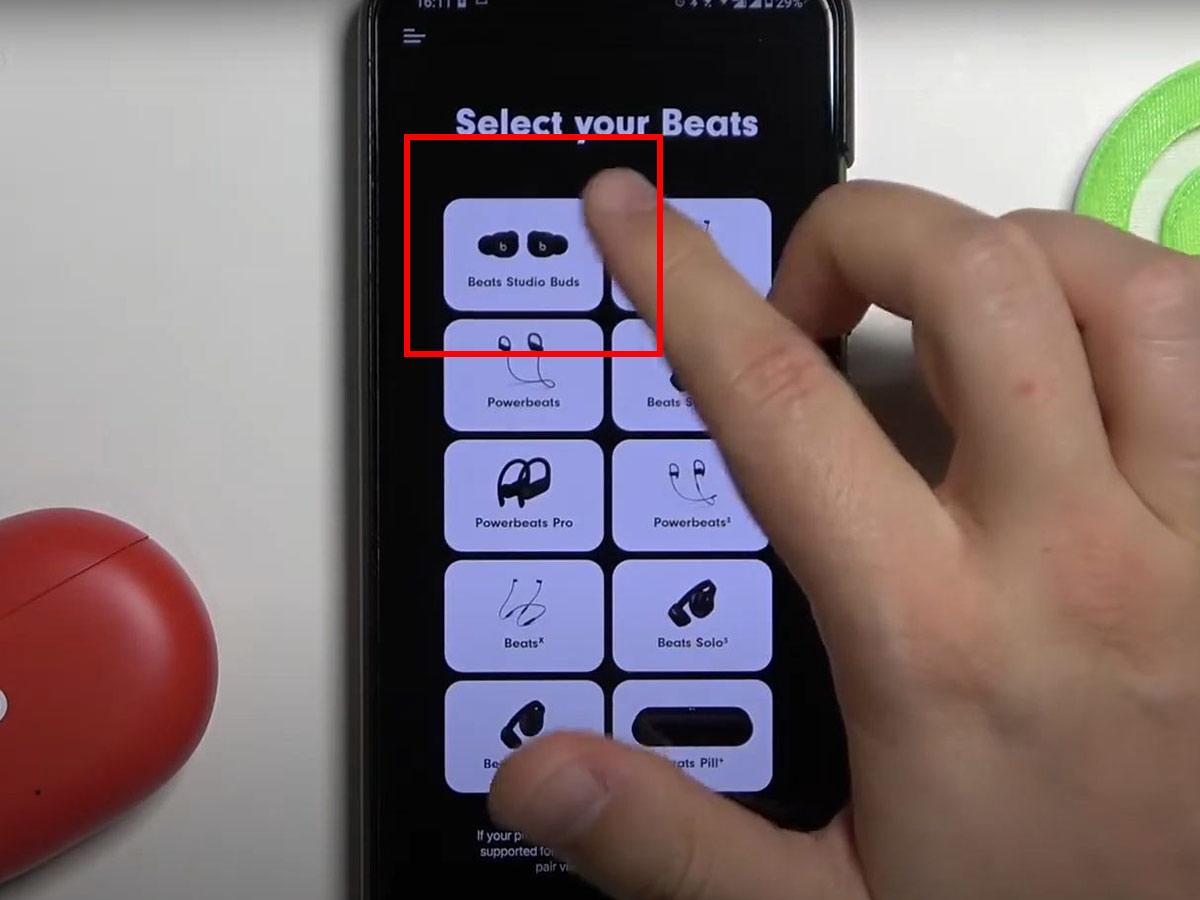
Install the Beats app for Android. (From: Youtube/HardReset.Info) - Open the app and select your Beats model.
Select Beats Studio Buds from the list. (From: Youtube/HardReset.Info) - See if there’s a notification on the app that says your Beats headphones need updating or if there’s a semi-transparent Update button on top of your Beats model icon.
These only appear if the Beats headphones are not up-to-date. - Click on Update.
7. Reset Your Headphones
Sometimes, Beats headphones may not charge due to software glitches. These glitches can interfere with the normal functioning of the headphones, including their ability to charge properly. Resetting the headphones can often resolve these issues by restoring the software to its default state.
Here’s how to reset your Beats headphones:
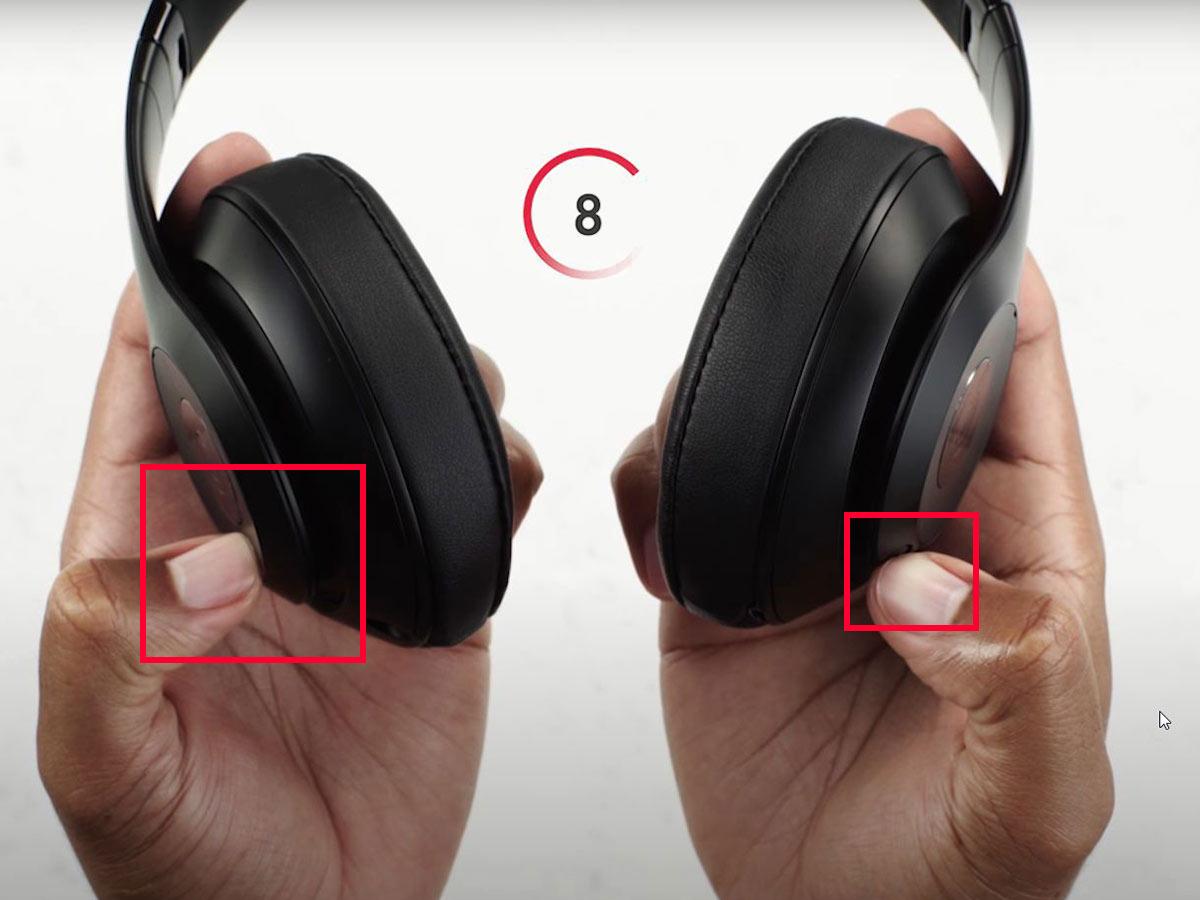
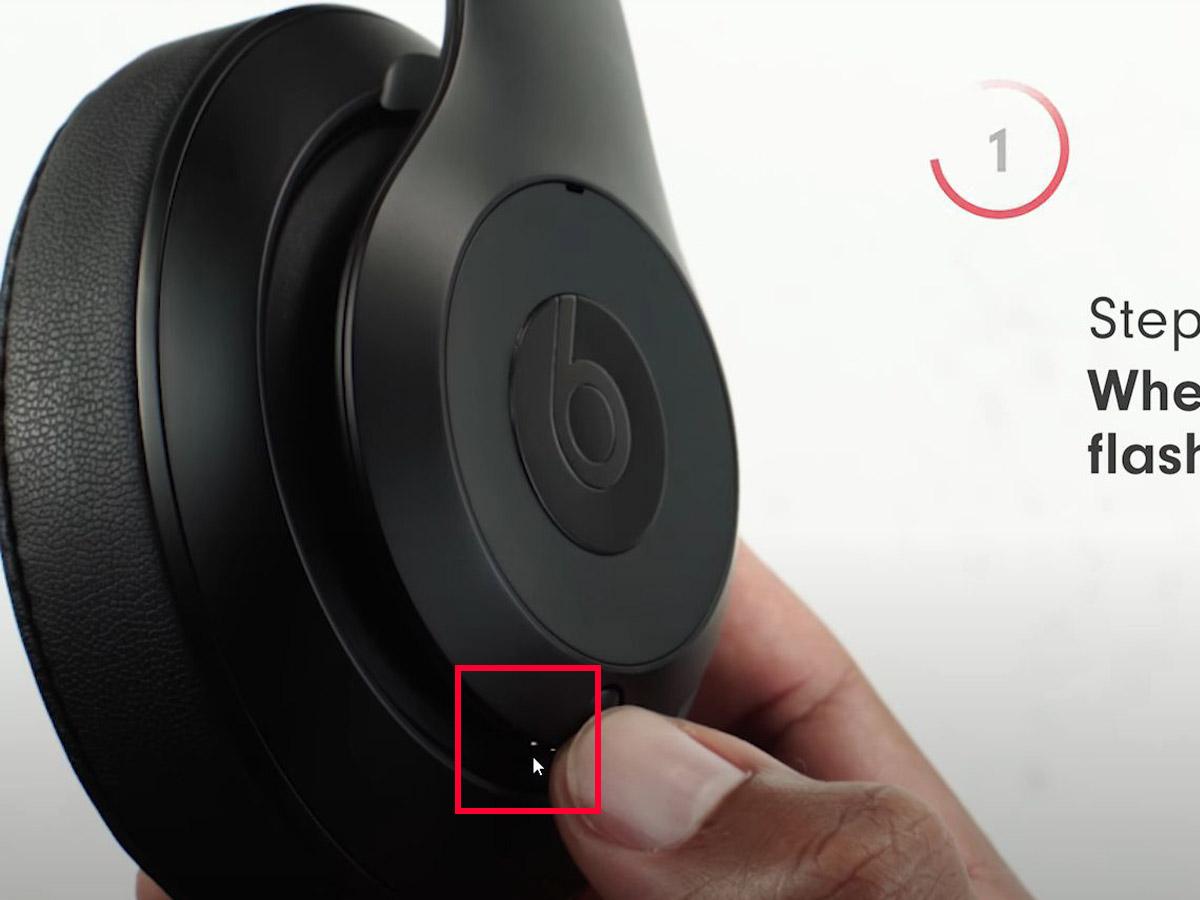
- Press the power and volume-down buttons for 10-15 seconds.
Press and hold both the power and volume-down buttons for at least ten seconds. (From: YouTube/Beats by Dre) - Release the button when the Fuel Gauge flashes red or white and red, depending on the model.
Release the buttons when the Fuel Gauge flashes. (From: YouTube/Beats by Dre) - After resetting, try charging the headphones again to see if the issue is fixed.
8. Consult Apple Support
If you’ve tried all the solutions and your Beats headphones still won’t charge, it’s time to consult Apple Support. They can provide further assistance and identify any issues causing the problem.
While Beats headphone warranties cover manufacturing defects, they do not cover normal battery problems. This is because battery lifespan can be influenced by various factors, including how often the headphones are used and how they’re charged.
You can use the “Get an Estimate” tool to get service directly from Apple. This is available on the Beats Repair & Service website and allows you to see potential costs. Other service providers may set their own fees, so it’s always a good idea to ask for an estimate to know which is better for you.
9. DIY Repair: Change Your Beats Batteries
For those whose Beats headphones are out of warranty, a viable option is to replace the headphones’ batteries yourself. This can save on the cost of a replacement.
To ensure a safe and successful battery replacement process, it’s crucial to understand the correct method of opening your Beats headphones to access the battery. Not doing so can damage your Beats headphones’ internal components, causing electrical malfunctions and headphone failure.
If you decide to proceed with the DIY repair, you can follow our detailed guide on changing the batteries of different Beats models for further instructions.
FAQs on Beats Headphones Not Charging
Why won’t my Beats’ charging lights turn on?
When we don’t see the charging lights turning on while charging, our first instinct is to unplug the headphones because we assume they’re not charging properly.
However, it’s important to understand that the LED lights on your headphones are separate components and can malfunction independently of the charging mechanism. So, when the charging lights on your Beats headphones don’t turn on, it might simply mean that the lights are defective. This doesn’t necessarily indicate a problem with the charging process.
To confirm the issue, let the headphones charge for an extended period and monitor the battery percentage. If the battery percentage increases, the problem is likely with the LED lights. In such cases, you should try resetting your headphones to see if that fixes the issue.
Can I overcharge my Beats headphones?
Beats headphones use modern lithium-ion batteries, which feature a built-in technology that prevents them from overcharging. This means that once the battery reaches full charge, the mechanism kicks in to stop further charging. As such, you don’t need to panic if you’ve left them charging overnight.
At the same time, it’s not good to habitually leave your headphones charging for too long. Doing so can cause unwanted reactions in the battery, leading to irreversible damage to its components in the long run.
Conclusion
At this point, you should be able to address charging problems with your Beats headphones by following the given instructions. Doing so should quickly restore your headphones’ charging function, saving you both time and money.
We hope that this guide has been helpful and has made your life a bit easier. We know your headphones are an important part of your daily life, whether you’re using them for work, leisure, or both. Ensuring they’re in good working order can make a significant difference to your day-to-day activities.
Did you find the solutions we suggested helpful? Were you able to resolve your charging issues? We’d love to hear from you, so please leave a comment below and let us know.
great stuff, however alot of suggestions the headphones must have some charge.mine are completely dead so doing a hard set , checking if battery charge increases etc are not possible.
any suggestions??
i don’t have a solution at the moment, but what model are your headphones?
my beats solo 3 headphones still won’t charge after all i’ve tried. i’ve had them for two years and at this point, i might as well take them to the Apple store to get them looked at. if anyone has any other suggestions i’d be happy to hear them.
My son’s Studio 3 headphones are 15 months old and won’t charge. The first pretty little white light flashes, but that’s as far as it goes. I have tried all the reset solutions, and none of them work. I brought them into an Apple service store, and they said, “$299 to replace them.” I said, WTF. At least they could have looked at them or given me suggestions on what the issue may be and what I can do to DIY. I’m so pissed at Apples!!!
I would appreciate anyone’s input or suggestions.
Thank you for listening to my rant.
I got mine around Christmas and the same thing is happening luckily I have a warranty, still upset at the quality that Apple makes, especially the hundreds of dollars for something that has these issues